AWS Solutions Architect: Arjunan K
Section 1: Introduction - AWS Certified Solutions Architect Associate
Section 1: Introduction - AWS Certified Solutions Architect Associate
What is AWS
- AWS (Amazon Web Services) is a Cloud Provider
- They provide you with servers and services that you can use on demand and scale easily
- AWS has revolutionized IT over time
- AWS powers some of the biggest websites in the world
- Amazon.com
- Netflix
What AWS services we will learn
Section 2: Code & Slides Download
Section 2: Code & Slides Download
Section 3: Getting started with AWS
Section 3: Getting started with AWS
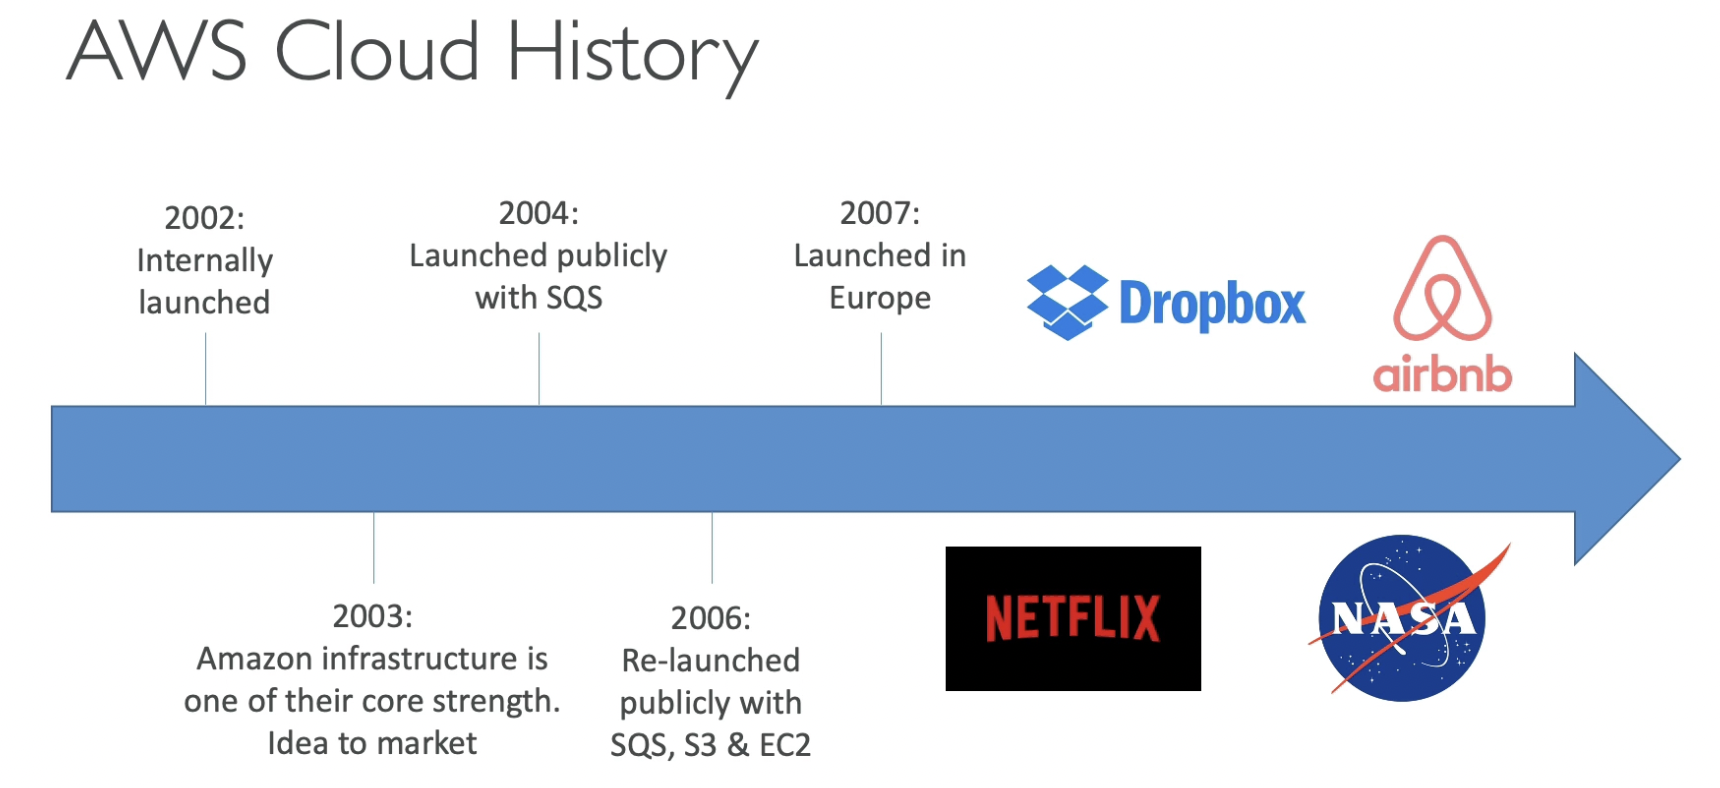
History of AWS Cloud
Several companies that use AWS services are shown below.
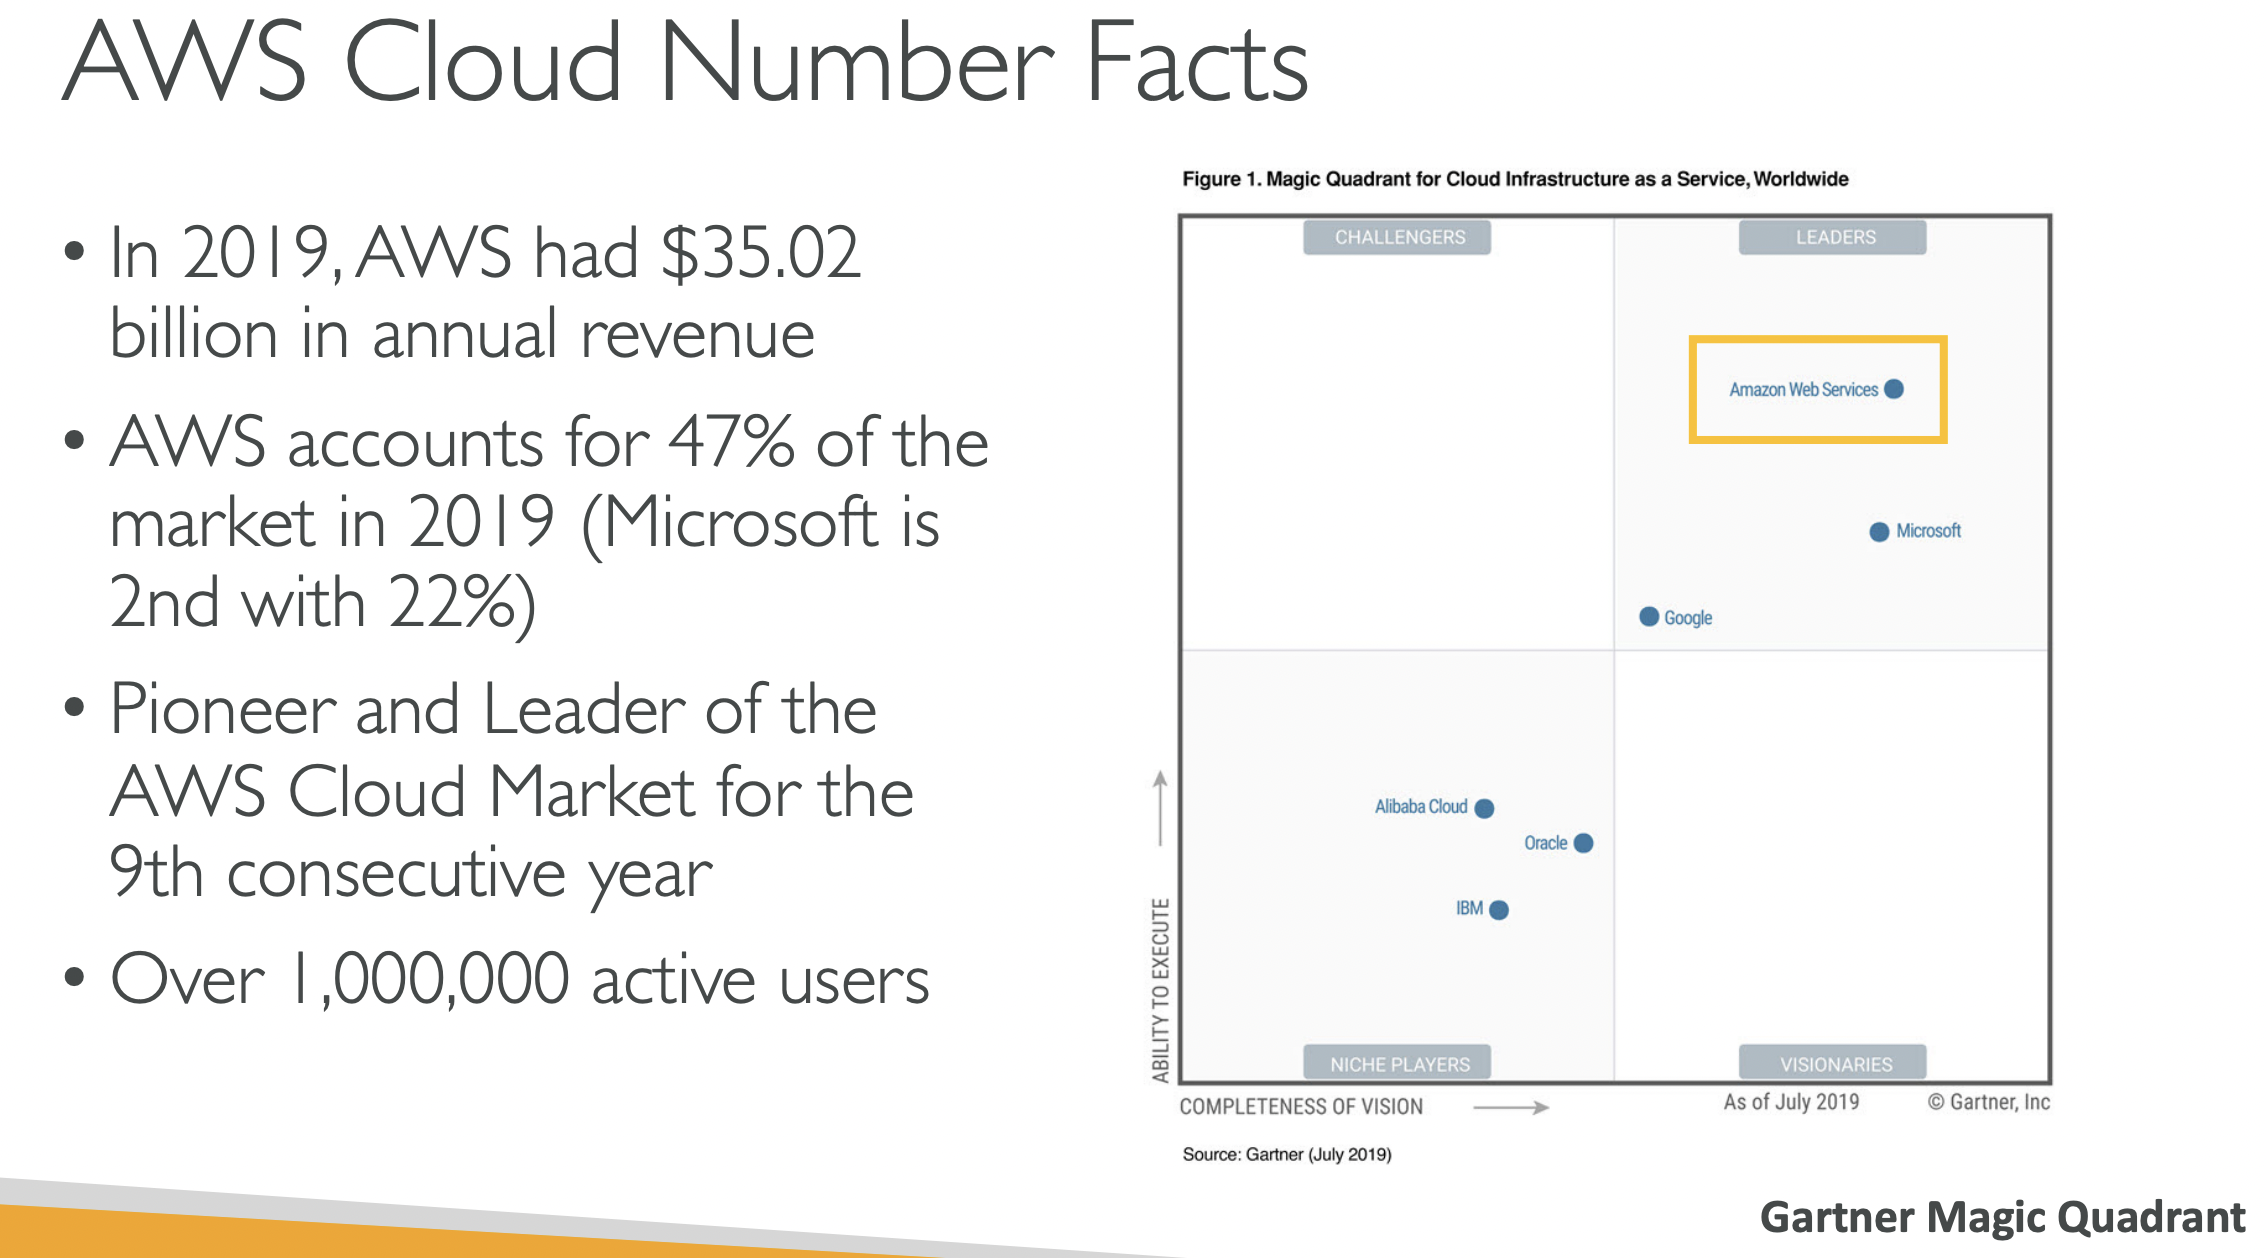
Market Cap
- AWS has the largest market cap followed by Microsoft Azure
Cloud use cases
- AWS enables you to build sophisticated, scalable applications
- Applicable to a diverse set of industries
- Use cases include Enterprise IT, Backup & Storage, Big Data analytics, Website hosting, Mobile & Social Apps, Gaming
AWS Global Infrastructure
- The entire AWS infrastructure is divided into
- Regions
- Availability Zones
- Data Centers
- Edge locations/Points of Presence
Global Services and Regional Services
Global services do not require a region to be selected.
- Global Services:
- Identity and Access Management (IAM)
- Route 53 (DNS service)
- CloudFront (Content Delivery Network)
- WAF (Web Application Firewall)
- Most AWS services are Region-scoped:
- Amazon EC2 (Infrastructure as a Service)
- Elastic Beanstalk (Platform as a Service)
- Lambda (Function as a Service)
- Rekognition (Software as a Service)
- Global Services:
AWS Regions
- Intro
Region scoped means that if you use the same service in two different regions, you will be charged twice. Most AWS services are region scoped. Each region is fully isolated and consists of multiple availability zones.
A region is a cluster of data centers.
- How to choose an AWS region
- Compliance with data governance and legal requirements: data never leaves a region without your explicit permission (some countries require the data to be present in a data center present in that country by law)
- Proximity to customers: reduced latency
- Available services within a Region: new services and new features aren’t available in every Region
- Pricing: pricing varies region to region and is transparent in the service pricing page
- Intro
AWS Data Centers
A data center is a physical location that stores computing machines and their related hardware equipment. It contains the computing infrastructure that IT systems require, such as servers, data storage drives, and network equipment. It is the physical facility that stores any company’s digital data.
AWS Availability Zones
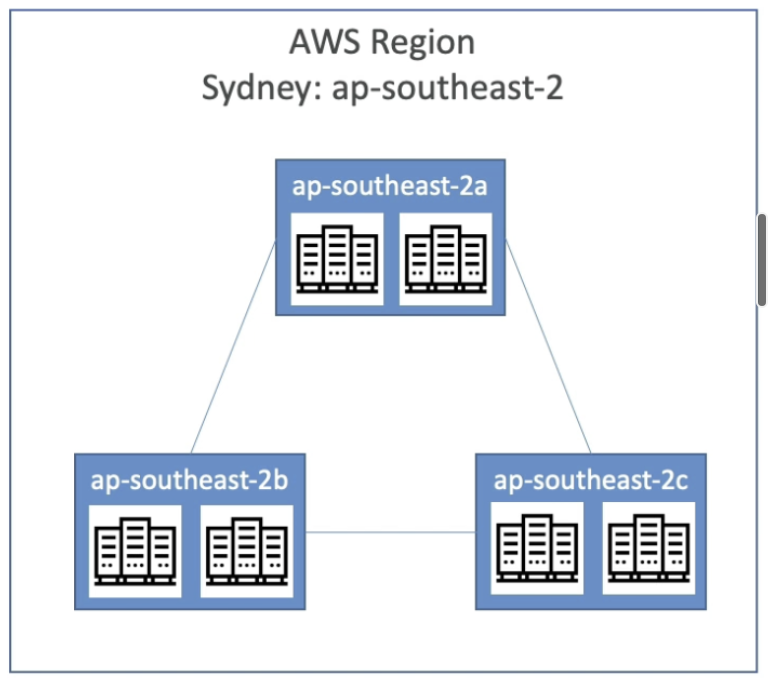
- Each region has many availability zones (usually 3, min is 2, max is 6)
- Each availability zone (AZ) is one or more discrete data centers with redundant power, networking, and connectivity
- AZs are separated from each other, so that they’re isolated from disasters
- They’re connected with high bandwidth (The more bandwidth a data connection has, the more data it can send and receive at one time), ultra-low latency networking (Low Delay).
In the example below, each availability zone has 2 data centers.
AWS Points of Presence (Edge Locations)
Amazon has 216 Points of Presence (205 Edge Locations & 11 Regional Caches) in 84 cities across 42 countries to deliver content to end users with lower latency.
- The entire AWS infrastructure is divided into
Section 4: IAM & AWS CLI
Section 4: IAM & AWS CLI
IAM: Users & Groups
Intro
- IAM is a global AWS service, not linked to any region
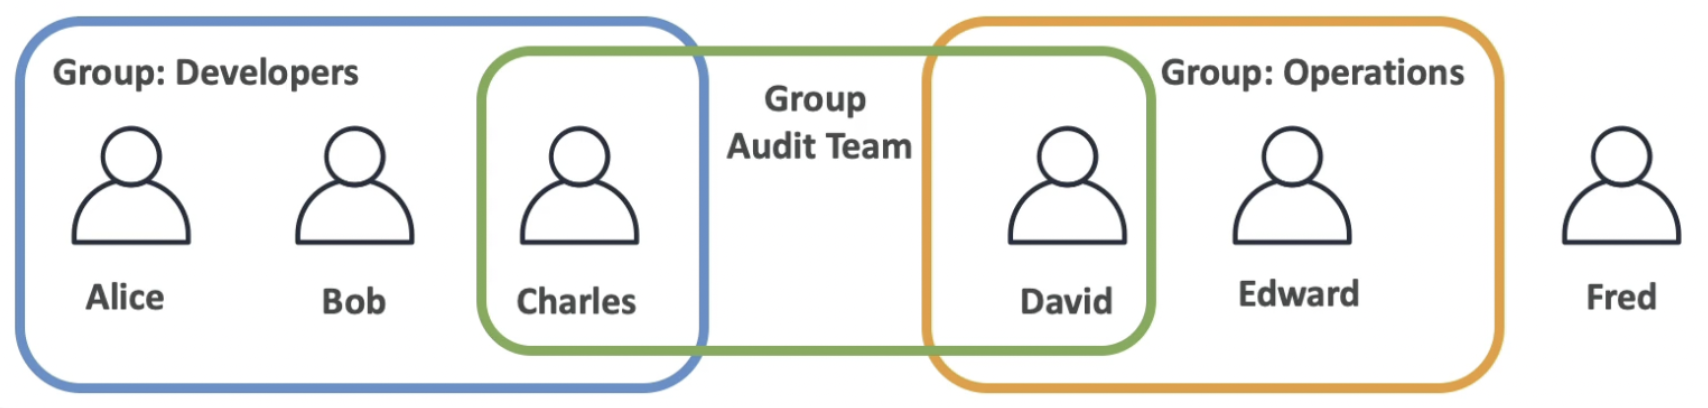
- Users are people within your organization, and can be grouped
- Groups only contain users, not other groups
- Users don’t have to belong to a group, and user can belong to multiple groups
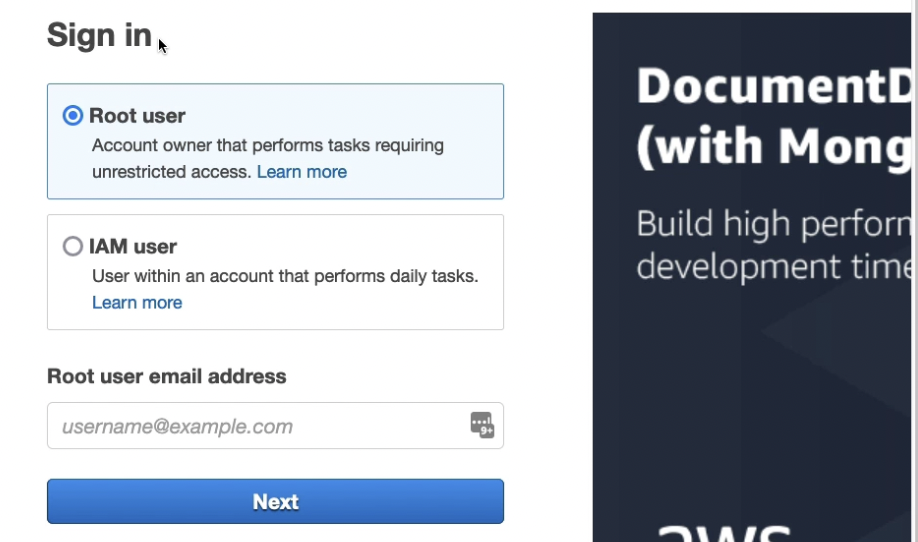
Root User vs IAM User
- Root user is the one that has full access to the account (account owner).
- IAM user is the one that is created with limited permissions (engineers, developer, etc.)
⛔ You should log in as an IAM user with admin access even if you have root access. This is just to be sure that nothing goes wrong by accident.
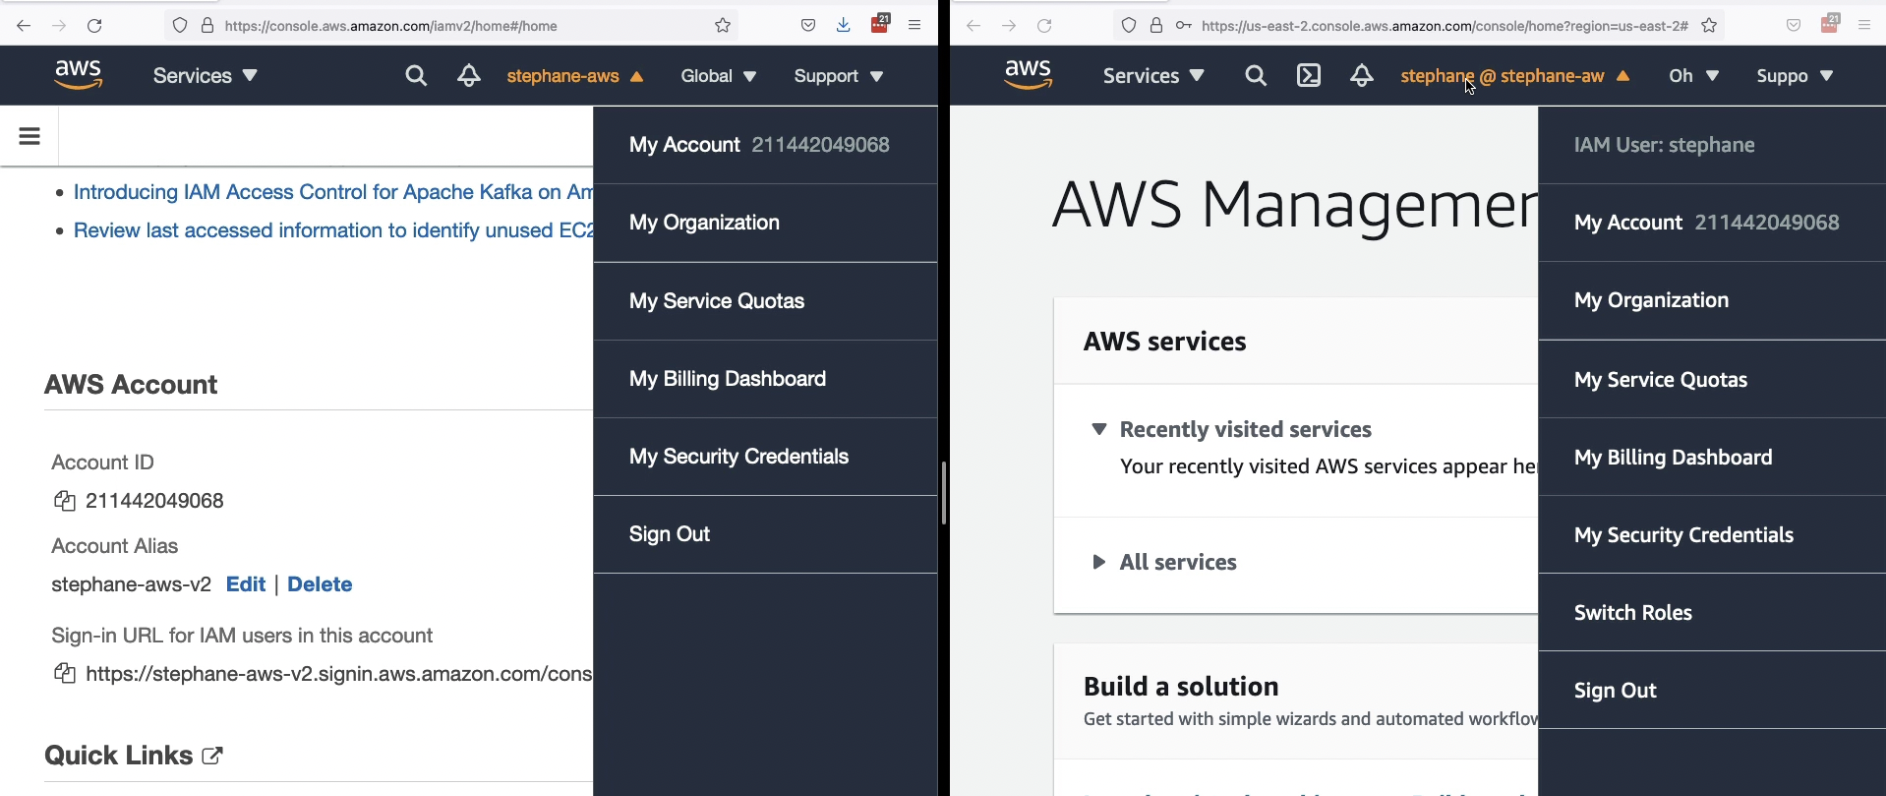
Left: root user (just the account alias)
Right: IAM user (user @ account alias)
Creating an IAM user and assigning a group
IAM → Users → Create a user → Attach user to group
Change Account Alias
Signing in as an IAM user requires Account ID which is hard to remember. So, we can create alias and use that instead.
IAM → Dashboard → Account Alias → Create
IAM: Policies
Intro
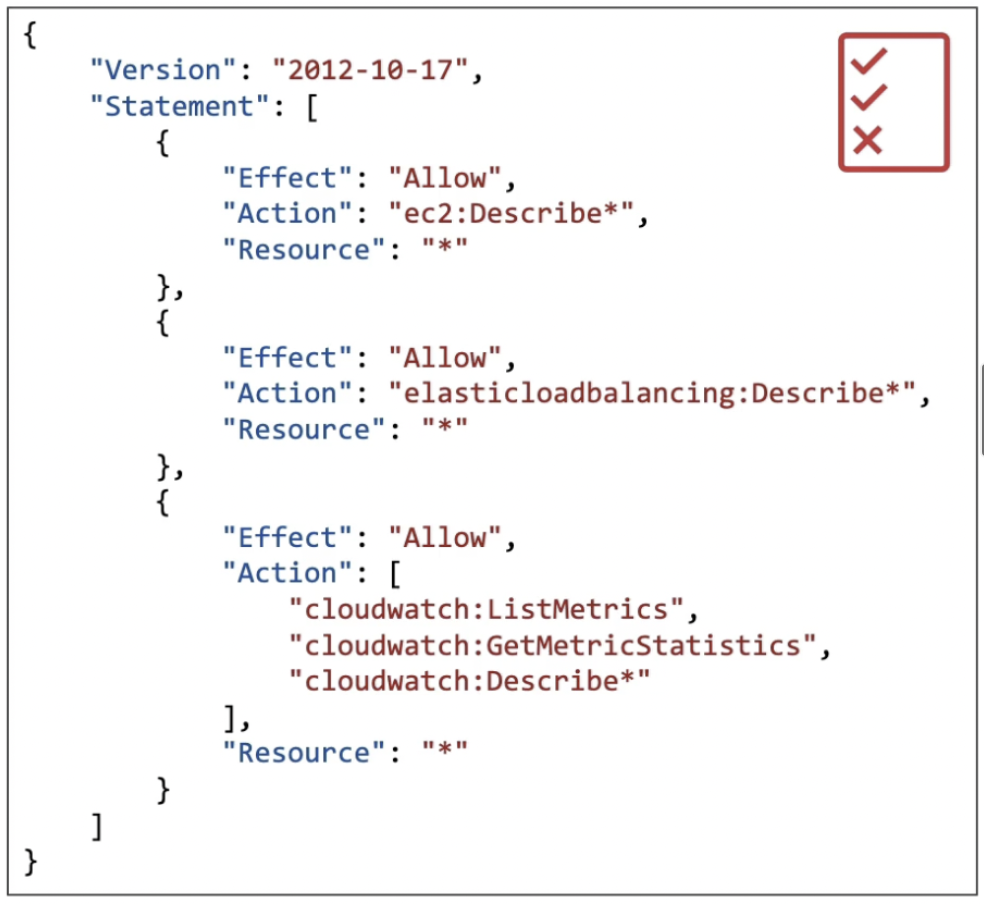
- Policies are JSON documents that outline permissions for users, groups or roles.
- A policy consists of one or more statements.
- In AWS you should apply the least privilege principle: don’t give more permissions than a user, group or role needs
Policy Inheritance
In the diagram below, a policy is attached to each group. Users that are in multiple groups will have both the policies (union of both the policies). User Fred is not assigned any group, so he will have an inline policy (attached directly to the user). Users that are assigned to one of more groups can also be assigned inline policies.

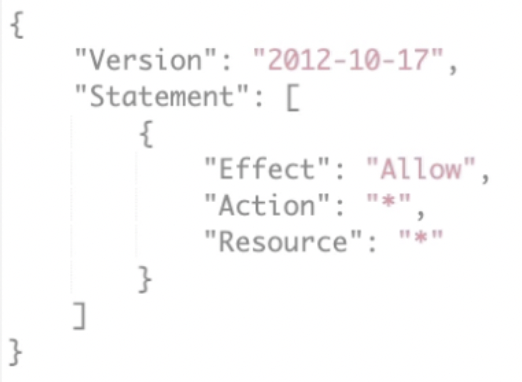
Policy Structure
In the diagram below, the policy is being applied to the root user

Admin Policy
The below policy has only one statement saying “Allow this group of users to perform any action on any resource”
IAM: Security
The account owner (root user) needs to ensure that the AWS account is not compromised at any cost. There are two options to do the same:
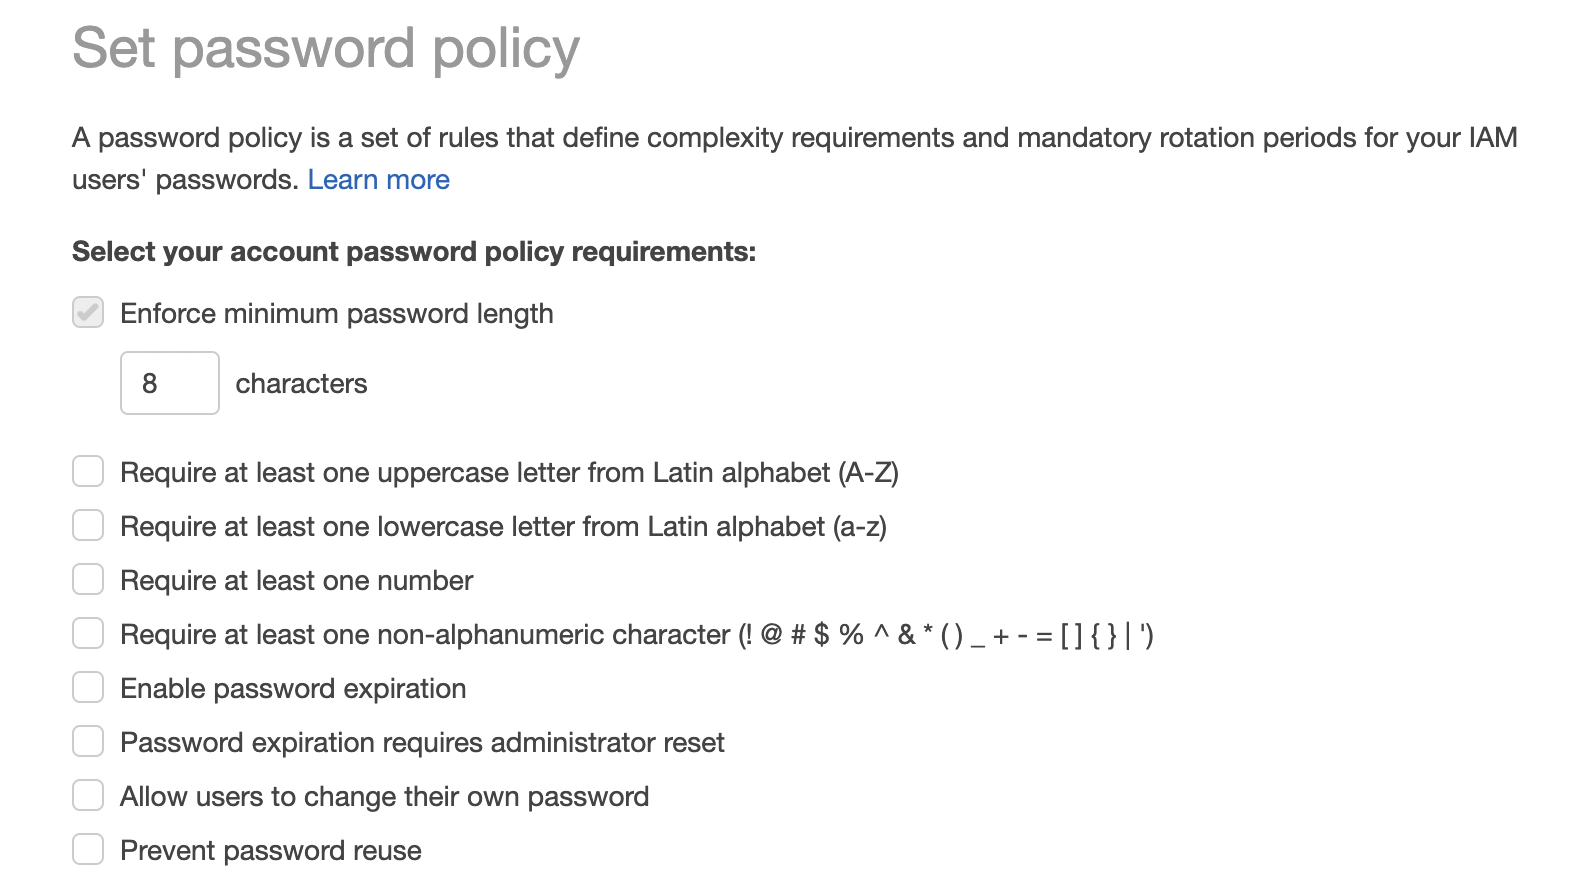
IAM: Password Policy
- Intro
Using Password Policy, the account owner can enforce certain standards for password.
- In AWS, you can setup a password policy:
- Set a minimum password length
- Require specific character types:
- uppercase letters
- lowercase letters
- numbers
- non-alphanumeric characters
- Allow all IAM users to change their own passwords
- Require users to change their password after some time (password expiration)
- Prevent password re-use
⛔ Prevents brute force attacks
- In AWS, you can setup a password policy:
- Edit password policy
IAM → Account Settings → Change Password Policy
- Intro
IAM: Multi Factor Authentication
Intro
- Both root and all of the IAM users should be secured using MFA.
- MFA = password you know + security device you own
- If the password is stolen or hacked, the account is not compromised
- MFA devices options:
- Virtual MFA device (support for multiple tokens on a single device)
- Google Authenticator (phone only)
- Authy (multi-device)
- Universal 2nd Factor (U2F) Security Key (support for multiple root and IAM users using a single security key)
- YubiKey by Yubico (3rd party)
- Hardware Key Fob MFA Device
- Provided by Gemalto (3rd party)
- Hardware Key Fob MFA Device for AWS GovCloud (US)
- Provided by SurePassID (3rd party)
- Virtual MFA device (support for multiple tokens on a single device)
Enable MFA
Account/User name (top right hand corner) → Security Credentials → MFA → Activate MFA → Virtual MFA device → Scan the QR code using Authy → Enter the current MFA token and the next token → Activate MFA
MFA will be required from the next login
IAM: Roles
- Intro
- IAM Roles are a collection of policies for AWS services. Each AWS service will be assigned some role which will grant it the permission to access other AWS services.
- Usually, EC2 and Lambda are most commonly assigned roles as they have to access other AWS services within the account.
- Create a role
IAM → Roles → Create role
- Intro
IAM Security Tools
IAM Credentials Report
- A report that lists all your account’s users (account-level) and the status of their various credentials
- The report is a CSV file with all the details about the users and their security like MFA, password rotation etc.
- It is used to audit security for all the users
- IAM → Credentials Report → Download Report
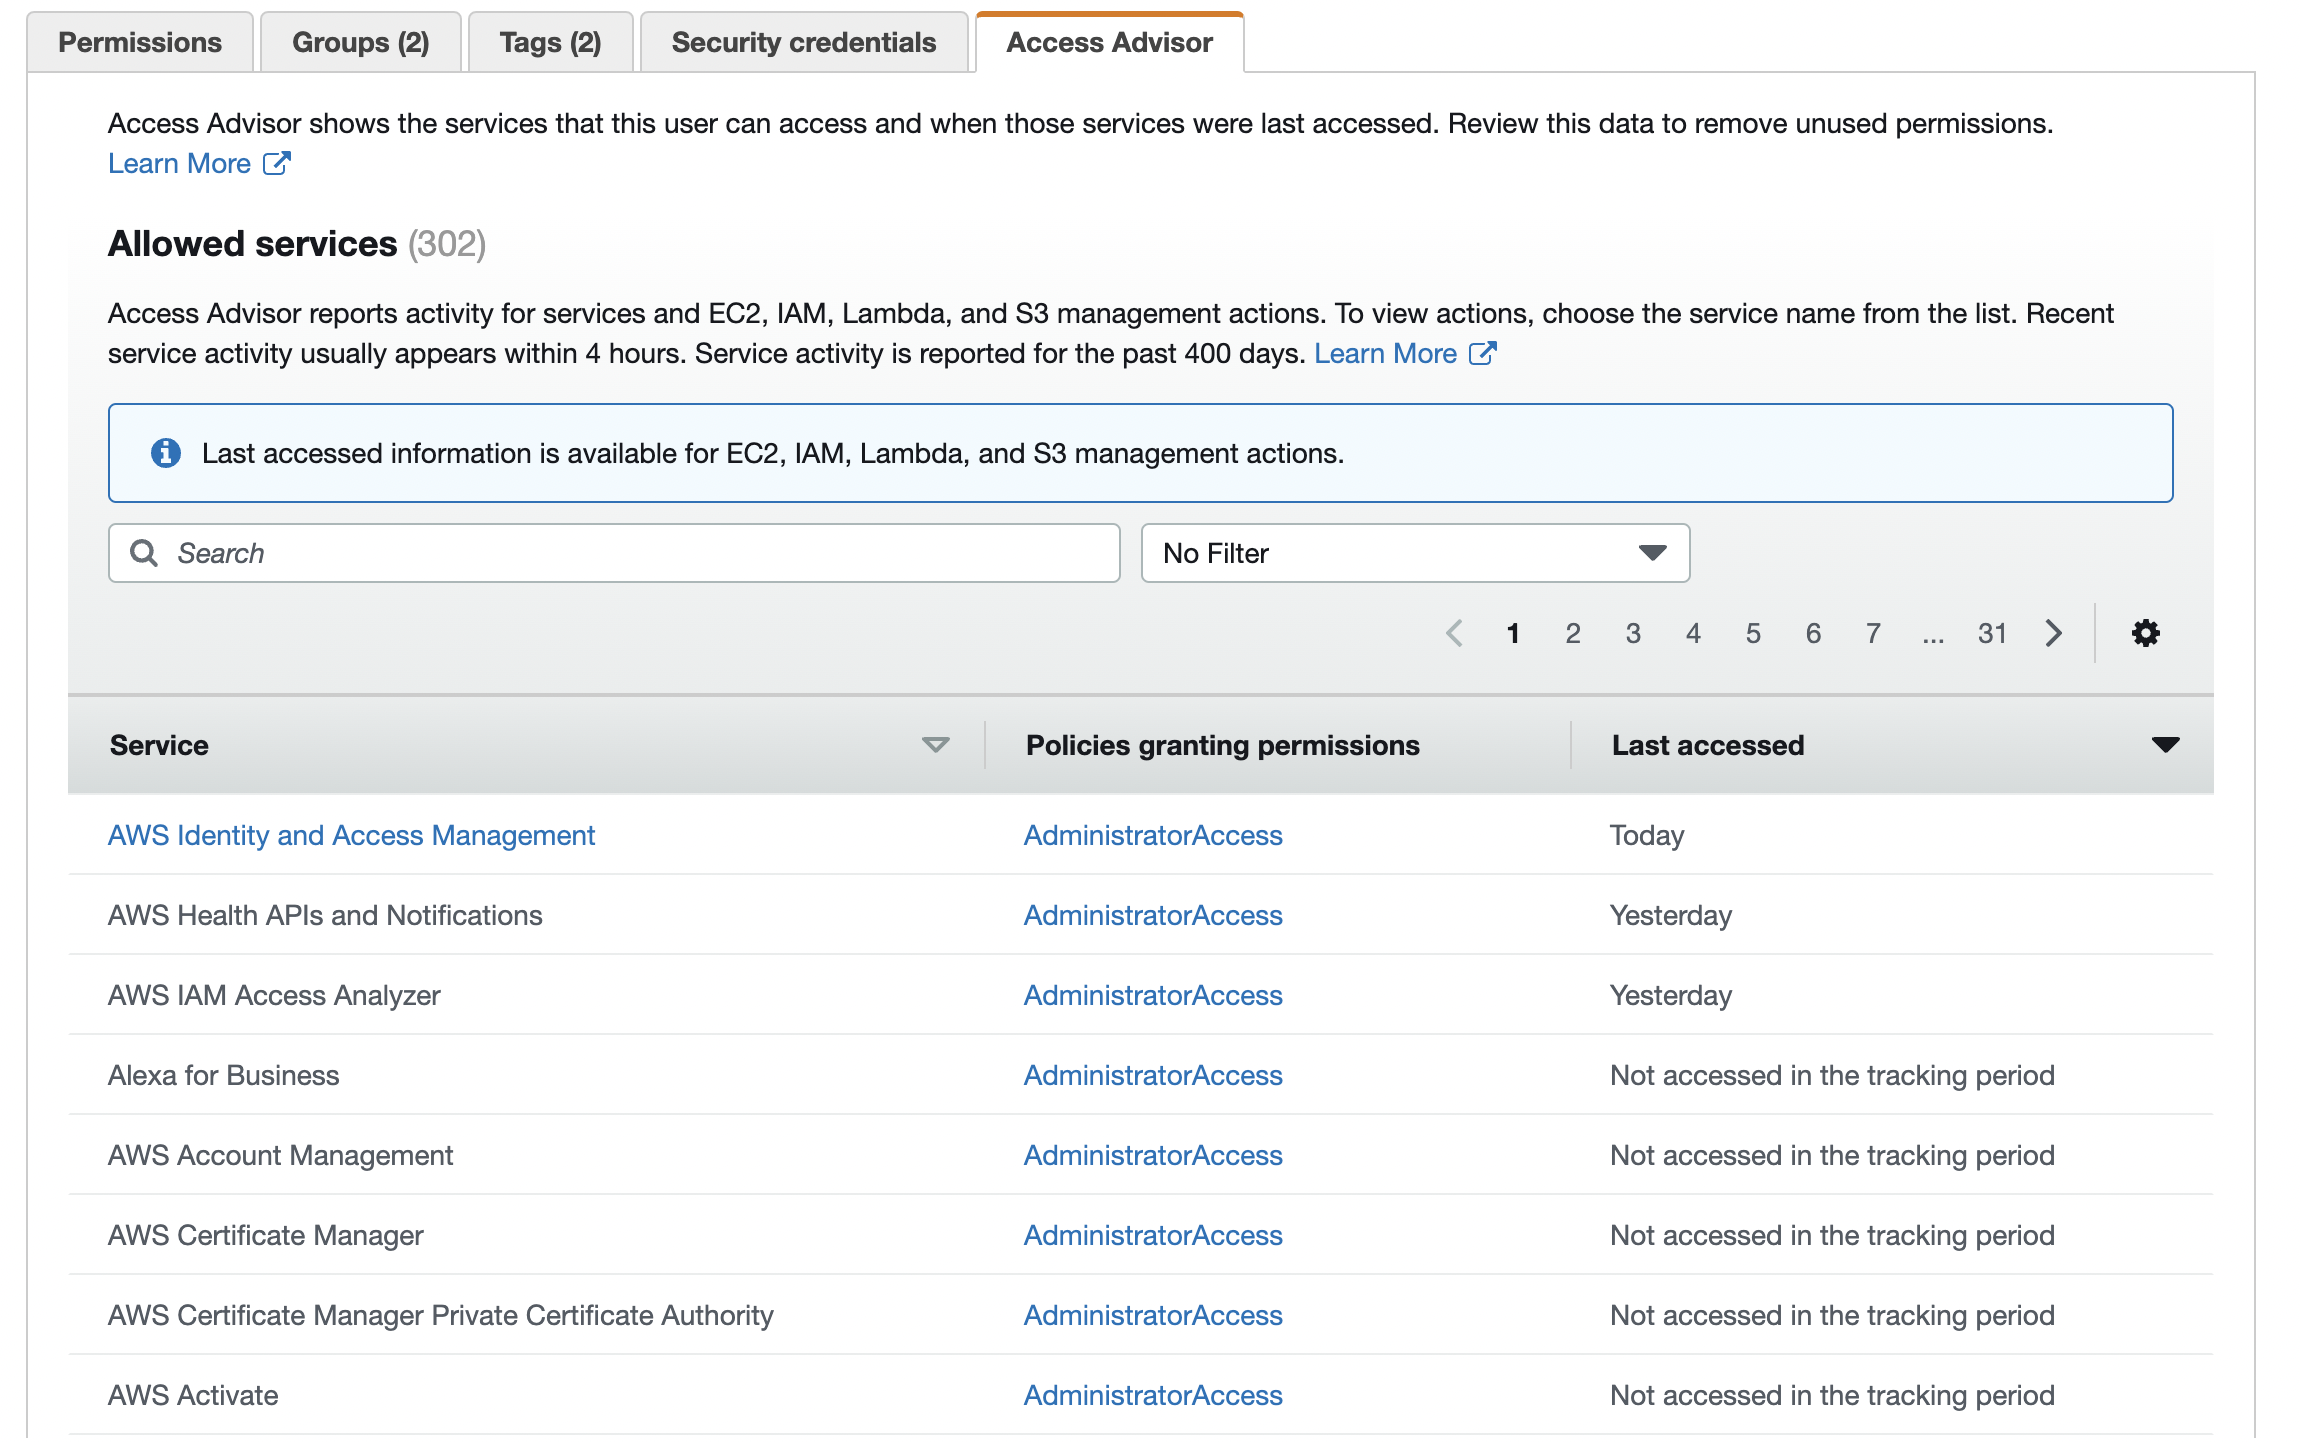
IAM Access Advisor
- Access advisor shows the service permissions granted to a user (user-level) and when those services were last accessed.
- You can use this information to revise your policies for a specific user
- IAM → Users → Select a user → Access Advisor
- In the report below, you can see that the user has not been using some services and so it might be a good idea to revoke permissions to those services to follow the least permission policy.
IAM Guidelines and Best Practices
- Don’t use the root account for anything except for AWS account setup
- One physical user = One AWS user
- Use and enforce the use of Multi Factor Authentication (MFA) for both root and IAM users
- Use Access Keys for Programmatic Access (CLI / SDK)
- Audit permissions of your account with the lAM Credentials Report
- Never share lAM users & Access Keys
Accessing AWS Services
- To access AWS, you have three options:
- AWS Management Console: protected by password + MFA
- AWS Command Line Interface (CLI): protected by access keys
- AWS Software Developer Kit (SDK): protected by access keys
- Access Keys are generated through the AWS Console
- Users manage their own access keys
- Access Keys are secret, just like a password (don’t share them)
- Access Key ID ~ username
- Secret Access Key ~ password
- To access AWS, you have three options:
AWS CLI
Intro
- A tool that enables you to interact with AWS services using commands in your command-line shell
- Direct access to the public APIs of AWS services
- You can develop scripts to manage your resources
- It’s open-source https://github.com/aws/aws-cli
- Alternative to using AWS Management Console
Installation
Installing or updating the latest version of the AWS CLI
Run
aws --versionto verify the installation
Generate Access Key
User (top right hand corner) → Security Credentials → Create Access Key
⛔ Access keys are only shown once and if you lose them you need to generate a new access key
Configure AWS CLI
aws configure→ Access Key ID → Secret Access Key → AWS Region
AWS CloudShell
- It is a terminal built into the AWS console.
- It is available for some regions only.
- It takes the permission of the current user.
- It also allows us to download and upload files from our system to the AWS CloudShell environment.
AWS SDK
- Enables you to access and manage AWS services programmatically
- Embedded within your application
- Language specific, supports following languages:
- SDKs: JavaScript, Python, PHP, .NET, Ruby, Java, Go, Node.js, C++
- Mobile SDKs: Android, iOS, etc.
- loT Device SDKs: Embedded C, Arduino, etc.
💡 AWS CLI is built on AWS SDK for Python
Section 5: EC2 Fundamentals
Section 5: EC2 Fundamentals
Intro
- EC2 (Elastic Compute Cloud) is an Infrastructure as a Service (IaaS)
- t2.micro can be run continuously throughout a month with no cost
Sizing an Configuration
EC2 is highly customizable.
- Operating System (OS): Linux, Windows or Mac OS
- Compute power & cores (CPU)
- RAM
- Storage space:
- Network-attached (EBS & EFS)
- Hardware (EC2 Instance Store)
- Network card: speed of the card & Public IP address
- Firewall rules: security group
- Bootstrap script (configure at first launch): EC2 User Data
User Data (bootstrap)
- It is possible to bootstrap our instances (launch some commands when a machine starts) using an EC2 User data script.
- User data script is only run once at the instance first start
- User data is used to automate boot tasks such as:
- Installing updates
- Installing software
- Downloading common files from the internet
- The EC2 User Data Script runs with the root user privilege
Create an instance
EC2 → Instances → Launch Instance → Select AMI → Choose instance type → Configure Instance Details → Add storage → Configure Security Groups → Review and Launch → Select an existing key pair or create a new one
Adding User Data
User data (code that executes when the EC2 is booted for the first time) is setup during instance configuration. To setup a basic http server, use the shell script below
#!/bin/bash
# Use this for your user data (script from top to bottom)
# install httpd (Linux 2 version)
yum update -y
yum install -y httpd
systemctl start httpd
systemctl enable httpd
echo "<h1>Hello World from $(hostname -f)</h1>" > /var/www/html/index.html
Adding an HTTP rule
Add an HTTP rule to access the website from anywhere.
If we do this, we will be able to access the server using its public IP address.

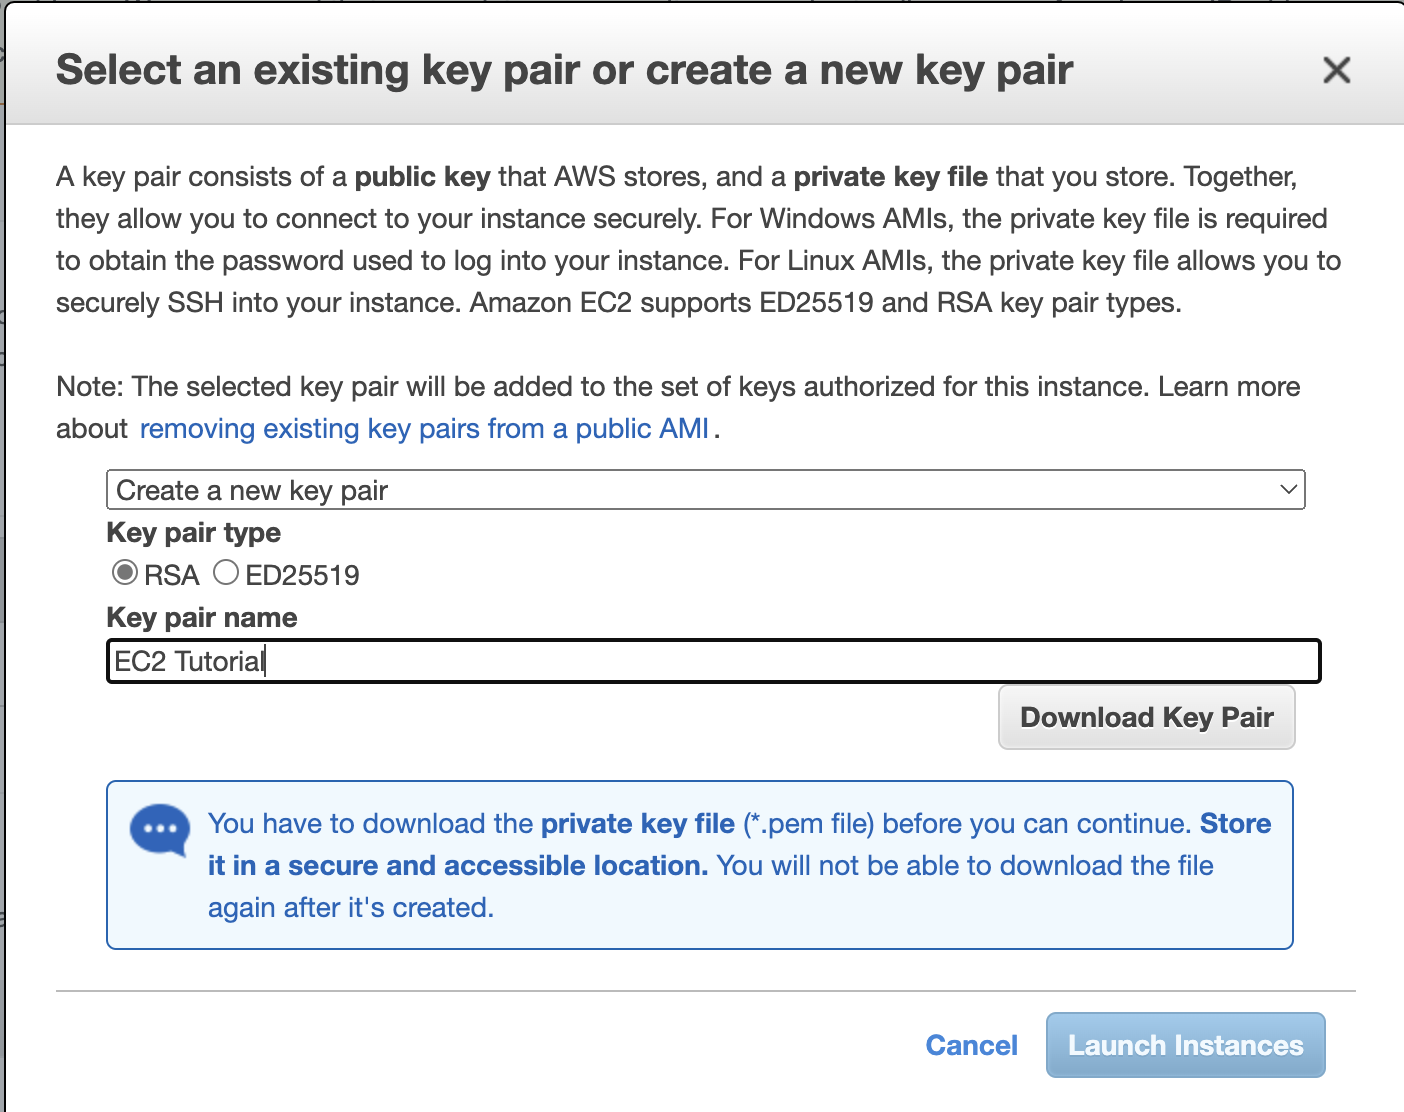
Create a new key pair
Key pair will be used to SSH into our EC2 instance. Don’t lose the downloaded key pair file.
Stopping and Restarting an EC2 instance
Right click any instance → Stop instance
Right click any instance → Start instance
⛔ Restarting any instance may change its public IP but not its private IP
Instance Types
Amazon EC2 Instance Types - Amazon Web Services
Amazon EC2 Instance Comparison
Naming Convention
### m5.2xlarge
m ⇒ instance class 5 ⇒ generation (AWS improves them over time) 2xlarge ⇒ size within the instance class
Instance Classes
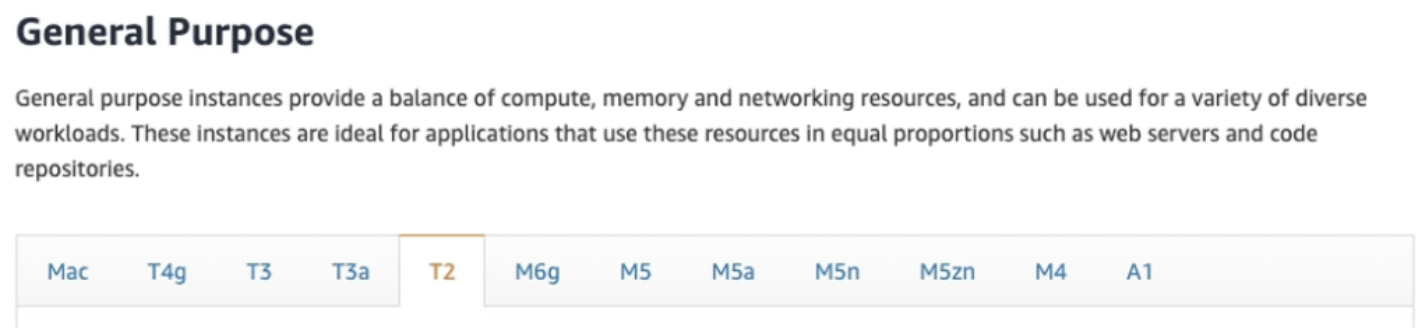
General Purpose Instances
- Great for a diversity of workloads such as web servers or code repositories
- Balance between:
- Compute
- Memory
- Networking
- t2.micro is a General Purpose EC2 instance
Compute Optimized Instances
- Great for compute-intensive tasks that require high performance processors:
- Batch processing workloads
- Media transcoding
- High performance web servers
- High performance computing (HPC)
- Scientific modeling & machine learning
- Dedicated gaming servers

- Great for compute-intensive tasks that require high performance processors:
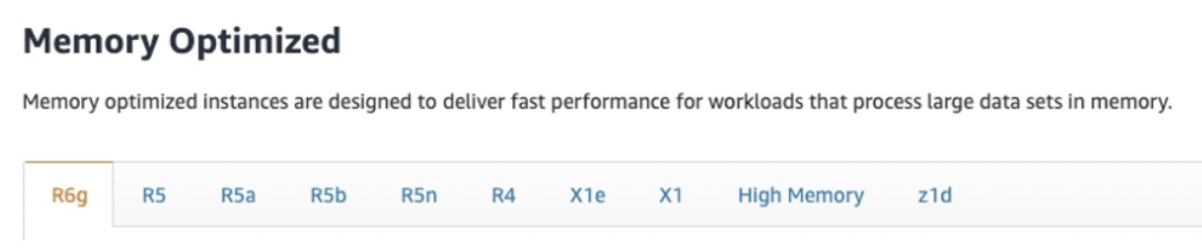
Memory Optimized Instances
- Fast performance for workloads that process large data sets in memory
- Use cases:
- High performance, relational / non-relational databases
- Distributed web scale cache stores
- In-memory databases optimized for Bl (business intelligence)
- Applications performing real-time processing of big unstructured data
Storage Optimized Instances
- Great for storage-intensive tasks that require high, sequential read and write access to large data sets on local storage
- Use cases:
- High frequency online transaction processing (OLTP) systems
- Relational & NoSQL databases
- Cache for in-memory databases (eg. Redis)
- Data warehousing applications
- Distributed file systems

Security Groups
Intro
- They control how traffic is allowed into or out of our EC2 Instances.
- Security groups only contain allow rules
- Security groups rules can reference by IP or by security group
- Security groups act as a “firewall” on EC2 instances
- They regulate:
- Access to Ports
- Authorized IP ranges IPv4 and IPv6
- Control of inbound & outbound network

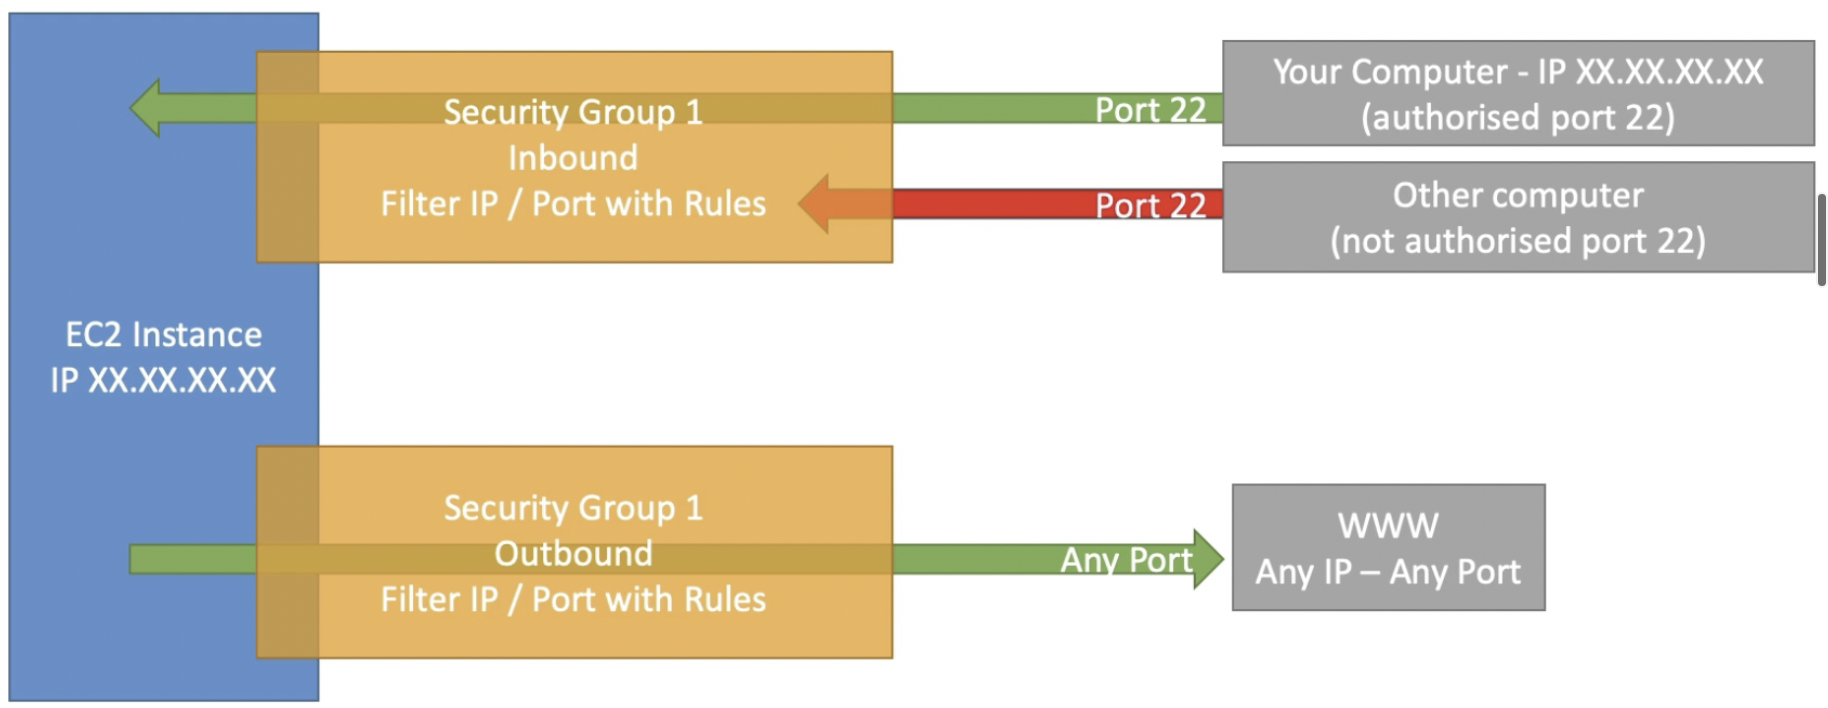
Firewall Diagram
In the diagram below, EC2 has only 1 security group which is shown separately for inbound and outbound traffic. Our computer comes under the authorized IP range, so it get access to the EC2 instance but any other computer whose IP doesn’t fall in the range will be denied access and the request will time out.
EC2 instances, by default, allow any traffic out of it. So, it can send a request to a web server.
Important Points
- A security group can be attached to multiple instances
- An instance can have multiple security groups attached to it
- Security groups are locked down to a region or VPC. So, if you change the region or VPC, you need to re-create security groups.
- Security groups live outside the EC2, they are not some application running on the instance. So if the traffic is blocked, the EC2 instance won’t even know.
- It’s recommended to maintain a separate security group for SSH access
- If your application is not accessible (time out), then it’s probably a security group issue. But, if you get a “connection refused” error, then the security group worked fine. In this case, it’s an application issue.
- By default, for a new SG, all inbound traffic is blocked and all outbound traffic is authorized.
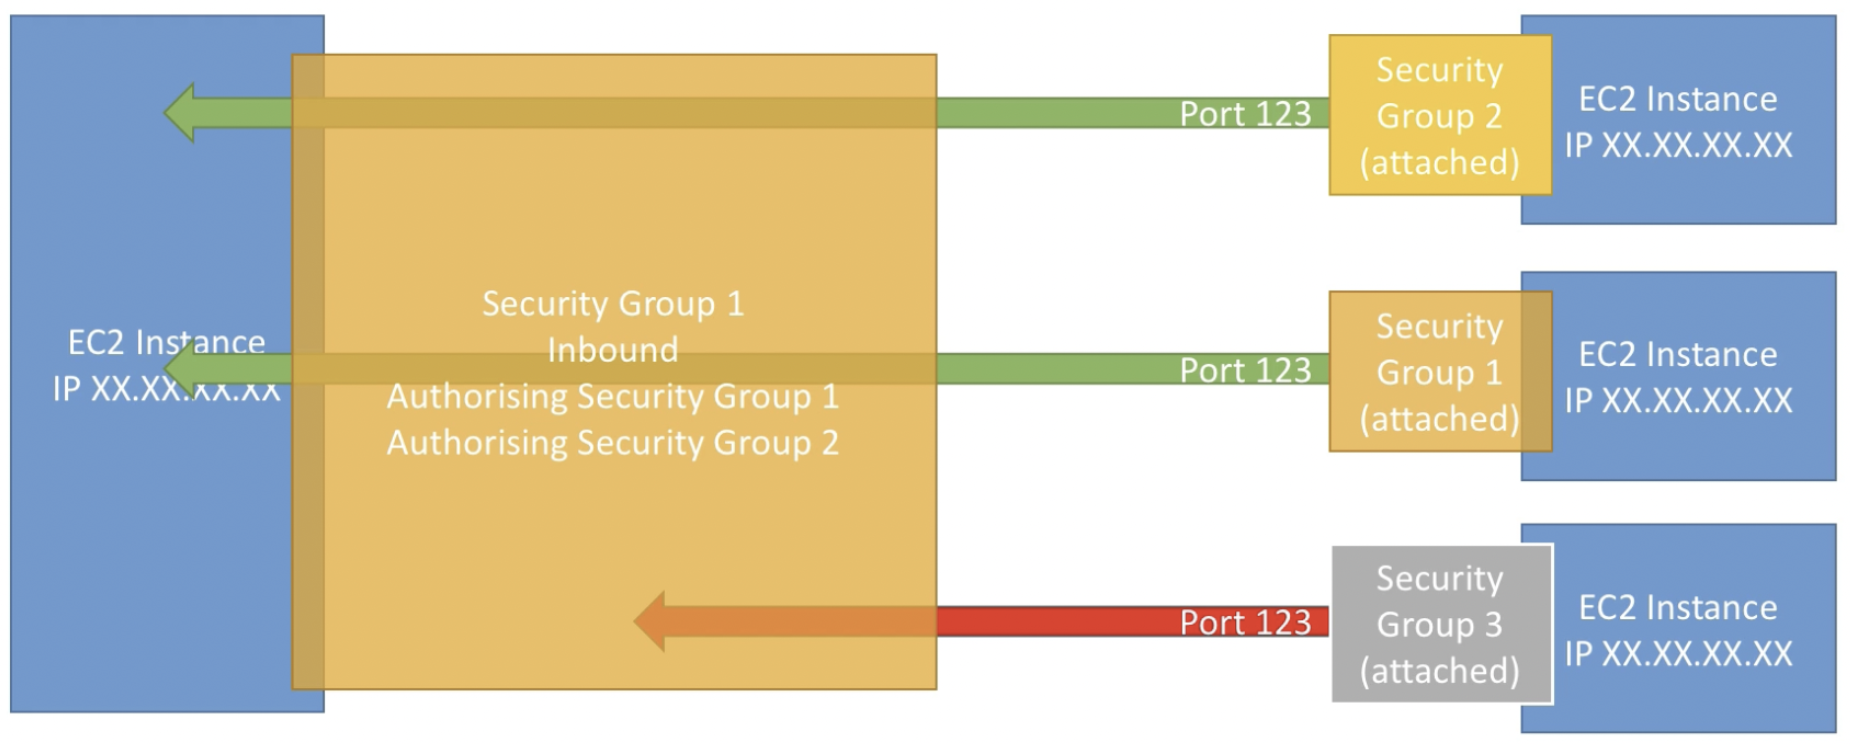
Referencing other security groups
In the diagram below, security group 1 allows inbound traffic from instances that have security group 1 or 2 attached to them. This pattern is quite common in load balancers.
Untitled
Important Ports to know
- FTP: 21 - File Transfer Protocol - Upload files into a file share
- SSH: 22 - Secure Shell - Log into a Linux instance
- SFTP: 22- Secure File Transfer Protocol - (same as SSH) - used for uploading files using SSH
- HTTP: 80 - access unsecured websites
- HTTPS: 443 - access secured websites
- RDP: 3389 - Remote Desktop Protocol - Log into a Windows instance
Connect to an EC2 instance
- Intro
- SSH is used to connect to the instance for some maintenance. It allows us to control a remote machine using a terminal.
- EC2 instance connect is a web browser based way to connect to an EC2 instance without the use of a terminal.

SSH into an EC2 instance (Linux or Mac)
- Open terminal and navigate to the
.pemkey file location
- Run
ssh -i EC2Tutorial.pem ec2-user@65.0.74.155to SSH into the EC2 instance. Here,EC2Tutorial.pemis the key file name and65.0.74.155is the public IP of the instance.
- If the above command throws an error as shown below, run
chmod 0400 EC2Tutorial.pemand SSH again.Permissions 0644 for 'EC2Tutorial.pem' are too open.It is required that your private key files are NOT accessible by others.This private key will be ignored.Load key "EC2Tutorial.pem": bad permissionsec2-user@65.0.74.155: Permission denied (publickey,gssapi-keyex,gssapi-with-mic)
- To close the SSH connection, run
exitorCtrl + Din the terminal
- Open terminal and navigate to the
SSH into an EC2 instance (Windows - Using Putty)
- Download & Install Putty from https://www.putty.org/
- If you haven’t downloaded ppk format we can make pem file to ppk using putty gen
- Click Putty gen → Load → All files → Click pem file → ok → save privet key → yes → save the file as ppk format
- Click Putty → type host name as 13.127.185.123, which is the public IP from the AWS ec2 instance
- SSH → Type EC2 Instance Save → Double click EC2 Instance → Click Accept → But it wont be logged in
- Start Putty → Load → EC2 Instance → Type host name as ec2-user@13.127.185.123 → SSH → Side SSH → Auth → Credential → add pkk file in private key file. → Session → Save → Open
- Check commands
whoami,pinggoogle.com
- To stop it hit Ctrl + C
- type
exitto close
- Open Putty Again → Load EC2 Instance → Click Open to access EC2 again directly.
SSH into an EC2 instance (Windows ≥ 10)
- type ssh in terminal to check if it supports it or not. If ssh is supported it shows like below.
usage: ssh [-46AaCfGgKkMNnqsTtVvXxYy] [-B bind_interface] [-b bind_address] [-c cipher_spec] [-D [bind_address:]port] [-E log_file] [-e escape_char] [-F configfile] [-I pkcs11] [-i identity_file] [-J [user@]host[:port]] [-L address] [-l login_name] [-m mac_spec] [-O ctl_cmd] [-o option] [-p port] [-Q query_option] [-R address] [-S ctl_path] [-W host:port] [-w local_tun[:remote_tun]] destination [command]- Open terminal (powershell or command prompt) and navigate to the
.pemkey file location
- Run
ssh -i .\EC2Tutorial.pem ec2-user@13.127.185.123to SSH into the EC2 instance. Here,EC2Tutorial.pemis the key file name and13.127.185.123is the public IP of the instance.
- Click
yesincase asked for authenticity
- To close the SSH connection, run
exitin the terminal
Connection Error
- If it doesn’t connect to the server
- Navigate pem file → right click → properties → security → Advanced → Make sure that you are the owner → else change → object type → Find your name → location is your computer → type your name as object name → ok
- Then remove access of system and administrator
- For that first disable inheritance → Remove all Inherited permissions from this object → add → type your name → ok → full control → ok
- ok → ok → right click property and security we see our name only
- Then repeat the above ssh task to show the connection.
EC2 Instance Connect
EC2 → Instances → Select instance and click on Connect button → EC2 instance connect → Connect
This will open a terminal in the web browser by generating a temporary key behind the scenes.

⛔ This still uses port 22 (SSH), so the security group must have inbound rules activated on this port for this to work.
- Intro
IAM roles for EC2 instances
- Intro
To allow our instances to access AWS resources, we need to provide them the access. We can either provide our credentials (Access Key ID and Secret Access Key) or attach IAM roles to the instances. The former should not be done at any cost and the latter is preferred.
- Never enter AWS credentials into the EC2 instance
NX2 AMIs come with AWS CLI pre installed. So, we can run AWS CLI commands from inside the instance. Running some AWS CLI commands will require you to configure AWS credentials inside the EC2 instance which is a horrible idea as anyone else can SSH into the instance and get the credentials from the instance.
- Attach IAM roles to EC2 instances
EC2 → Instances → Select instance → Actions → Security → Modify IAM role → Select the IAM role → Attach
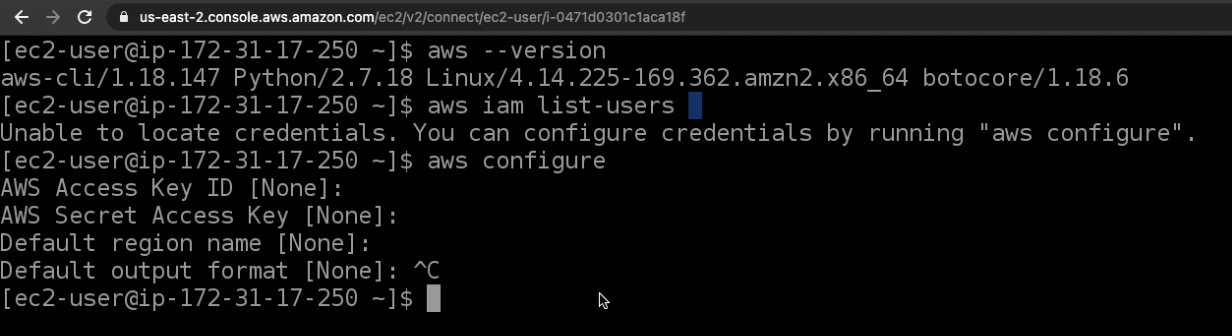
To check this run
aws iam list-usersin ec2 instance connect and it shows all user details.This will allow the EC2 instance to perform allowed operations on the AWS resources.
- Intro
EC2 instances purchasing options
Intro
If we need some instances for long term, choosing the right type of instance can save some us some cost.
- On-Demand Instances: short workload, predictable pricing
- Reserved: (1 & 3 years)
- Reserved Instances: long workloads
- Convertible Reserved Instances: long workloads with flexible instances
- Savings Plan (1 & 3 years) - commitment to amount of usage, long workload
- Spot Instances: short workloads, cheap, can lose instances (less reliable)
- Dedicated Hosts: book an entire physical server, control instance placement
- Dedicated Instances: No other customer will share your hardware
- Capacity Reservation: Reserve Capacity in a specific AZ for a duration
On Demand Instances
- Pay for what you use:
- Linux or Windows - billing per second, after the first minute
- All other operating systems - billing per hour
- Has the highest cost but no upfront payment
- No long-term commitment
- Recommended for short-term and un-interrupted workloads, where you can’t predict how the application will behave
- Pay for what you use:
EC2 Reserved Instances
- Up to 72% discount compared to on-demand instances
- Reservation period: 1 year ⇒ +discount or 3 years ⇒ +++discount
- Purchasing options: no upfront | partial upfront ⇒ +discount | all upfront ⇒ ++discount
- Reserved Instance Scope - Regional or Zonal (reserve capacity in an AZ)
- Recommended for steady-state usage applications (like database)
- You can buy and sell in a Reserved Instance Marketplace
- Convertible Reserved Instance
- can change the EC2 instance type, instance family, OS, scope and tenancy
- Up to 66% discount
.png)
Savings Plans
- Get discount based on long term usage (Up to 72% same as Reserved Instance)
- Commit to certain type usage like $10/hour for 1 or 3 years
- Usage beyond Savings plan is billed at the On-Demand price
- locked to a specific instance family & AWS region (eg: M5 in us-east-1)
- Flexible across
- instance size (M5.xlarge, M5.2xlarge)
- OS (Linux & Windows)
- Tenancy (possession) of Host/Dedicated/Default
Spot Instances
Intro
- Can get a discount of up to 90% compared to On-demand
- Spot instances work on a bidding basis where you say you are willing to pay a specific max hourly rate for the instance. Your instance can terminate if the spot price increases.
- The MOST cost-efficient instances in AWS
- Useful for workloads that are resilient to failure
- Batch jobs
- Data analysis
- Image processing
- Any distributed workloads
- Workloads with a flexible start and end time
- Not suitable for critical jobs or databases
Instance Request
- Define max spot price and get the instance while current spot price < max
- The hourly spot price varies based on offer and capacity
- If the current spot price > your max price you can choose to stop (retain the data and resume it later when the spot price comes down) or terminate (start with a fresh instance later) your instance with a 2 minutes grace period.
- Spot Block (deprecated)
- Block spot instance during a specified time frame (1 to 6 hours) without interruptions
- In rare situations, the instance may be reclaimed
- Define max spot price and get the instance while current spot price < max
Pricing
You can notice a significant price difference between the on demand instance and the spot instance.

Untitled
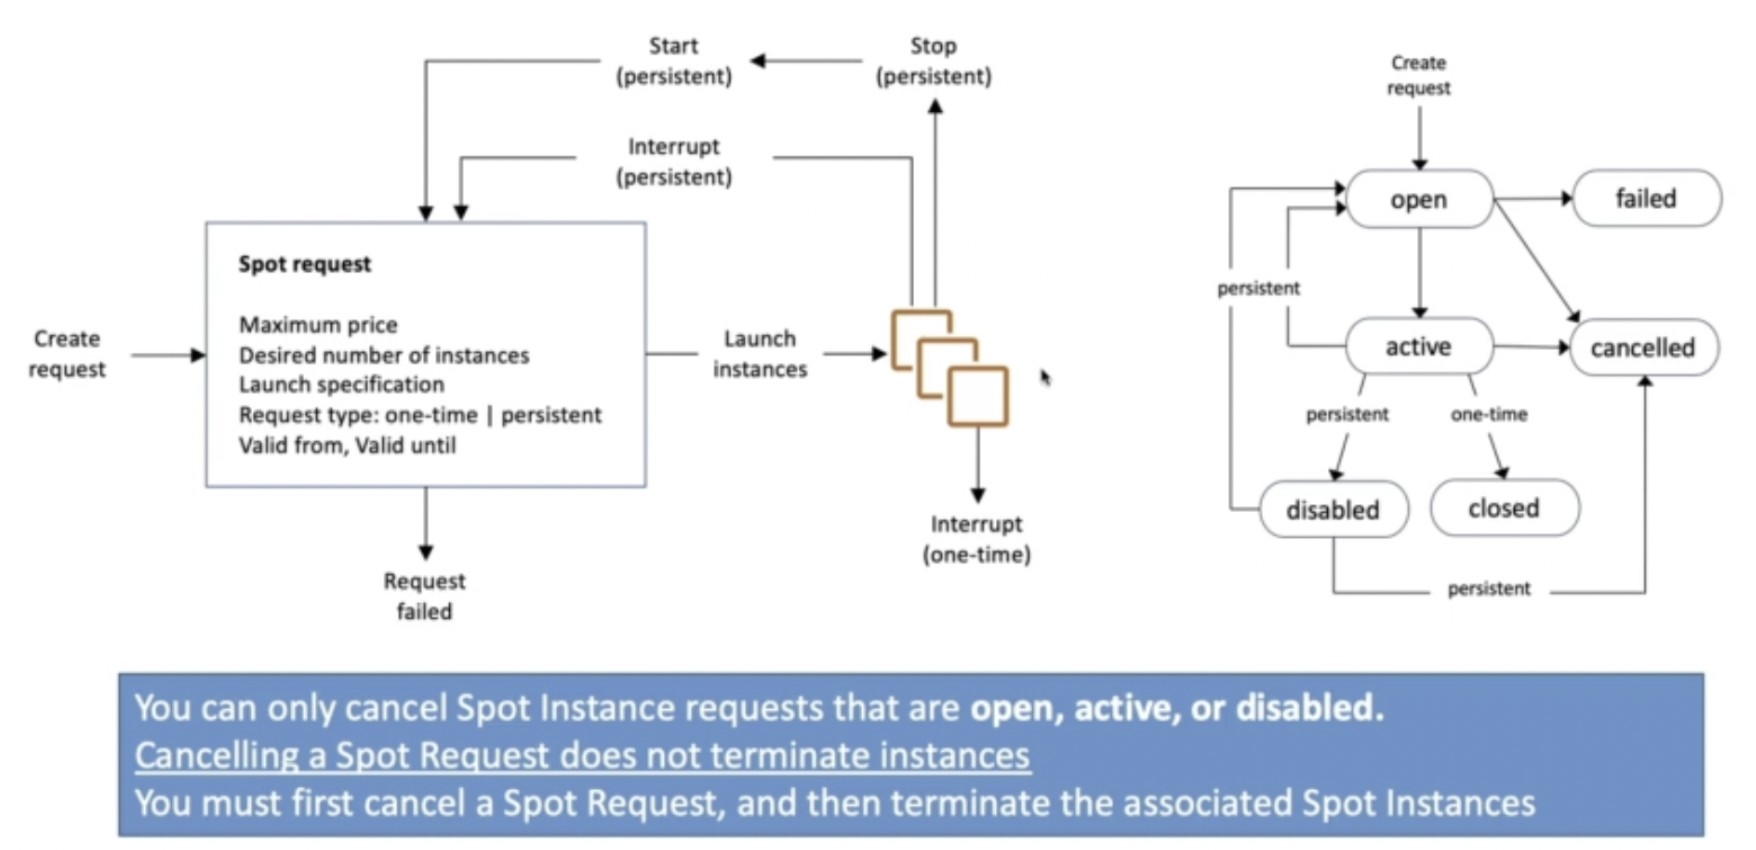
Spot Request and Termination
Spot requests define request type as either one-time or persistent. One-time request, once opened, spins up the spot instances and the request closes. In case of persistent request, the request will stay disabled while the spot instances are up and running. Once these instances stop or terminate and need to be restarted, the request will become active again, ready to start the instances.
To terminate spot instances, we need to first terminated the spot request to prevent relaunching of these instances, and then terminate the spot instances.
Untitled
Spot Fleets
Intro
Spot fleets are basically a combination of spot instances and on-demand instances that tries to optimize for cost or capacity. It’s like a smart way to let AWS choose the best set of spot instances for us to save cost.
- Spot Fleets = set of Spot Instances + On-Demand Instances (optional)
- The Spot Fleet will try to meet the target capacity with price constraints
- Define possible launch pools: instance type (m5.large), OS, Availability Zone
- Can have multiple launch pools, so that the fleet can choose
- Spot Fleet stops launching instances when reaching capacity or max cost
- Strategies to allocate Spot Instances:
- lowestPrice: from the pool with the lowest price (cost optimization, short workload)
- diversified: distributed across all pools (great for availability, long workloads)
- capacityOptimized: pool with the optimal capacity for the number of instances
- Spot Fleets allow us to automatically request Spot Instances with the lowest price
Create a spot fleet request
EC2 → Spot Requests → Request Spot Instances
In this we can either configure the spot fleet manually or using a template. Templates allow us to have on-demand instances in the spot fleet.
Create a single spot instance
When creating a normal EC2 instance, you have the option to make it a spot instance.
Spot Instances: Hands on
- View Pricing History
EC2 → Spot Requests → Pricing History
- View Pricing History
Dedicated Hosts
- A physical server with EC2 instance capacity fully dedicated to your use.
- Allow you address compliance requirements and use your existing server bound software licenses (per-socket, per-scope, pe-VM software licenses)
- Purchasing Options
- On-Demand - Pay per second for active Dedicated Host
- Reserved - 1 or 3 years (No Upfront, partial Upfront, All Upfront)
- More expensive
- Useful for software that have complicated licensing model (BYOL - Bring Your Own License) or for companies that have strong regulatory or compliance needs.
Dedicated Instances
- Instances running on hardware that’s dedicated to you
- May share hardware with other instances in same account
- No control over instance placement (can move hardware after Stop / Start)
.png)
Capacity Reservation
- Reserve on demand capacity in a specific AZ for any duration
- You have access to EC2 capacity when you need it.
- No time commitments (create/cancel anytime), no billing discounts
- combined with Regional Reserved Instance and Savings plan to benefit from billing discounts
- you are charged at On Demand price whether or not your instance is running
- Suitable for short term, uninterrupted workloads in a specific AZ
Outro
.png)
Price Comparison of a m4.large - US-east- 1
.png)
Spot Instances and Spot Fleet
EC2 Spot Instance Requests
- Can get a discount up to 90% compared to On-Demand
- Define max spot price and get the instance while current spot price < max
- The hourly spot price varies based on offer and capacity
- If the current spot price > your max price you can choose to stop or terminate your instance with a 2 minutes grace period.
- Other Strategy: Spot Block (Not available after 31 Dec 2022)
- “block” a spot instance during a specified time frame (1 to 6 hours) without interruptions
- In rare situations, the instance may be reclaimed
- Used for batch jobs/Data analysis/Workloads that are resilient to failures
- Not great for critical jobs or database
.png)
Spot Fleet
.png)
EC2 Instance Launch type hands on
Request Spot Instance → Launch template/Manual → AMI → Key Pair → Additional →Untick Apply Defaults for more options → Make necessary changes → Target Instance → Set instance/vCPUs/Memory → maintain target capacity → set AZ → manual/specific → capacity or price optimized → launch
You can also normally launch a ec2 instance and in advanced section we can optimize it
Section 6: EC2 - Solutions Architect Associate Level
Section 6: EC2 - Solutions Architect Associate Level
Public & Private IPs
Intro
Private IPs allow computers within a private network to communicate with each other.
Public IPs allow computers to talk to other computers on the internet.

IPv4 vs IPv6
- IPv4 is still the most common format used online.
- IPv6 is newer and solves problems for the Internet of Things (loT).
Private v/s Public IP (IPv4)
Public IP
- Machines can be identified on the internet (WWW)
- Must be unique - Two machines cannot have same public IP
- Can be geo located easily
Private IP
- Private IP means the machine can only be identified on a private network only
- the IP must be unique across the private network
- But 2 different private network (2 companies) can have the same IPs
- machines connect to WWW using a NAT + internet gateway (a proxy)
- Specified range can be used as a private IP
Elastic IPs
Intro
- When you stop and then start an EC2 instance, it can change its public IP. If you need to have a fixed public IP for your instance, you need an Elastic IP.
- An Elastic IP is a public IPv4 IP you own as long as you don’t delete it
- You can attach it to one instance at a time
- With an Elastic IP address, you can mask the failure of an instance or software by rapidly remapping the address to another instance in your account.
- You can only have 5 Elastic IP in your account (request AWS to increase that).
- Overall, try to avoid using Elastic IP. They often reflect poor architectural decisions. Instead, use a random public IP and register a DNS name to it or use a Load Balancer (Don’t use Load Balancer).
AWS EC2
- A public IP for WWW
- By default EC2 instance have a private IP for internal AWS Network
SSH on EC2
- when doing SSH into our EC2 machines we can’t use a private IP, because we are not in the same network
- We can only use the public IP.
- If EC2 instance is stopped and then started public IP can change
Billing
Elastic IPs are billed as long as you own them and they are not attached to any instance.
Allocate Elastic IP & associate it to an EC2 instance
EC2 → Elastic IPs → Allocate Elastic IP address → Allocate
This will allocate for us an elastic IP from the pool of elastic IPs that AWS holds. Now, let’s associate this IP to our EC2 instance.
Select the elastic IP → Actions → Associate elastic IP address → Choose the instance and private IP address of the instance → Associate
Now, in the instance summary we can see the elastic IP and public IP are identical and they will not change even if we restart the instance.
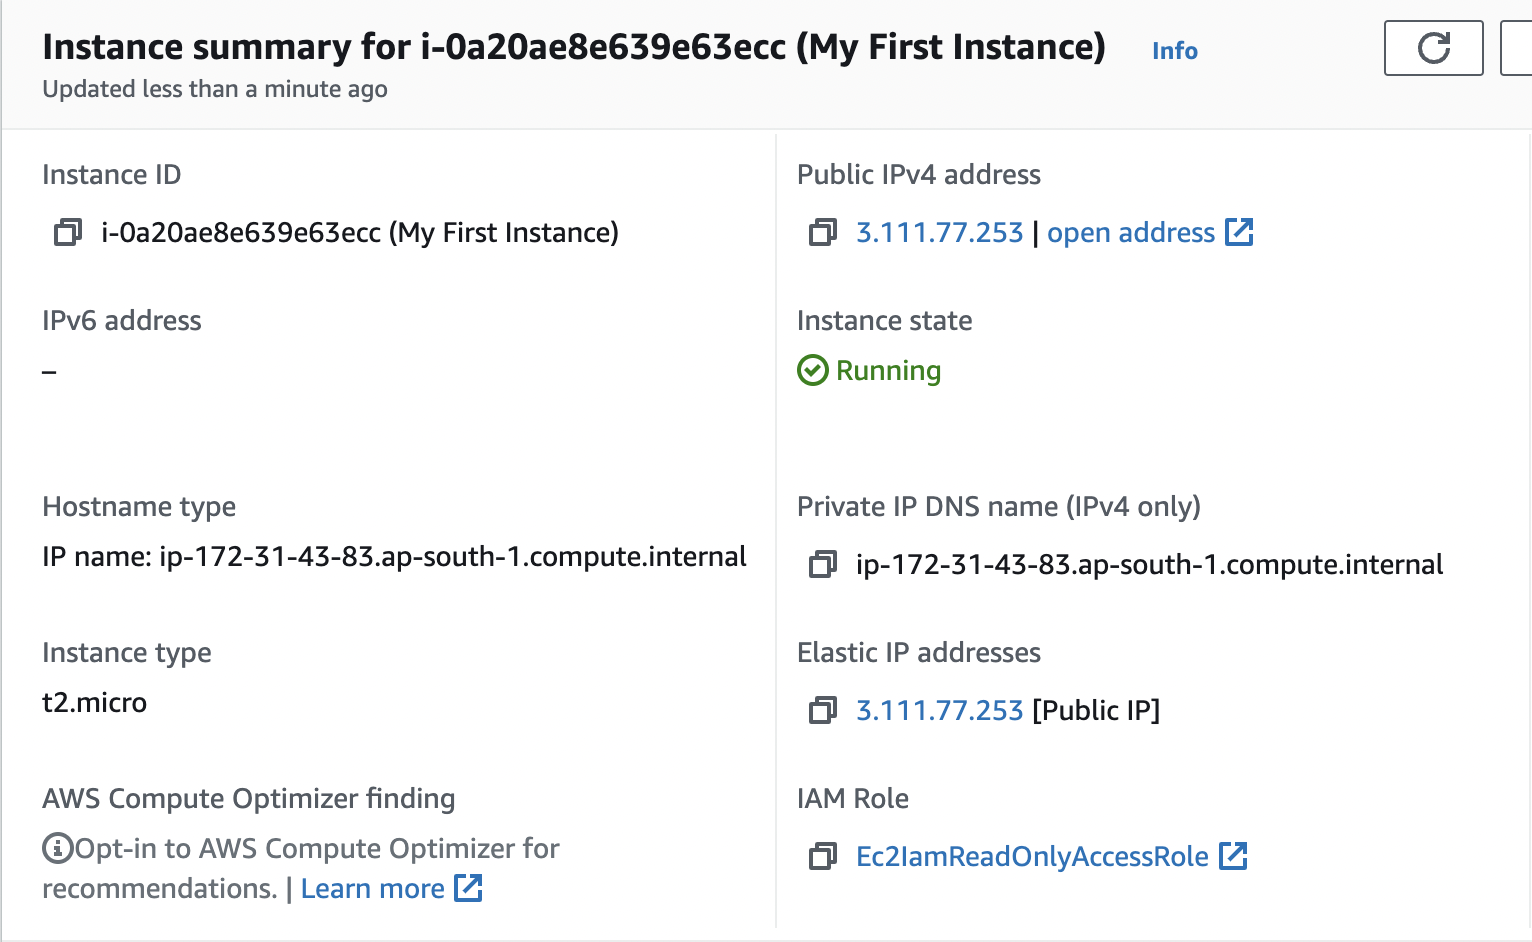
Untitled
Disassociate & Release Elastic IP
EC2 → Elastic IPs → Select the IP → Actions → Disassociate elastic IP
This will detach the elastic IP from the instance. Next, release the elastic IP to prevent billing.
Select the IP → Actions → Release elastic IP
- IPs for EC2 instances
If we have a VPN using which we can connect to our AWS VPC, we can use the private IP to SSH into our EC2 instance. Otherwise, we will have to use the public IP which might change when you stop and start your instance.
Placement Groups
Intro
- Placement group lets us control the placement strategy of our instances within the AWS infrastructure.
- When you create a placement group, you specify one of the following strategies for the group:
- Cluster - clusters instances into a low-latency group in a single Availability Zone
- Spread - spreads instances across underlying hardware (max 7 instances per group per AZ) for critical applications
- Partition - spreads instances across many different partitions (which rely on different sets of racks) within an AZ. Scales to 100s of EC2 instances per group (Hadoop, Cassandra, Kafka)
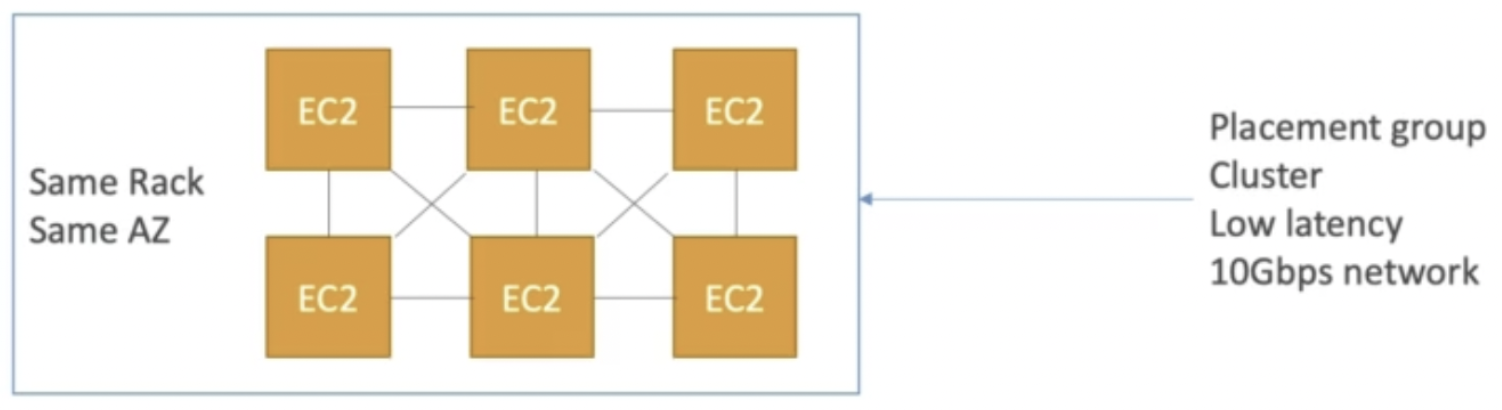
Cluster Placement Strategy (optimize for network)
All the instances are placed on the same hardware (same rack) which is obviously in the same availability zone.
- Pros: Great network (10 Gbps bandwidth between instances)
- Cons: If the rack fails, all instances will fail at the same time
- Use case:
- Big Data job that needs to complete fast
- Application that needs extremely low latency and high network throughput
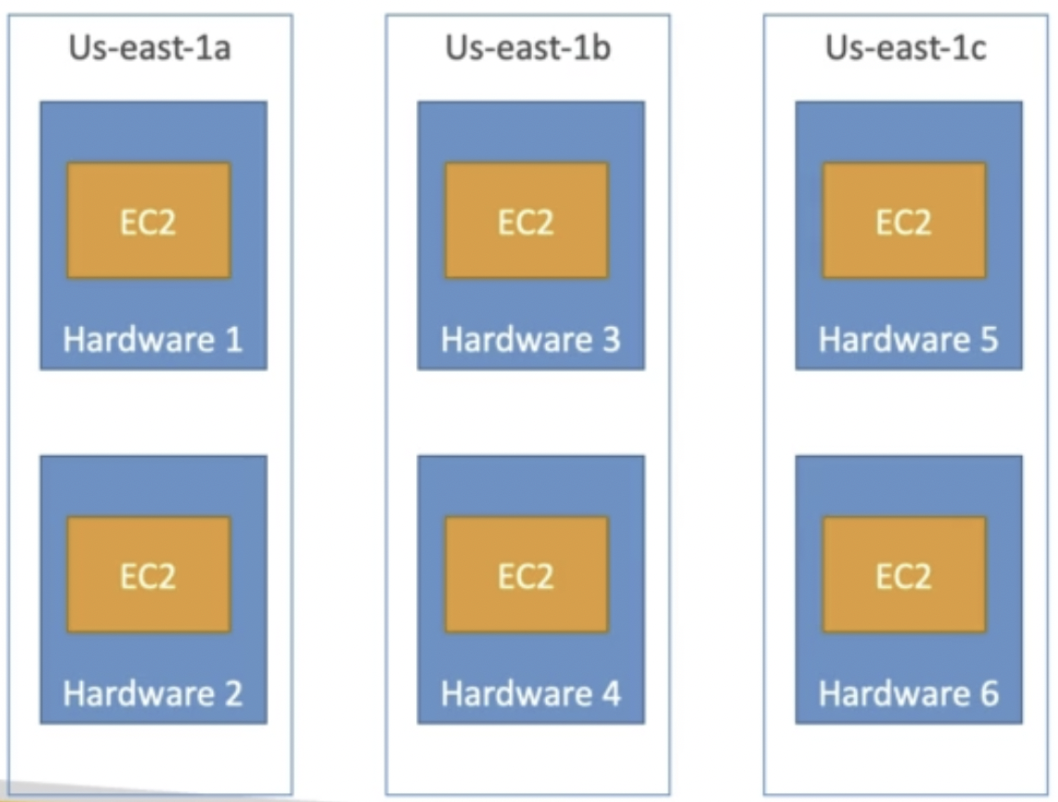
Spread Placement Strategy (minimize risk of failure)
- Each instance is in a separate rack (physical hardware) for maximum reliability.
- Pros:
- Reduced risk of simultaneous failure (multi AZ)
- Span across the AZs
- EC2 Instances are on different physical hardware
- Cons:
- Limited to 7 instances per AZ per placement group
- Use case:
- Application that needs to maximize high availability
- Critical Applications where each instance must be isolated from each other for increased reliability
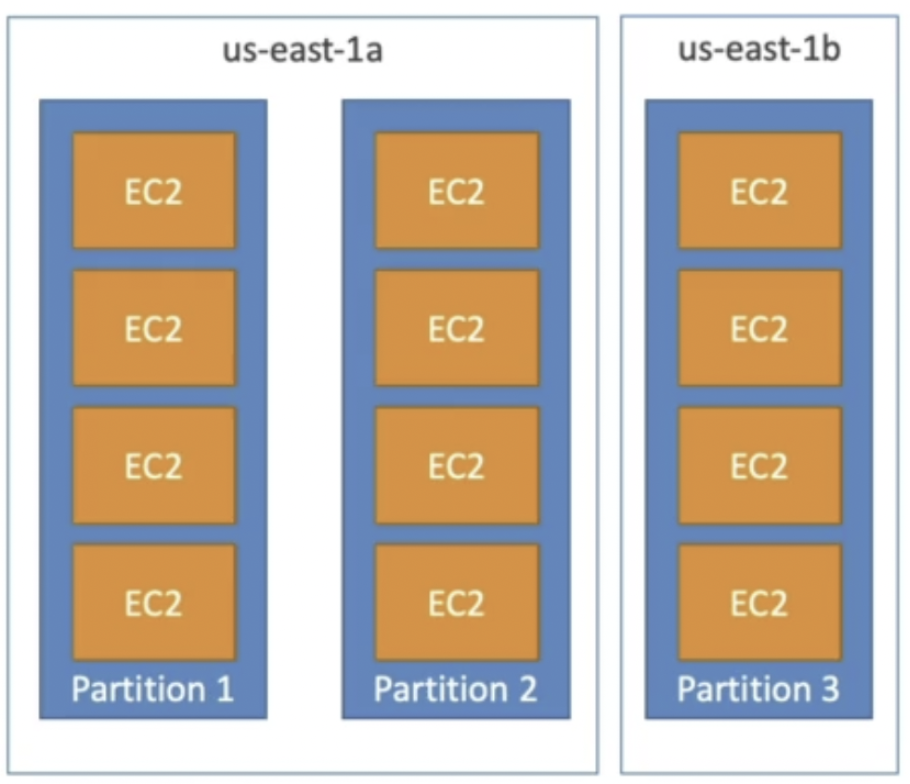
Partition Placement Strategy (best of both worlds)
- Instances in a partition do not share rack with instance in other partitions.
- Instances in a partition share rack with each other so if the rack goes down, the entire partition goes down. But, it won’t affect other partitions. Used in big data applications (HDFS, HBase, Cassandra, Kafka)
- EC2 instances get access to the partition information as metadata
- Up to 7 partitions per AZ
- Spread across multiple AZs in the same region
- Up to 100s of EC2 instances
- We need use it in Big data applications like HDFS, Kafka ….
Hands on
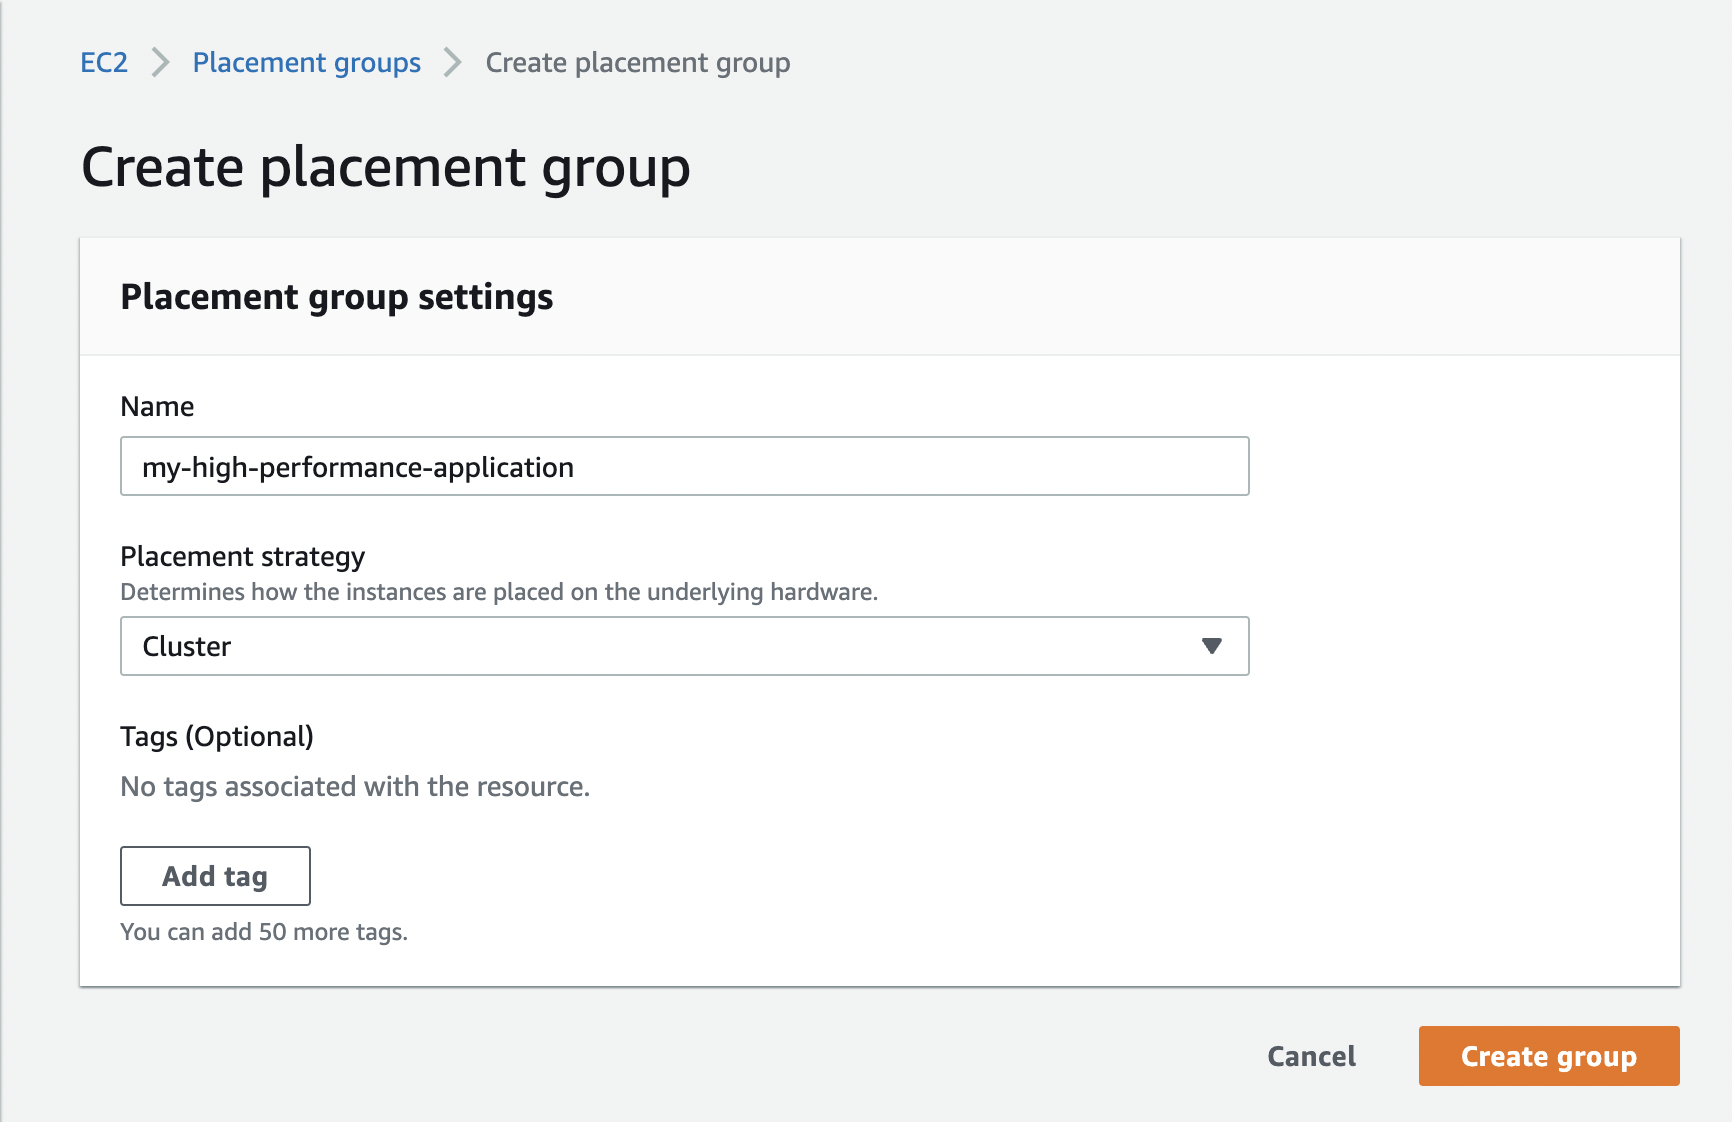
Create Placement Groups
EC2 → Placement groups → Create placement group
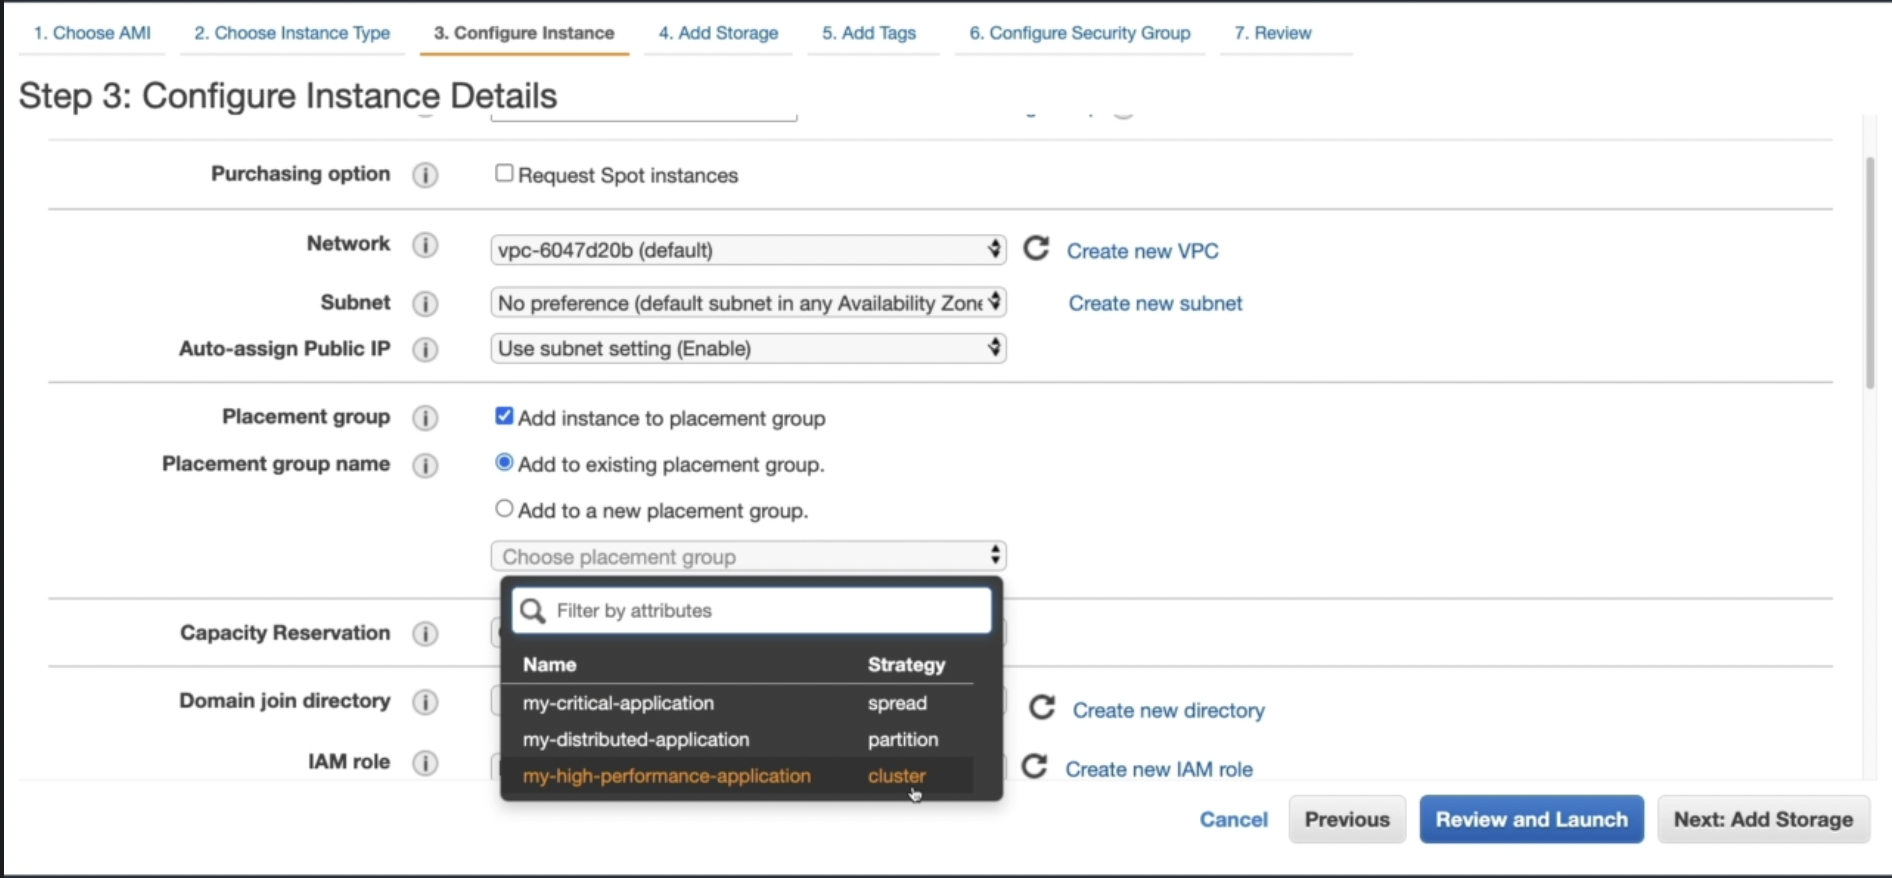
Launch EC2 instances in Placement Groups
While creating a new EC2 instance, you can add it to a placement group.
Elastic Network Interfaces (ENI)
Theory
- ENIs are virtual network cards that give EC2 instances access to the private network. A primary ENI is created and attached to the instance upon creation. The primary ENI will be deleted automatically upon instance termination.
- We can create additional ENIs and attach them to an EC2 instance to access it via multiple private IPs. ENIs can be moved from one instance to another for failover. Secondary ENIs will not be deleted automatically upon instance termination.
- Remember that ENIs can only be moved within an AZ (subnet).
- ENI can have the following attributes:
- Primary private IPv4
- One or more secondary IPV4
- One Elastic IP (IPv4) per private IPv4
- One Public IPv4
- One or more security groups
- MAC address

Hands on
- Create an ENI
EC2 → Network Interfaces → Create network interface → Give it a name and select the subnet (availability zone) for this ENI → Create
Once created, the ENI will appear as available. The other two ENIs shown below are in use and they were created by default when two EC2 instances were started.

- Attach and Detach ENI to and from an EC2 instance
To attach, EC2 → Network Interfaces → Select the ENI → Action → Attach → Select the instance → Attach
- The attached ENIs can be viewed in the instance details

To detach, select the ENI → Action → Detach → Enable force detach → Detach
- The attached ENIs can be viewed in the instance details
- Create an ENI
EC2 Hibernate
Theory
.png)
.png)
- Supported Instance Families - C3, C4, C5, I3, M3, M4, R3, R4, T2, T3 …..
- Instance RAM Size - Must be less than 150 GB
- Instance Size - Not supported for bare metal instances
- AMI - Amazon Linux 2, Linux AMI, Ubuntu, RHEL, CentOS & Windows …..
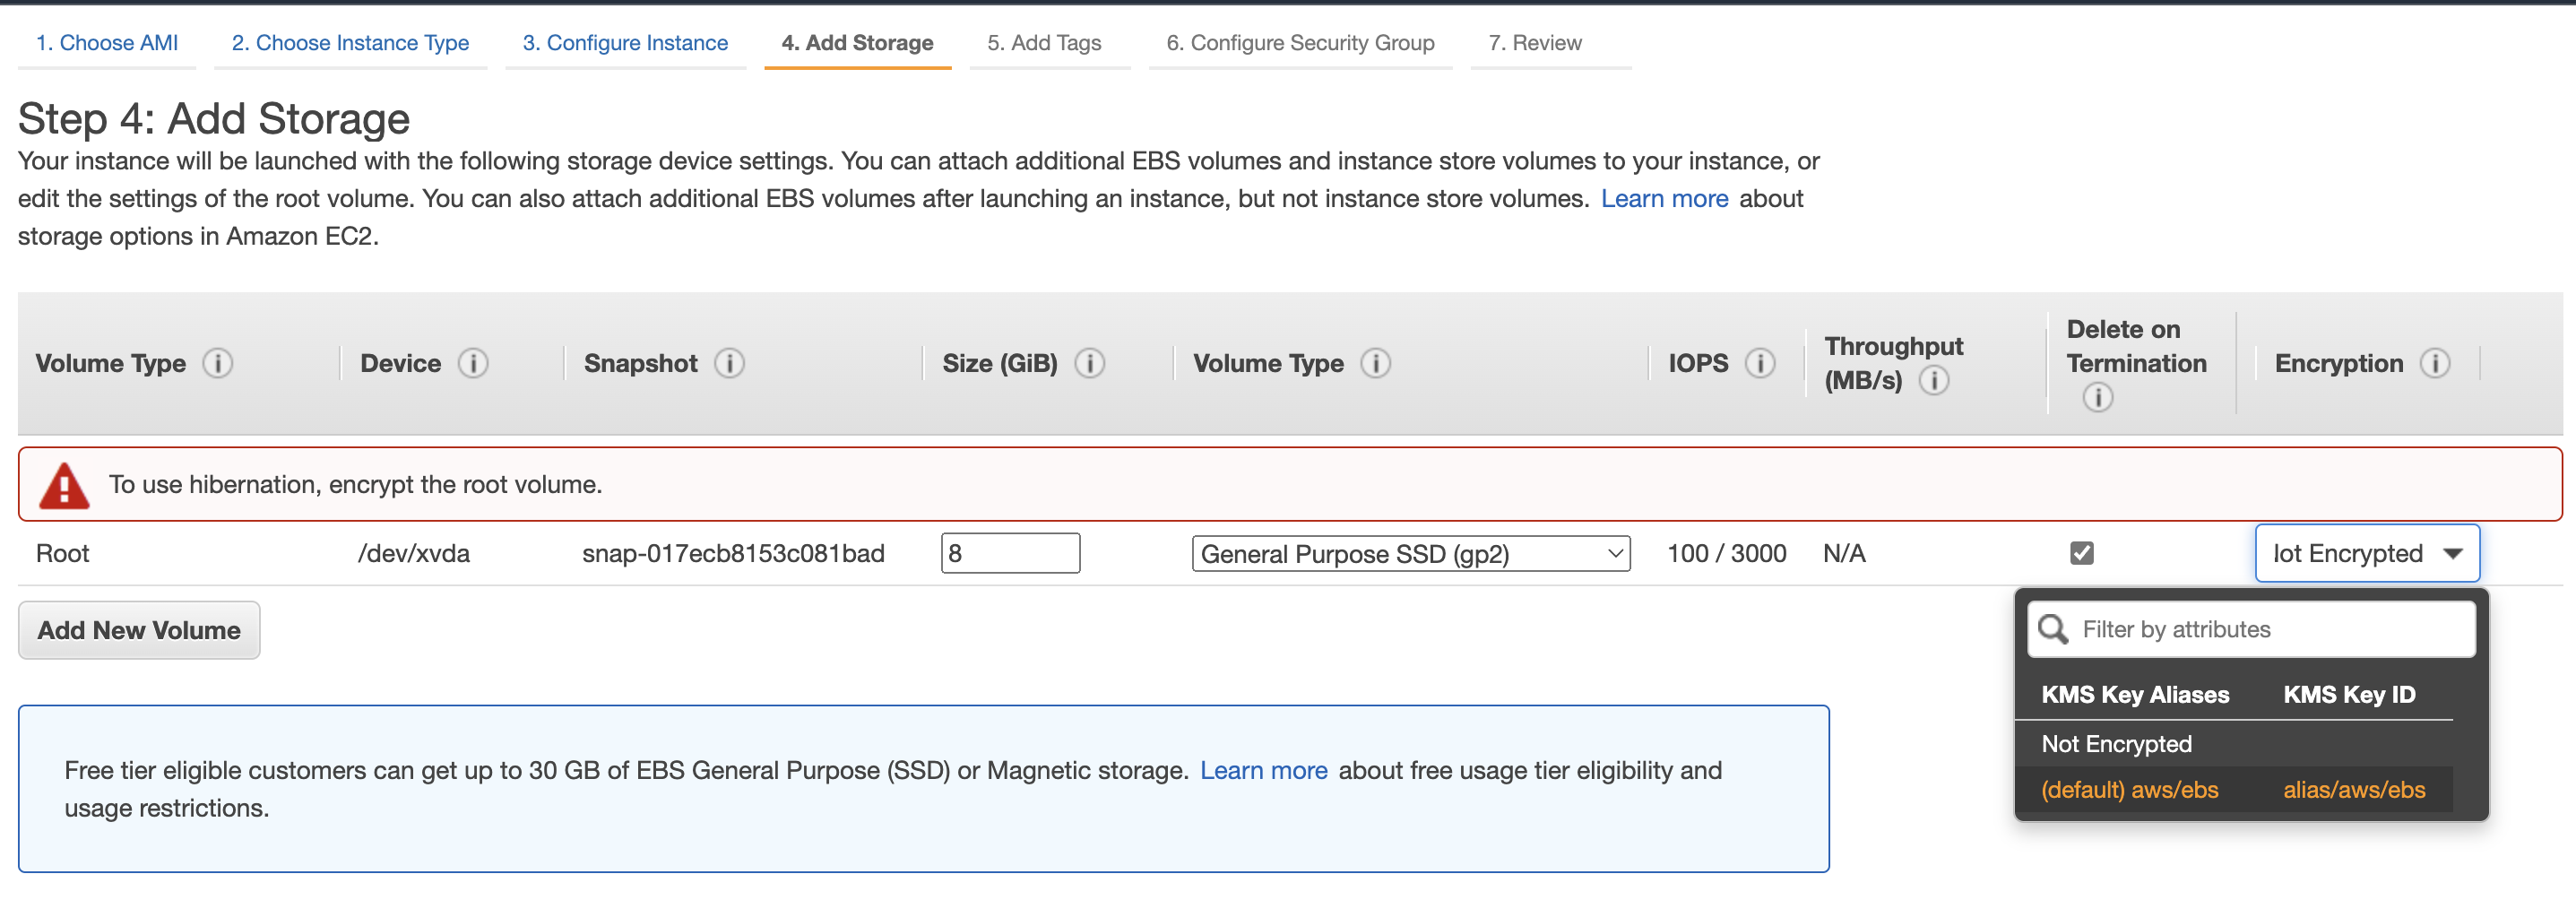
- Root Volume - Must be EBS, encrypted not instance store and large
- Hibernation is supported in On-Demand, Reserved instances and Spot instances
- Instances cannot hibernate more than 60 days
Hands on
- Enable Hibernation for an EC2 instance
When creating an EC2 instance:
Enable hibernation as an additional stop behavior
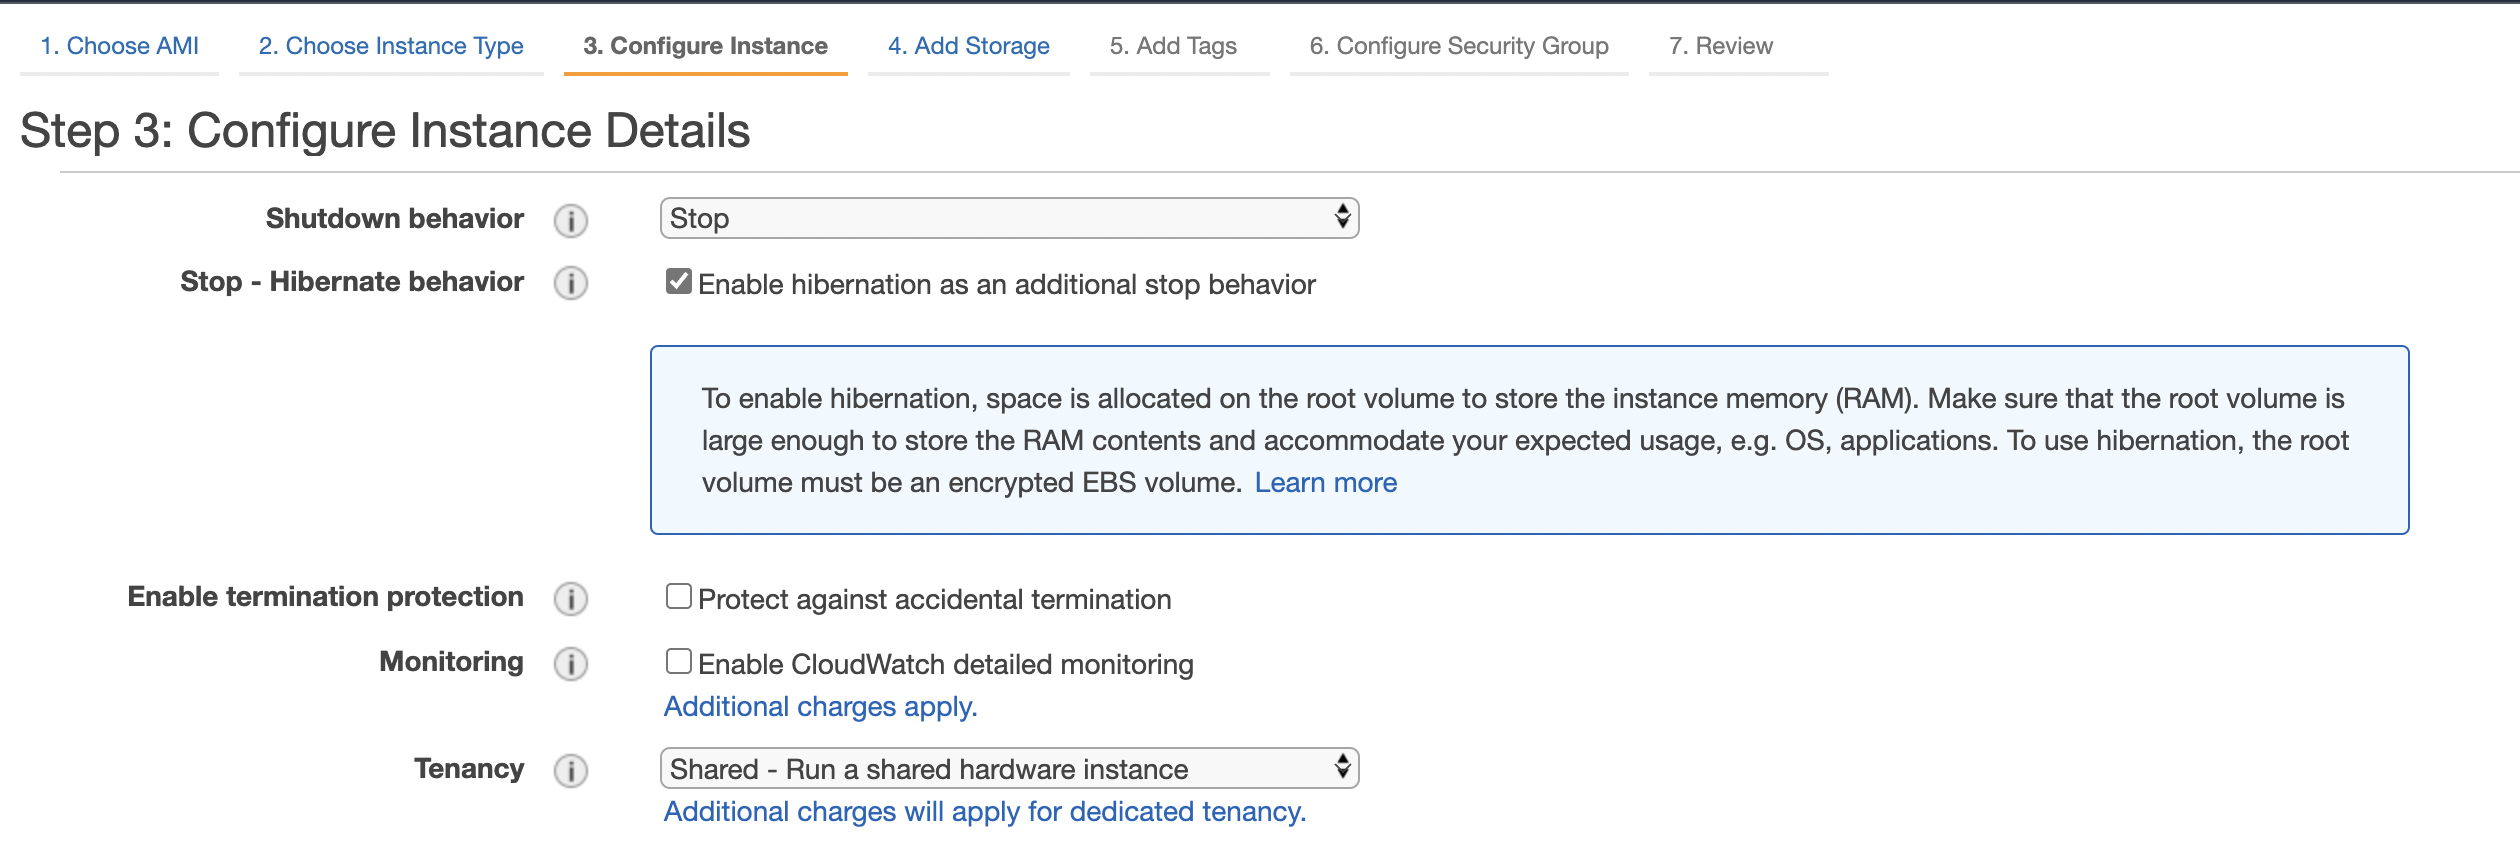
Encrypt the EBS storage
- Check if an instance was hibernating or stopped
SSH into the instance and run
uptimewhich basically prints how long the instance has been on. In case of hibernation, the printed uptime will not be ~ 0
- Enable Hibernation for an EC2 instance
EC2 Nitro
- New virtualization technology for next-gen EC2 instances
- Allows for better performance:
- Better networking options (enhanced networking, HPC, IPv6)
- Higher Speed EBS - Nitro is necessary for 64,000 EBS IOPS max 32,000 on non-Nitro
- Better underlying security
vCPU
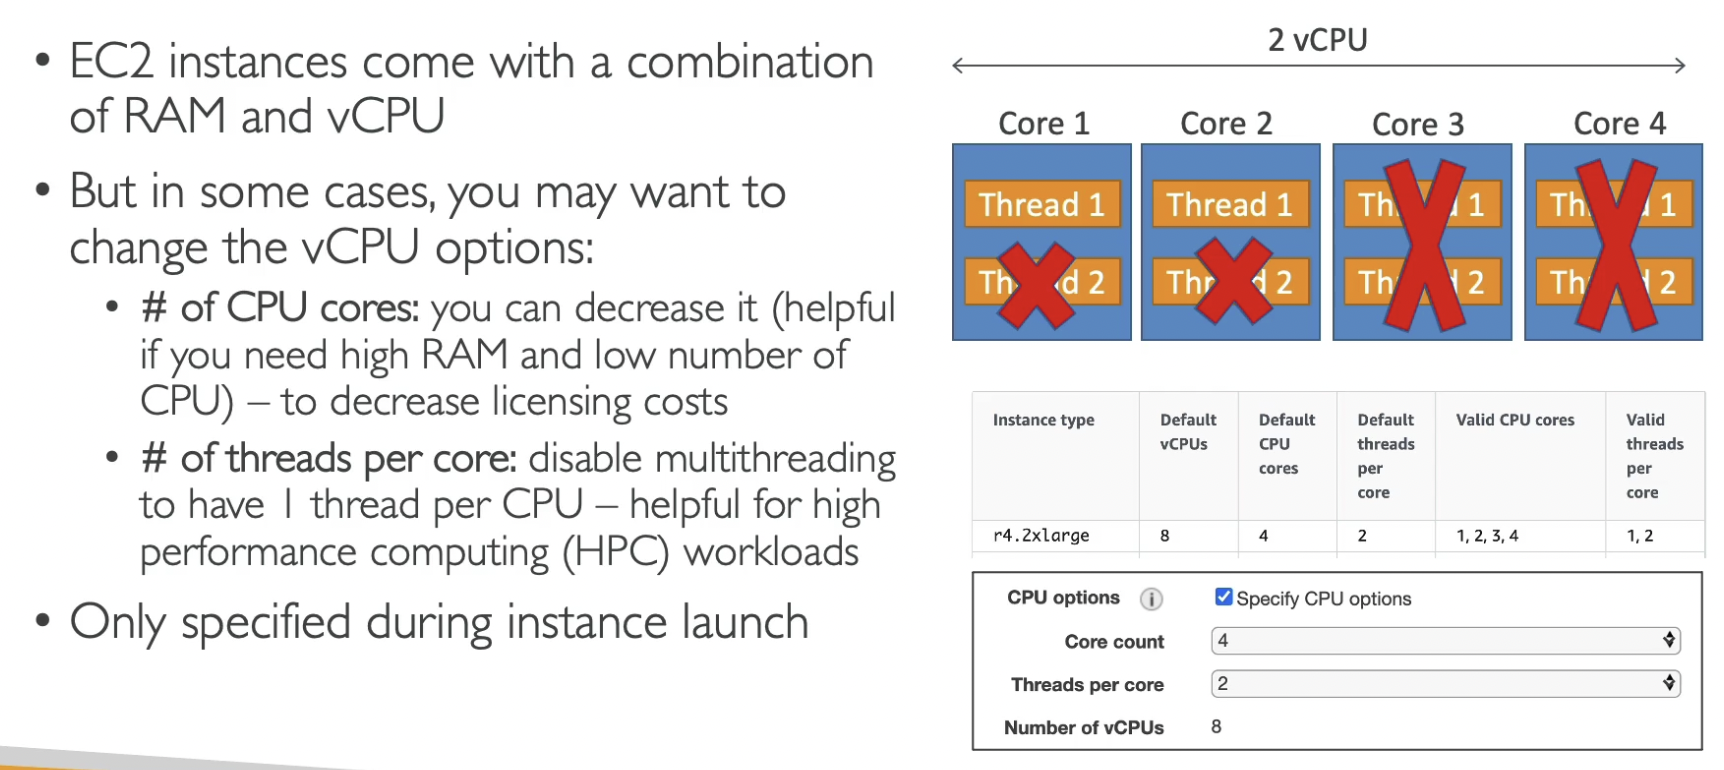
- Intro
- Multiple threads can run on one CPU (multi-threading)
- vCPU is basically the total number of concurrent threads that can be run on an EC2 instance.
- Usually 2 threads per CPU core (eg. 4 CPU ⇒ 8 vCPU)
- Optimizing vCPU options
Untitled
- Intro
Capacity Reservations
- Capacity Reservations ensure you have EC2 Capacity when needed
- Manual or planned end-date for the reservation
- No need for 1 or 3-year commitment
- Capacity access is immediate, you get billed as soon as it starts
- Specify:
- The Availability Zone in which to reserve the capacity (only one)
- The number of instances for which to reserve capacity
- The instance attributes, including the instance type, tenancy, and platform/OS
- Combine with Reserved Instances and Savings Plans to do cost saving
Section 7: EC2 - Instance Storage
Section 7: EC2 - Instance Storage
Elastic Block Store (EBS)
Theory
Intro
- An EBS (Elastic Block Store) Volume is a network drive you can attach to your instances while they run. It allows your instances to persist data, even after their termination.
- They can only be mounted to one instance at a time
- An instance can have multiple EBS volumes attached to it
- An EBS volume can be left unattached
- They are bound to a specific availability zone
- An EBS volume on us-east- 1 a cannot be attached to another one quickly
- to move a volume across first we need to snapshot it.
- It is a network drive, not a physical drive, it uses network to communicate with the instance so there will be bit of latency
- It can be detached from an EC2 instance and attached to another one quickly
- Capacity (size in GB & throughput in IOPS) must be provisioned
- You get billed for the provisioned capacity
- You can increase the provisioned capacity overtime
.png)
Delete on termination
- By default, the root EBS volume is deleted upon instance termination (attribute enabled)
- By default, any other attached EBS volume is not deleted upon instance termination (attribute disabled)
- The default behavior can be overridden
- used to preserve root volume when instance is terminated

Hands on
- Create a new EBS volume & attach it to an instance
To create a new volume: EC2 → Volumes (under Elastic Block Store) → Create volume → Choose the storage size and availability zone → Create
To attach an existing volume to an instance: Right click on the volume → Attach → Select the instance → Attach

- Create a snapshot of an EBS volume
Select the volume → Right click → Create Snapshot
To view the snapshots: EC2 → Snapshots (under Elastic Block Store)
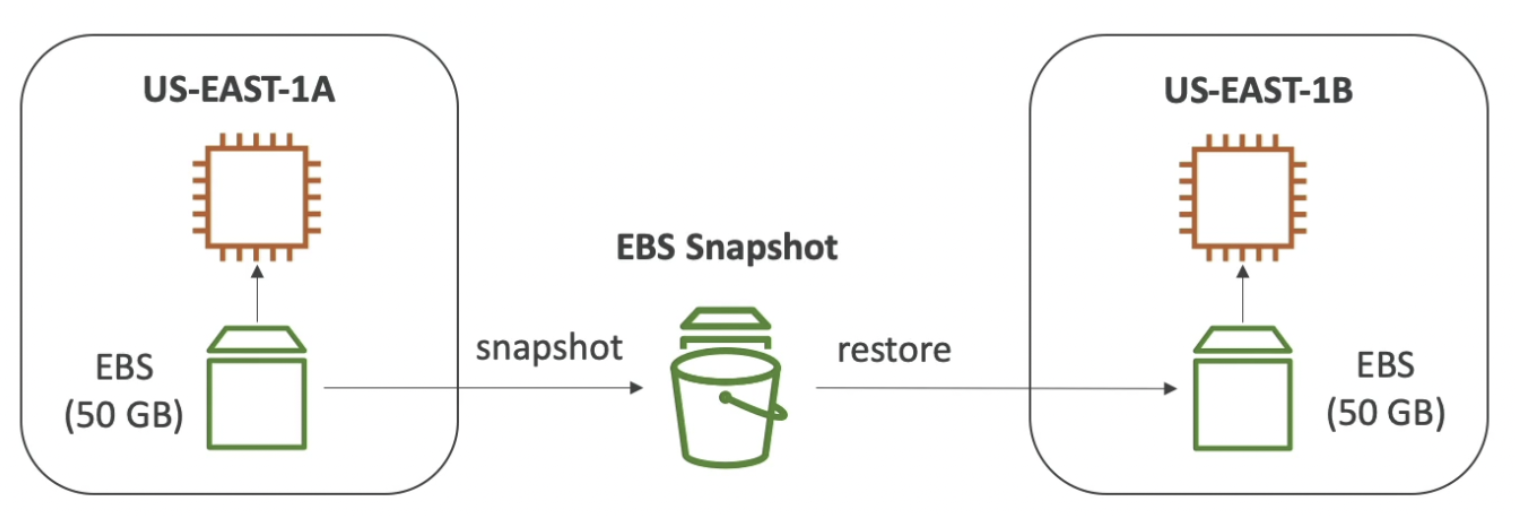
- Create a volume from a snapshot (in different AZ)
Select snapshot → Right click → Create volume from snapshot
During the above process, we can select a different availability zone from the one that contains the snapshot.
- Copy the snapshot (to a different region)
Right click the snapshot → Copy snapshot → select the destination region → Copy snapshot
- Create a new EBS volume & attach it to an instance
EBS Snapshots
- Snapshots allow us to restore the contents of an EBS volume at a later point in time.
- Not necessary to detach volume to do snapshot, but recommended
- Can copy snapshots across AZ or Region (used to transfer data between availability zones or regions)
.png)
Amazon Machine Image (AMI)
Theory
- AMIs are the image of the instance after installing all the necessary OS, software and configuring everything. It boots much faster because the whole thing is pre-packaged and doesn’t have to be installed separately for each instance.
- AMI are built for a specific region (can be copied across regions)
- You can launch EC2 instances from:
- A Public AMI: AWS provided
- Your Own AMI: you make and maintain them yourself
- An AWS Marketplace AMI: an AMI someone else made (and potentially sells)
.png)
Hands on
- Create an AMI from an existing EC2 instance
EC2 → Instances → Right click on the instance → Image and Templates → Create image
To view the created AMI: EC2 → AMIs (under Images)

Untitled
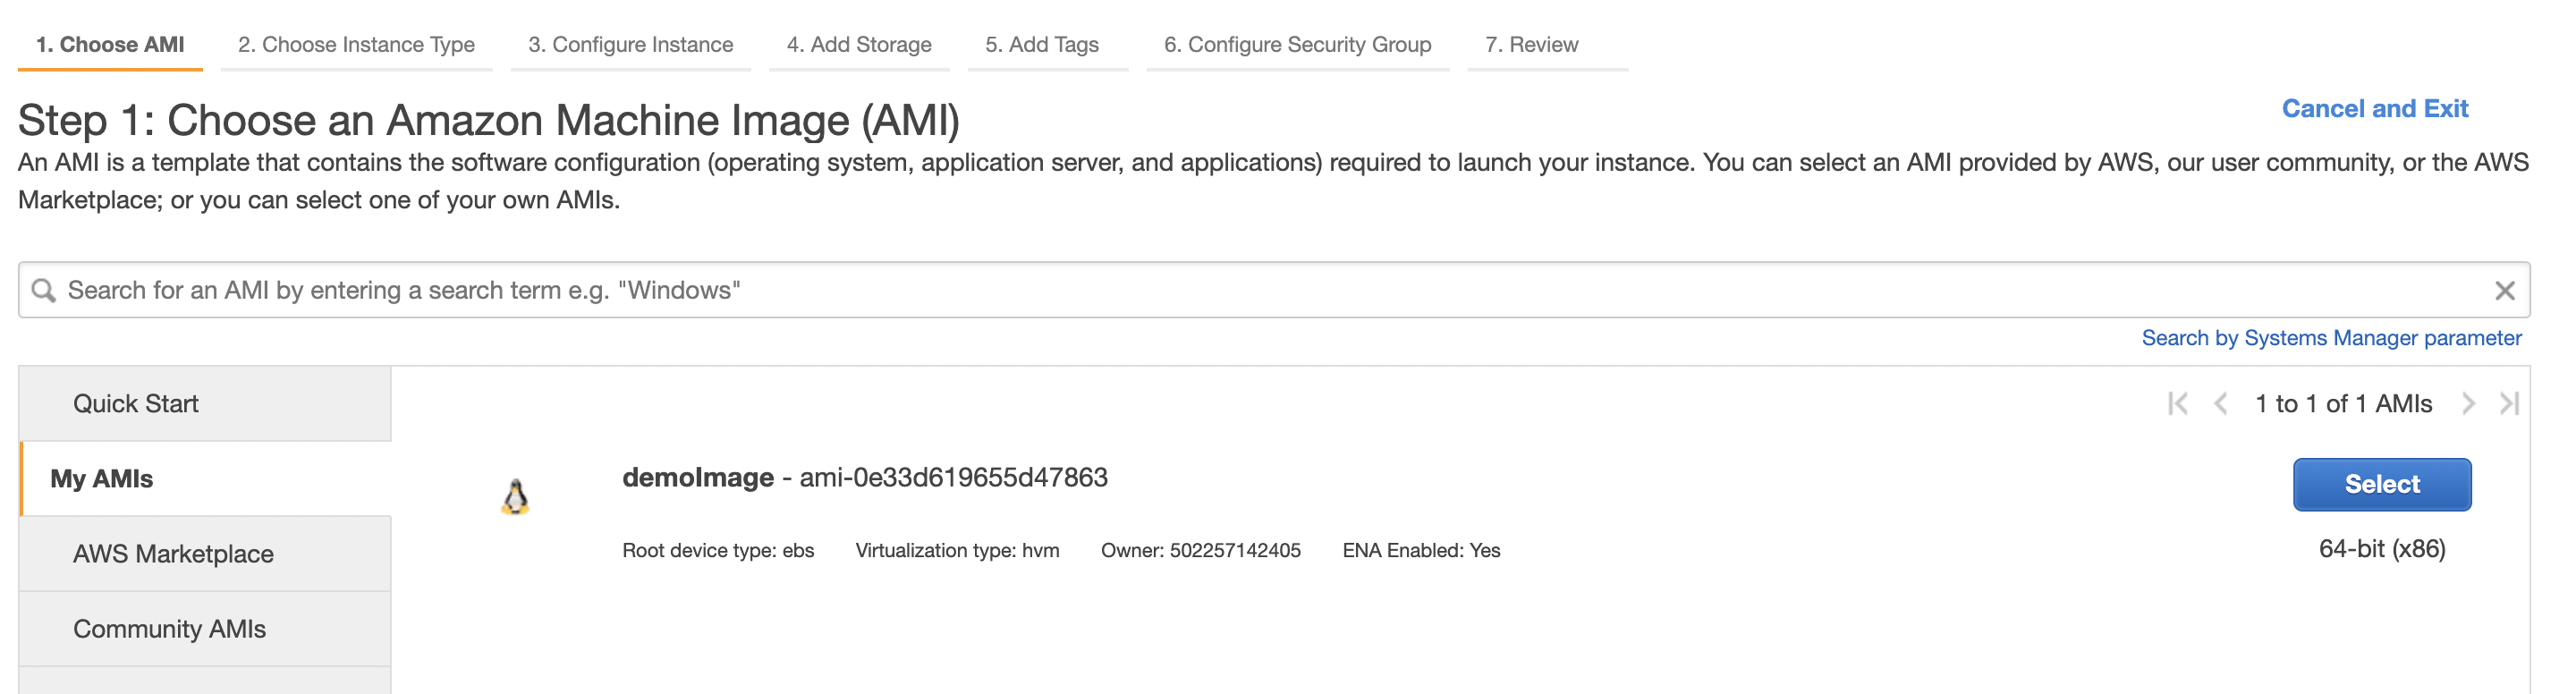
- Create an EC2 instance from an existing AMI
⛔ If you just created an AMI, it could take some time to become available to create instances from it.
When creating an EC2 instance, go to “My AMIs” to create an instance from your AMI.
- Create an AMI from an existing EC2 instance
Instance Store
- Instance stores are hardware storages directly attached to EC2 instances (servers hosting the EC2 instances).
- Network isn’t involved, so the IO performance of instance store is very high, but unlike EBS, they lose data when the instance is stopped or terminated (ephemeral).
- Good for buffer / cache / scratch data / temporary content
- Risk of data loss if hardware fails
EBS Volume Types
.png)
Only SSD based volumes (gp2/gp3 or io1/io2) can be used as root for EC2 instances.
General Purpose SSD
- Cost effective storage, low-latency
- Good for system boot volumes, virtual desktops, development and test environments
- Storage: 1 GiB - 16 TiB
- gp3:
- Baseline of 3,000 lOPS and throughput of 125 MiB/s
- Can increase IOPS up to 16,000 and throughput up to 1000 MiB/s independently
- gp2:
- Small gp2 volumes can burst IOPS to 3,000
- Size of the volume and IOPS are linked, max IOPS is 16,000
- 3 IOPS per GB (linked), means at 5,334 GB we are at the max lOPS
Provisioned IOPS (PIOPS) SSD
- Good for critical business applications with sustained lOPS performance or applications that need more than 16,000 IOPS (max for gp3)
- Great for databases workloads (demanding storage performance and consistency)
- Supports EBS Multi-attach (attach volume to multiple instances)
- io1/io2:
- Storage: 4 GIB - 16 TiB
- Max PIOPS: 64,000 for Nitro EC2 instances & 32,000 for other
- Can increase PIOPS independently from storage size
- io2 have more durability and more IOPS per GiB (at the same price as io1)
- io2 Block Express:
- Storage: 4 GiB - 64 TiB
- Sub-millisecond latency
- Max PIOPS: 256,000 with an lOPS: GiB ratio of 1,000: |
Hard Disk Drives (HDD)
- Cannot be a boot volume
- Storage: 125 MiB to 16 TiB
- Throughput Optimized HDD (st1)
- Big Data, Data Warehouses, Log Processing
- Max throughput - 500 MiB/s - max IOPS 500
- Cold HDD (sc1):
- For data that is infrequently accessed
- Scenarios where lowest cost is important
- Max throughput - 250 MiB/s - max IOPS 250
EBS Multi Attach
- Attach the same EBS volume to multiple EC2 instances in the same AZ
- Each instance has full read & write permissions to the volume
- Multi attach only works for Provisioned IOPS (io1 and io2 family)
- Use case:
- Achieve higher application availability in clustered Linux applications (eg. Teradata)
- Applications must manage concurrent write operations
- Must use a file system that’s cluster-aware (not XFS, EX4, etc…)
- Up to 16 EC2 Instances at a time
.png)
EBS Encryption
Intro
- When you create an encrypted EBS volume, you get the following:
- Data at rest is encrypted inside the volume
- All the data in-flight moving between the instance and the volume is encrypted
- All snapshots are encrypted
- All volumes created from the snapshot are encrypted
- Encryption and decryption are handled transparently (you have nothing to do)
- Encryption has a minimal impact on latency
- EBS Encryption leverages keys from KMS (AES-256)
- Copying an unencrypted snapshot allows encryption
- Snapshots of encrypted volumes are encrypted
- When you create an encrypted EBS volume, you get the following:
Encrypt EBS volumes upon creation
When creating EBS volumes, select the checkbox to encrypt the volume
Encrypt an un-encrypted EBS volume
Follow the steps below in order.
- Create an EBS snapshot of the volume
- Copy the EBS snapshot and encrypt the new copy
- Create a new EBS volume from the encrypted snapshot (the volume will be automatically encrypted)
Shortcut way:
- Create an EBS snapshot of the volume
- Create a new EBS volume from the un-encrypted snapshot and select the checkbox to encrypt this volume.
Elastic File System (EFS)
Theory
Intro
Compatible with Linux based AMI (Not Windows)
.png)
.png)
Performance and Storage Class
⛔ Really important for exam
- EFS Scale - 1000s of concurrent NFS clients - 10 GB+ /s throughput - Grow to Petabyte-scale network file system automatically
Performance mode (set at EFS creation time)
- General purpose (default): latency-sensitive use cases (web server, CMS, etc…)
- Max I/O: higher latency, throughput, highly parallel (big data, media processing)
Throughput mode
- Bursting
- By default, EFS is in bursting throughput mode (throughput scales with the file system size).
- For every 1TB storage, we get 50MiB/s + burst of up to 100MiB/s.
- Provisioned
- Throughput is fixed regardless of the storage size. eg: 1 GiB/s for 1TB storage
- Bursting
Storage Tiers (lifecycle management feature - move file after N days)
.png)
- EFS Scale - 1000s of concurrent NFS clients - 10 GB+ /s throughput - Grow to Petabyte-scale network file system automatically
new →
Hands on
- Create an EFS
EFS → Create file system → Customize → Create
- Attach EFS to EC2 instances during instance creation

- Attach EFS to existing EC2 instances
- EFS → Select the file system → Attach

- SSH into the EC2 instance
- Create an
efsdirectory in the instance by runningmkdir efs
- Install
amazon-efs-utilson the instance by runningsudo yum install -y amazon-efs-utils
- Mount the EFS to the
efsdirectory by running the command shown in the Attach modal (using the EFS mount helper). If this takes too long or gives a timeout error. Then, we need to add NFS inbound rules to the security group attached to the EFS.
If the above method doesn’t work, run the command “Using NFS client” and it will mount the EFS to the
efsdirectory.Once mounted to multiple instances, the change made in the efs directory by one instance will be visible to other instances too.
- Setup NFS rule to allow EC2 instances into the EFS
The NFS rule below allows all EC2 instances that have
ec2-to-efssecurity groups attached to them to access the EFS.
- Create an EFS
EFS v/s EBS
.png)
.png)
- EFS - Billed for what you use, For a network volume mounted on one instance and locked on a AZ
- EBS - Have to provision in advance a size that you know for EBS drive, and you pay for provision capacity, not actual use capacity, For Network file system mounted across multiple instances.
- Instance Store - To get maximum amount of IO onto a instance but we lose that, if we lose the instance so it is a ephemeral drive
Section 8: High Availability And Scalability: ELB & ASG
Section 8: High Availability And Scalability: ELB & ASG
Scalability
- Scalability means that an application / system can handle greater loads by adapting.
- There are two kinds of scalability:
- Vertical Scalability (scaling up / down)
- Vertically scalability means increasing the size (performance) of the instance
- For example, your application runs on a t2.micro. Scaling that application vertically means running it on a t2.large
- Vertical scalability is very common for non-distributed systems, such as a database.
- RDS, ElastiCache are services that can scale vertically.
- There’s usually limit to how much you can vertically scale (hardware limit)
- Horizontal Scalability (elasticity) (scaling out / in)
- Horizontal Scalability means increasing the number of instances / systems for your application.
- Horizontal scaling implies distributed systems.
- This is very common for web applications / modern applications
- It’s easy to horizontally scale thanks the cloud offerings such as Amazon EC2
- Horizontal scaling is done through
- Auto Scaling Group (ASG)
- Load Balancer
- Vertical Scalability (scaling up / down)
High Availability
- High availability means running your application / system in at least 2 data centers (Availability Zones)
- The goal of high availability is to survive a data center loss
- The high availability can be passive (for RDS Multi AZ for example)
- The high availability can be active (for horizontal scaling)
- High availability is achieved though
- Auto Scaling Group (multi AZ enabled)
- Load Balancer (multi AZ enabled)
Example: having two call centers in different locations so that if one goes down, the other can keep running
- Vertical Scaling: Increasing the instance size
- from t2.nano - 0.5G of RAM, 1 vCPU
- To: u-12tb 1.metal - 12.3 TB of RAM, 448 vCPUs
- Horizontal Scaling: Increasing number of instance
- Auto Scaling Group
- Load Balancer
- High Availability: Run instance for same application across multiple AZ
Elastic Load Balancer (ELB)
Intro
- Load Balances are servers that forward traffic to multiple servers (e.g. EC2 instances) downstream.
- In the diagram below, none of these users know internally which EC2 instance they are connected to. ELB gives one endpoint of connectivity only.

Why use an ELB
- Spread load across multiple downstream instances
- Expose a single point of access (DNS) to your application
- Seamlessly handle failures of downstream instances (if an instance is down, ELB can route the traffic to another instance)
- Do regular health checks to your instances
- Provide SSL termination (HTTPS) for your websites
- Enforce stickiness with cookies
- High availability across zones
- Separate public traffic from private traffic
- It is integrated with many AWS offerings / services:
- EC2, Auto Scaling Groups, Amazon ECS
- AWS Certificate Manager (ACM), CloudWatch
- Route 53, AWS WAF, AWS Global Accelerator
.png)
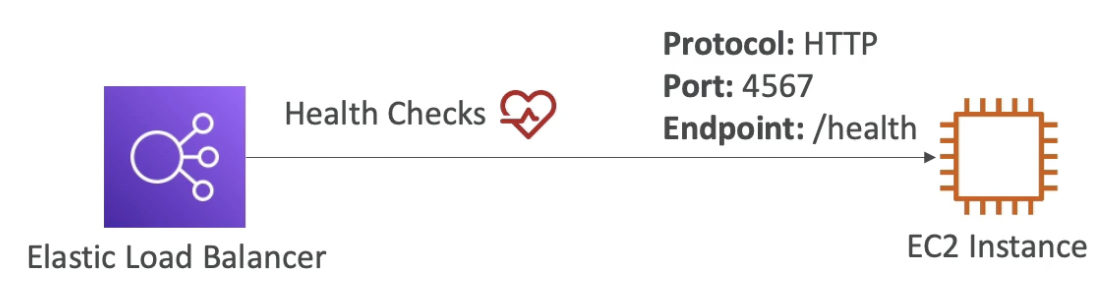
Health Checks
- Health checks allow ELB to know which instances are working properly
- Health Checks are crucial for Load Balancers
- The health check is done on a port and a route (
/healthis common)
- If the response is not 200 (OK), then the instance is unhealthy and ELB will send the incoming traffic to another instance.
Types of Load Balancers
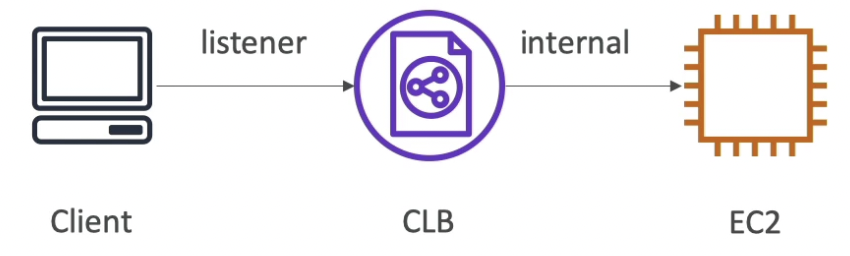
Classic Load Balancer (CLB) (deprecated)
- Theory
- v1 - old generation (started in 2009)
- Provides load balancing to a single application
- Supports HTTP, HTTPS (layer 7) & TCP, SSL (secure TCP) (layer 3)
- Health checks are HTTP or TCP based
- Provides a fixed hostname (xxx.region.elb.amazonaws.com) where we can send traffic
Untitled
- Create a CLB and attach multiple EC2 instances to it
- Create a CLB with a security group to allow HTTP traffic from anywhere: EC2 → Load Balancers → Create load balancer → CLB
- Create a security group to only allow HTTP traffic from CLB’s security group
- Create multiple EC2 instances (with a server running on each of them)
- Attach EC2 instances to CLB: Select CLB → Edit instances
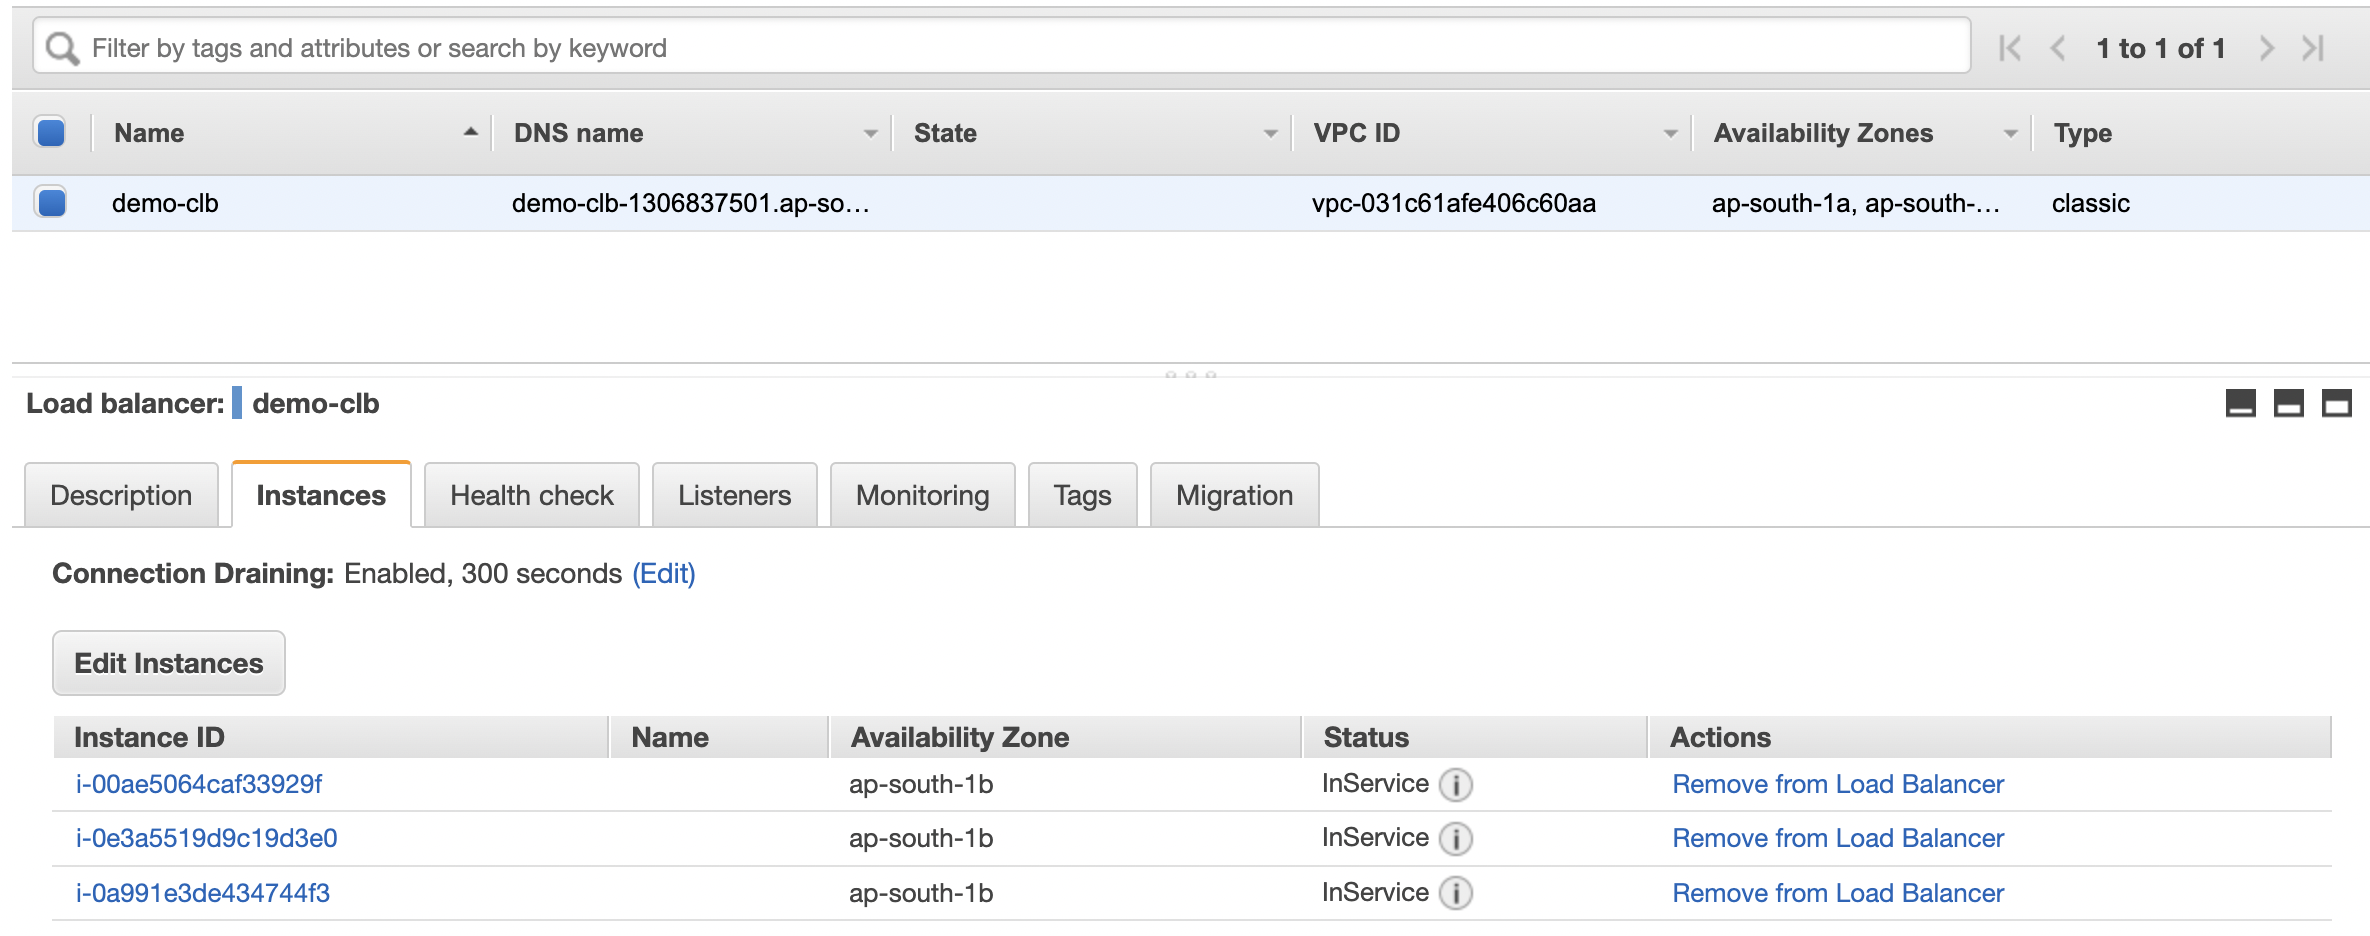
Untitled
Wait for the instance status to become InService. After this, you can use the DNS (URL) provided by the CLB to access the webpage.
- Theory
Application Load Balancer (ALB)
Theory
Intro
- v2 - new generation (started in 2016)
- Supports only Layer 7 (HTTP, HTTPS and WebSocket)
- Supports load balancing to multiple HTTP applications across machines using target groups
- Supports load balancing to multiple applications on the same machine (eg. containers)
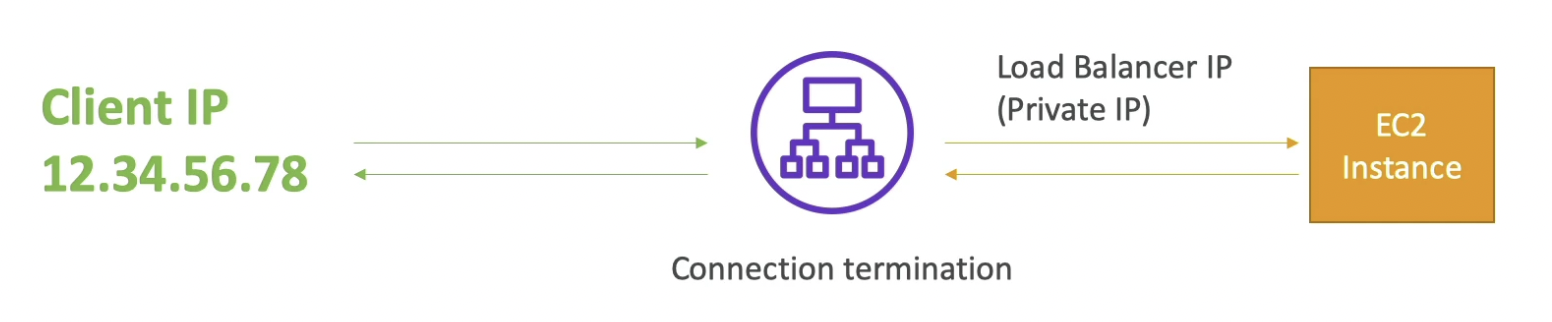
- ALB terminates the original connection and creates a new connection to the EC2 instance
- Support redirects (from HTTP to HTTPS for example)
- Supports both internal and external traffic
- ALBs are a great fit for micro services & container-based application (eg. Docker & Amazon ECS)
- Has a port mapping feature to redirect to a dynamic port in ECS
- In case of CLB, we’d need one CLB per application whereas one ALB can balance the load on multiple applications.
- ALB also provides a fixed hostname (XXX.region.elb.amazonaws.com)
- The application servers don’t see the IP of the client (external user making the request) directly
- The true IP of the client is inserted in the header X-Forwarded-For
- We can also get Port (X-Forwarded-Port) and protocol (X-Forwarded-Proto)
Target Groups
- Target groups could be:
- EC2 instances (can be managed by an Auto Scaling Group) - HTTP
- ECS tasks (managed by ECS itself) - HTTP
- Lambda functions - HTTP request is translated into a JSON event
- IP Addresses (must be private IPs)
- Traffic can be routed to different target groups based on:
- Path in URL (example.com/users & example.com/posts)
- Hostname In URL (one.example.com & other.example.com)
- Query String (example.com/users?id=123&order=false)
- Request Headers
- Source IP address
- Health checks are done at the target group level
- Target groups could be:
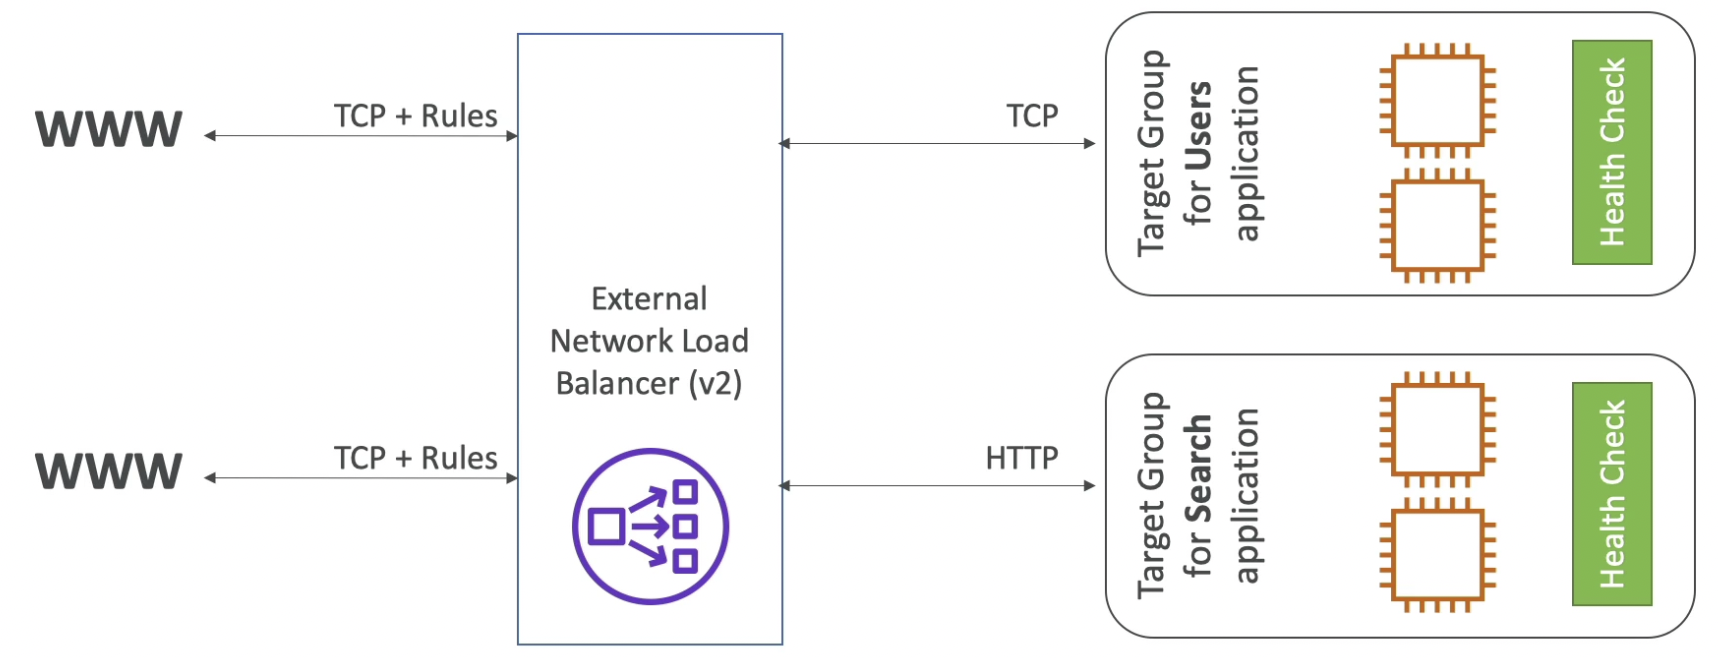
ALB (path routing)
In the diagram below, we have two micro services:
/userand/search. Both of these services are balanced by a single ALB. Both the services are kept under separate target groups. The ALB determines which target group to balance for using the URL path in the incoming request.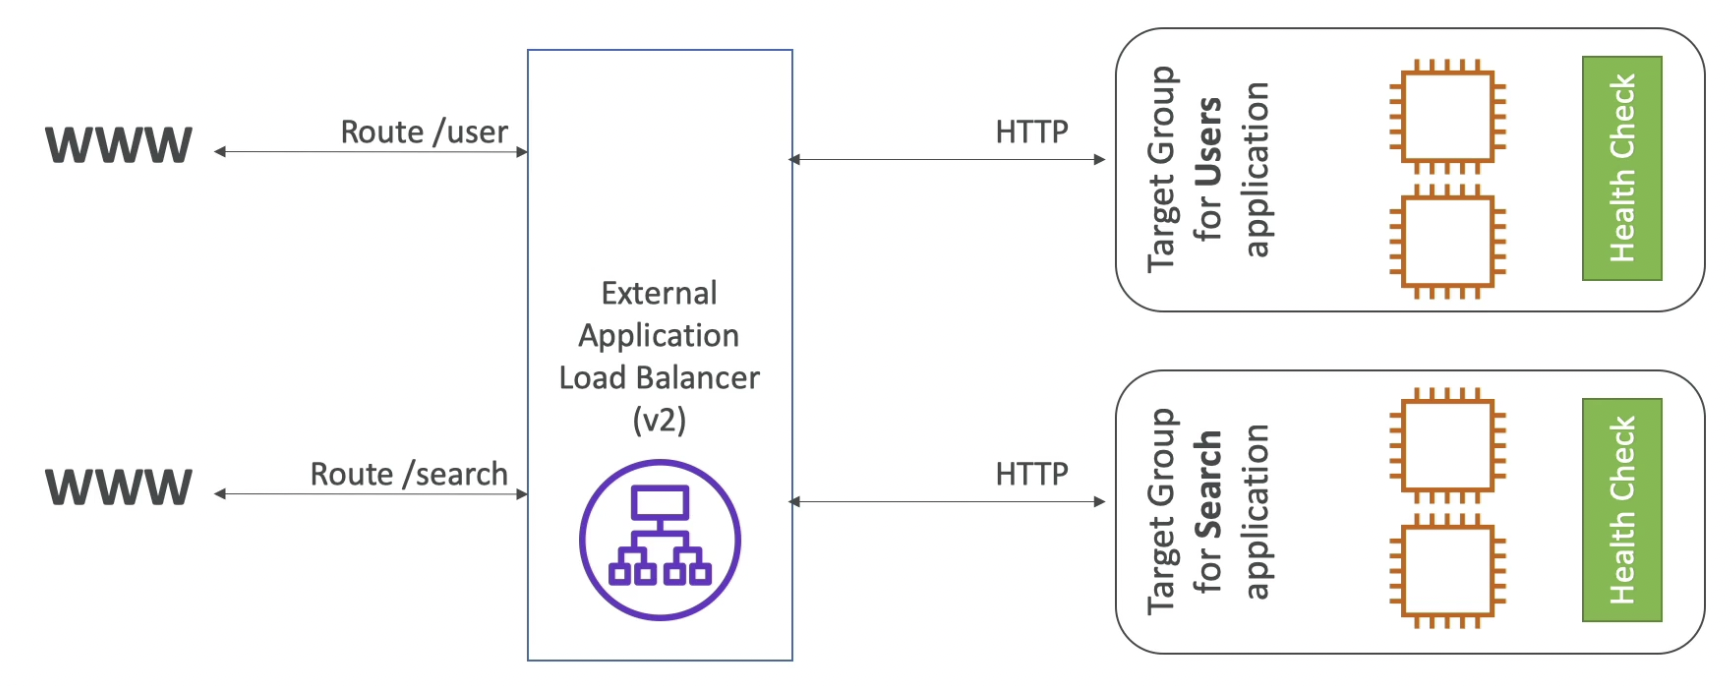
Untitled
ALB (query string parameter routing)
We can balance loads for two different target groups based on some query string parameters.

Untitled
Hands on
- Create an ALB and attach EC2 instances to it
EC2 → Load Balancers → Create → ALB
EC2 instances will have to be added to target groups which can be created during the ALB creation.
Sample summary for reference.

Untitled
We can also create additional target groups later and add them by editing the rules of the listener on the ALB.
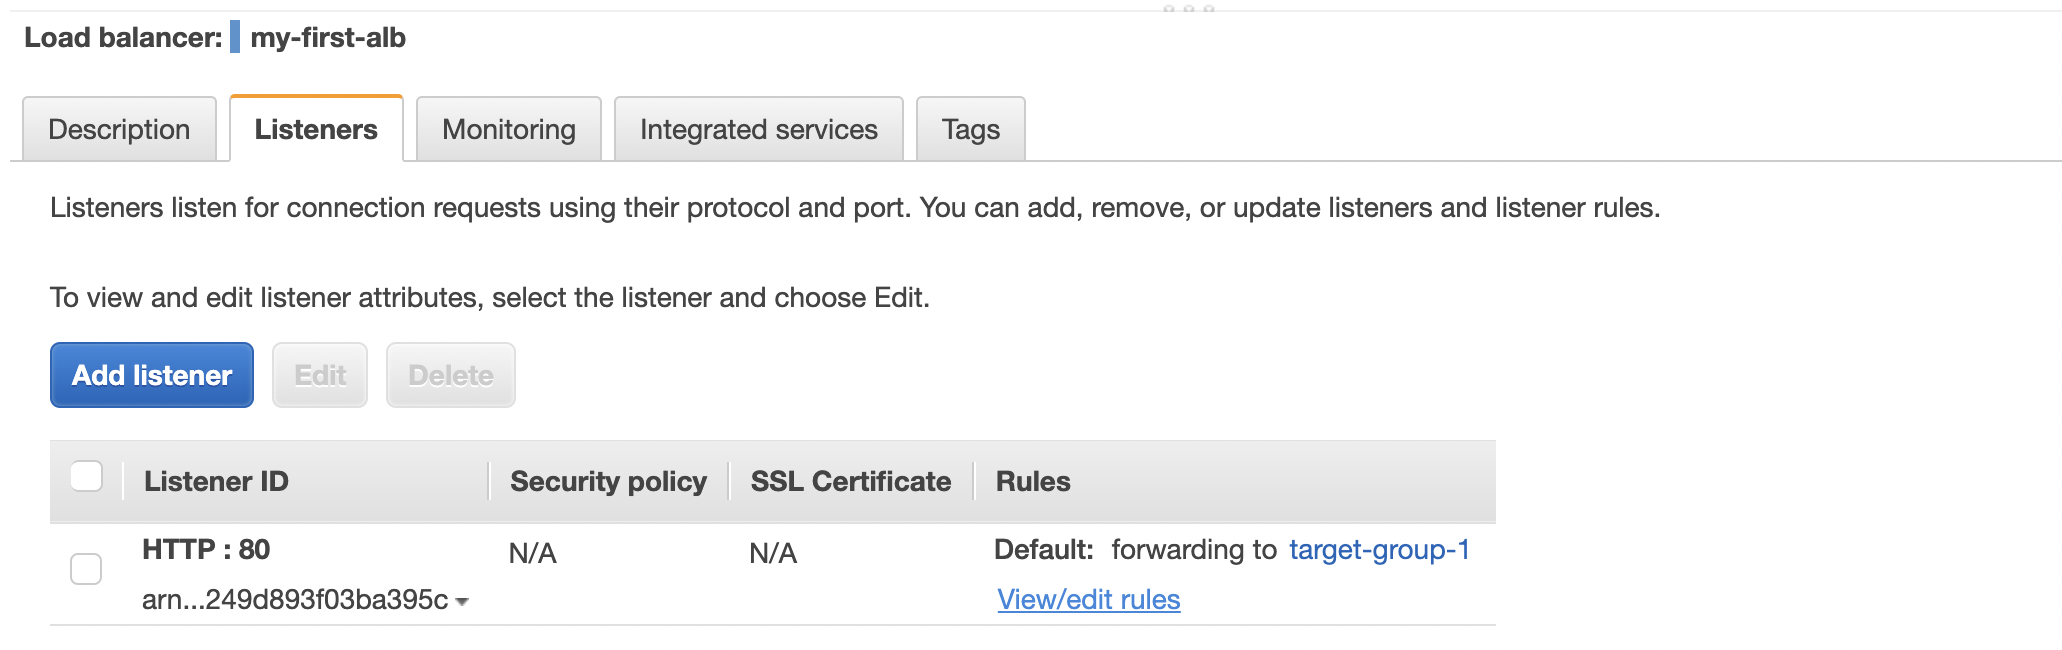
Untitled
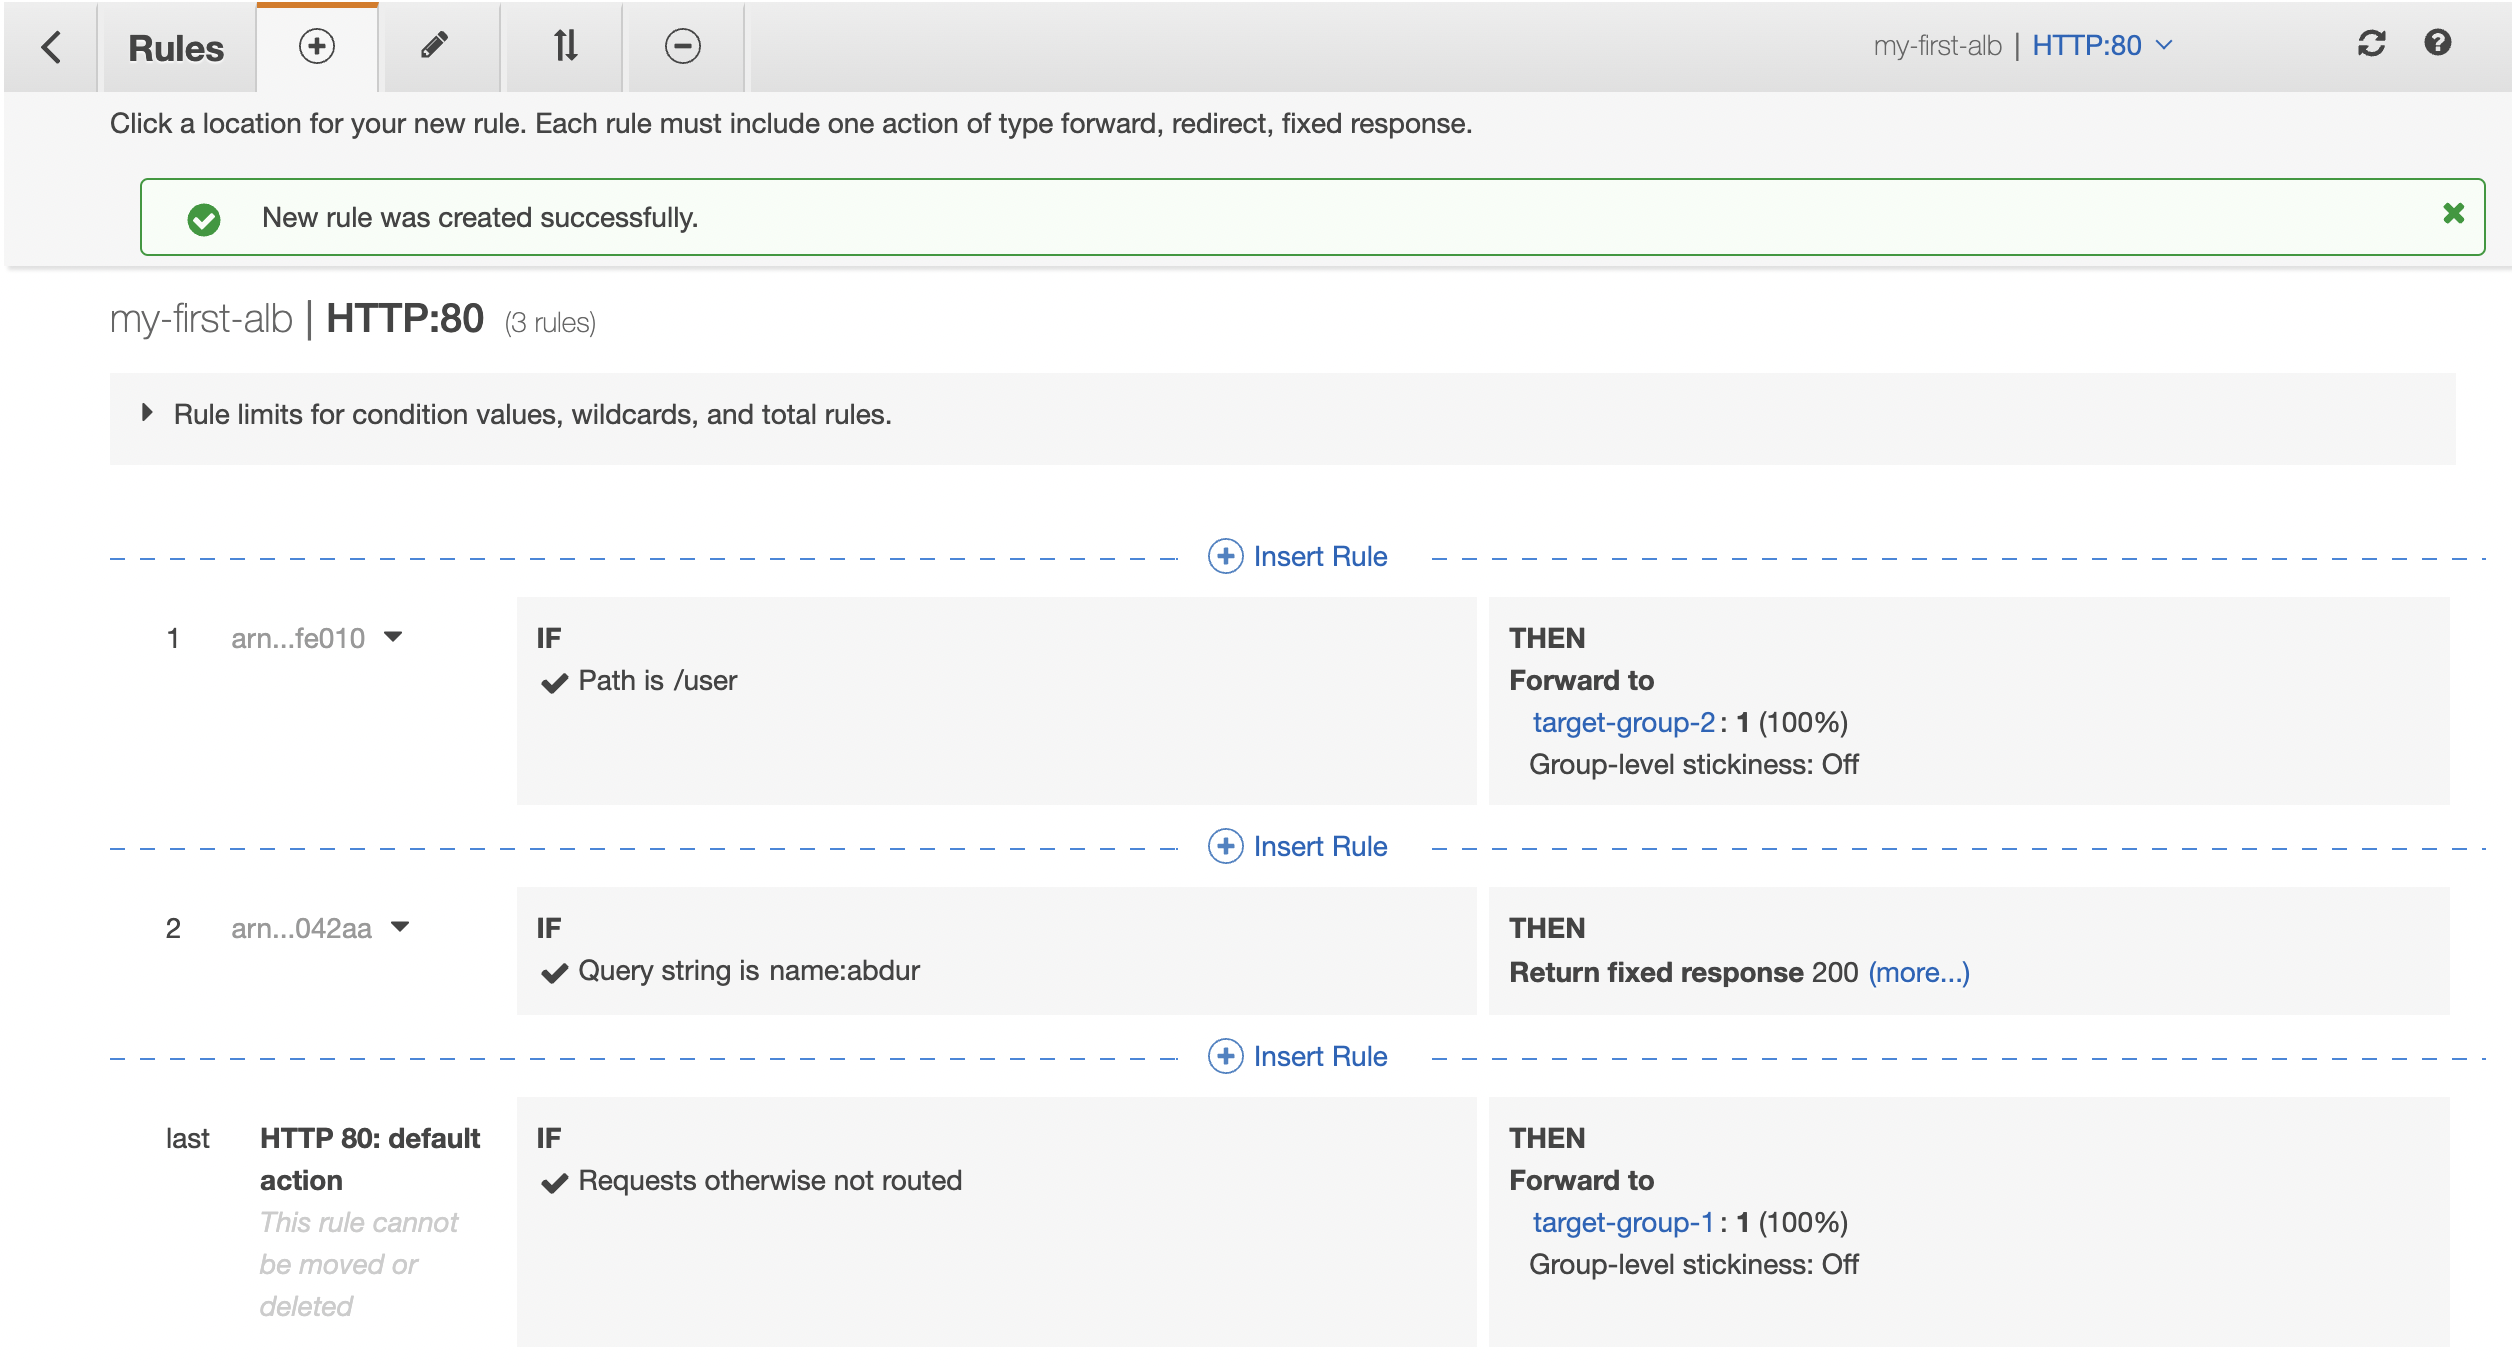
- Edit listener rules
We can add rules to direct traffic to different target groups based on the IP, path, hostname, query string parameter etc. We can also return fixed response if required.
Untitled
- Create an ALB and attach EC2 instances to it
Network Load Balancer (NLB)
Theory
Intro
- v2 - new generation (started in 2017)
- Supports Transport Layer (layer 4) traffic (TCP, TLS (secure TCP), UDP)
- Forward TCP & UDP traffic to your instances
- Can handle millions of request per seconds (extreme performance)
- Less latency ~ 100 ms (vs 400 ms for ALB)
- NLB has one static IP per AZ (vs a static hostname for CLB & ALB)
- Maintains the same connection from client all the way to the instance
- No security groups can be attached to NLBs. So, the attached instances must allow TCP traffic on port 80 (HTTP) from anywhere (as if no ELB is attached).
- Supports assigning Elastic IP (helpful for whitelisting specific IP)
- Not included in the AWS free tier
- We can configure rules to direct traffic to different target groups
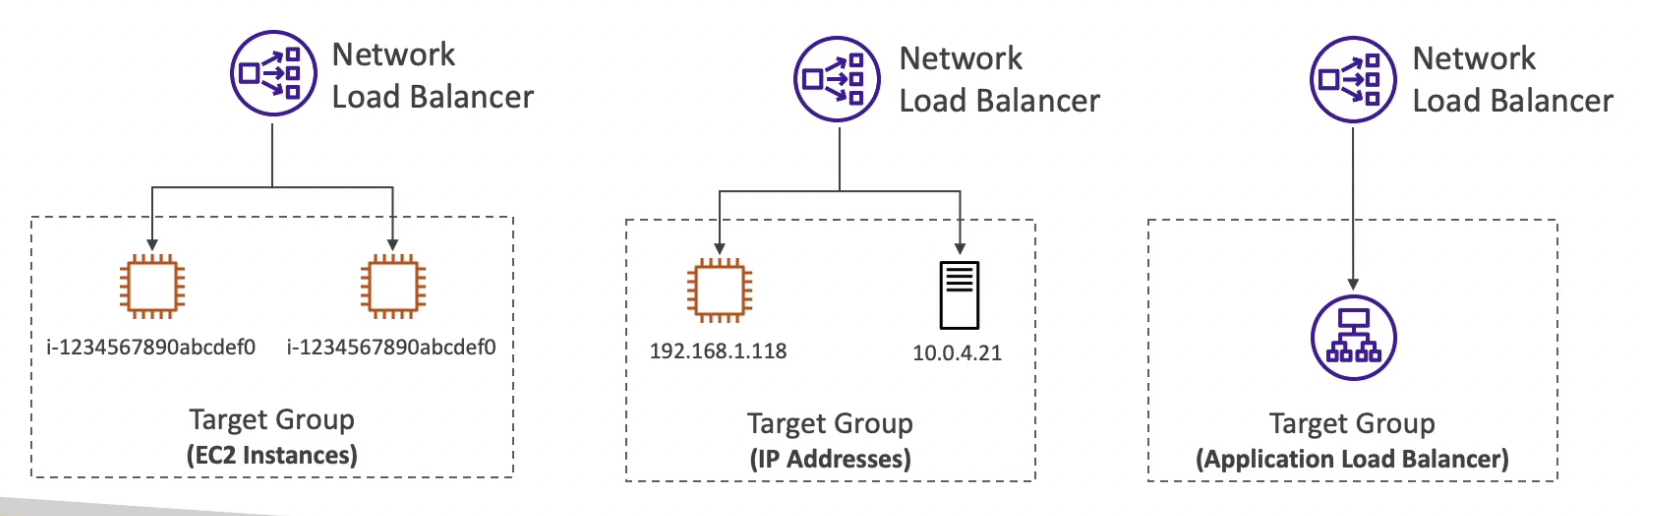
Target Groups
Within a target group, NLB can send traffic based on
- EC2 instances
- IP addresses
- Used when you want to balance load for a physical server having a static IP.
- Application Load Balancer (ALB)
- This setup is used when you want a static IP provided by a NLB but also want to use the features provided by ALB at the application layer.
Create a NLB and attach EC2 instances to it
EC2 → Load Balancers → Create → NLB
Separate target groups (that work on TCP) must be created for NLBs. Target groups created for ALB will not work with NLBs.
⛔ No security groups are attached to NLBs. They just forward the incoming traffic to the right target group as if those requests were directly coming from client. So, the attached instances must allow TCP traffic on port 80 from anywhere.
Gateway Load Balancer (GWLB)
Intro
- Newest (started in 2020)
- Operates at layer 3 (Network layer) - IP Protocol
- Used to deploy, scale, and manage a fleet of 3rd party network virtual appliances in AWS. Example: Firewalls, Intrusion Detection and Prevention Systems (IDPS), Deep Packet Inspection Systems, payload manipulation, etc.
- Performs two functions:
- Transparent Network Gateway (single entry/exit for all traffic)
- Load Balancer (distributes traffic to your virtual appliances)
- Uses the GENEVE protocol on port 6081
- In the diagram below, all of the external traffic is first sent to a fleet of EC2 instances to perform security check on the traffic. If the request passes the security check, it is then routed to the application.
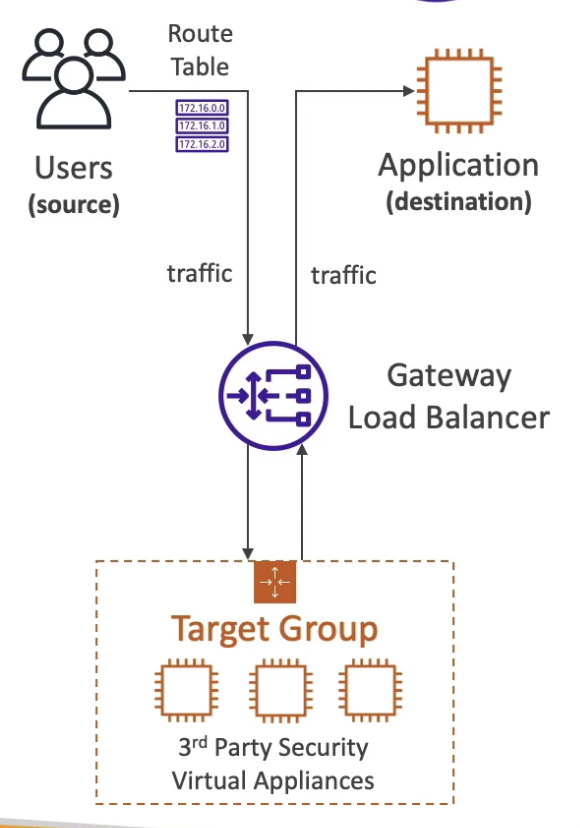
Untitled
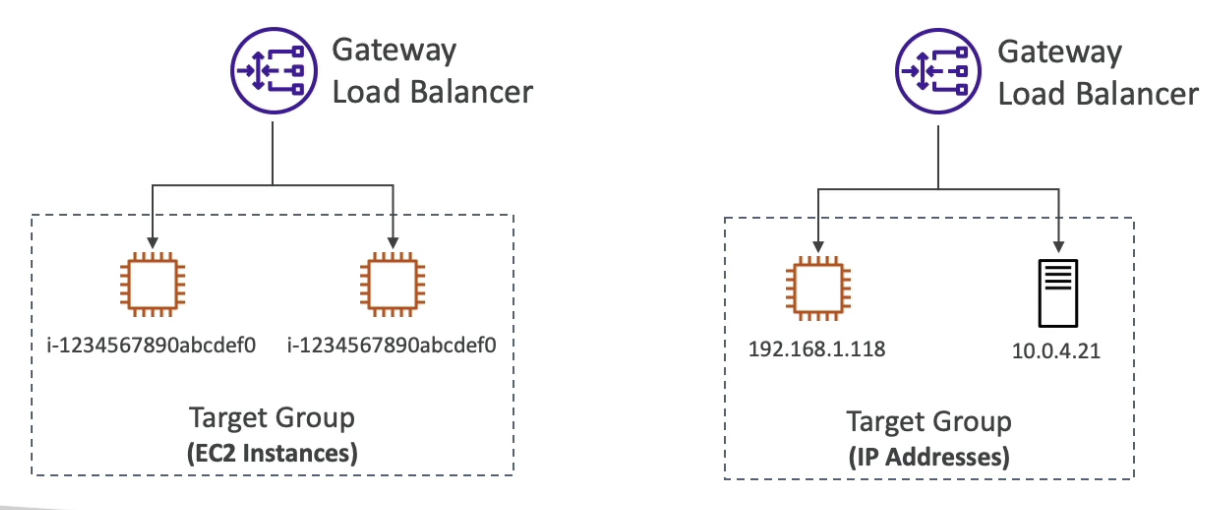
Target Groups
Target groups for GWLB will be the external appliances. They could be:
- EC2 instances
- IP addresses
Overall, it is recommended to use the newer generation load balancers as they provide more features.
Some load balancers can be setup as internal (private), balancing load within the VPC, or external (public), balancing load coming from outside the VPC like website.
Security groups for ELB
ELB will be publicly available on the internet, so it’s security group should allow HTTP and HTTPS traffic from anywhere.
EC2 should only allow traffic from the ELB, so the it’s security group should allow HTTP requests from ELB’s security group.

Classic Load Balancer (CLB) (deprecated)
Theory
- v1 - old generation (started in 2009)
- Provides load balancing to a single application
- Supports HTTP, HTTPS (layer 7) & TCP, SSL (secure TCP) (layer 4)
- Health checks are HTTP or TCP based
- Provides a fixed hostname (xxx.region.elb.amazonaws.com) where we can send traffic
Hands On
- Create a CLB and attach multiple EC2 instances to it
- Create a CLB with a security group to allow HTTP traffic from anywhere: EC2 → Load Balancers → Create load balancer → CLB
- Create a security group to only allow HTTP traffic from CLB’s security group
- Create multiple EC2 instances (with a server running on each of them)
- Attach EC2 instances to CLB: Select CLB → Edit instances
Wait for the instance status to become InService. After this, you can use the DNS (URL) provided by the CLB to access the webpage.
- Create a CLB and attach multiple EC2 instances to it
Application Load Balancer (ALB)
Theory
Intro
- v2 - new generation (started in 2016)
- Supports only Layer 7 (HTTP, HTTPS and WebSocket)
- Supports load balancing to multiple HTTP applications across machines using target groups
- Supports load balancing to multiple applications on the same machine (eg. containers)
- ALB terminates the original connection and creates a new connection to the EC2 instance
- Support redirects (from HTTP to HTTPS for example)
- Supports both internal and external traffic
.png)
- ALBs are a great fit for micro services & container-based application (eg. Docker & Amazon ECS)
- Has a port mapping feature to redirect to a dynamic port in ECS
- In case of CLB, we’d need one CLB per application whereas one ALB can balance the load on multiple applications.
- ALB also provides a fixed hostname (XXX.region.elb.amazonaws.com) like CLB
- The application servers don’t see the IP of the client (external user making the request) directly
- The true IP of the client is inserted in the header X-Forwarded-For
- We can also get Port (X-Forwarded-Port) and protocol (X-Forwarded-Proto)
Target Groups
- Target groups could be:
- EC2 instances (can be managed by an Auto Scaling Group) - HTTP
- ECS tasks (managed by ECS itself) - HTTP
- Lambda functions - HTTP request is translated into a JSON event
- IP Addresses (must be private IPs)
- ALB can route to multiple target groups
- Traffic can be routed to different target groups based on:
- Path in URL (example.com/users & example.com/posts)
- Hostname In URL (one.example.com & other.example.com)
- Query String (example.com/users?id=123&order=false)
- Request Headers
- Source IP address
- Health checks are done at the target group level
- Target groups could be:
ALB (path routing)
In the diagram below, we have two micro services:
/userand/search. Both of these services are balanced by a single ALB. Both the services are kept under separate target groups. The ALB determines which target group to balance for using the URL path in the incoming request.
ALB (query string parameter routing)
We can balance loads for two different target groups based on some query string parameters.
Hands on
- Create an ALB and attach EC2 instances to it
EC2 → Load Balancers → Create → ALB
EC2 instances will have to be added to target groups which can be created during the ALB creation.
Sample summary for reference.
We can also create additional target groups later and add them by editing the rules of the listener on the ALB.
- Edit listener rules
We can add rules to direct traffic to different target groups based on the IP, path, hostname, query string parameter etc. We can also return fixed response if required.
- Create an ALB and attach EC2 instances to it
Network Load Balancer (NLB)
Theory
Intro
- v2 - new generation (started in 2017)
- Supports Transport Layer (layer 4) traffic (TCP, TLS (secure TCP), UDP)
- Forward TCP & UDP traffic to your instances
- Can handle millions of request per seconds (extreme performance)
- Less latency ~ 100 ms (vs 400 ms for ALB)
- NLB has one static IP per AZ (vs a static hostname for CLB & ALB)
- Maintains the same connection from client all the way to the instance
- No security groups can be attached to NLBs. So, the attached instances must allow TCP traffic on port 80 (HTTP) from anywhere (as if no ELB is attached).
- Supports assigning Elastic IP (helpful for whitelisting specific IP)
- Not included in the AWS free tier
- We can configure rules to direct traffic to different target groups
Target Groups
Within a target group, NLB can send traffic based on
- EC2 instances
- IP addresses- must be private IPs
- Health Checks support the TCP, HTTP, HTTPS Protocols
- Used when you want to balance load for a physical server having a static IP.
- Application Load Balancer (ALB)
- This setup is used when you want a static IP provided by a NLB but also want to use the features provided by ALB at the application layer.
Create a NLB and attach EC2 instances to it
EC2 → Load Balancers → Create → NLB
Separate target groups (that work on TCP) must be created for NLBs. Target groups created for ALB will not work with NLBs.
⛔ No security groups are attached to NLBs. They just forward the incoming traffic to the right target group as if those requests were directly coming from client. So, the attached instances must allow TCP traffic on port 80 from anywhere.
Gateway Load Balancer (GWLB)
Intro
- Newest (started in 2020)
- Operates at layer 3 (Network layer) - IP Protocol
- Used to deploy, scale, and manage a fleet of 3rd party network virtual appliances in AWS. Example: Firewalls, Intrusion Detection and Prevention Systems (IDPS), Deep Packet Inspection Systems, payload manipulation, etc.
- Performs two functions:
- Transparent Network Gateway (single entry/exit for all traffic)
- Load Balancer (distributes traffic to your virtual appliances)
- Uses the GENEVE protocol on port 6081
- In the diagram below, all of the external traffic is first sent to a fleet of EC2 instances to perform security check on the traffic. If the request passes the security check, it is then routed to the application.
Target Groups
Target groups for GWLB will be the external appliances. They could be:
- EC2 instances
- IP addresses - must be private IPs
Sticky Sessions (Session Affinity)
Theory
Intro
It is possible to implement stickiness so that the requests coming from a client is always redirected to the same instance behind the load balancer.
- It only works for CLB & ALB
- Cookie is used for stickiness. This cookie has an expiration date that you can control. After the cookie expires, the requests coming from the same user might be redirected to another instance.
- Use case: to make sure the user doesn’t lose his session data (example login info). If sticky session is not enabled, it will result in the user being prompted to login again and again if they just navigate to a different webpage.
- Enabling stickiness may bring imbalance to the load over the backend EC2 instances
.png)
Cookie types
- Application-based Cookies
- Custom cookie
- Generated by the target (your application)
- Can include any custom attributes required by the application
- Cookie name must be specified individually for each target group
- Don’t use AWSALB, AWSALBAPP, or AWSALBTG (reserved for use by the ELB)
- Duration of the cookie is specified by the application
- Application cookie
- Generated by the load balancer
- Cookie name is AWSALBAPP
- Custom cookie
- Duration-based Cookies
- Generated by the load balancer
- Cookie name is AWSALB for ALB, AWSELB for CLB
- Duration of the cookie is specified by the load balancer
- Application-based Cookies
Hands on
- Enable stickiness
EC2 → Target groups → Select target group → Actions → Edit attributes
We have both Application based and Duration based cookie options. For Application based one, we need to specify the cookie name.

Untitled
- View cookie
Inspect and send the request to the ALB. You can see the cookies being used.

- Enable stickiness
Cross-zone load balancing
Theory
Intro
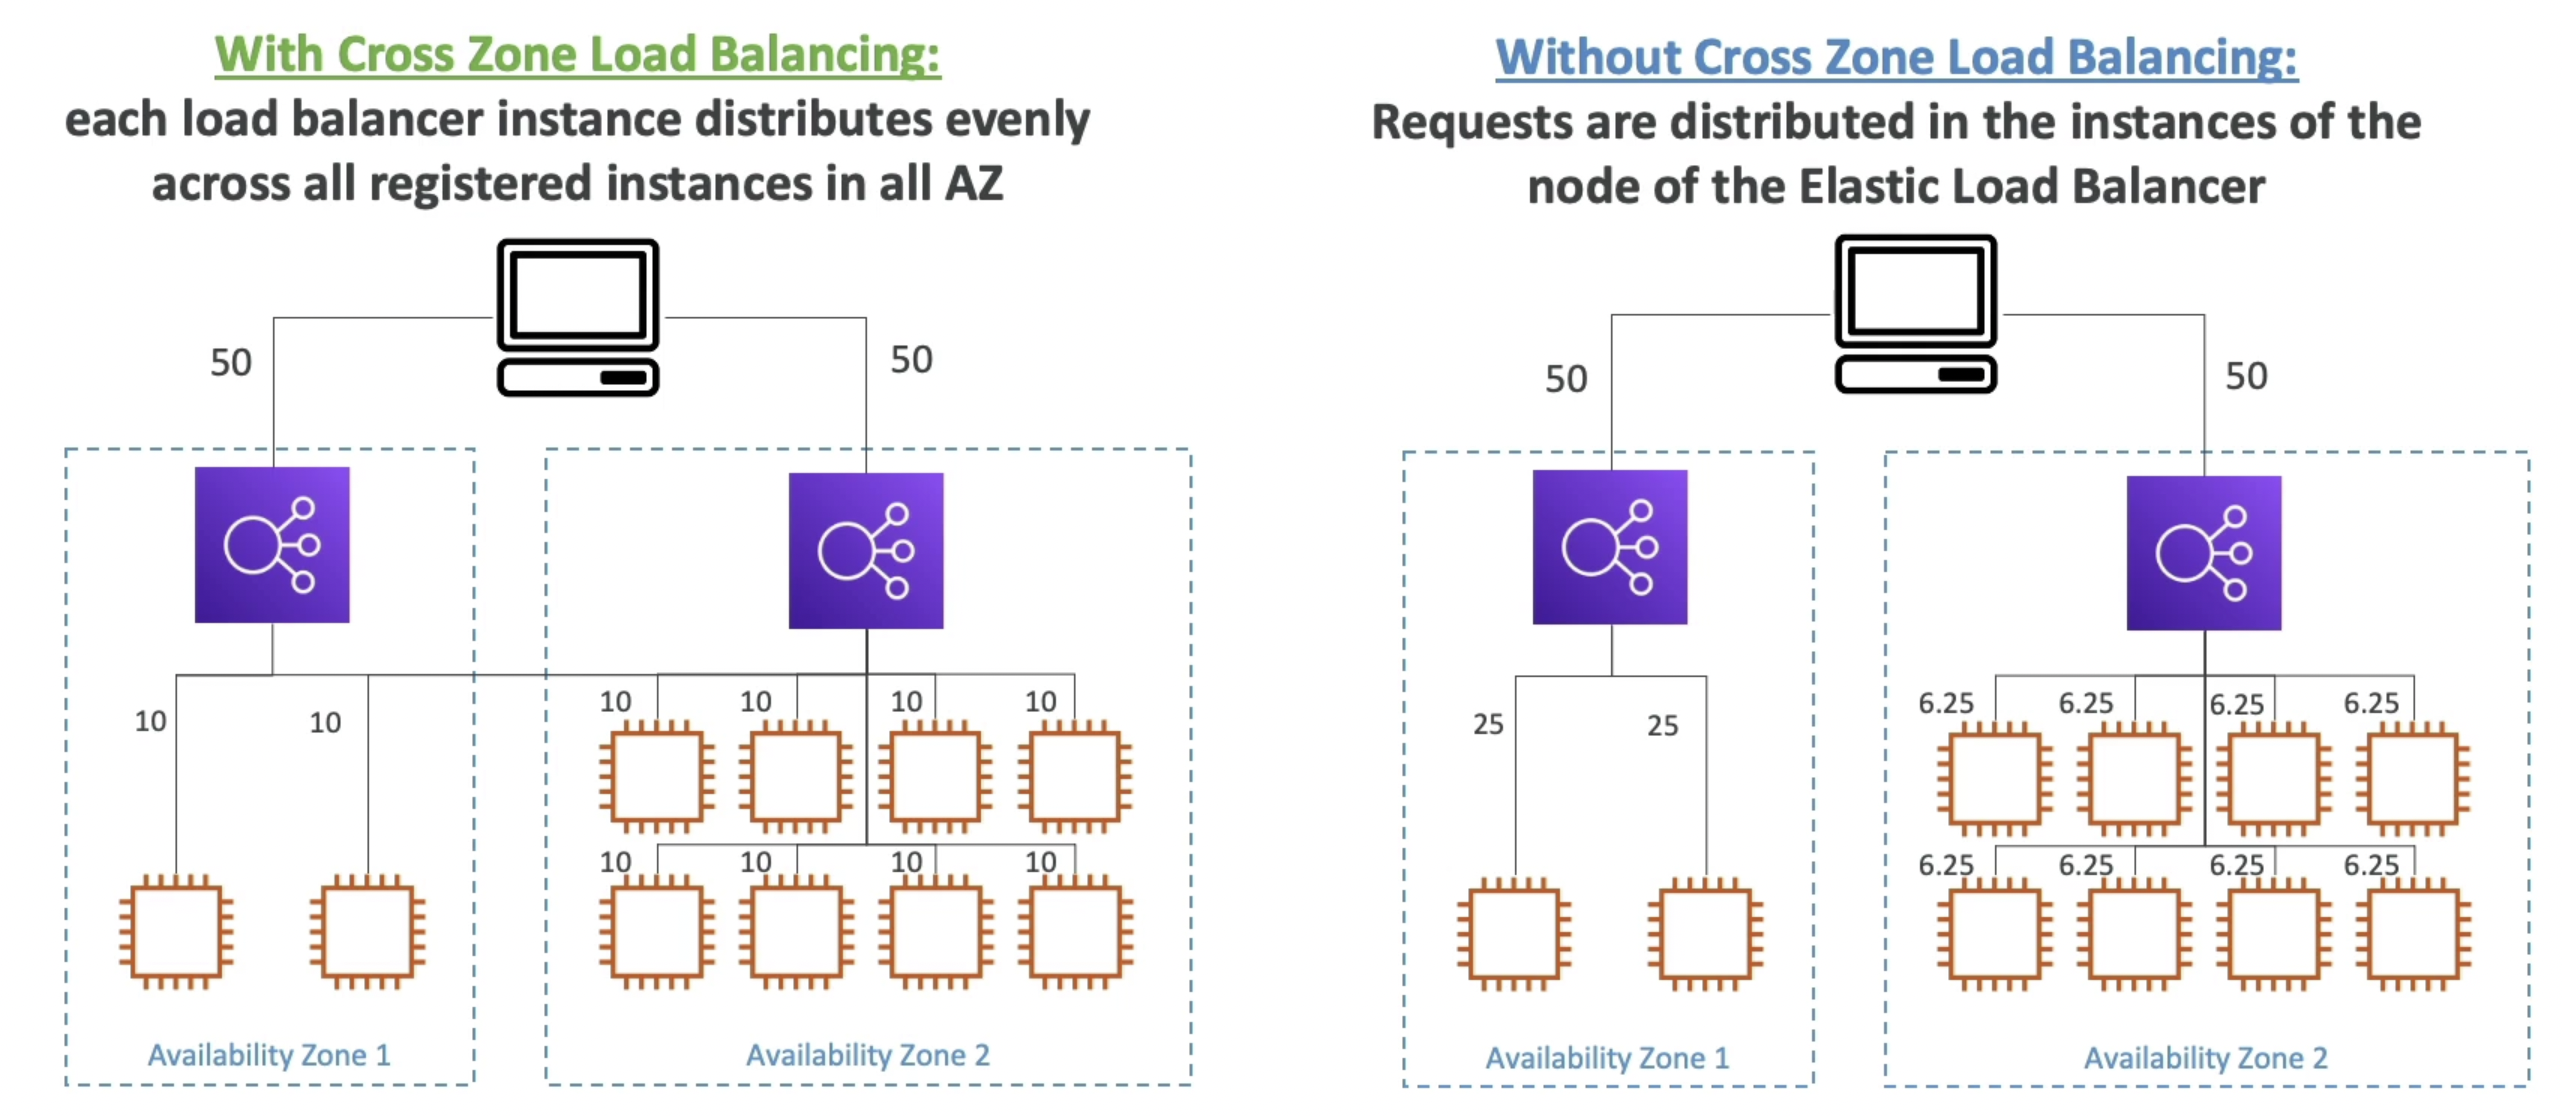
Cross-zone load balancing allows ELBs in different AZs containing unbalanced number of instances to distribute the traffic evenly across all instances in all the AZs registered under a load balancer. A load balancer created for multiple AZs has different ELB instances for each AZ, even though they are part of a single load balancer.
In the diagram below, the client is sending 50% of the traffic to either load balancer. In case of cross-zone load balancing, the traffic coming through any of the load balancer is equally distributed across all instances registered under the load balancer. Without cross-zone load balancing, each load balancer distributes traffic within its AZ.
Supported load balancers
- Classic Load Balancer
- Disabled by default
- No charges for inter AZ data if enabled
- Application Load Balancer
- Always on (can’t be disabled)
- No charges for inter AZ data
- Network Load Balancer
- Disabled by default
- You pay charges for inter AZ data if enabled
- Classic Load Balancer
Enable cross-zone load balancing
EC2 → Load Balancers (CLB/NLB) → Select load balancer → Activate cross-zone load balancing in the attributes
ALB is enable by default
SSL / TLS Certificates
Intro
- An SSL Certificate allows traffic between your clients and your load balancer to be encrypted in transit (in-flight encryption)
- SSL refers to Secure Sockets Layer and it is used to encrypt connections
- TLS refers to Transport Layer Security (newer version). Nowadays, TLS certificates are mainly used, but people still refer to them as SSL
- SSL certificates have an expiration date (you set) and must be renewed regularly to make sure they are authentic.
- Public SSL certificates are issued by Certificate Authorities (CA) like Comodo, Symantec, GoDaddy, GlobalSign, Digicert, Letsencrypt, etc.
HTTPS encryption using SSL certificates
User to load balancer communication happens over HTTPS which is in-flight encrypted. Load balancer to EC2 instance communication happens over HTTP inside the VPC which is secure.

- The load balancer uses an X.509 certificate (SSL/TLS server certificate)
- You can manage certificates using ACM (AWS Certificate Manager) or you can create and upload your own certificates to ACM.
- When you setup an HTTPS listener:
- You must specify a default certificate
- You can add an optional list of certs to support multiple domains
- Clients can use SNI (Server Name Indication) to specify the hostname they reach
- Ability to a specify a security policy to support older versions of SSL /TLS (legacy clients)
Server Name Indication (SNI)
- SNI allows us to load multiple SSL certificates onto one web server (to serve multiple websites securely)
- It’s a “newer” protocol, and requires the client to indicate the hostname of the target server in the initial SSL handshake. The server will then find the correct certificate to encrypt the traffic, or return the default one.
- Since it is a newer protocol, not every client supports it yet.
- Only works for ALB & NLB. They can load multiple certificates on each listener using SNI. Each certificate will be used for a separate target group.
- SNI is not supported in CLB. CLBs only support one SSL certificate. Need to use multiple CLBs for multiple hostnames in order to use multiple SSL certificates.
- SNI is supported in CloudFront
- In the diagram below, the ALB is routing HTTPS traffic to two target groups, each with a different hostname. So, the ALB needs to have two SSL certificates (one for each target group). SNI allows the ALB to have multiple SSL certificates on one listener and use the right one.
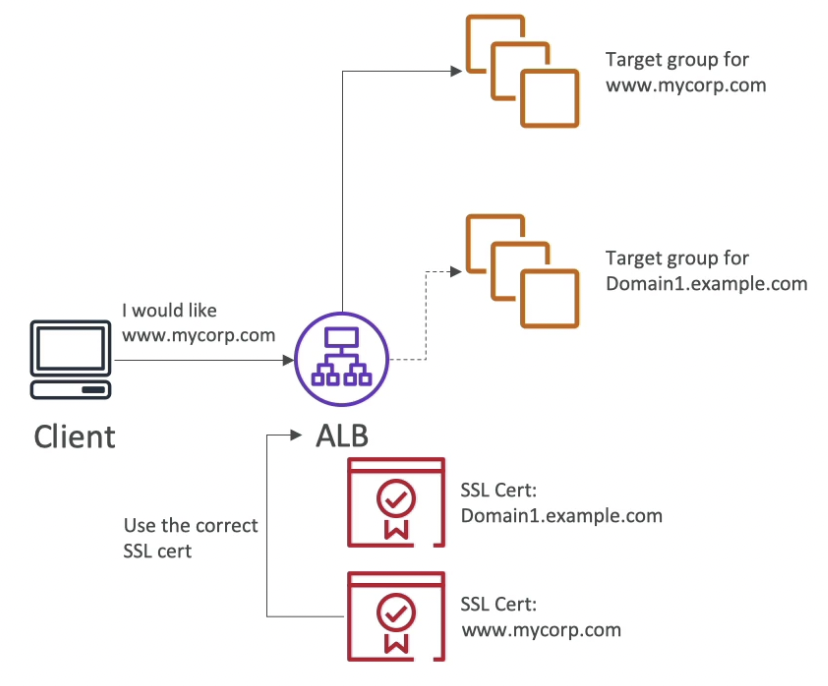
.png)
Steps
Load Balancer → CLB → Listeners → edit → add → HTTPS → Cipher → SSL Certificate from ACM/Upload → Save
Load Balancer → ALB → Add listener → HTTPS → Default Action → Forward to → target ALB grp → Security Policy → Default SSL certificate → ACM/IAM/import → Add
Load Balancer → NLB → Add listener → TLS → Default Action → Forward to → target ALB grp → Security Policy → Default SSL certificate → ACM/IAM/import → Add
Connection Draining / De-registration Delay
- While the instance is de-registering or unhealthy (going offline), the “in-flight requests” being served by that instance are given time to complete before shutting down the instance. The ELB stops sending new requests to the EC2 instance which is de-registering.
- Called as Connection Draining for CLB and De-registration Delay for ALB & NLB
- The de-registration delay can be set manually (between 1 to 3600 seconds) (default: 300 seconds)
- Set to a low value if your requests are short and vice versa
- Can be disabled (set value to 0)

Auto Scaling Groups (ASG)
Theory
Purpose of ASG
In real life load on a website can change. ASG helps us to deal this issue.
- Scale out (add EC2 instances) to match an increased load
- Scale in (remove EC2 instances) to match a decreased load
- Ensure we have a minimum and a maximum number of machines running
- Automatically Register new instances to a load balancer
- Re-Create EC2 instance incase a previous one was terminated (eg: If Unhealthy)
- ASG are free we only pay for the underlying EC2 instances
.png)
.png)
Attributes of ASG
- A Launch Template (what type of instances will be created - older Launch Configurations are deprecated)
- AMI + Instance Type
- EC2 User Data
- EBS Volumes
- Security Groups
- SSH Key Pair
- IAM Roles for your EC2 instances
- Network + Subnets Information
- Load Balancer Information
- Min Size / Max Size / Initial Capacity
- Network + Subnets Information (where the instances will be created)
- Load Balancer Information (specify which ELB to attach instances to)
Scaling Policies (specify what will trigger a scale out or scale in)
.png)
new →
Three type of scaling Policies:
Scheduled Scaling Policies
- Anticipate a scaling based on known usage patterns
- Example: increase the min capacity to 10 at 5 pm on Fridays
Dynamic Scaling Policies
- Target Tracking Scaling
- Most simple and easy to set-up. Just ask the ASG to maintain a metric and scale accordingly. The ASG automatically creates cloudwatch alarms for this to work.
- Example: I want the average ASG CPU to stay at around 40% and let ASG scale accordingly
- Simple / Step Scaling
- Need to setup CloudWatch alarms and specify the actions.
- Example: When CPU > 70%, then add 2 units and when CPU < 30%, then remove 1 unit. CloudWatch alarms will be the trigger points in this case.
- Target Tracking Scaling
Predictive Scaling Policies
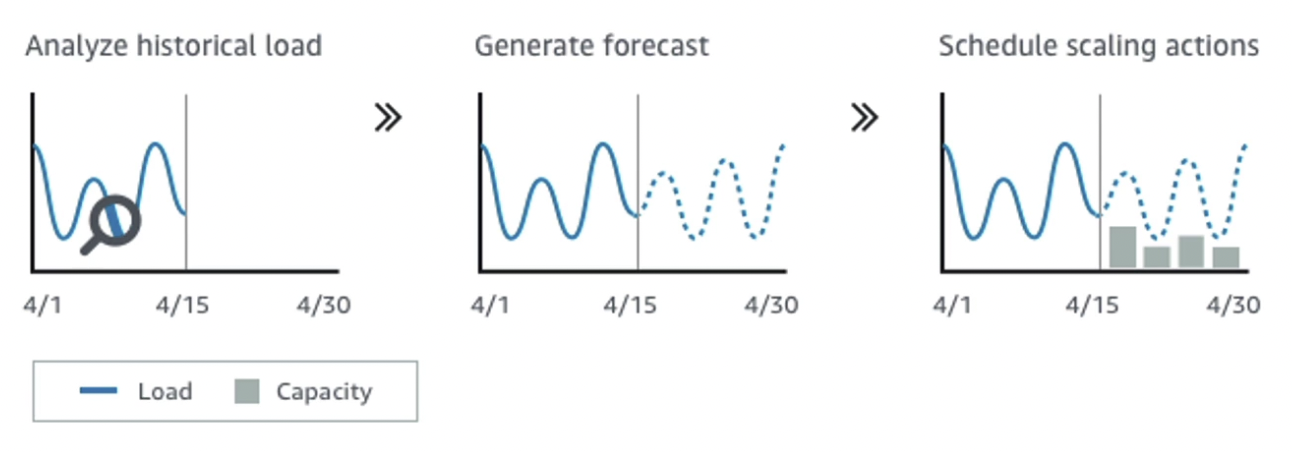
This is a new kind of scaling where the historical data is used to predict the load patterns using ML. We need to specify the metric based on which we want to scale our ASG and it will automatically create a forecast for that metric and scale accordingly.
Untitled
Good metrics to scale on
- CPU Utilization: average CPU utilization across your instances
- RequestCountPerTarget: to make sure the number of requests per EC2 instances is stable
- Average Network In / Out: if you’re application is network bound, meaning it involves a lot of download or upload and the network could become a bottleneck
- Any custom metric (that you push using CloudWatch)
We can auto scale based on a custom metric (ex: number of connected users). To set this up:
- Send custom metric from application on EC2 to CloudWatch using the PutMetric API
- Create CloudWatch alarm to react to low / high values
- Use the CloudWatch alarm as the scaling policy for ASG
- A Launch Template (what type of instances will be created - older Launch Configurations are deprecated)
new →
Important
- ASGs use Launch configurations or Launch Templates which are a newer version of launch configuration.
- To update an ASG, you must provide a new launch configuration / launch template
- IAM roles attached to an ASG will get assigned to EC2 instances
- ASGs are free. You pay for the underlying resources being launched
- Having instances under an ASG means that if they get terminated for whatever reason, the ASG will automatically create new ones as a replacement.
- ASG can terminate instances marked as unhealthy by an ELB (and hence replace them)
Default Termination Policy (simplified)
Select the AZ with the most number of instances. If there are multiple instances in this AZ, delete the one with the oldest launch configuration. By default, ASG prioritizes to balance the number of instances across AZ.
In the diagram below, if an instance has to be dropped, it will be a v1 instance in A.
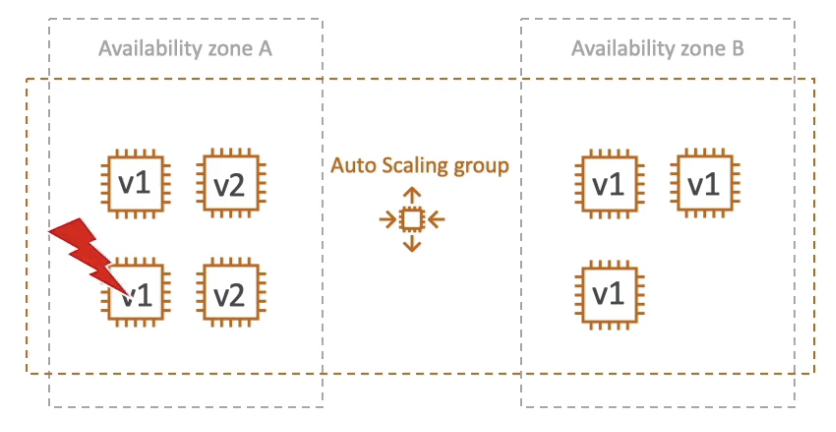
Lifecycle Hooks
It is a feature of ASG which allows us to perform extra steps before creating or terminating an instance. Example: install some extra software or do some checks (during pending state) before declaring the instance as “in service”. Similarly, before the instance is terminated (terminating state), extract the log files.
Without lifecycle hooks, pending and terminating states are avoided.

Untitled
Launch Template vs Launch Configuration
- Both allow us to configure the ID of the AMI, the instance type, a key pair, security groups, and the other parameters that you use to launch EC2 instances (tags, EC2 user-data, etc.)
- Launch Configuration (legacy):
- Must be re-created every time you want to make some changes to the configuration
- Launch Template (newer):
- Can have multiple versions
- Create parameters subsets (partial configuration for re-use and inheritance)
- Provision using both On-Demand and Spot instances (or a mix)
- Can use T2 unlimited burst feature
- Recommended by AWS going forward
Hands on
Create an ASG
EC2 → Auto Scaling Groups → Create ASG
Create a launch template to configure the EC2 instances that ASG will be creating
Choose multiple AZs as ASG can balance the instance creation across all the zones.
Attach a load balancer to the ASG
Enable health checks on both EC2 and ELB level
⛔ Right after creation, the ASG will automatically create EC2 instances based on the scaling policy or desired instances count.
Setup Scaling Policies for ASG
- Navigate to Scaling Policies
Select the ASG → Automatic Scaling (tab)
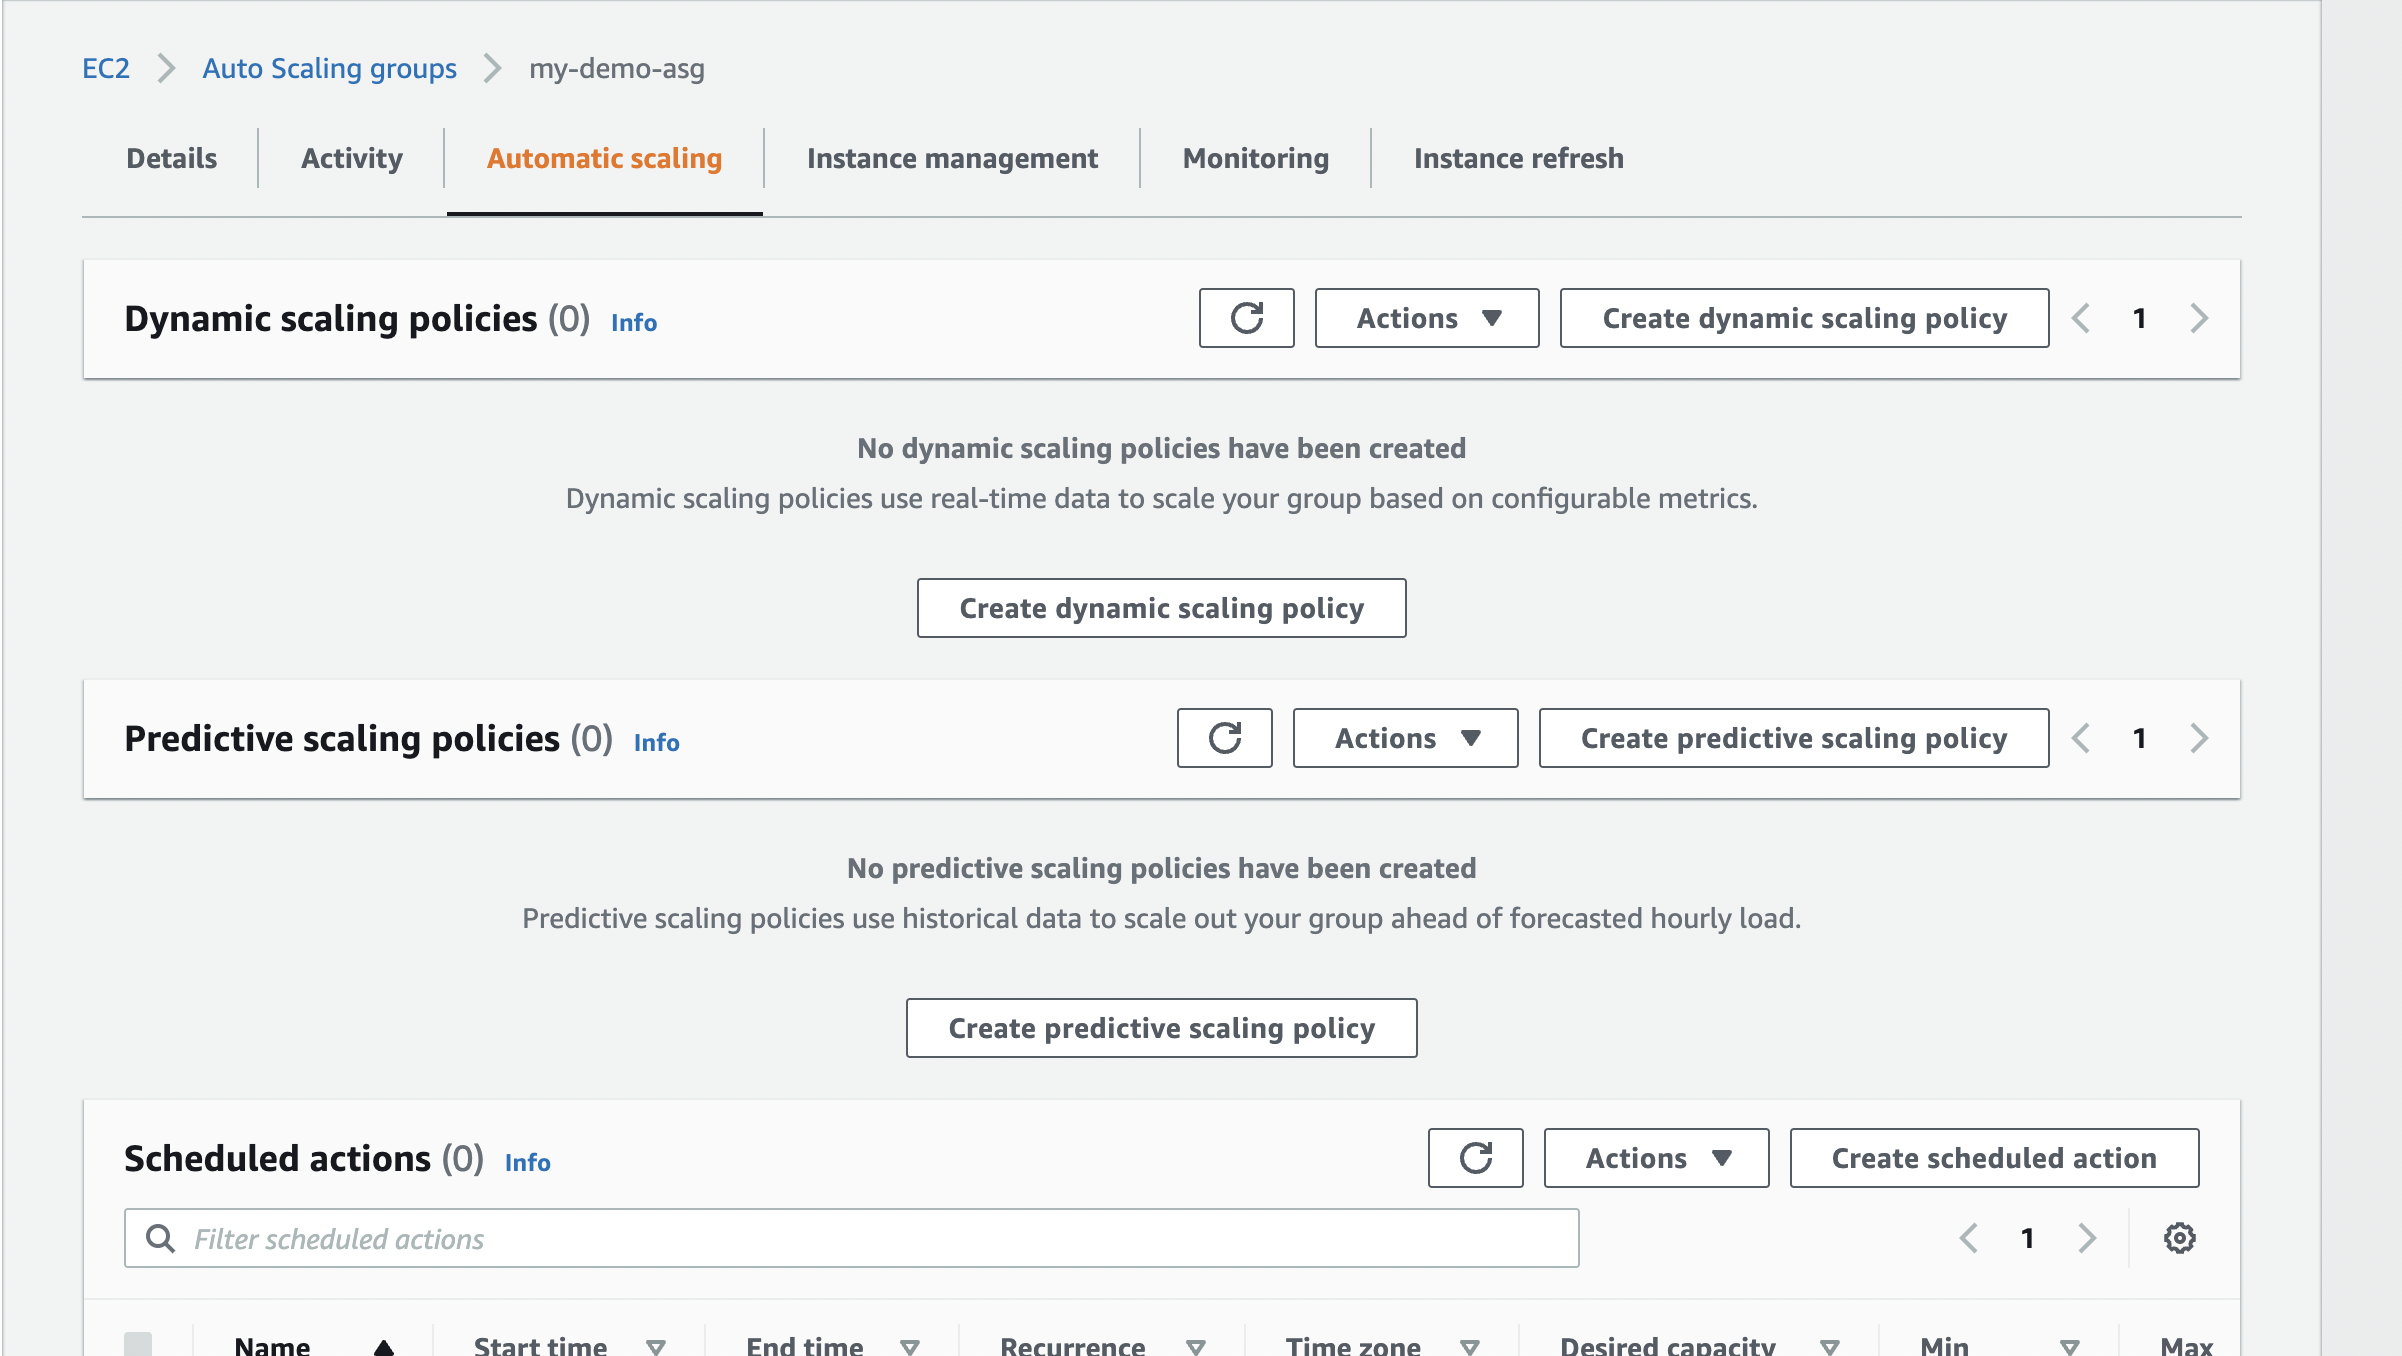
Untitled
- Dynamic Scaling
- Target Scaling
Just specify the metric and target value to maintain. The ASG will scale accordingly by automatically setting up cloudwatch alarms that trigger the scaling action.
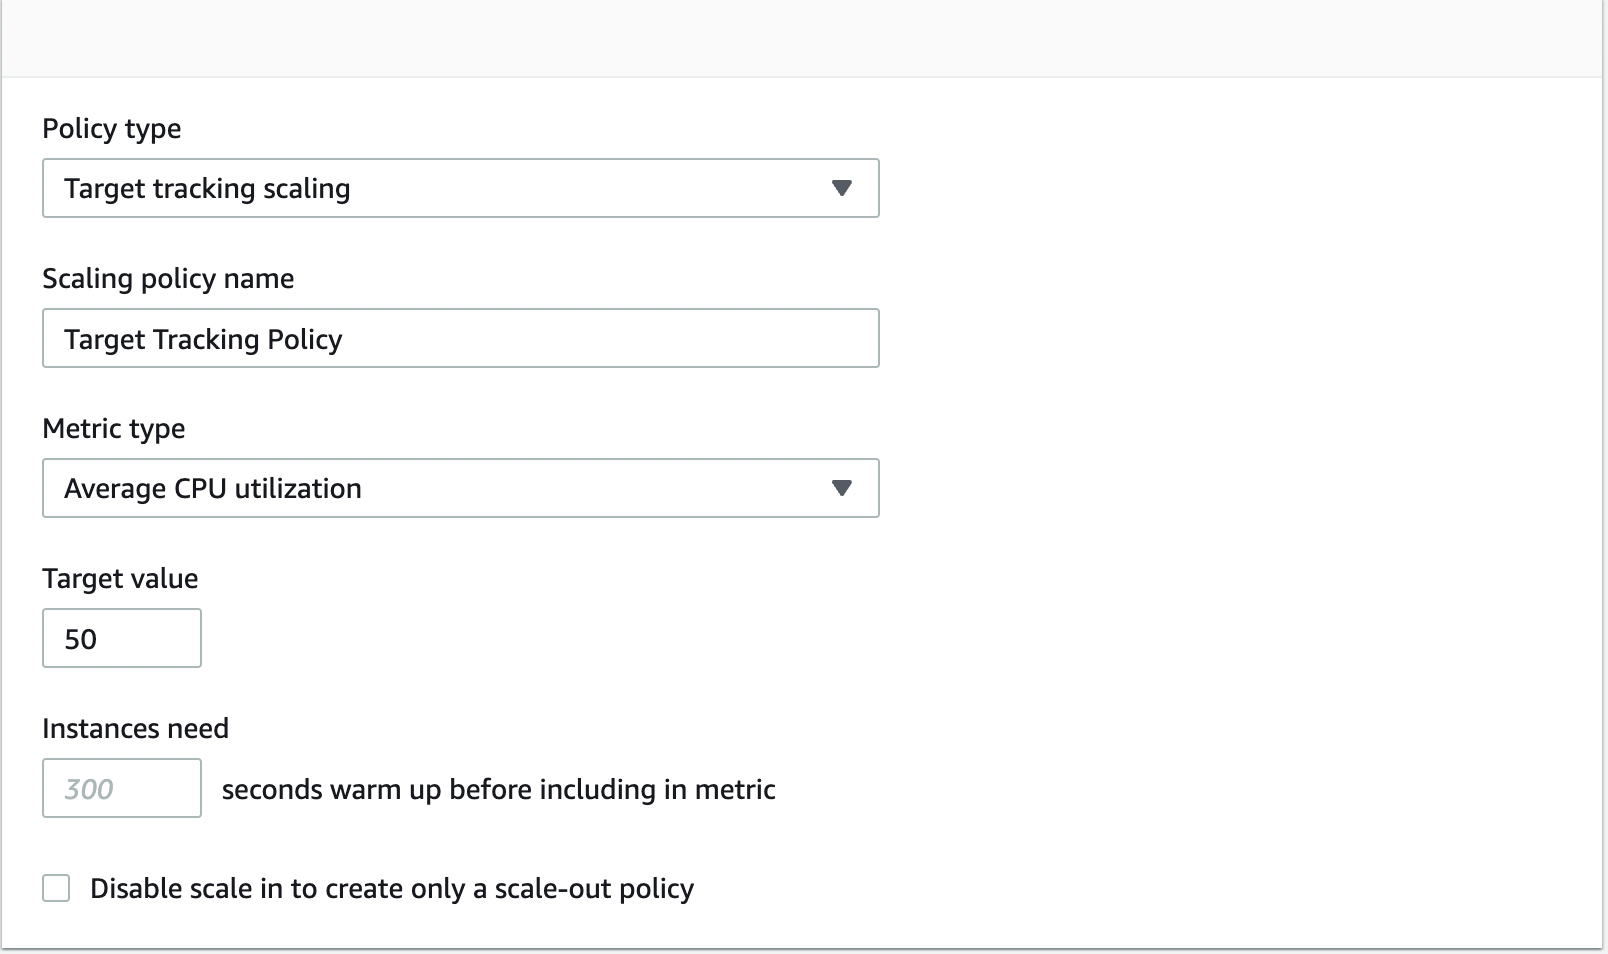
Untitled
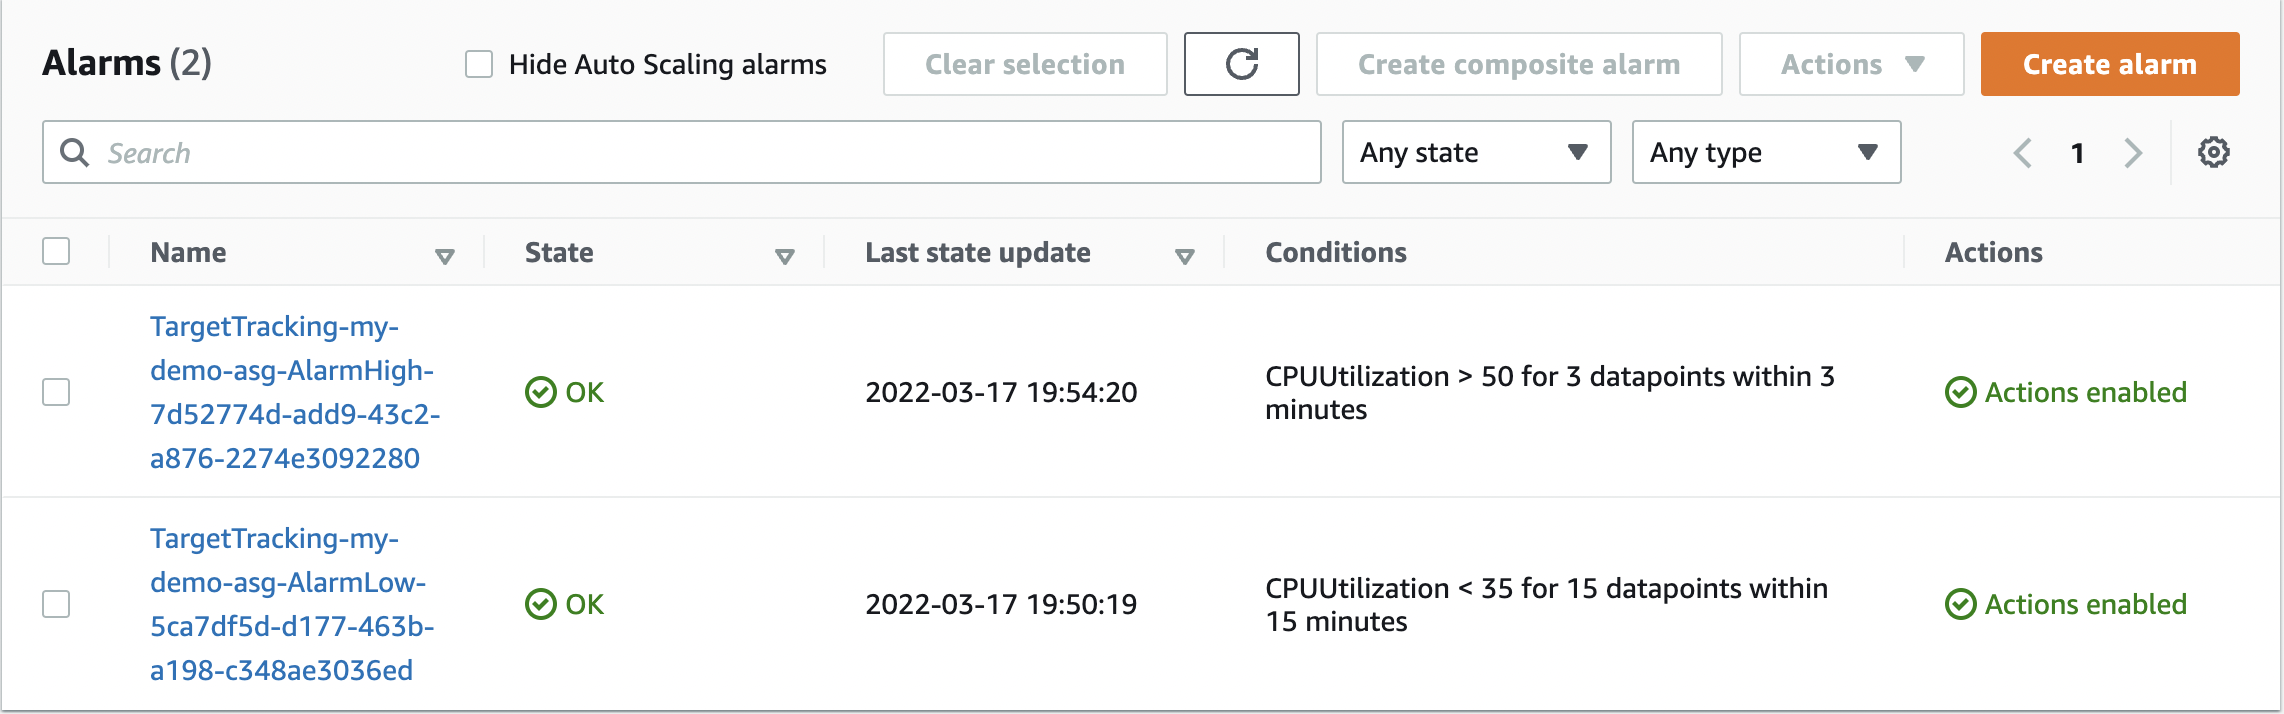
Untitled
- Simple Scaling
Here, we need to specify a CloudWatch alarm and the action.

Untitled
- Step Scaling
Like simple scaling, but we can specify steps to scale gradually.
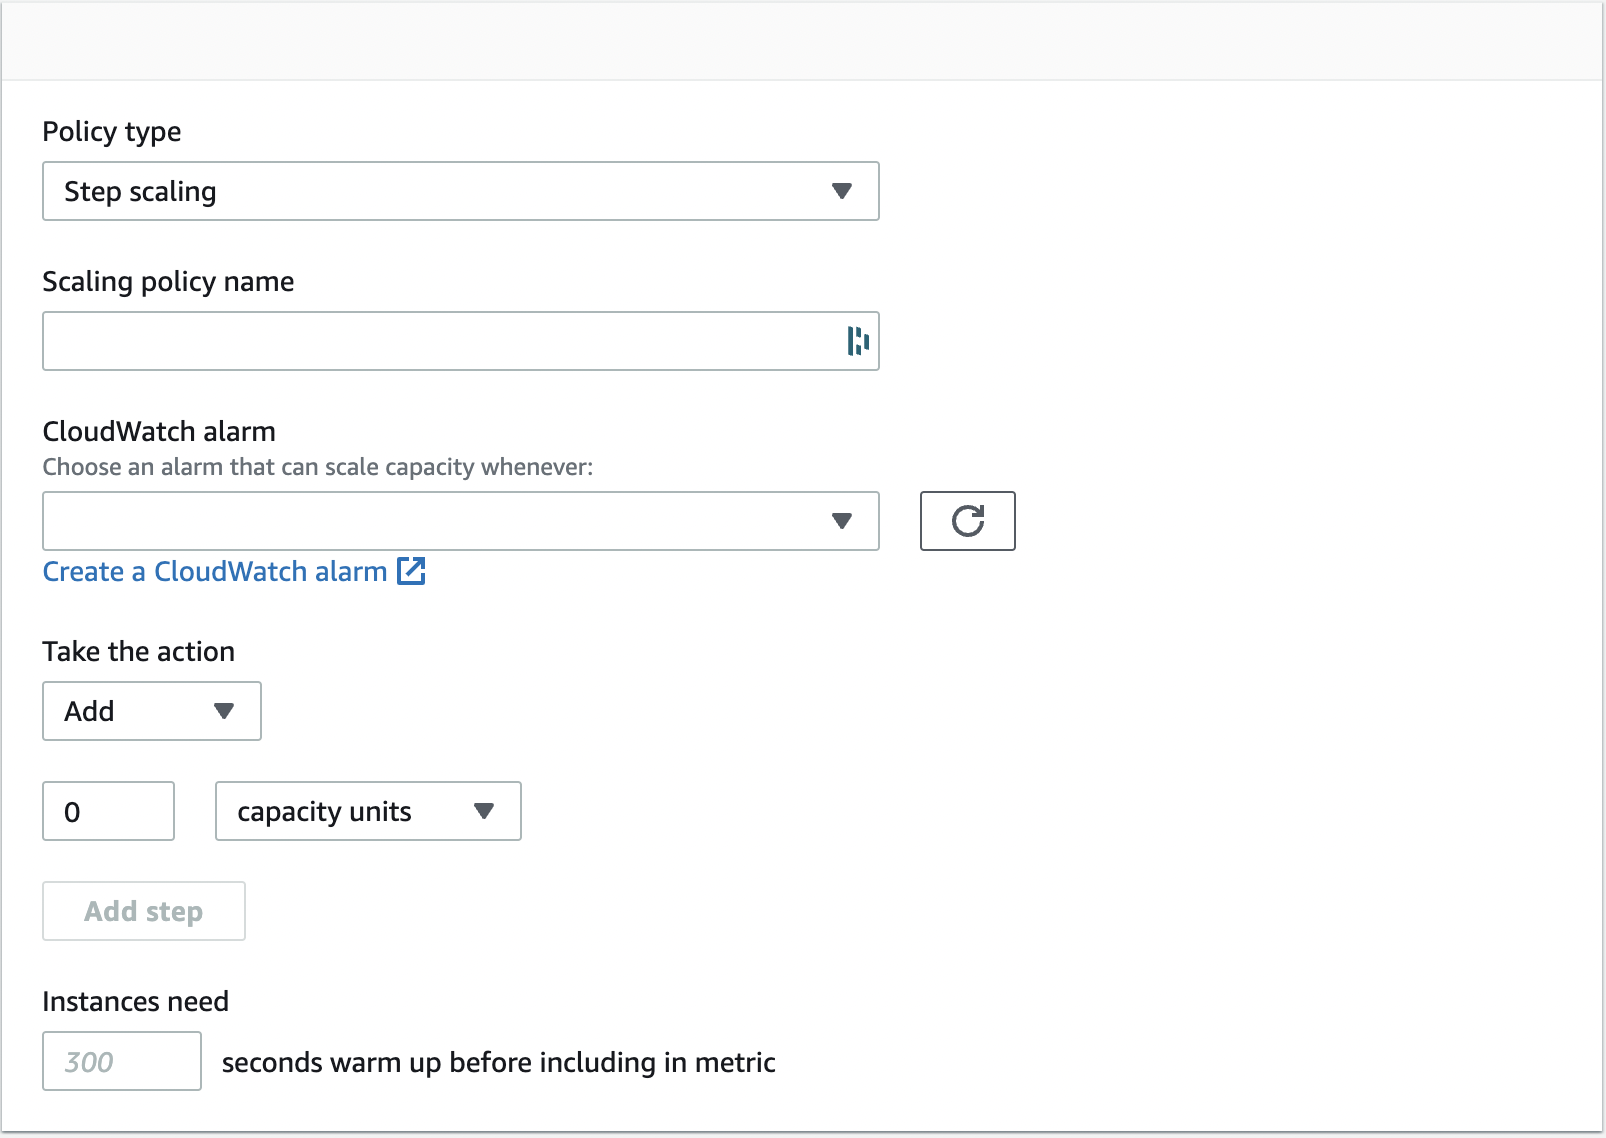
Untitled
- Target Scaling
- Test scaling by stressing the EC2 instance
Connect to an EC2 instance and install stress by running these two linux commands:
sudo amazon-linux-extras install epel -ysudo yum install stress -yAfter installing:
Stress 4 vCPUs:
stress -c 4This will make the CPU utilization go up and should trigger scaling if your metric was set to CPU utilization.
To stop the stressing, reboot all the active instances.
- Navigate to Scaling Policies
Scaling Policies
Two types of scaling Policies
Dynamic Scaling Policies
- Scheduled Actions
- Anticipate a scaling based on known usage patterns
- Example: increase the min capacity to 10 at 5 pm on Fridays
- Target Tracking Scaling
- Most simple and easy to set-up. Just ask the ASG to maintain a metric and scale accordingly. The ASG automatically creates cloudwatch alarms for this to work.
- Example: I want the average ASG CPU to stay at around 40% and let ASG scale accordingly
- Simple / Step Scaling
- Need to setup CloudWatch alarms and specify the actions.
- Example: When CPU > 70%, then add 2 units and when CPU < 30%, then remove 1 unit. CloudWatch alarms will be the trigger points in this case.
- Scheduled Actions
Predictive Scaling Policies
This is a new kind of scaling where the historical data is used to predict the load patterns using ML forecast load and schedule scaling ahead. We need to specify the metric based on which we want to scale our ASG and it will automatically create a forecast for that metric and scale accordingly.
Good metrics to scale on
- CPU Utilization: average CPU utilization across your instances
- RequestCountPerTarget: to make sure the number of requests per EC2 instances is stable
- Average Network In / Out: if you’re application is network bound, meaning it involves a lot of download or upload and the network could become a bottleneck
- Any custom metric (that you push using CloudWatch)
We can auto scale based on a custom metric (ex: number of connected users). To set this up:
- Send custom metric from application on EC2 to CloudWatch using the PutMetric API
- Create CloudWatch alarm to react to low / high values
- Use the CloudWatch alarm as the scaling policy for ASG
Scaling Cooldown
After a scaling activity happens, the ASG is in a cooldown period (default 300 seconds) during which it will not launch or terminate additional instances (it will ignore scaling requests) to allow the metrics to stabilize.
Use a ready-to-use AMI to reduce configuration time in order to be serving request fasters and reduce the cooldown period.
Section 9: AWS Fundamentals: RDS + Aurora + ElastiCache
Section 9: AWS Fundamentals: RDS + Aurora + ElastiCache
Relational Database Service (RDS)
Theory
Intro
- It’s a managed DB service where SQL is used as the query language.
- Supported database engines:
- Postgres
- MySQL
- MariaDB
- Oracle
- Microsoft SQL Server
- Aurora (AWS Proprietary database)
- Automated provisioning, OS patching
- Continuous backups and restore to specific timestamp (Point in Time Restore)
- Monitoring dashboards
- Read replicas for improved read performance
- Multi AZ setup for DR (Disaster Recovery)
- Maintenance windows for upgrades
- Scaling capability (vertical and horizontal)
- Storage backed by EBS (gp2 or io1)
- You can’t SSH into your RDS instances. Since RDS is managed by AWS, we don’t have access to the underlying EC2 instances.
Storage Auto Scaling
- Helps you increase storage on your RDS DB instance dynamically. When RDS detects that your DB is running out of free space, it scales automatically within a maximum storage threshold (set by you).
- Condition for automatic storage scaling:
- Free storage is less than 10% of allocated storage
- Low-storage lasts at least 5 minutes
- 6 hours have passed since last modification
- Avoids manually scaling your database storage
- Useful for applications with unpredictable workloads
- Supports all RDS database engines (MariaDB, MySQL, PostgreSQL, SQL Server, Oracle.

RDS Read Replicas
Intro
- Read Replicas allow us to scale the read operation on RDS. This is done by creating up to 5 replicas of the original DB within AZ, cross AZ or cross region.
- Replication is asynchronous, so reads are eventually consistent. This means if the application reads some data from any of the replicas before the new data is replicated, the application might receive the old data. Example: You have set up read replicas on your RDS database, but users are complaining that upon updating their social media posts, they do not see their updated posts right away.
- Replicas can be promoted to their own DB
- Applications must update the connection string to leverage read replicas
- Read replicas are used for SELECT (read only kind of statements not INSERT, UPDATE, DELETE)

Use case
You have a production database that is taking on normal load. Now, the analytics team informs you that they want to use the database to run some analytics. So, if you allow them to read the data off the original DB, it might slow down your application. Instead, you create a Read Replica to run the new workload there. This way the production application is unaffected.
It is for SELECT (=read) only kinds of statements (Not INSERT, UPDATE, DELETE)
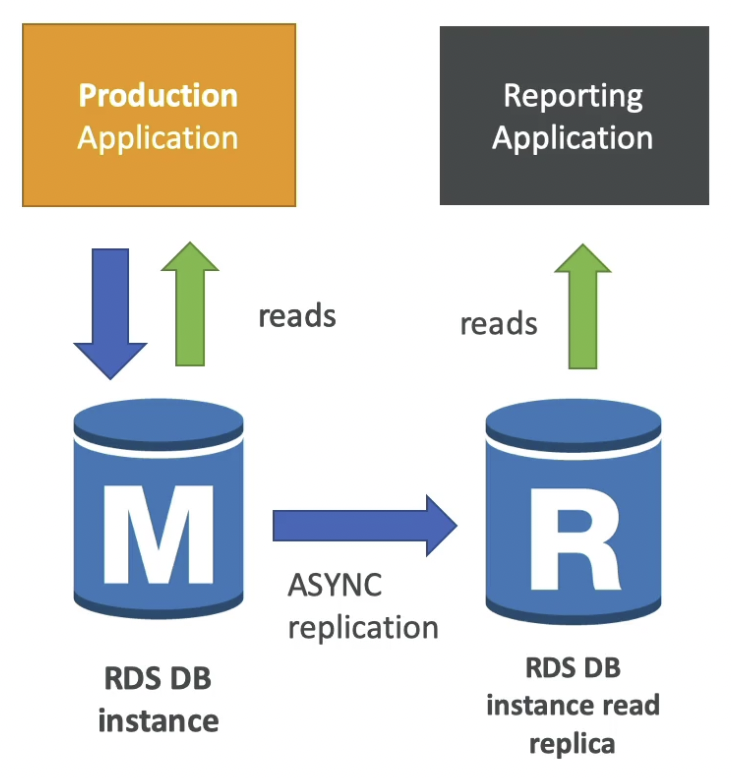
Network Cost
In AWS there’s usually a network cost when data moves from one AZ to another. For RDS Read Replicas, if your replicas are in the same region (even if in different AZ) as the original instance, you don’t incur the network cost. However, if your replica is in a different region than the original database, then you will incur the network cost (replication fee).
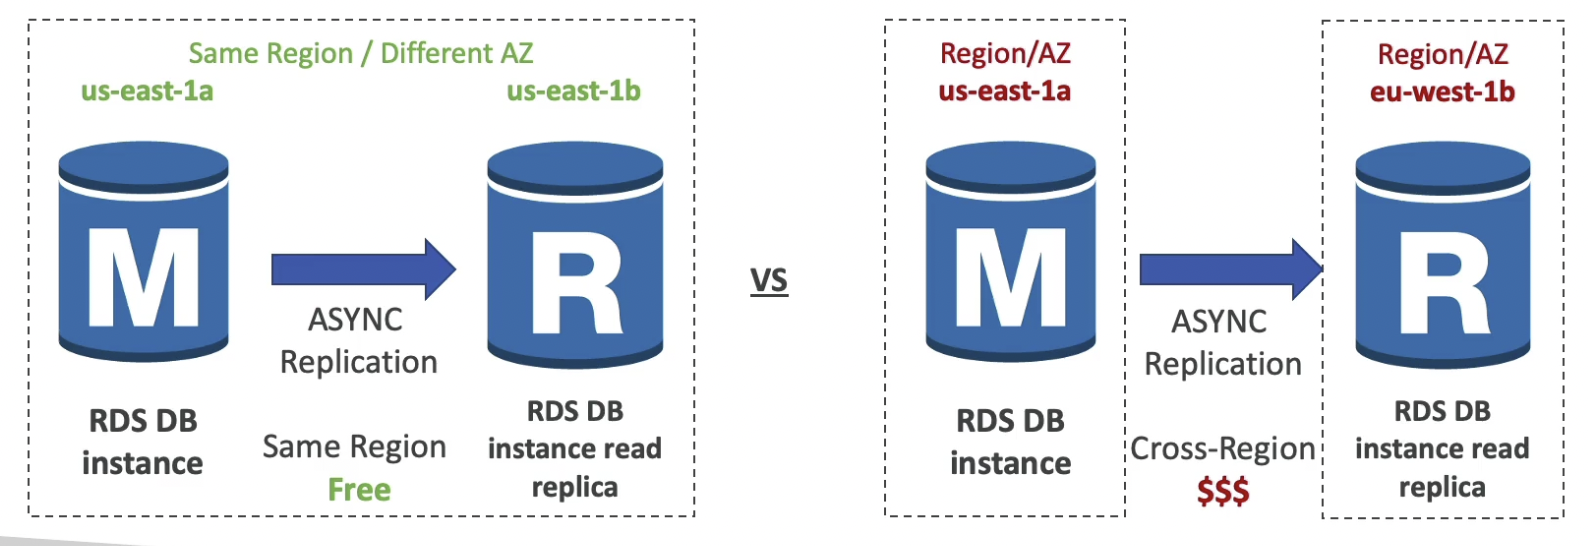
RDS Multi AZ (disaster recovery)
Intro
- Multi AZ is a feature that enables data redundancy for disaster recovery and hence increases the availability of the RDS database. This is done by synchronously replicating the the master database to standby database in another AZ. So, any change to be made to the master database is also made in parallel to the standby instance.
- Both the databases can be accessed by one DNS name, which allows for automatic app failover to standby database. Failover can occur in case of loss of AZ, loss of network, instance or storage failure. In these cases the standby database will become the new master.
- Connection string does not require to be updated
- No manual intervention is required on the application end
- Cannot be used for scaling as the standby database cannot take read/write operation.
⛔ Read Replicas can be setup as Multi AZ for Disaster Recovery. In that case, the replication will be asynchronous.

Moving from Single AZ to Multi AZ
Zero downtime operation (no need to stop the DB). Just click on ‘modify’ on the database configuration.
The following happens internally:
- A snapshot of the master DB is taken
- A new DB is restored from the snapshot in a new AZ
- Synchronization is established between the two databases
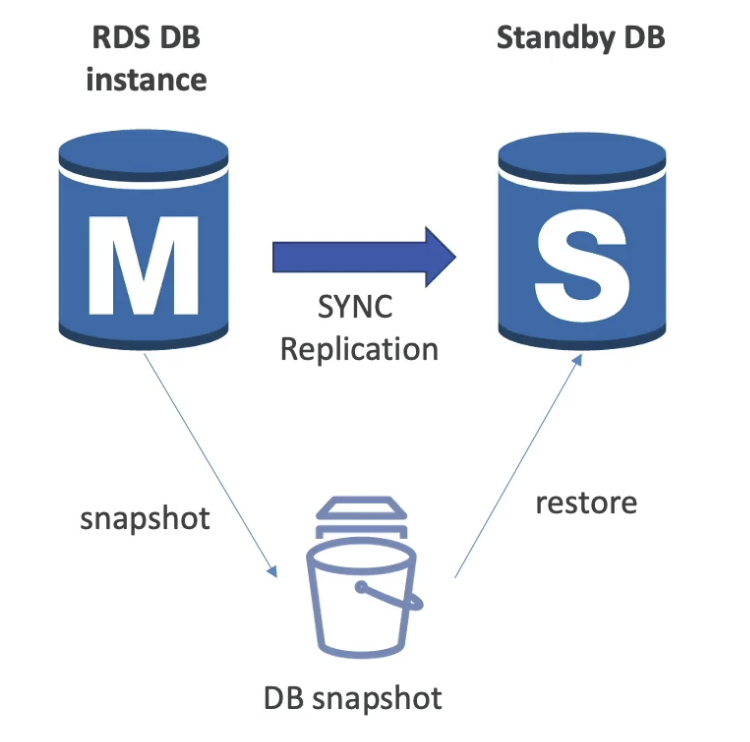
RDS Custom
.png)
new →
Backups
- Automated Backups (automatically enabled in RDS)
- Daily full backup of the database (during the maintenance window that you define)
- Transaction logs are backed-up by RDS every 5 minutes which gives us the ability to restore to any point in time (from oldest backup to 5 minutes ago)
- 7 days retention (can be increased to 35 days)
- DB Snapshots:
- Manually triggered by the user
- Retention of backup for as long as you want
- Automated Backups (automatically enabled in RDS)
Encryption
Intro
At rest encryption
- Possibility to encrypt the master & read replicas with AWS KMS AES-256 encryption
- Encryption has to be defined while creating the database
- If the master is not encrypted, the read replicas cannot be encrypted
- Transparent Data Encryption (TE) available for Oracle and SQL Server (alternative way of encrypting)
- Snapshots of un-encrypted RDS databases are un-encrypted
- Snapshots of encrypted RDS databases are encrypted
In-flight encryption
- SSL certificates are required to encrypt data to RDS in flight
- Need to provide SSL options with trust certificate when connecting to database
- To enforce SSL:
- PostgreSQL: rds.force_ssl=1 in the AWS RDS Console (Parameter Group)
- MySQL: Within the DB: GRANT USAGE ON ** TO ‘mysqluser’@‘%’ REQUIRE SSL; (SQL command)
Encryption Operations
- Encrypting RDS snapshots
- Take a snapshot of the RDS (unencrypted)
- Copy the snapshot and enable encryption for it
- To encrypt an un-encrypted RDS database:
- Create a snapshot of the un-encrypted database
- Copy the snapshot and enable encryption for the snapshot
- Restore the database from the encrypted snapshot
- Migrate applications to the new database, and delete the old database
- Encrypting RDS snapshots
Network Security
- RDS databases are usually deployed within a private subnet, not in a public one
- RDS security works by leveraging security groups (the same concept as for EC2 instances) it controls which IP / security group can communicate with RDS
IAM
- IAM policies help control who can manage (create or modify) AWS RDS (through the RDS API)
- Traditional Username and Password can be used to login into the database
- IAM-based authentication can be used to login into RDS MySQL & PostgreSQL
In the diagram below, the EC2 instance has an IAM role which allows is to make an API call to the RDS service to get the Auth token which it uses to access the MySQL database.
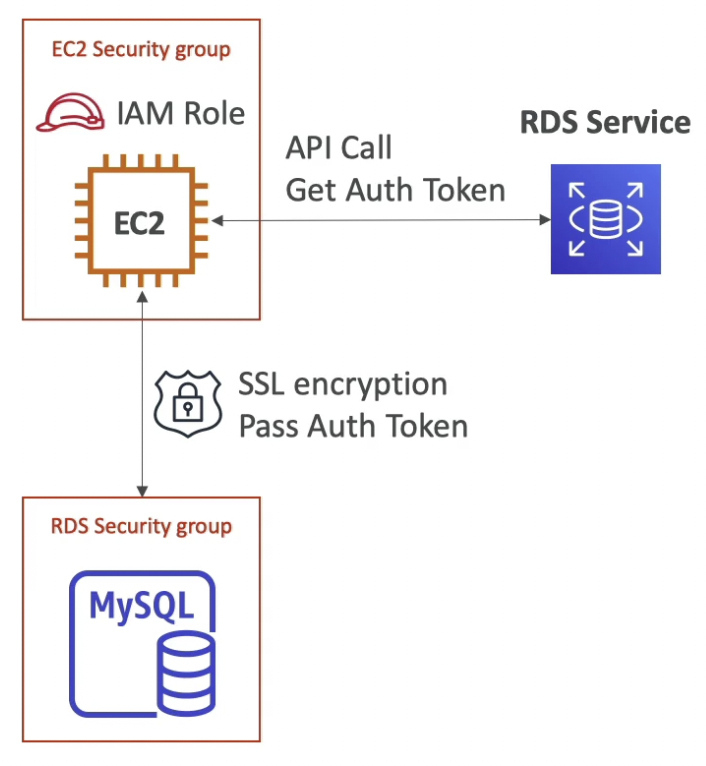
- To access the database, you don’t need a password, just an authentication token obtained through IAM & RDS API calls
- IAM database authentication works with MySQL and PostgreSQL
- Auth token has a lifetime of 15 minutes
- Benefits:
- Network in/out is encrypted using SSL
- Users are centrally managed by IAM instead of RDS
- Can leverage IAM Roles and EC2 Instance profiles for easy integration
Responsibilities
Your responsibility:
- Check the ports / IP / security group inbound rules in DB’s SG
- In-database user creation and permissions or manage through IAM
- Creating a database with or without public access
- Ensure parameter groups or DB is configured to only allow SSL connections
AWS responsibility:
- No SSH access
- No manual DB patching
- No manual OS patching
- No way to audit the underlying instance
Hands On
- Create an RDS database
RDS → Databases → Create database
Engine type: MySQL
Template: production
Credentials: arkalim : guitar123
DB instance class: burstable (for free tier)
Instance type: t2micro
Storage type: gp2
Public Access: enabled (for accessing via the internet)
⛔ The security group that you create during the RDS database creation will only allow incoming TCP traffic on port 3306 (DB port) from your public IP at the time of creating the database. So, if you don’t have a static IP, you need to modify the security group to allow incoming traffic from anywhere.
- Connect to RDS database
Download SQL electron GUI (DB client)
Sqlectron - One single DB client for any relational DB
Open SQL Electron and create a new connection using the RDS endpoint as the server address.

Once connected, we can run SQL queries.
- Delete an RDS database
Select the DB → Modify → Disable deletion protection → Select the DB → Action → Delete
- Create an RDS database
Amazon Aurora (part of RDS)
Intro
- Aurora is a proprietary technology from AWS (not open sourced)
- Postgres and MySQL are both supported as Aurora DB (that means your drivers will work as if Aurora was a Postgres or MySQL database)
- Aurora is “AWS cloud optimized” and claims 5x performance improvement over MySQL on RDS, over 3x the performance of Postgres on RDS
- Aurora storage automatically grows in increments of 10GB, up to 128 TB (best feature)
- Aurora can have 15 replicas while MySQL has 5, and the replication process is faster (sub 10 ms replica lag)
- Failover in Aurora is instantaneous
- Natively supports High Availability
- Aurora costs more than RDS (20% more) but is more efficient
High Availability and Read Scaling
In the diagram below, each color square represents a unit of data. So, in total 6 copies of a data is maintained across 3 AZ. Also, one master and 5 read replicas are present.
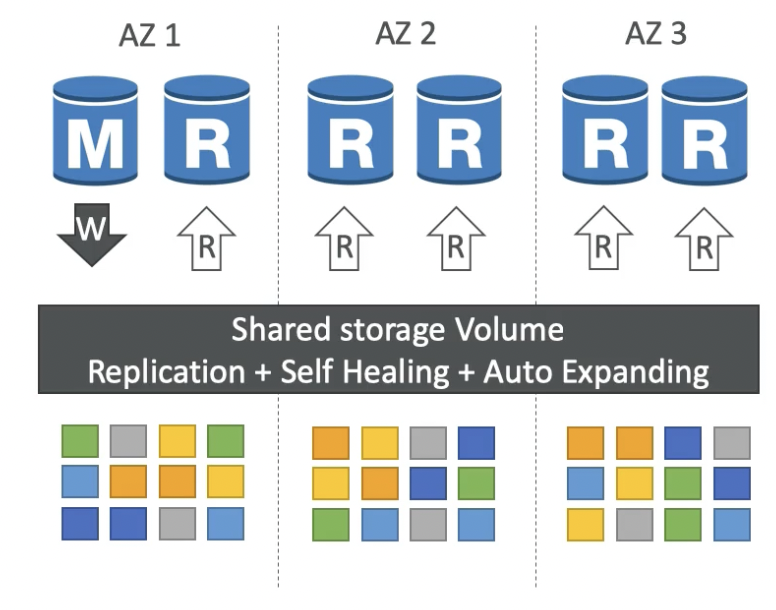
- Aurora maintains 6 copies of your data across 3 AZ:
- 4 copies out of 6 needed for writes (can still write if 1 AZ completely fails)
- 3 copies out of 6 need for reads
- Self healing with peer-to-peer replication (if some data is corrupted, it will be automatically healed)
- Storage is striped across 100s of volumes (more resilient)
- Only one Aurora instance (master) takes writes. But master + up to 15 Aurora Read Replicas can serve reads
- Automated failover for master in less than 30 seconds. So, if the master is down, one of the read replicas will replace it as the new master within 30 seconds.
- Support for Cross Region Replication
- Aurora maintains 6 copies of your data across 3 AZ:
Aurora DB Cluster
The Aurora DB cluster consists of a master DB and some read replicas. Only the master is allowed to perform write operations. So, there is a writer endpoint (always pointing to the master) which is used by the client to write data into the DB. The read replicas have auto scaling which can dynamically change the number of read replicas at a given point in time. So, there is load balancing implemented at the connection level (not at the statement level). So, all the read replicas are connected to the reader endpoint which is used by the client to read data from DB.
⛔ Aurora also features multi-master which allows multiple write instances to be connected to the same storage
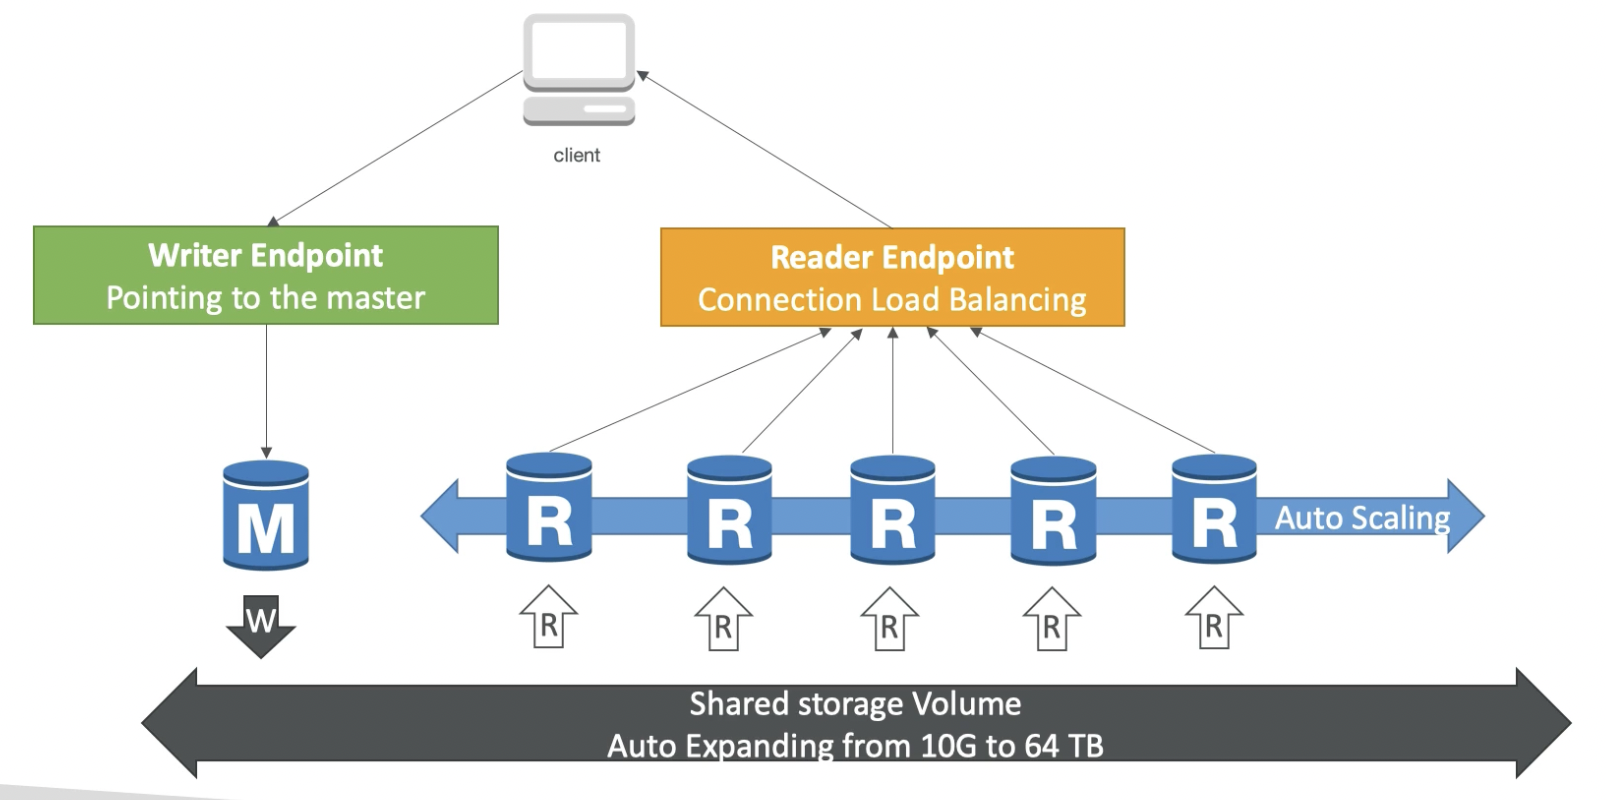
Features of Aurora
- Automatic fail-over
- Backup and Recovery
- Isolation and security
- Industry compliance
- Push-button scaling
- Automated Patching with Zero Downtime
- Advanced Monitoring
- Routine Maintenance
- Backtrack: restore data at any point of time without using backups (amazing feature)
Hands on
Create an Aurora DB
RDS → Create database
Engine type: Aurora
DB type: t3.small
Once created, the Aurora cluster will contain 2 instances (reader and writer). Both of these instances will have separate endpoints (reader and writer endpoints) which can be used by the application to read / write data into the DB. Since, I enabled multi AZ instance creation, the reader and writer instances are in different AZs.

Untitled
We can also add a reader to the cluster or create a cross-region read replica.
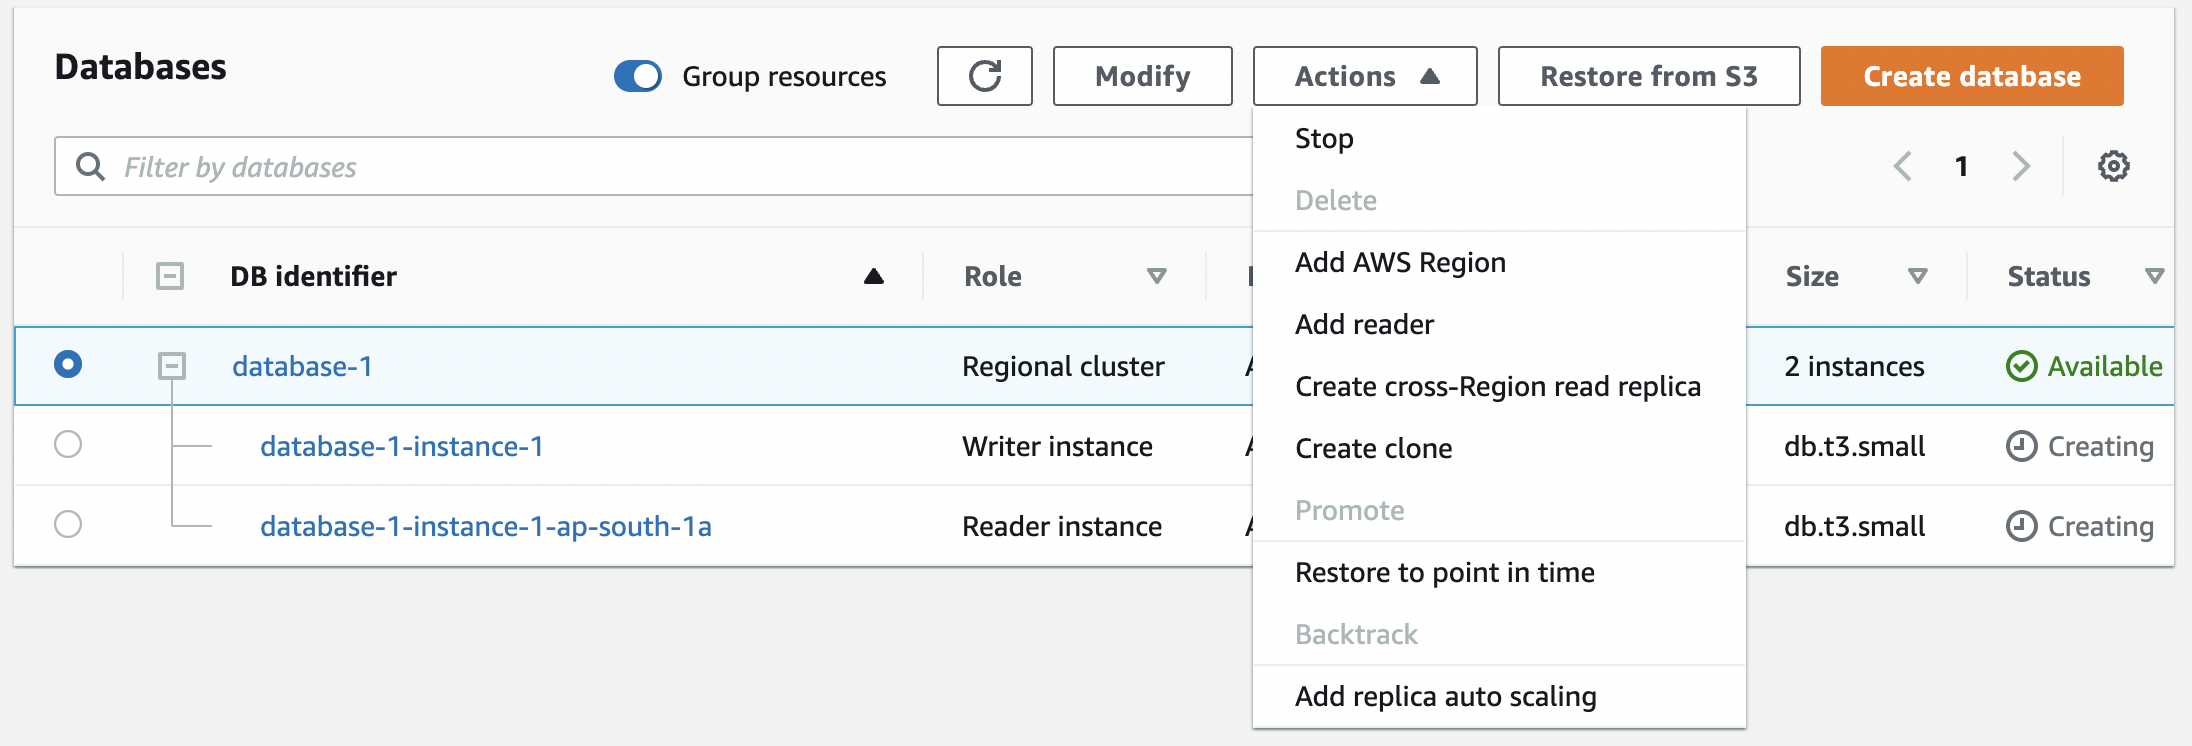
Untitled
Add replica auto scaling
This allows the read replicas to auto scale horizontally based on the target metric.
RDS → Databases → Select database → Actions → Add replica auto scaling

Untitled
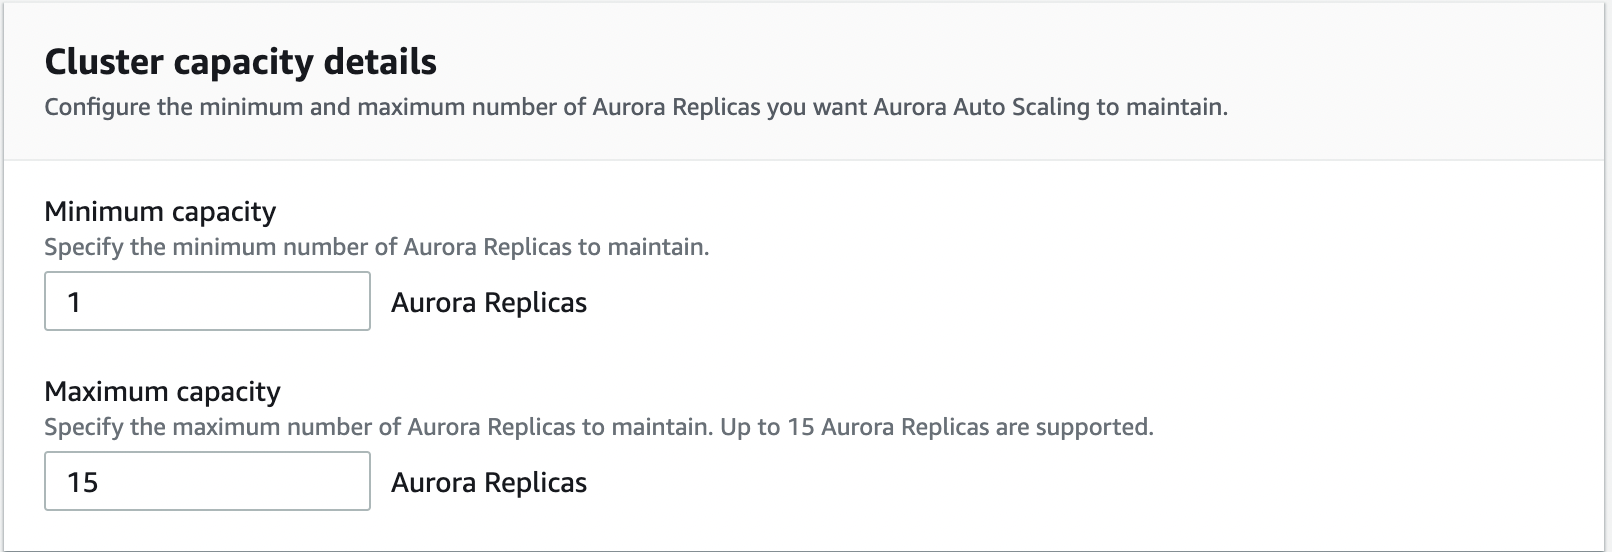
Untitled
Delete Aurora DB Cluster
Select the cluster → Modify → Disable deletion protection
Delete all the reader and writer instances under the Aurora cluster
This will automatically delete the cluster
Advanced Concepts
Aurora Replicas - Auto Scaling
.png)
Custom Endpoints
You would create multiple custom endpoints and therefore query a subset of the replicas.
.png)
Aurora Serverless
- Automated database instantiation and auto scaling based on actual usage
- Good for infrequent, intermittent or unpredictable workloads
- No capacity planning needed in advance
- Pay per second, can be more cost-effective
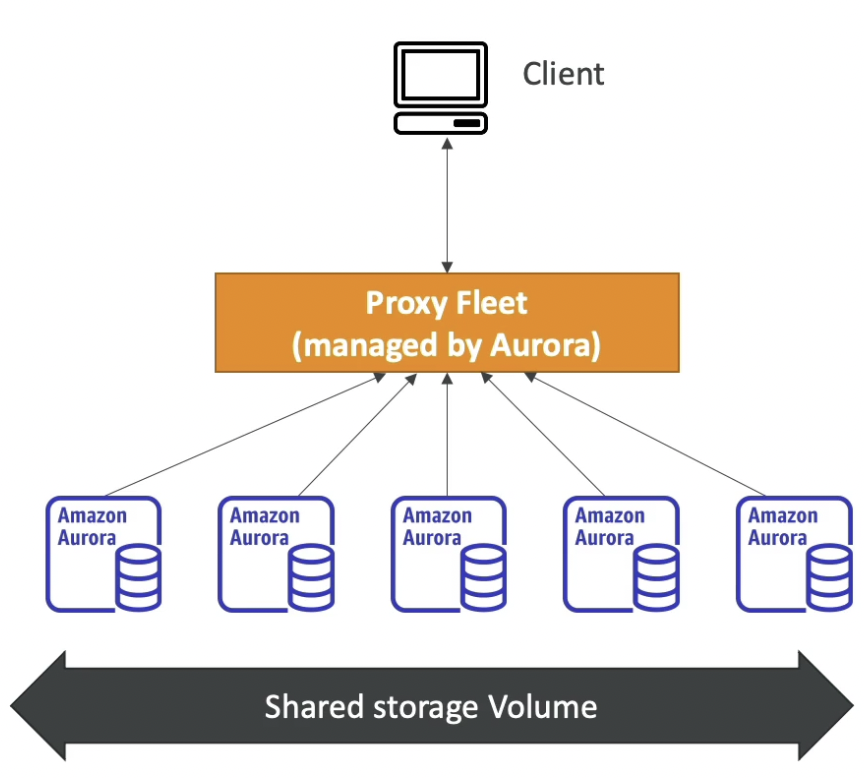
Aurora Multi-master
- If this is enabled, every node (replica) in the cluster does read and write.
- This should be used in case you want immediate failover for write node (high availability in terms of write). If multi-master is disabled and the master node fails, you need to promote a Read Replica as the new master (will take some time).
- In this case, the client is going to have multiple DB connections for failover.

Global Aurora
Aurora Cross Region Read Replicas:
- Read replicas are created in other regions
- Useful for disaster recovery
- Simple to put in place
Aurora Global Database (recommended):
- Entire database is replicated across regions
- 1 Primary Region (read / write)
- Up to 5 secondary (read-only) regions (replication lag < 1 second)
- Up to 16 Read Replicas per secondary region
- Helps for decreasing latency (for clients in other geographical regions)
- In case there is a database outage in one region, promoting another region (for disaster recovery) has an RTO (recovery time objective) of less than 1 minute.

Machine Learning (ML)
- Enables you to add ML-based predictions to your applications via SQL
- Simple, optimized, and secure integration between Aurora and AWS ML services
- Supported services
- Amazon Sage Maker (create any ML model in the backend)
- Amazon Comprehend (for sentiment analysis)
- You don’t need to have ML experience
- Use cases: fraud detection, ads targeting, sentiment analysis, product recommendations
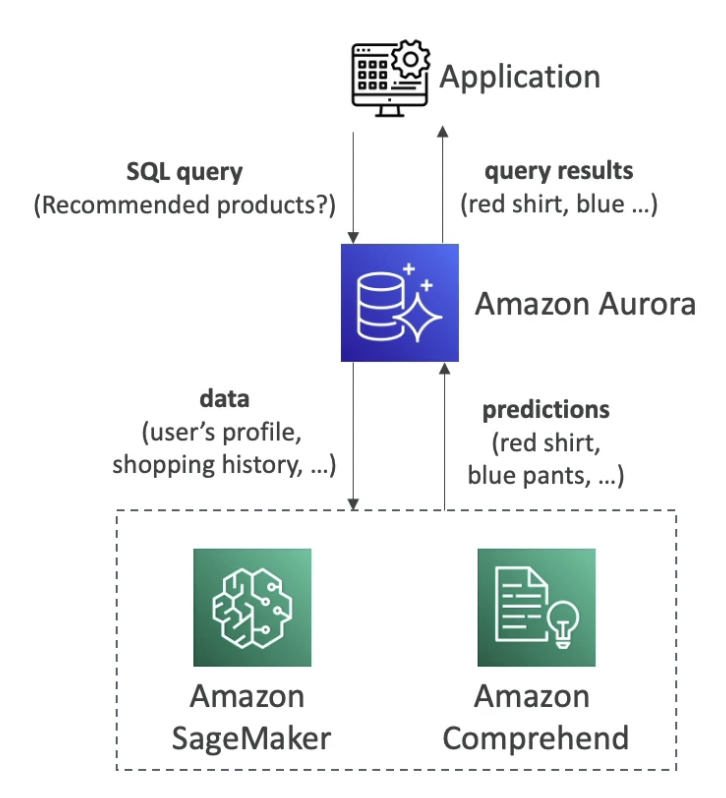
RDS and Aurora - Backup and Monitoring
.png)
.png)
.png)
.png)
Security
.png)
RDS Proxy
.png)
Amazon ElastiCache
Theory
Intro
- ElastiCache is a AWS managed caching service
- It is used to get managed Redis or Memcached
- The same way RDS is to get managed Relational Databases..…
- Caches are in-memory databases with really high performance and low latency.
- Helps reduce load off of databases for read intensive workloads. Common read operations are served from the cache which makes the application faster.
- ElastiCache helps make your application stateless because the application doesn’t have to cache locally.
- AWS takes care of OS maintenance / patching, optimizations, setup, configuration, monitoring, failure recovery and backups
- Using ElastiCache involves heavy application code changes (setup the application to query the cache before and after querying the database)
Usage Architecture
DB Cache (lazy loading)
Here, ElastiCache is used as a cache for the RDS which reduces read loads on the database. It is called lazy loading because only when we have a cache miss, we load the data into the cache.
Cache must have an invalidation strategy to make sure only the most current data is stored in the cache (most difficult problem to solve in caching technologies)
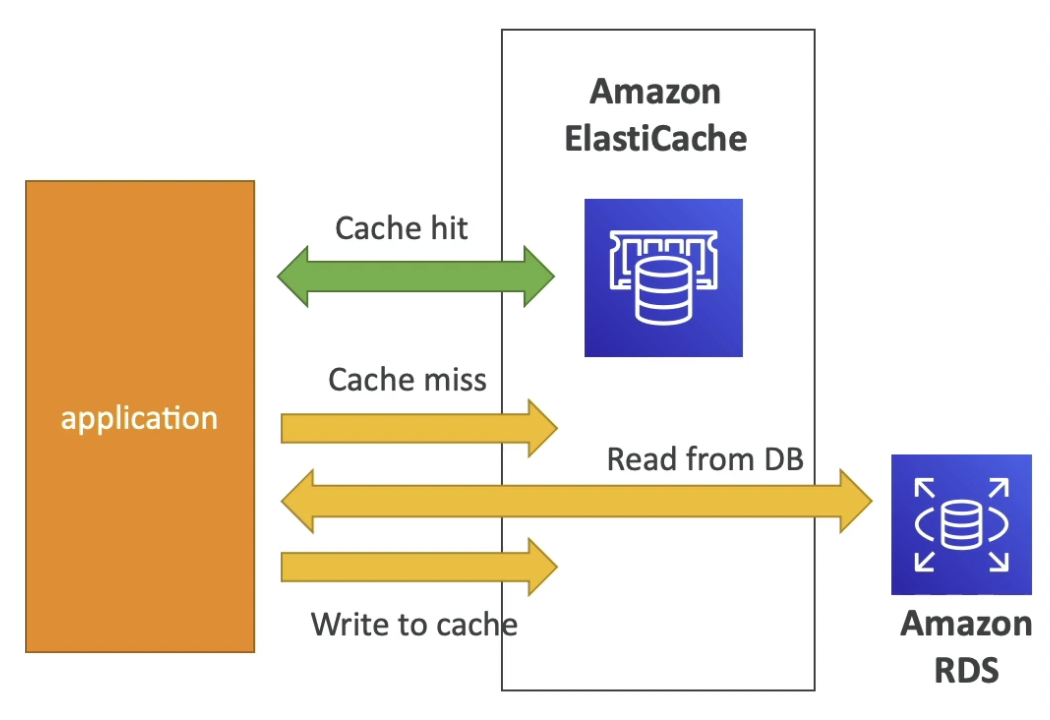
User Session Store
Using ElastiCache as a session store allows the application to be stateless. The session info can be fetched from ElastiCache when required.
- User logs into any of the application
- The application writes the session data into ElastiCache
- The user hits another instance of our application
- The instance retrieves the data and the user is already logged in

Redis vs Memcached
Amazon ElastiCache for Redis is a blazing fast in-memory data store that provides sub-millisecond latency to power internet-scale real-time applications. Amazon ElastiCache for Redis is a great choice for real-time transactional and analytical processing use cases such as caching, chat/messaging, gaming leaderboards, geospatial, machine learning, media streaming, queues, real-time analytics, and session store. ElastiCache for Redis supports replication, high availability, and cluster sharding right out of the box. Amazon ElastiCache for Redis is also HIPAA Eligible Service.
Amazon ElastiCache for Memcached is a Memcached-compatible in-memory key-value store service that can be used as a cache or a data store. Amazon ElastiCache for Memcached is a great choice for implementing an in-memory cache to decrease access latency, increase throughput, and ease the load off your relational or NoSQL database. Session stores are easy to create with Amazon ElastiCache for Memcached. Elasticache for Memcached is not HIPAA eligible.
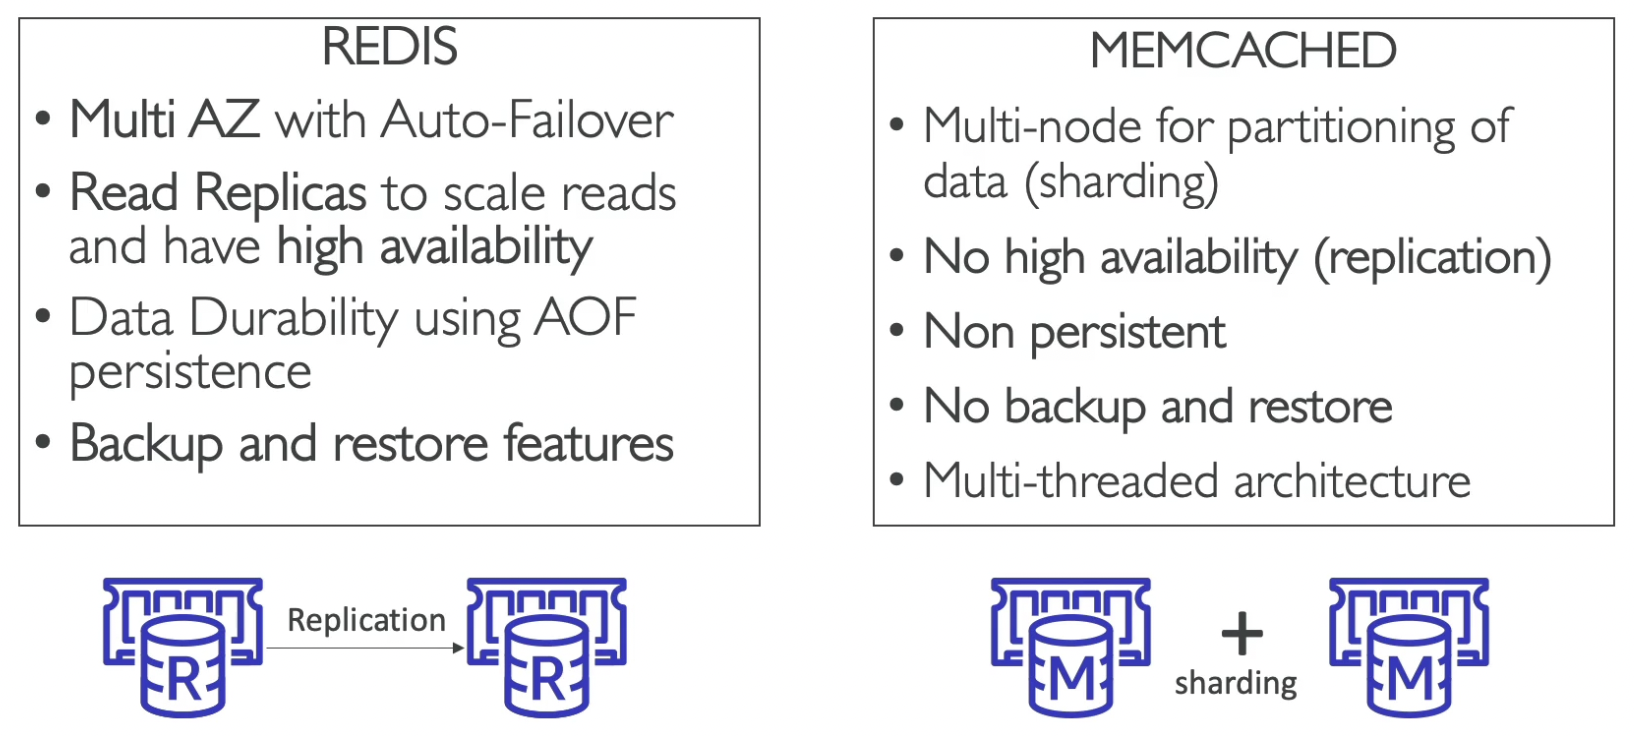

Create an ElastiCache
ElastiCache → Redis → Create
Encryption at rest: Uses KMS
Encryption in transit:
We can enable Redis Auth: In this case, we need to create a Redis Auth Token which will be required by our applications to connect to Redis.
Cache Security
- All caches in ElastiCache do not support IAM authentication. IAM policies on ElastiCache are only used for AWS API-level security such as creating / deleting caches.
- To authenticate to Redis, we can use Redis Auth. This requires us to set a “password/token” when we create a Redis cluster. This is an extra level of security for your cache (on top of security groups). It also supports SSL in flight encryption.
- Memcached supports SASL-based authentication (advanced)
Redis’ security group should only allow EC2 security group for incoming requests. Additionally, Redis Auth can be used for authentication if we are using Redis as the caching engine. SSL encryption is used for in-flight encryption.
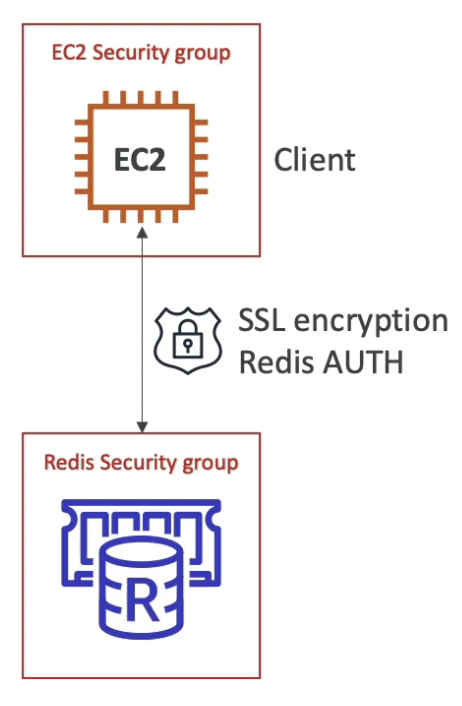
Write patterns for ElastiCache
- Lazy Loading: all the read data is cached, data can become stale in cache
- Write Through: Add or update data in the cache when written to a DB (no stale data)
- Session Store: store temporary session data in a cache and remove the data based on TTL (time to live) for the session data
Gaming Leaderboard using Redis - Use Case
- Gaming Leaderboards are computationally complex
- Redis Sorted Sets guarantee both uniqueness and element ordering
- Each time a new element added, it’s ranked in real time, then added in correct order
Using the Sorted Sets in a Redis cluster, we can build a real-time leaderboard where every instance of ElastiCache has the same up to date leaderboard.
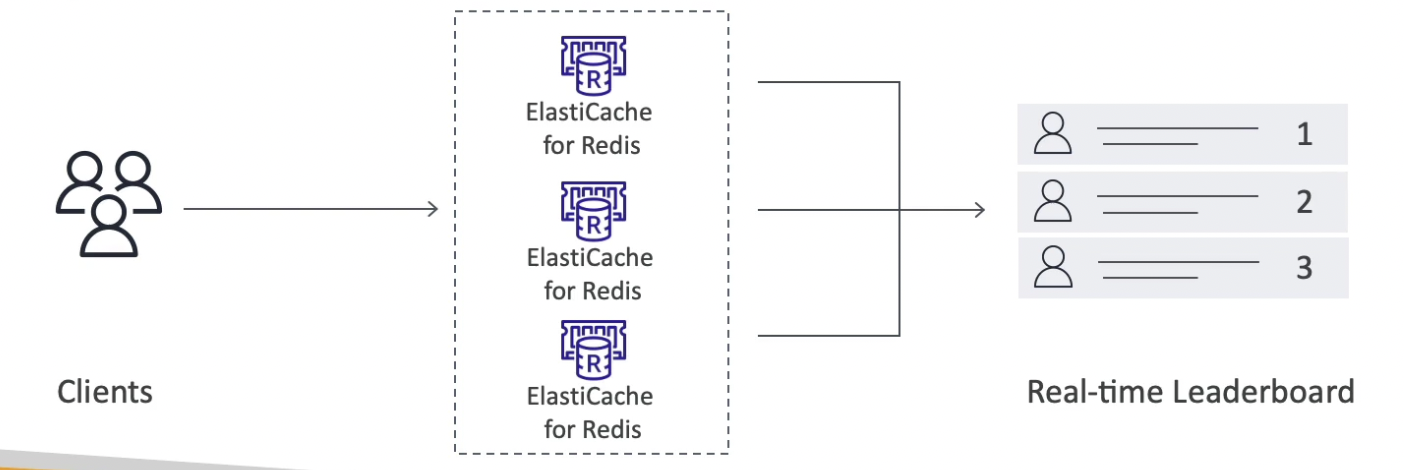
List of Ports to be familiar with
Important ports:
- FTP: 21
- SSH: 22
- SFTP: 22 (same as SSH)
- HTTP: 80
- HTTPS: 443
vs RDS Databases ports:
- PostgreSQL: 5432
- MySQL: 3306
- Oracle RDS: 1521
- MSSQL Server: 1433
- MariaDB: 3306 (same as MySQL)
- Aurora: 5432 (if PostgreSQL compatible) or 3306 (if MySQL compatible)
Section 10: Route 53
Section 10: Route 53
DNS
Intro
Domain Name System (DNS) translates the human friendly hostnames into the machine IP addresses
Example: www.google.com ⇒ 172.217.18.36
- DNS uses hierarchical naming structure:
.com
example.com
www.example.com
api.example.com
- DNS uses hierarchical naming structure:
DNS Terminologies
- Domain Registrar: This is where you register your domain names (Amazon Route 53, GoDaddy, etc.)
- DNS Records: A, AAAA, CNAME, NS, etc.
- Zone File (Hosted Zone): contains DNS records, used to match hostnames to IP addresses
- Name Server: resolves DNS queries (Authoritative or Non-Authoritative)
- Top Level Domain (TLD): .com, .us, .in, .gov, .org
- Second Level Domain (SLD): amazon.com, google.com, etc.

How DNS works
Your web browser wants to access the domain example.com which is being served by a server at IP 9.10.11.12. Your browser will first query the local DNS server which if it has that domain cached, it will return it right away. Otherwise, it will ask the same question to the Root DNS server. The root DNS server will extract the TLD (.com) from the domain and direct the local DNS to the TLD DNS Server that can serve .com TLD. The query to the TLD DNS server will be the same. The TLD DNS server returns the IP of the SLD DNS server which can store the IP of web server hosting example.com. Once again the same query is made to the SLD DNS Server which returns the IP 9.10.11.12 instead of NS (named server).
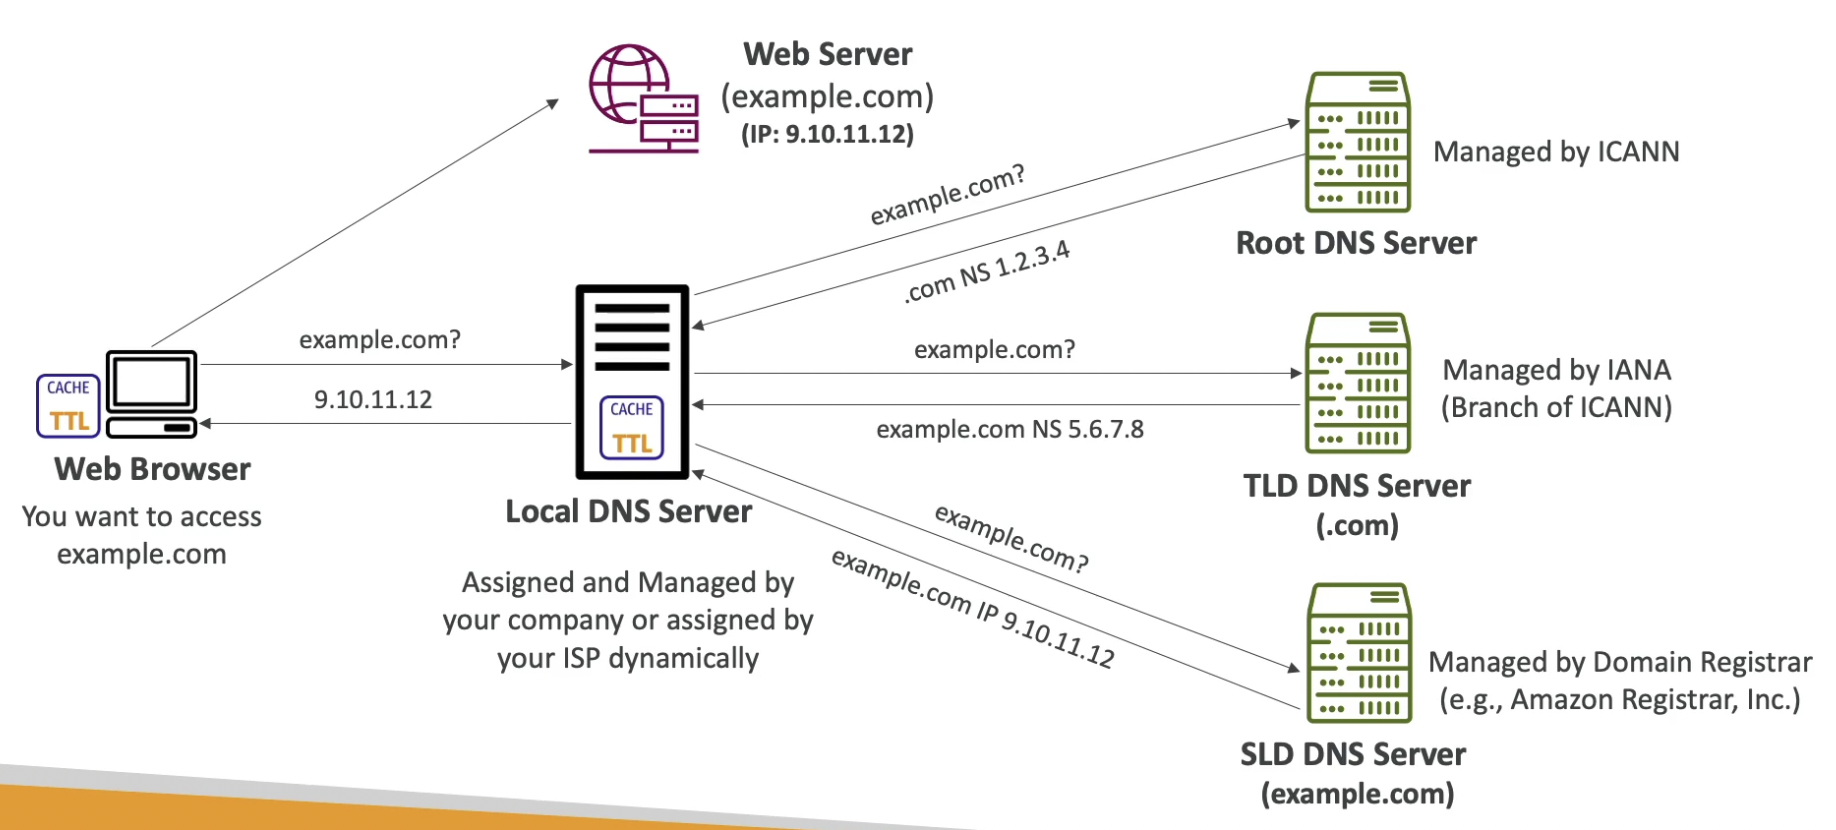
Route 53
Theory
Intro
- Route 53 is a global AWS service.
- A highly available, scalable, fully managed and Authoritative DNS provided by AWS (Authoritative means the customer can update the DNS records and have full control over the DNS)
- Route 53 is also a Domain Registrar which we can use to register our domain names
- Ability to check the health of your resources
- The only AWS service which provides 100% availability SLA
- Why Route 53? 53 is a reference to the traditional DNS port

Records
- In Route 53, we are going to define a bunch of records which define how we want to route traffic for a domain. Each record contains:
- Domain / Subdomain Name: e.g. example.com
- Record Type: e.g. A, AAAA, CNAME etc.
- Value: e.g. 12.34.56.78
- Routing Policy: how Route 53 responds to queries
TTL: amount of time the records are cached at DNS Resolvers
- High TTL (e.g. 24 hr)
- Less traffic on Route 53
- Possibly outdated records
- Low TTL e.g., 60 sec.
- More traffic on Route 53 (more cost)
- Records are outdated for less time
- Easy to change records as the change will be updated quickly in the client’s cache.
- Except for Alias records, TTL is mandatory for each DNS record

- High TTL (e.g. 24 hr)
- Route 53 supports the following DNS record types:
- Must know: A / AAAA / CNAME / NS
- Advanced: CAA / DS / MX / NAPTR / PTR / SOA / TXT / SPF / SRV
- In Route 53, we are going to define a bunch of records which define how we want to route traffic for a domain. Each record contains:
Record Types
- A - maps a hostname to IPv4
- AAAA - maps a hostname to IPv6
- CNAME - maps a hostname to another hostname
- The target is a domain name which must have an A or AAAA record
- Can’t create a CNAME record for the top node of a DNS namespace (Zone Apex) example: you can’t create CNAME for example.com, but you can create for www.example.com
- NS (Name Servers for the Hosted Zone) - controls how traffic is routed for a domain
Hosted Zones
A hosted zone is a container for records that define how to route traffic to a domain and its subdomains. Hosted zones are queried to get the IP address from the hostname.
There are two types of hosted zones:
Public Hosted Zones
- contains records that specify how to route traffic on the Internet (public domain names) example: application1.mypublicdomain.com
- can be queried by anyone on the internet
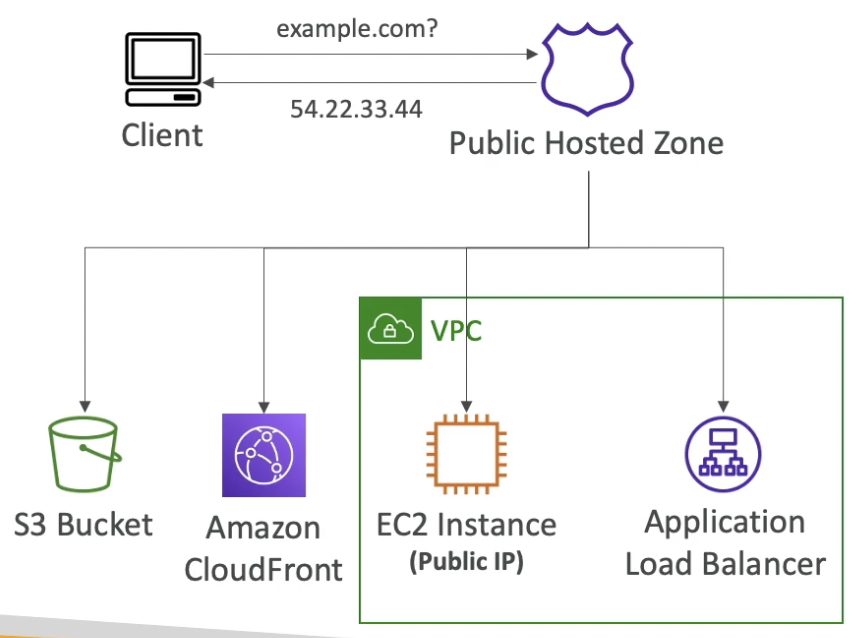
Private Hosted Zones
- contain records that specify how you route traffic within one or more VPCs (private domain names) example: applications.company.internal
- can only be queried from within the VPC

You pay $0.50 per month per hosted zone
Route 53 TTL (Time To Live)
AWS will cache the DNS request for 60s/24hr
.png)
Hands On
Create new Record → record name → record type A for Ipv4 → set value to IP of the EC2 instance we set → TTL set to seconds hours or 1 day → routing policy → create record.
Based on TTL if we update the set value IP to a new one it takes the time we set in TTL to reflect the changes due to cache in TTL time period
Check on chrome test.example.com or Cloud Shell dig command
CNAME vs Alias Records
AWS Resources expose an AWS hostname (example: Ib1-1234.us-east-2.elb.amazonaws.com). If we want to map this AWS resource to a hostname, we could use:
CNAME Records:
- Points a hostname to any other hostname (app.mydomain.com ⇒ blabla.anything.com)
- Only works for non-root domain names (something.mydomain.com instead of just mydomain.com)
Alias Records (specific to Route 53)
Intro
- Points a hostname to an AWS Resource (app.mydomain.com ⇒ blabla.amazonaws.com)
- Works for both root domains (Zone Apex) and non root domains (mydomain.com & something.mydomain.com)
- Free of cost
- Native health check
- Automatically recognizes changes in the AWS resource’s IP addresses
- Alias Record is always of type A/AAAA for AWS resources (IPv4 / IPv6)
- You can’t set the TTL manually for Alias records (it is set automatically)
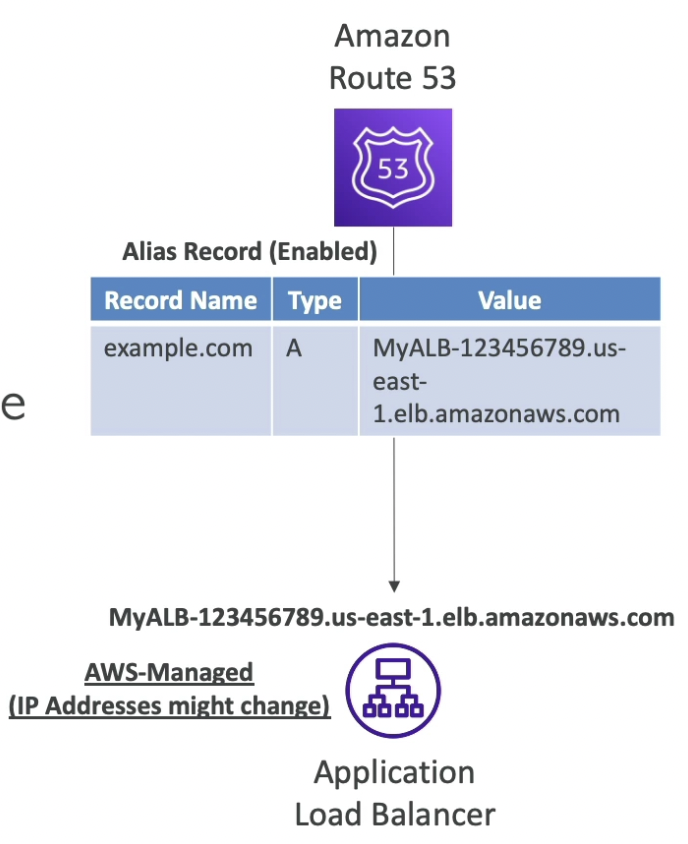
Alias Record Targets
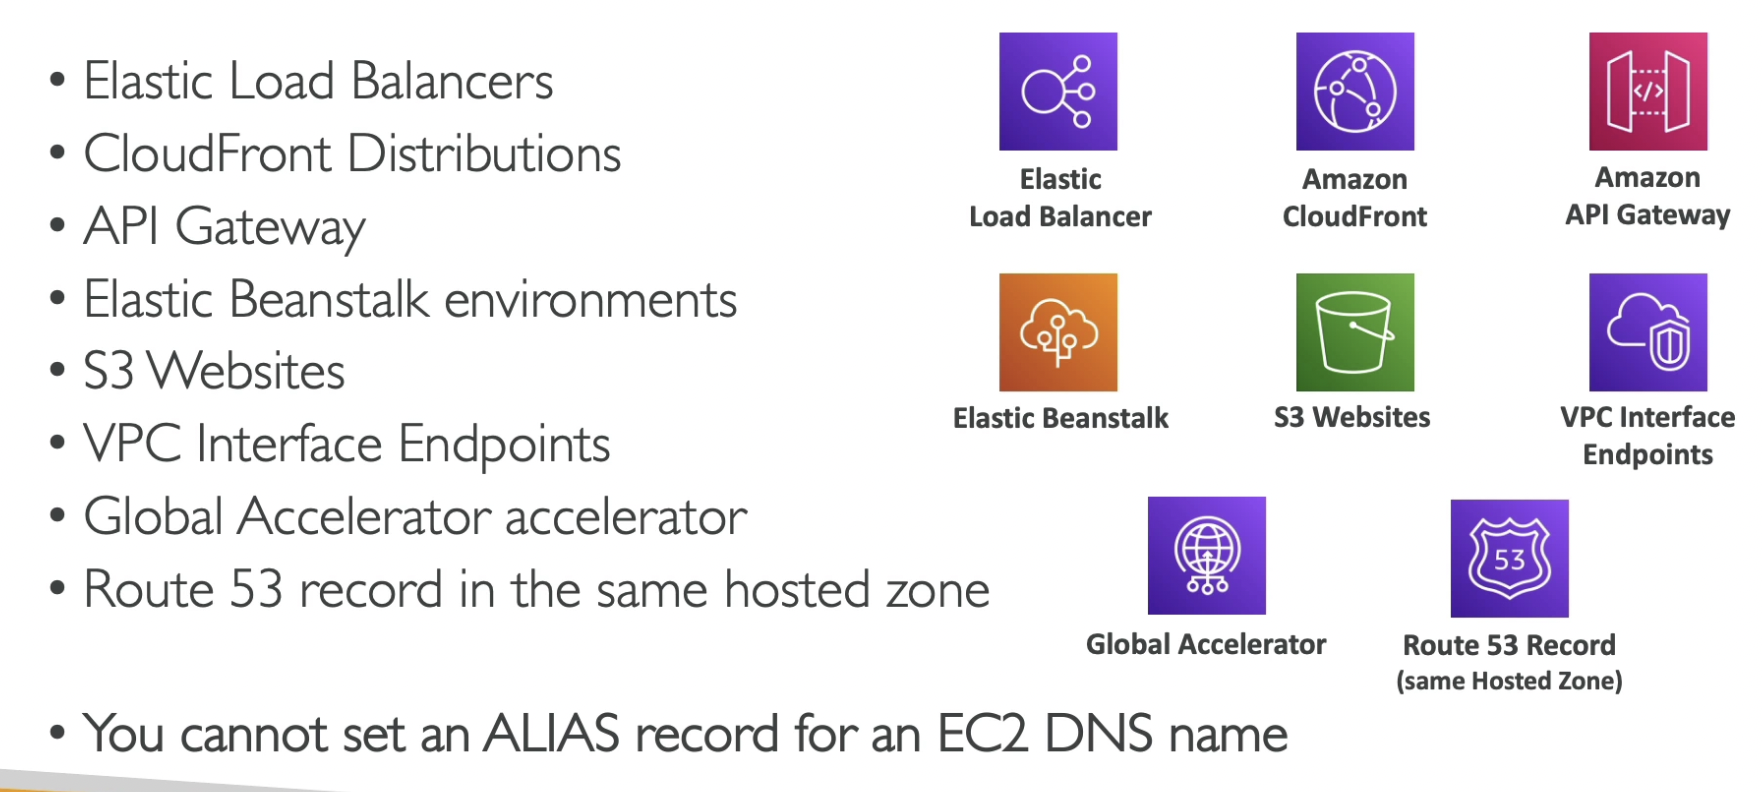
Hands On
- Create a Record → record name → type CNAME → set domain name in Value → create record.
This is good and work on many domain names, but not AWS native. Since we are redirecting to a ALB we can create a Alias
- Create a record → type is A for alias records → enable Alias key → route traffic to from dropdown → select EC2 Region → select the load balancer we created → evaluate target health is selected → create record
- To redirect directly → create record → keep record name blank → CNAME as type → value as the load balancer link → create record throw a error
- To redirect directly → create record → keep record name blank → Select Alias → Select A as Type → select region and load balancer → create record will work
- Create a Record → record name → type CNAME → set domain name in Value → create record.
Routing Policies
- Routing policies define how Route 53 responds to DNS queries
- Don’t get confused by the word “Routing”
- It’s not the same as Load balancer routing which routes the traffic through itself
- DNS does not route any traffic, it only responds to the DNS queries after resolving hostnames
- Route 53 Supports the following Routing Policies
Simple
- Typically, route traffic to a single resource
- Can specify multiple values in the same record (by entering them in new lines). If multiple values are returned, a random one is chosen by the client
- When Alias is enabled in case of a simple routing policy, we can specify only one AWS resource
- Can’t be associated with Health Checks

Hands On
create/edit a record → In value use multiple IP
Weighted
- Control the % of the requests that go to each specific resource
- Assign each record a relative weight. These weights don’t need to sum up to 100.

- Can be associated with Health Checks
- Use cases: load balancing between regions, testing a new application version by sending a small amount of traffic
- Assign a weight of 0 to a record to stop sending traffic to a resource
- If all records have weight of 0, then all records will be returned equally
- When creating weighted records, create multiple records with the same name and type, and assign different weights to each.
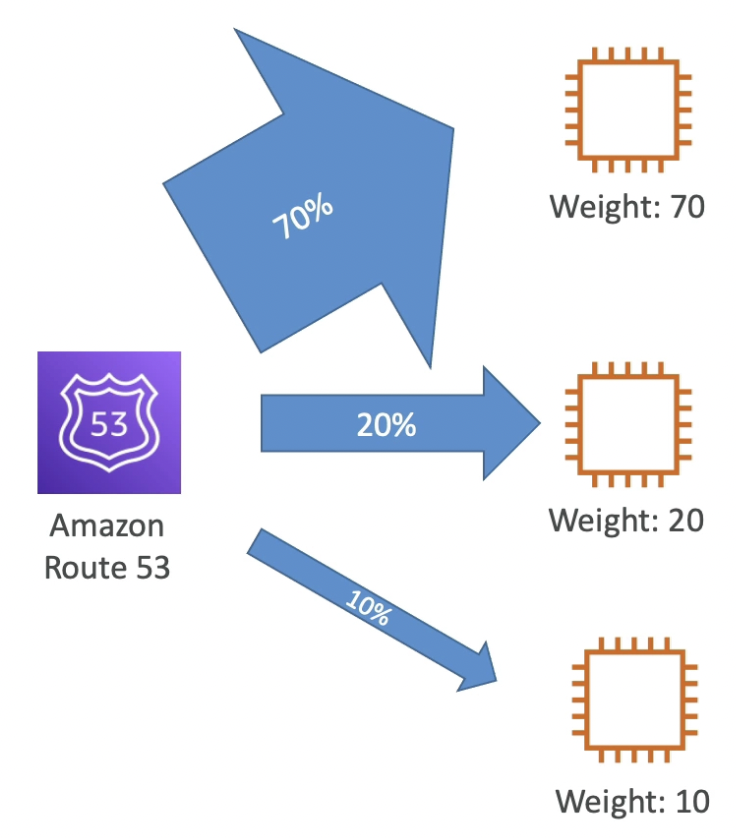
Hands On
Create a record → name → A record → policy as weighted → IP as value → weight as 50 → TTL as 3s for this example → record ID → add another record → same except IP as value and weight 20 → add another record → same except IP as value and weight 30

Latency based
- Redirect to the resource that has the least latency (most of the time is the one closest to us)
- Super helpful when latency for users is a priority
- Latency is based on traffic between users and AWS Regions. For example: German users may be directed to the US (if that provides the lowest latency)
- Can be associated with Health Checks (has a failover capability)
- Need to create multiple records, one for each region that is available and Route 53 will automatically route the clients to the lowest latency region. This can be tested using a VPN.
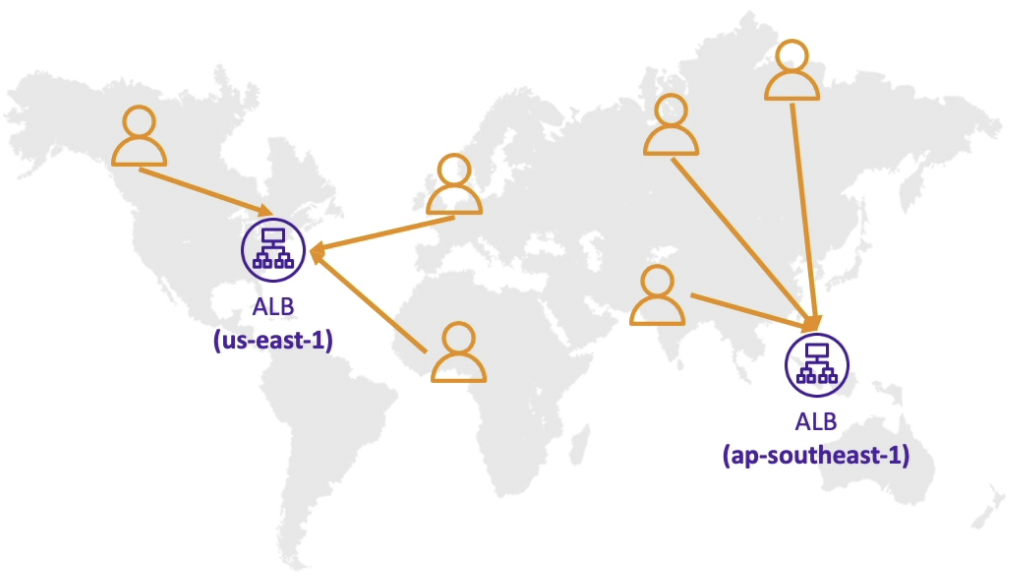
Create a record → same except Routing policy as Latency → When we put a IP we need to specify the region
when we add a record again for a IP we need to specify the region
We can use VPN to check this by using different places near to set Regions

Failover
Here, we can setup a primary EC2 instance with a mandatory health check. If the health check fails, the Route 53 will route the traffic to the secondary instance.

To achieve this we need to create two records of type failover in the hosted zone, one will be labelled as primary and the other will be secondary. A health check must be attached to the primary record.
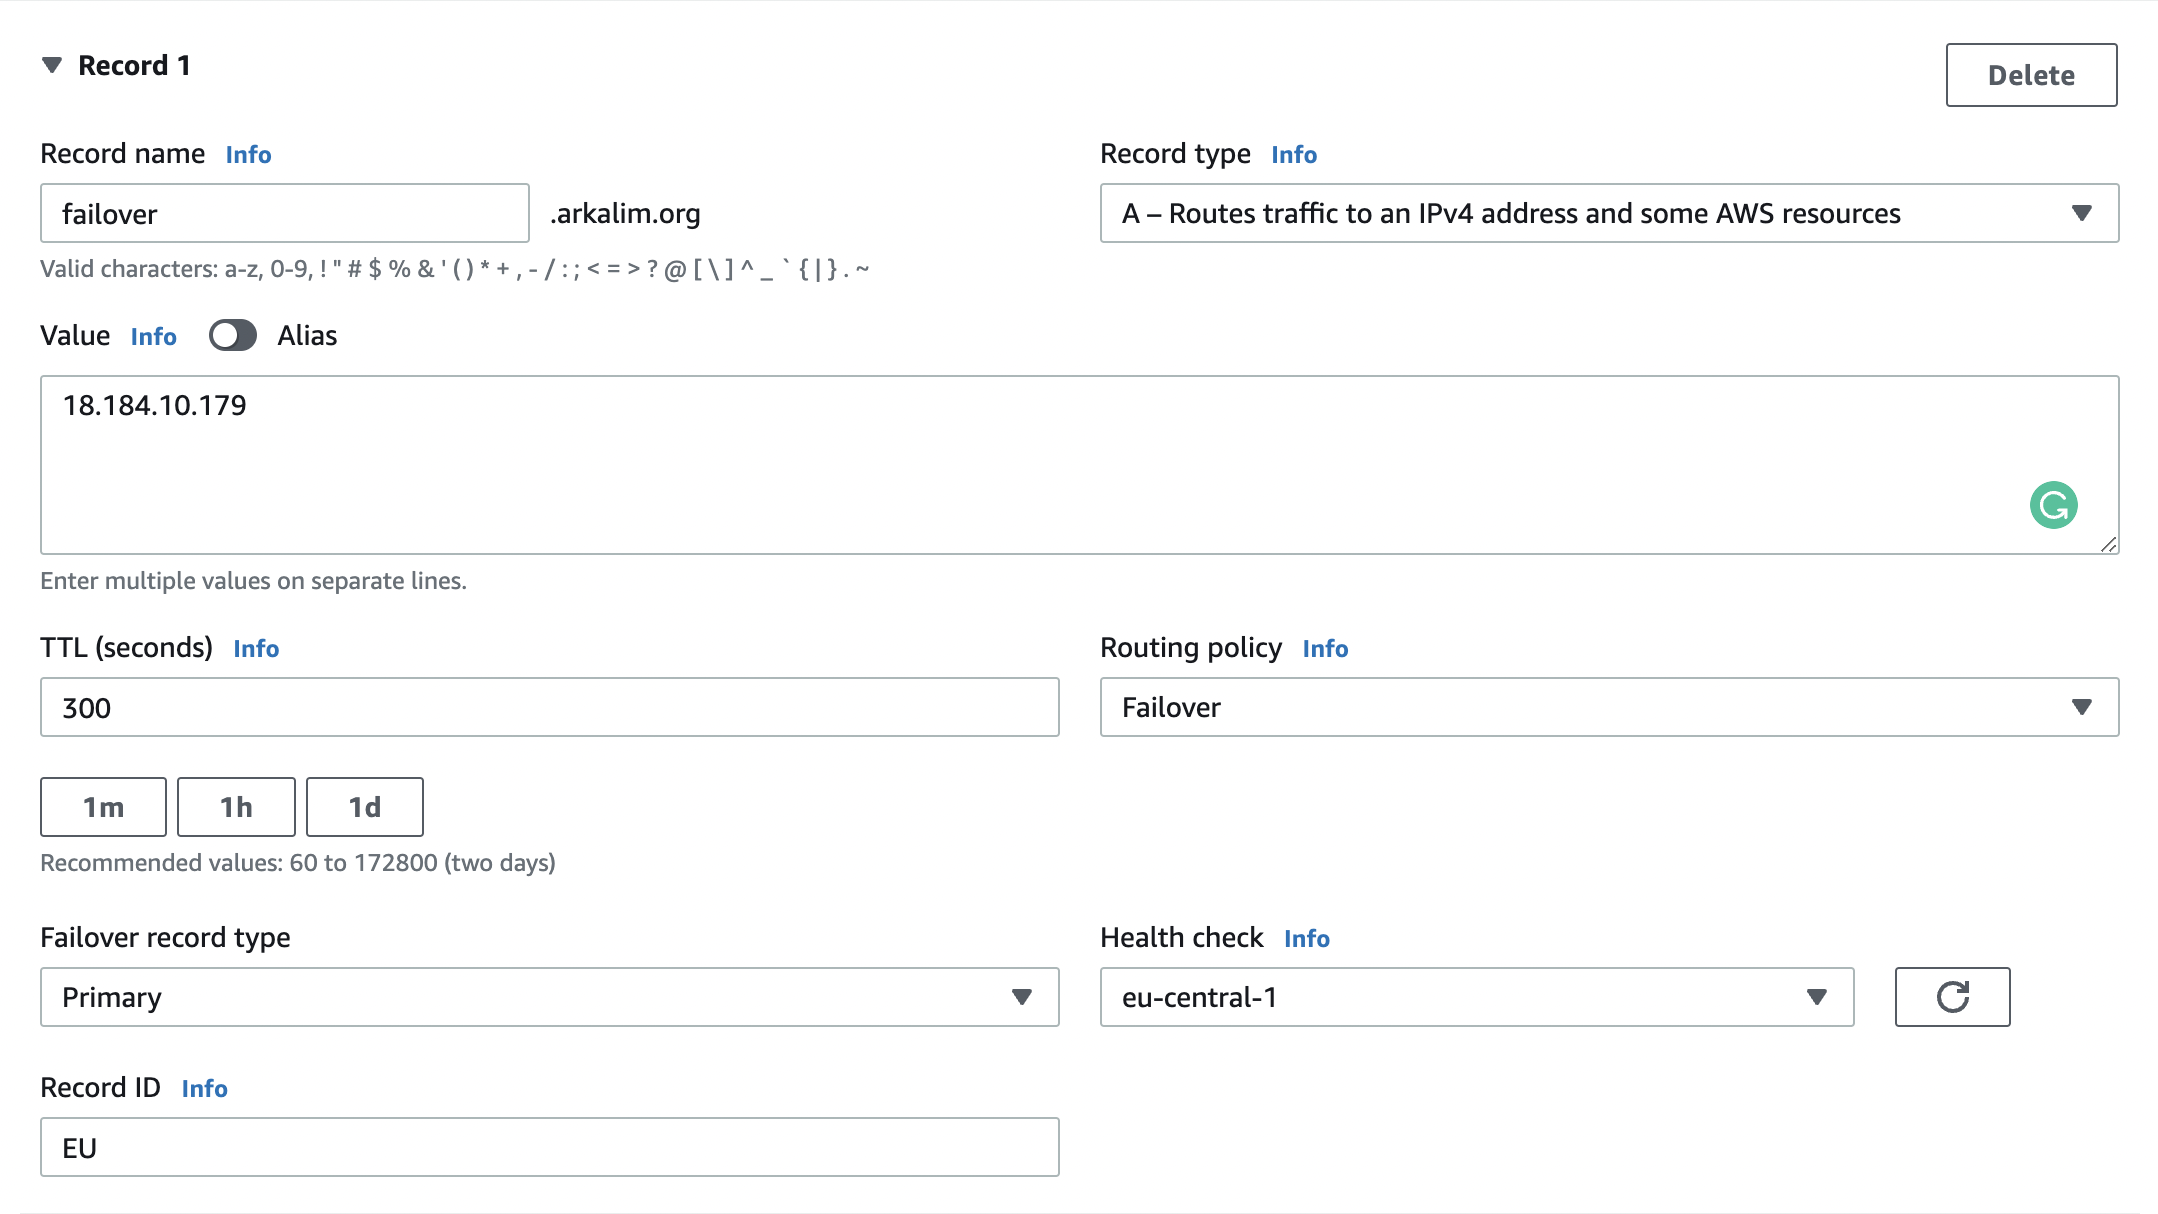
Geolocation
- This routing is based on user location by Continent, Country or by US State (if there’s overlapping, most precise location selected)
- Should create a “Default” record (in case there’s no match on location)
- Use cases: website localization, restrict content distribution, load balancing, language preference, etc.
- Can be associated with Health Checks

When creating records, we can select a continent, country or US states. Also, create a record with the location as default for the case when the location doesn’t match any. This can be tested by using a VPN.
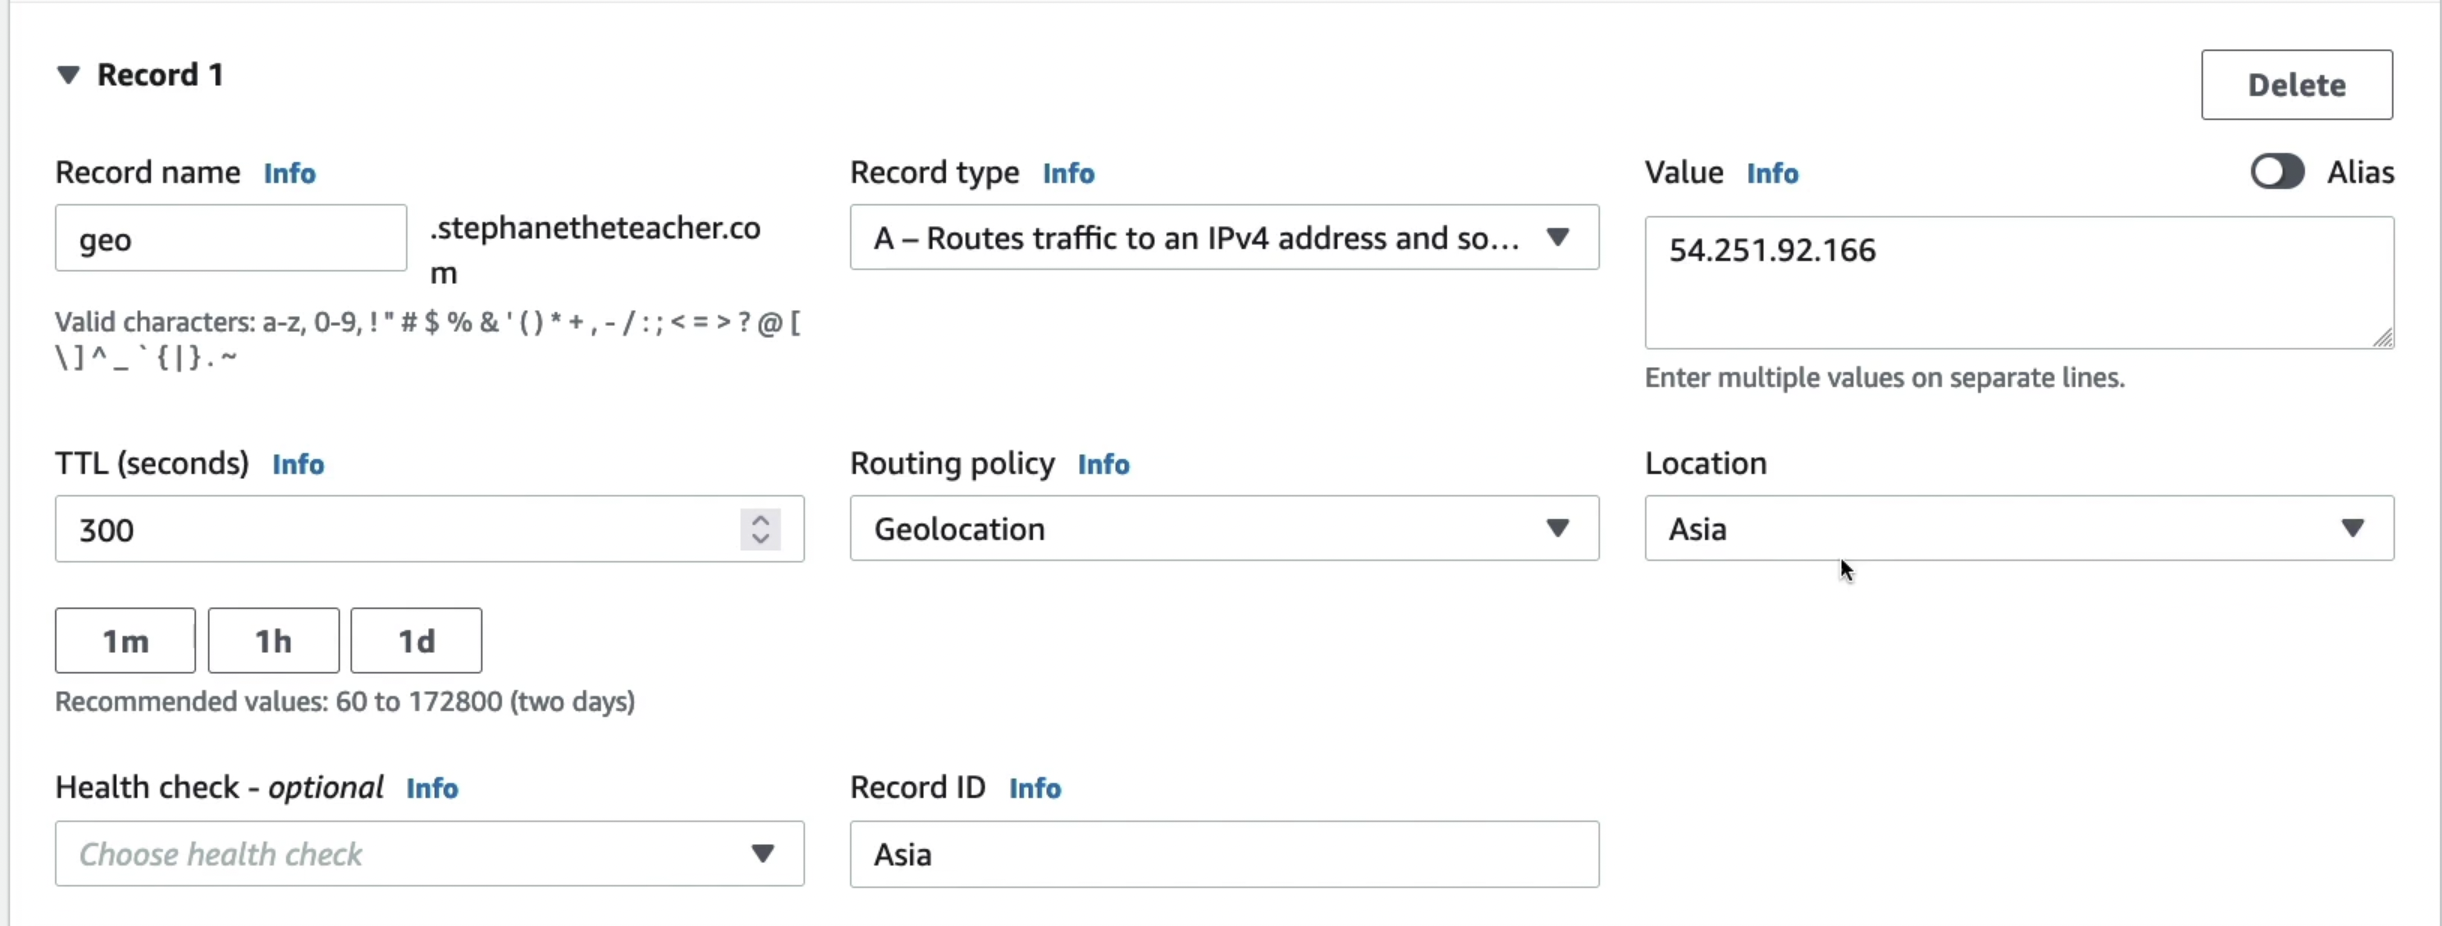
Geo Proximity (using Route 53 Traffic Flow feature)
- Route traffic to your resources based on the geographic location of users and resources
- It provides the ability to shift more traffic to resources based on the defined bias. To change the size of the geographic region, specify bias values:
- To expand (1 to 99) → more traffic to the resource
- To shrink (-1 to-99) → less traffic to the resource
- Resources can be:
- AWS resources (specify AWS region)
- Non-AWS resources (specify Latitude and Longitude)
- You must use Route 53 Traffic Flow (advanced) to use this feature
- No bias means going to the close Region
- The higher the bias, the farther the decision boundary will be from that resource.
- High Bias take more users to that Resource therefore increase the traffic
- Low Bias try to remove more users from that Resource, therefore decrease the traffic

Multi-Value
- Use when routing traffic to multiple resources
- Route 53 return multiple (max 8) values / resources
- Can be associated with Health Checks (only healthy resources will be returned). It is not possible in case you return multiple values from a simple routing policy since they don’t support health checks. So, some of the returned values in that case may be unhealthy.
- Multi-Value (client-side load balancing) is not a substitute for having an ELB (server-side load balancing)
When creating multi-value routing policies, we need to create multiple records in the hosted zone (one for each resource). We can separately attach health check to each instance. The records having the same path will be treated as the multiple options for that path.
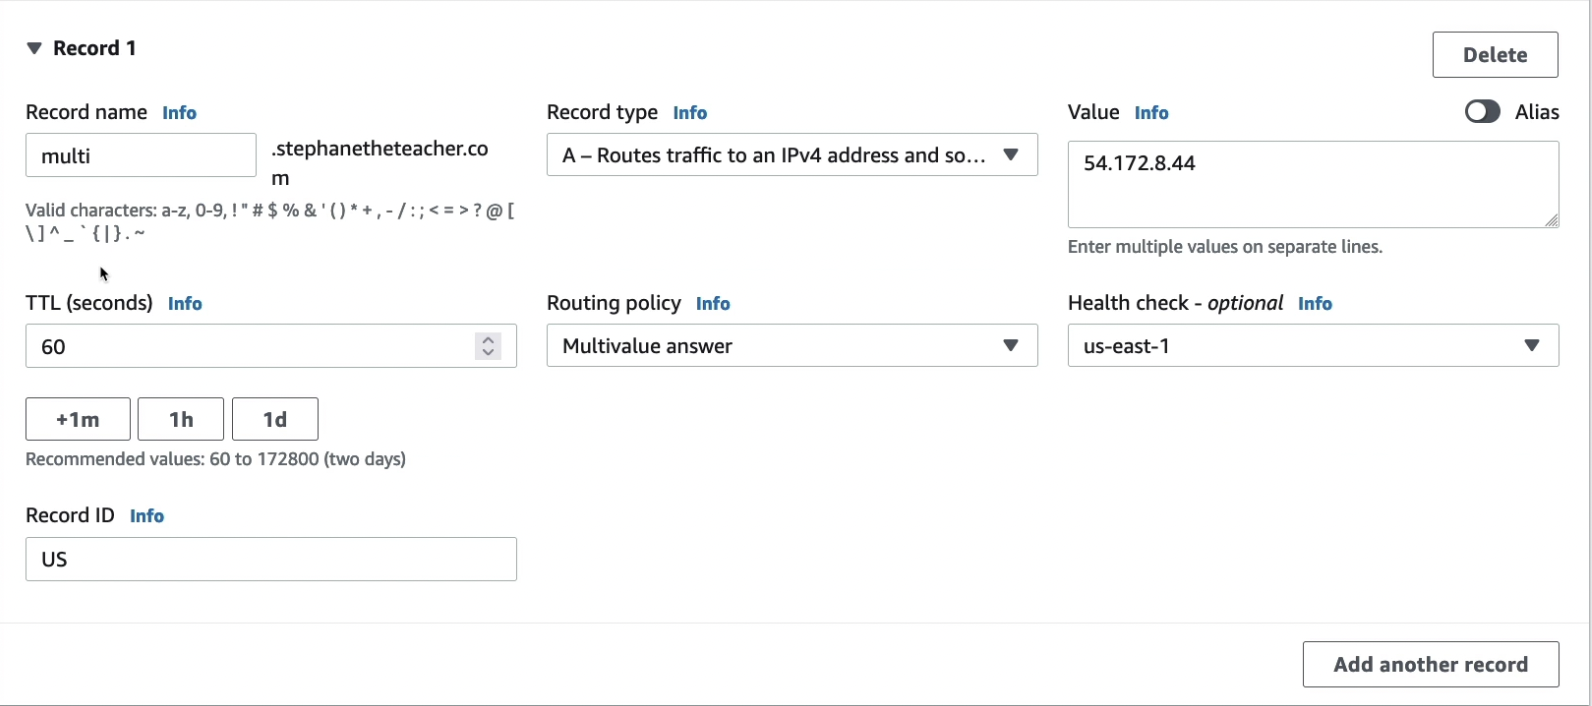
Querying the route will return multiple endpoints that are healthy.
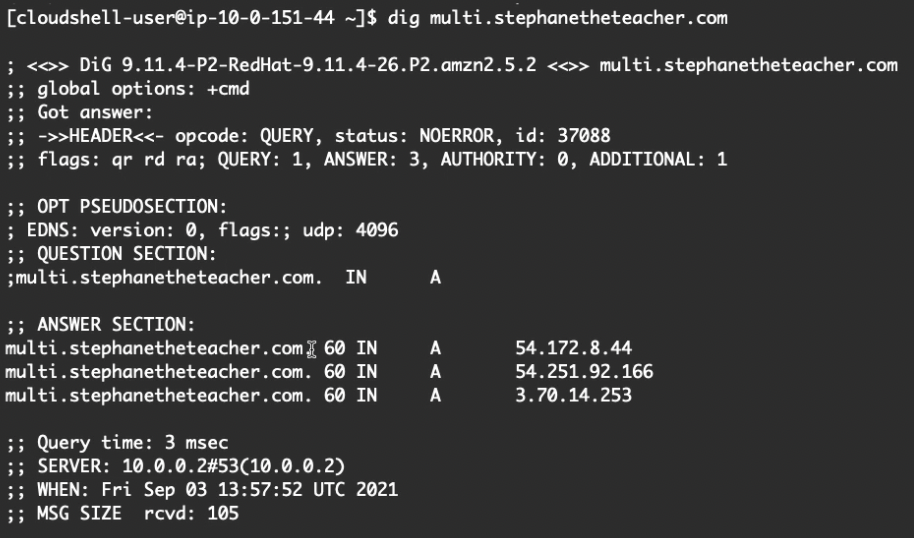
Health Checks
Theory
Intro
- HTTP Health Checks are only for public resources
- Health Check allows for Automated DNS Failover. So, if a region is down, the users will be routed to another region.
- There are three types of health checks on Route 53:
- Health checks that monitor an endpoint (application, server, other AWS resource)
- Health checks that monitor other health checks (Calculated Health Checks)
- Health checks that monitor CloudWatch Alarms (full control) e.g. throttles of DynamoDB, alarms on RDS, custom metrics (helpful for private resources)
- Health Checks are integrated with CloudWatch metrics
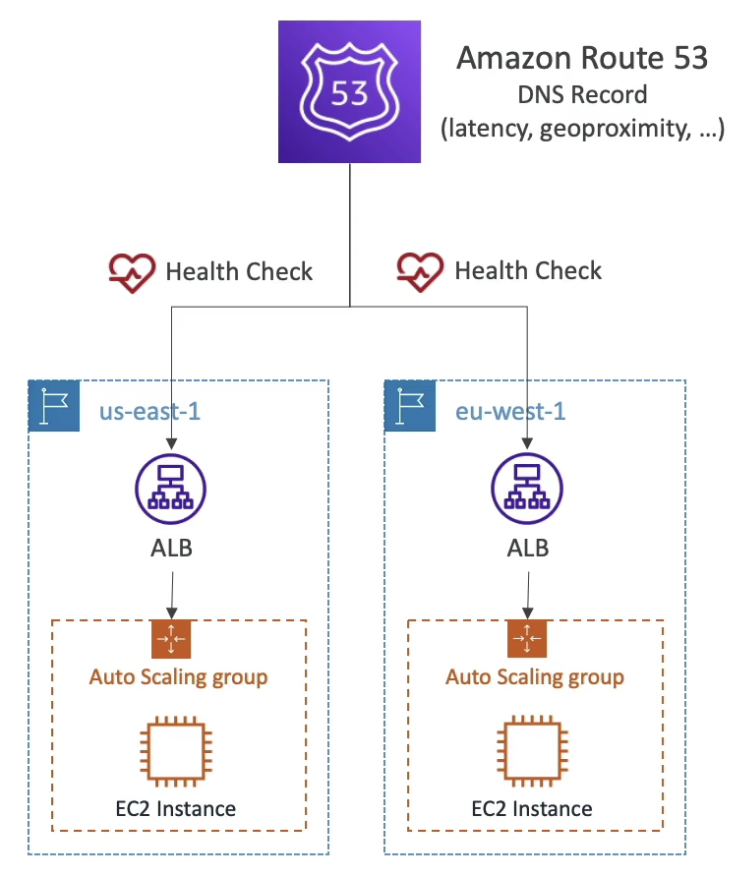
How an endpoint is monitored
- About 15 global health checkers will check the endpoint health
- Healthy/Unhealthy Threshold: 3 (by default)
- Health Check Interval: 30 sec (can set to 10 sec but the cost is higher)
- Supported protocol: HTTP, HTTPS and TCP
- If > 18% of health checkers report the endpoint is healthy, Route 53 considers it Healthy. Otherwise, it’s Unhealthy
- We have the ability to choose which locations you want Route 53 to use for health checks
- Health Checks pass only when the endpoint responds with the 2xx and 3xx status codes
- In case of a text response, Health Checks can be setup to pass / fail based on the text in the first 5120 bytes of the response
- You must configure your router / firewall to allow incoming requests from the IPs of Route 53 Health Checkers (https://ip-ranges.amazonaws.com/ip-ranges.json)
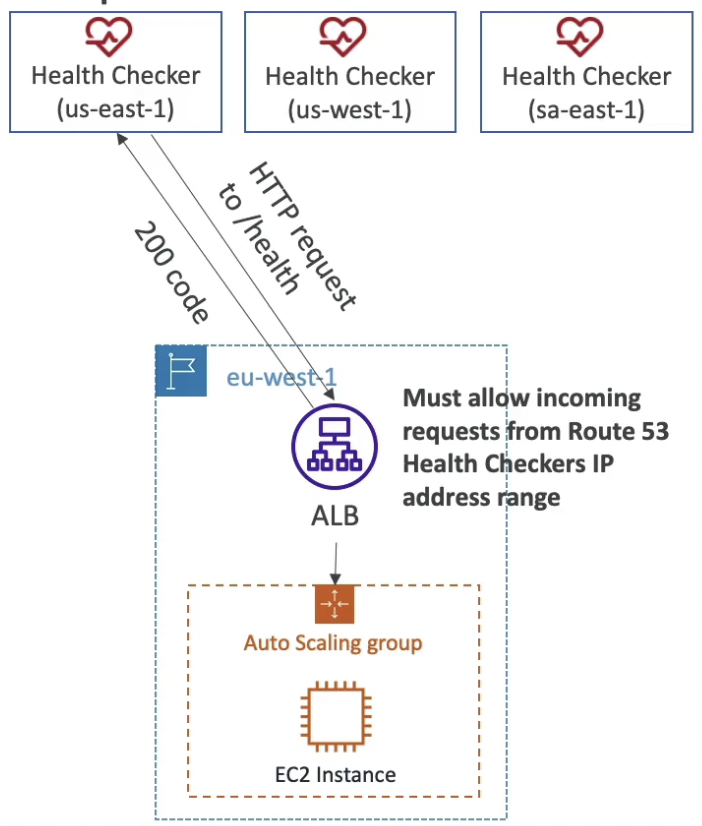
Calculated Health Checks
- Combine the results of multiple Health Checks into a single Health Check. AND, OR or NOT can be used to combine children health checks.
- Can monitor up to 256 Child Health Checks
- Specify how many of the health checks need to pass to make the parent pass
- Usage: perform maintenance to your website without causing all health checks to fail
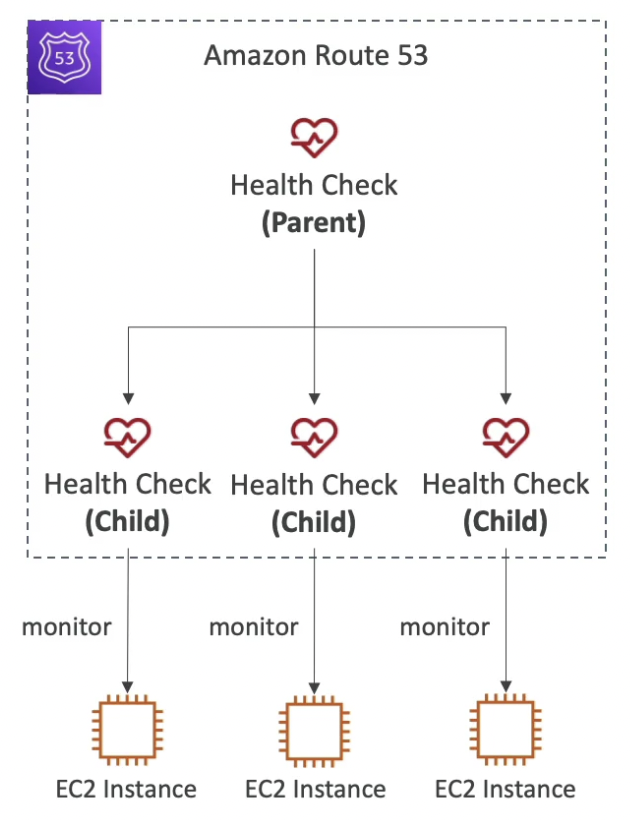
Health checks for private hosted zones
Route 53 health checkers are outside the VPC. They are not designed to perform health checks on private resources. They can’t access private endpoints (private VPC or on-premises resource). Instead, you can create a CloudWatch Metric and associate a CloudWatch Alarm to it, then create a Health Check that checks the CW alarm.
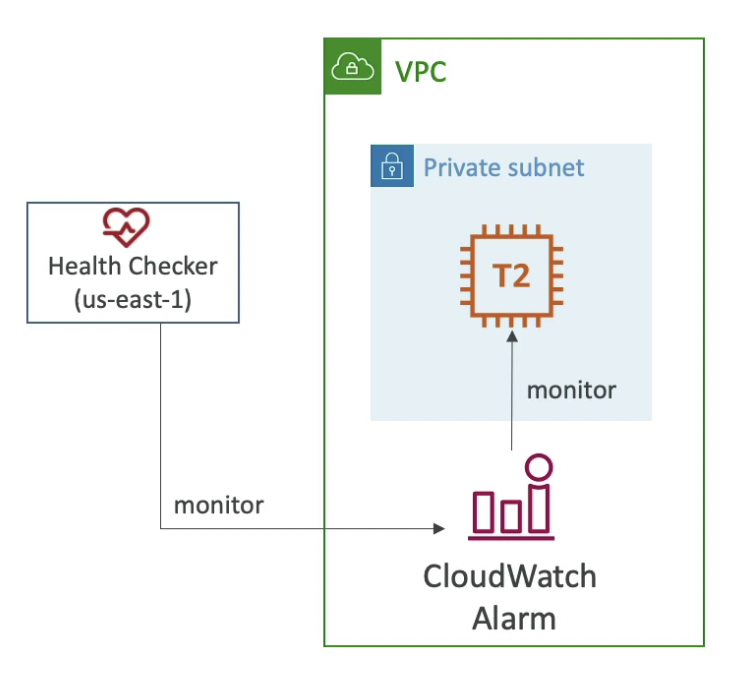
Hands on
Create health checks to monitor EC2 instances
Route 53 → Health Checks → Create health check
IP address should be of the EC2 instance

Untitled
Create a calculated health check
Since one of the instances is unhealthy, the calculated health check is also unhealthy.

Untitled
new →
Traffic Policies
- Intro
- Visual editor to manage complex routing decision trees. Simplifies the process of creating and maintaining records in large and complex configurations.
- Configurations can be saved as Traffic Flow Policy
- Can be applied to different Route 53 Hosted Zones (different domain names)
- Supports versioning

Untitled
- Create a traffic policy for Geoproximity based routing
Route 53 → Traffic Policies → Create traffic policy
GUI is super interactive to use.

Untitled
- Intro
Hands on
- Registering a domain
Route 53 → Registered Domains → Register a domain → Choose the domain → Fill in your contact details
Enable privacy protection to prevent getting spammed by the internet on your registered contact details.
Once registered, the domain name will be visible under Hosted Zones. Inside the hosted zone, there will be two records. Here, in case of NS (named server), the values represent the DNS servers that store the IP linked to the registered domain.
⛔ Registering a domain costs money $ 12 for an entire 1 year at a time.
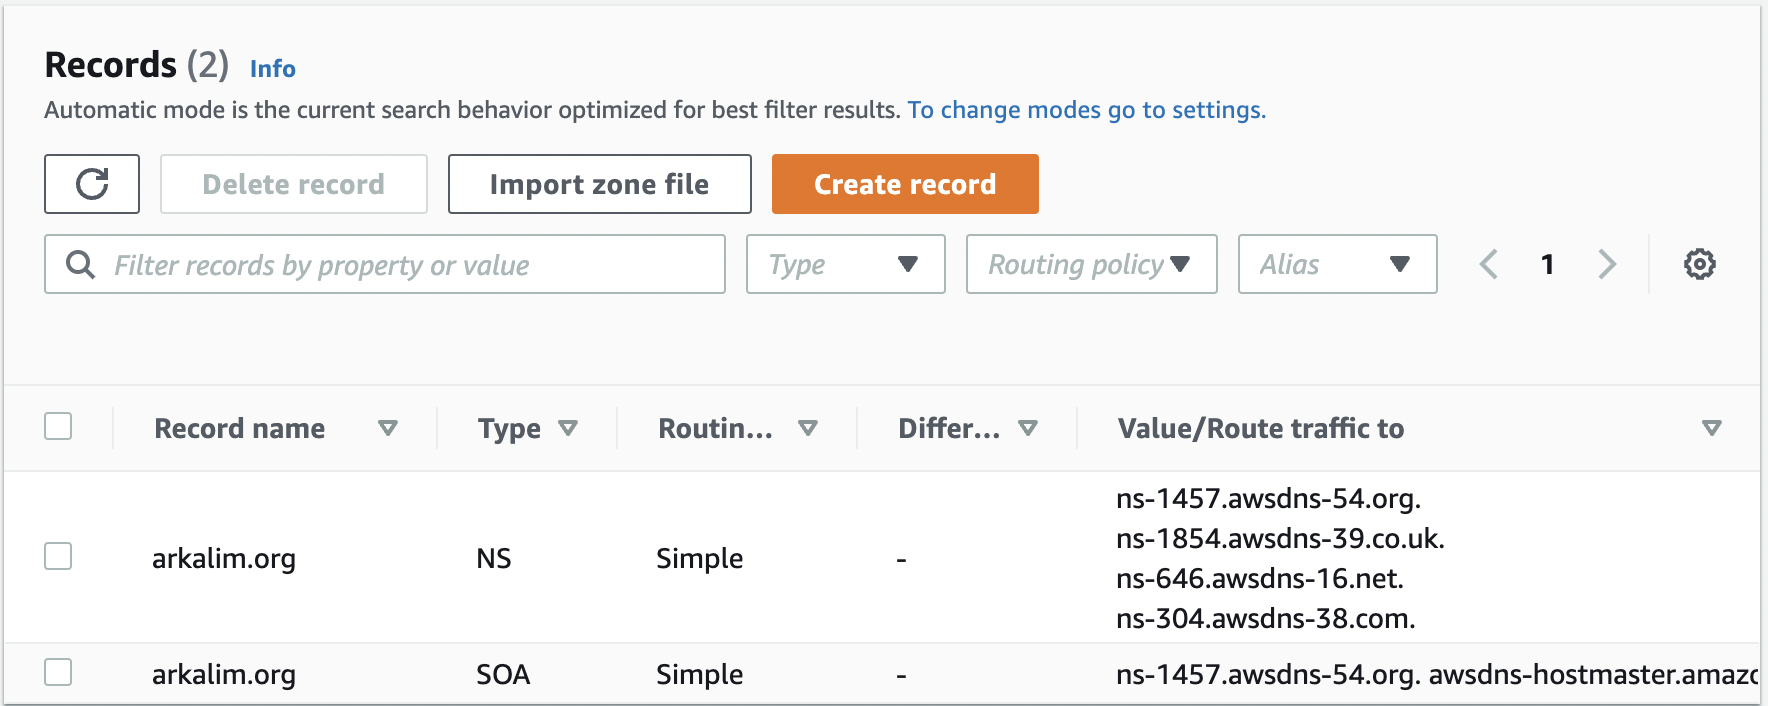
- Create records in a hosted zone
Route 53 → Hosted Zones → Open the hosted zone → Create records
In the diagram below, I have routed traffic on about.arkalim.org to the IP 192.0.0.123 using record type A.

- Query the hosted zone using terminal
dig about.arkalim.orgThe ANSWER SECTION tells that there is a record for about.arkalim.org which is of type A and is pointing to 192.0.0.123. Also the number 291 is the time in seconds for which this value is cached in the client.
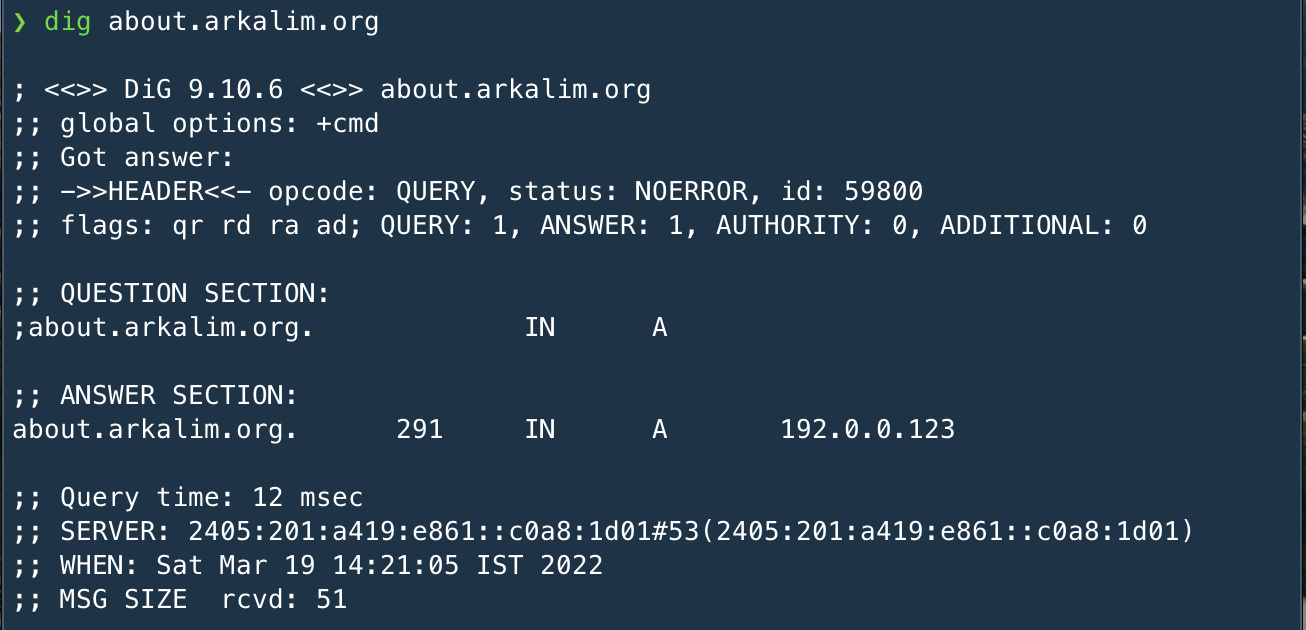
- EC2 setup
ALB (ap-south-1 | Mumbai) - my-first-alb-1053855370.ap-south-1.elb.amazonaws.com
Instance 1 (ap-south-1) - 35.154.11.198
Instance 2 (us-east-1) - 52.87.202.214
Instance 3 (eu-central-1) - 18.184.10.179
Now, if we create a record in the hosted zone pointing to the public IP of any of the instances above, we can open that domain in the web browser to be directed to that public IP.

- Create a CNAME record mapping to an ALB
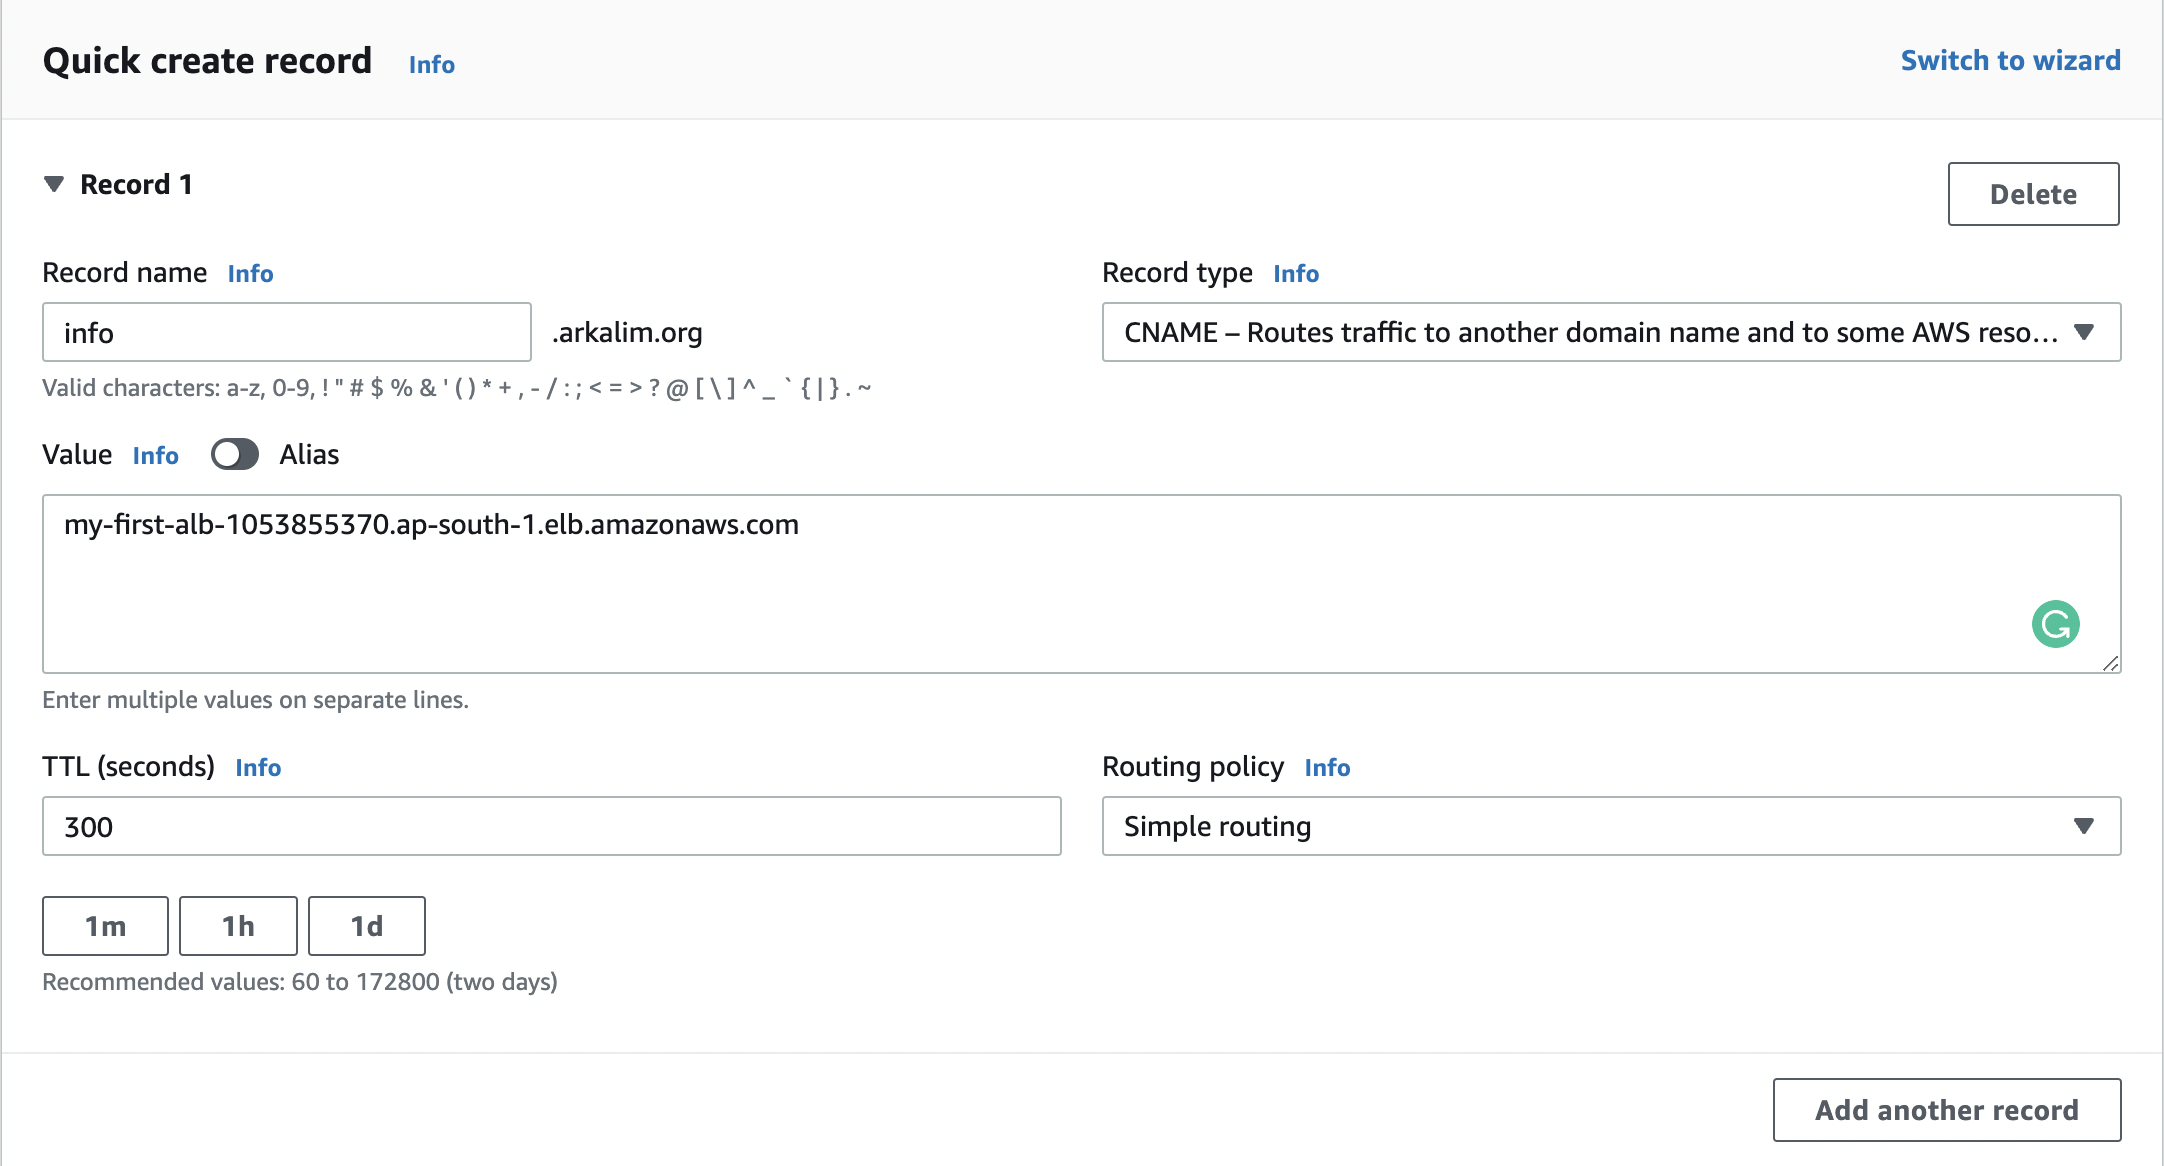
- Create an Alias record mapping the Zone Apex to an ALB
Only Alias records can be used for this. CNAME records cannot map to root level hostnames.

- Delete a hosted zone
- First delete all the records except the NS and SOA
- Registering a domain
3rd party Domains and Route 53
- Theory
- You buy or register your domain name with a Domain Registrar typically by paying annual charges (e.g. GoDaddy, Amazon Registrar, etc.). The Domain Registrar usually provides you with a DNS service to manage your DNS records.
- You can use another DNS service to manage your DNS records. Example: purchase the domain from GoDaddy and use Route 53 to manage your DNS records
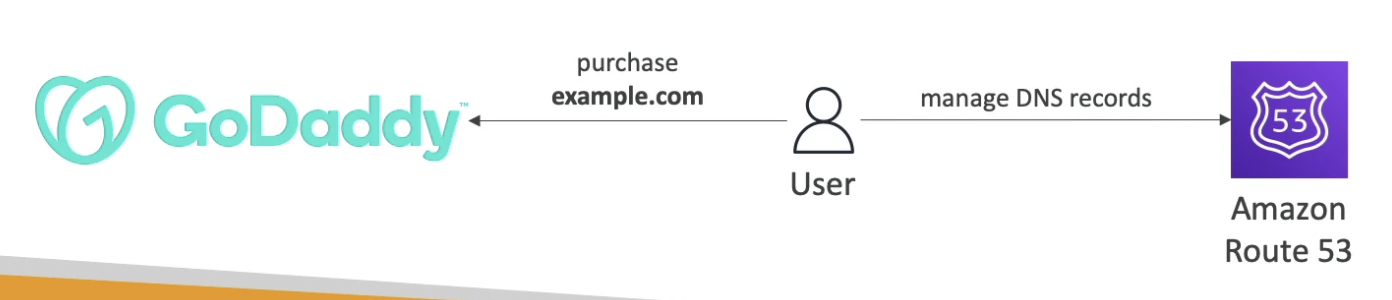
- Use GoDaddy as registrar and Route 53 as DNS
Once we register a hostname at GoDaddy, we need to update the name servers (NS) of GoDaddy to match the name servers of a public hosted zone created in Route 53. This way, GoDaddy will use Route 53’s DNS.
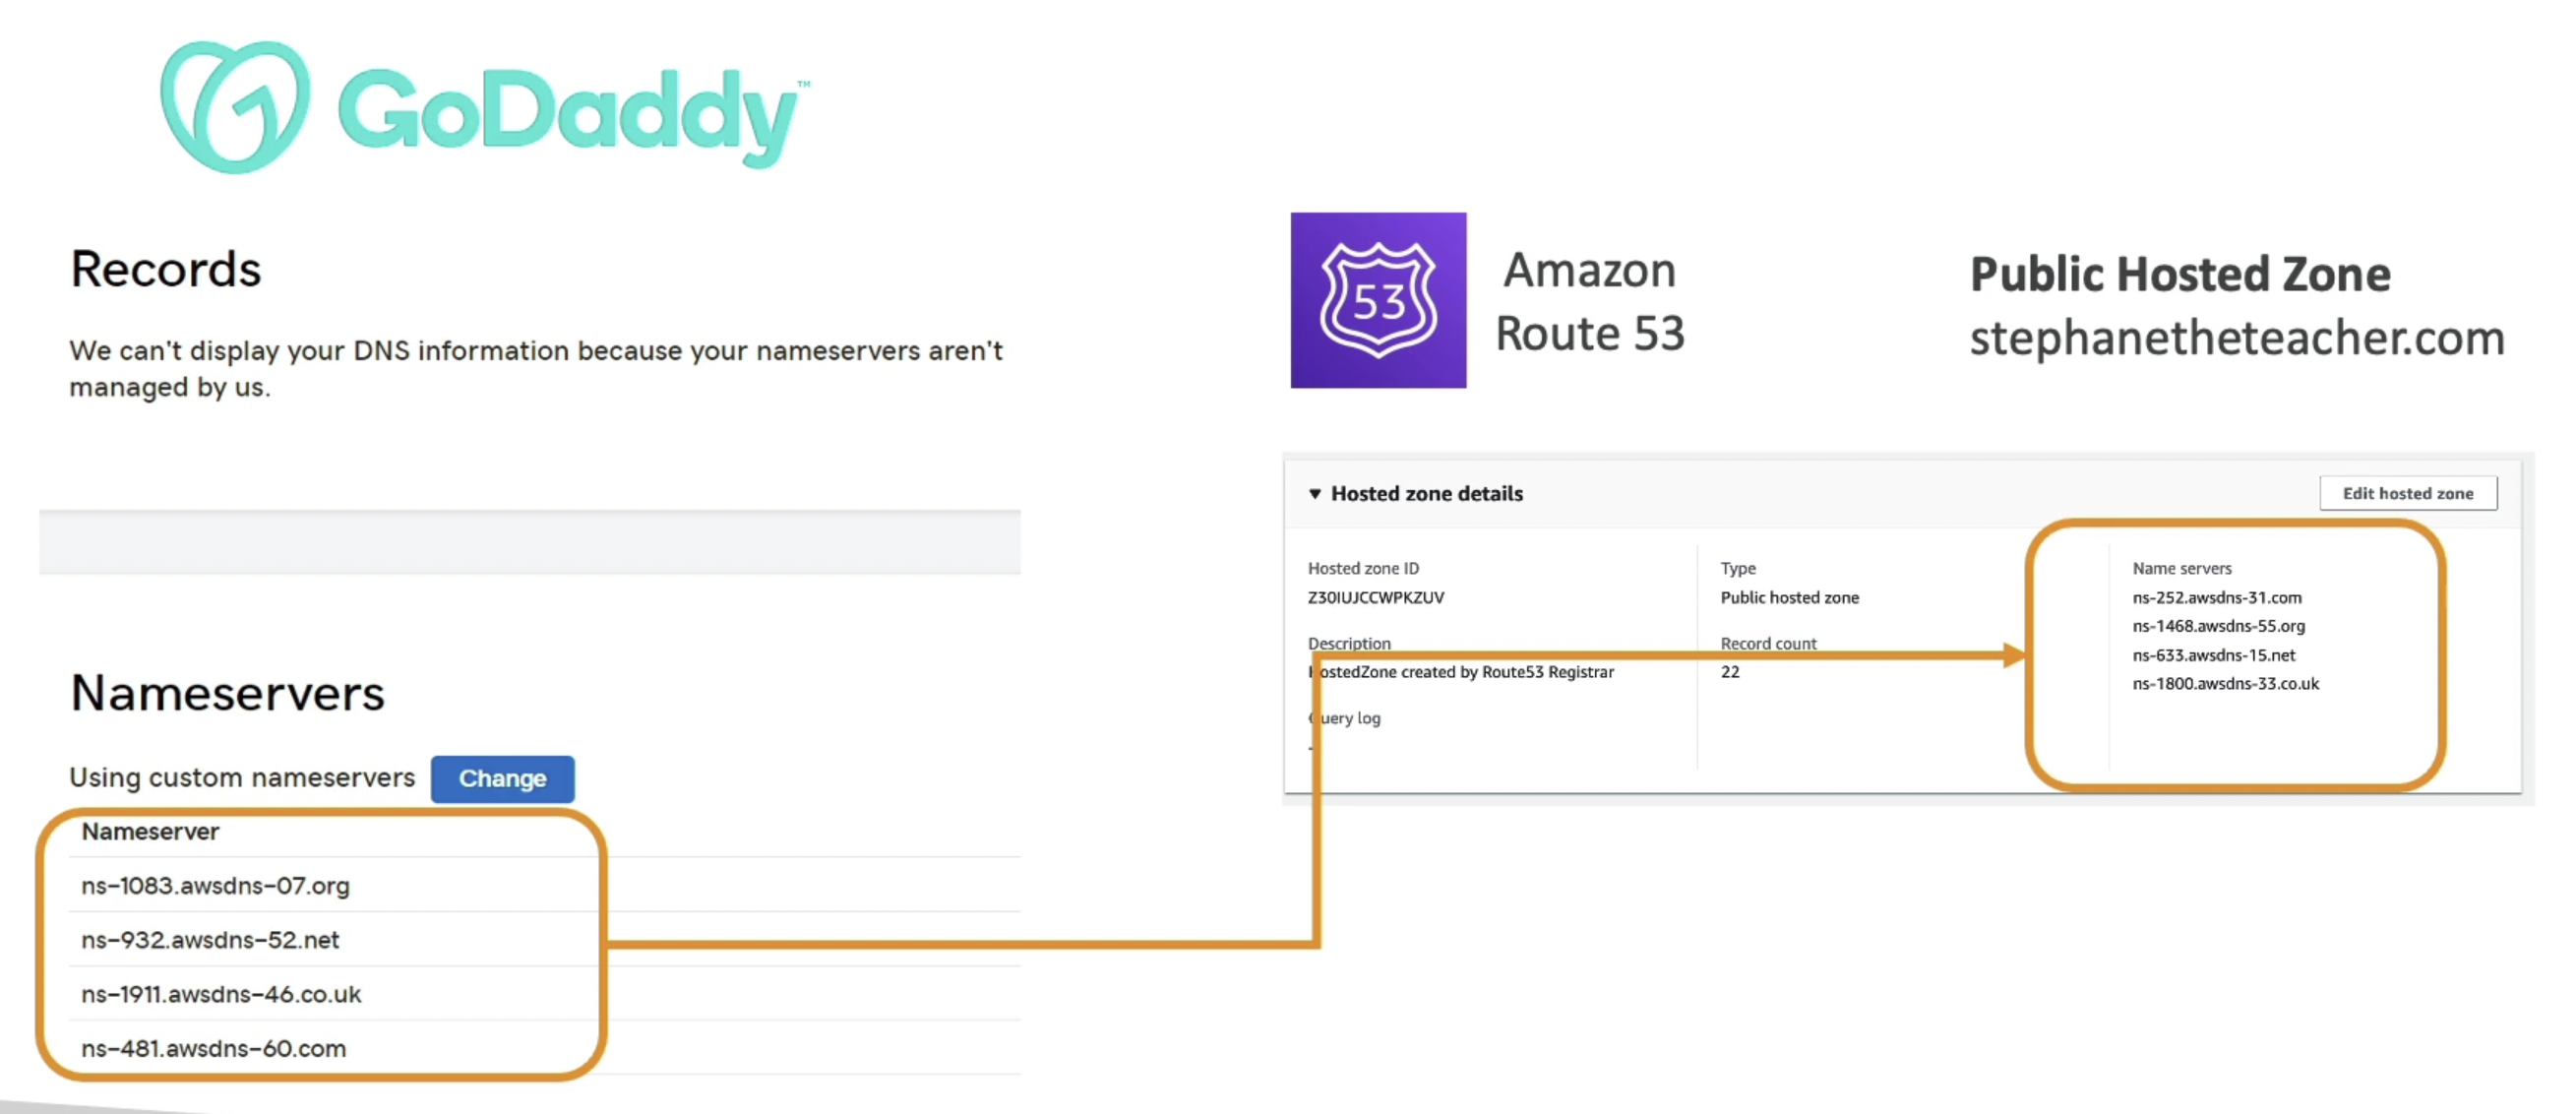
.png)
- Theory
Section 11: Classic Solutions Architecture Discussions
Section 11: Classic Solutions Architecture Discussions
Solutions
In this section, we will see how all the technologies we have learned so far connects together to provide a solution. We will look at some case studies:
WhatIsTheTime.com
Allows people to know the current time.
Stateless Web App: Database not needed
Version 1
Single public EC2 instance with an elastic IP to keep it static.
Problem: if load increases, need to scale vertically.

Version 2
Switched T2 to M5 (scaled vertically)
Problem: downtime while upgrading to M5 and vertical scaling is limited

Version 3
Add more instances (scale horizontally) and attach elastic IPs to each instance.
Problem: Users need to be aware of all the IPs and we can only have 5 elastic IPs max

Version 4
Instead of using elastic IPs, use Route 53 to return the list of IPs of all the EC2 instances.
Problem: if an instance goes down, DNS will take some time to update based on health check (1h), so some users will experience down time. Also, not easy to add or remove instances as DNS takes some time to update.

Version 5
Instead of letting the client select a public EC2 instance, we can do the load balancing on the server side using a load balancer. This will allow the EC2 instances to be private and restricted to be accessed only by the ELB (using security groups). Route 53 will have an alias record pointing to the ELB which using health checks will direct the traffic only to live instances.
Problem: Horizontal Scaling is still manual

Version 6
Auto scaling group is used to dynamically add or remove instances (horizontal scaling) and attach them to ELB.
Problem: Since all the instances and ELB are hosted in the same AZ, they might go down in case of a disaster.
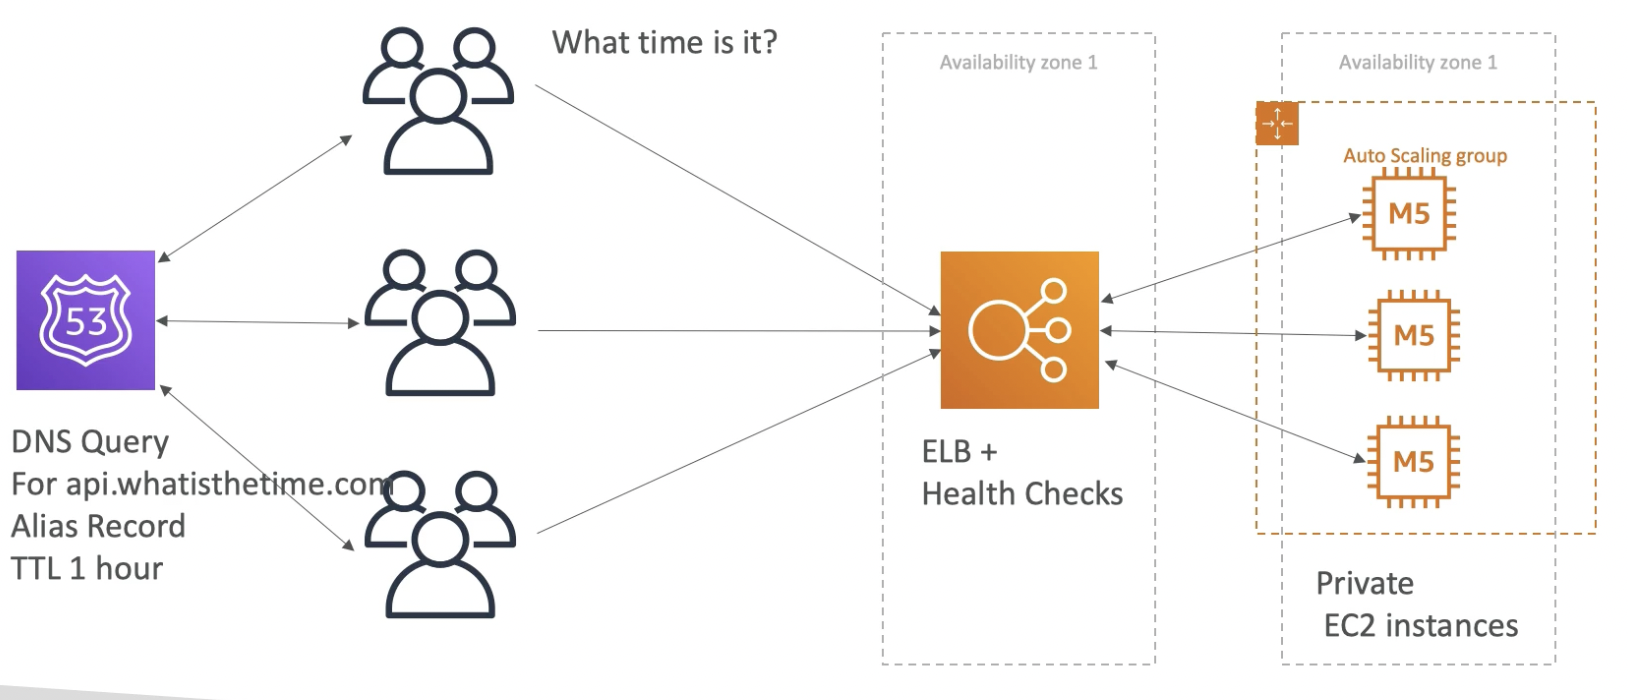
Version 7
Let’s make our app multi-AZ by setting up ELB in all the AZs and making the ASG span all the AZs. This will make our app highly available and resilient to failure.
Problem: Expensive as all the EC2 instances are on-demand even though we know that the minimum number of instances required to be highly available is 2.

Version 8
Reserve 2 EC2 instances in separate AZs for 1 or 3 years to stay highly available while cutting down the cost.

Outro
.png)
MyClothes.com
Allows people to buy clothes online (100s of users at the same time). We need horizontal scalability and keep our web application as stateless as possible. Users should have their address stored in a database (stateful web app).
Version 1
Multi AZ ASG with ELB (horizontally scalable solution)
Problem: User loses the cart info while navigating the website because ELB routes every request to a different instance.
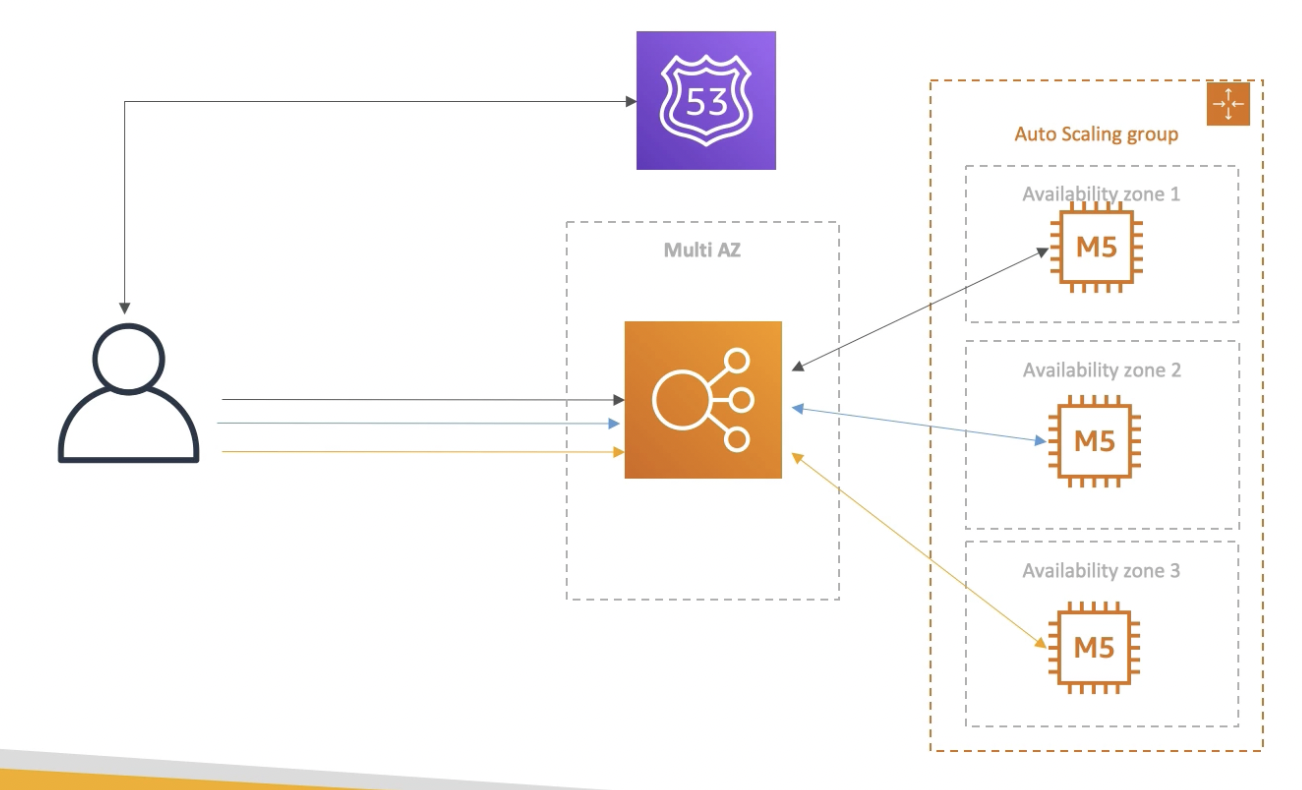
Untitled
Version 2
Implement session affinity (stickiness) at ELB. This will route all of the requests coming from a user to the same EC2 instance. Will solve the lost cart info issue.
Problem: if the instance serving user goes down, the state info will be lost.

Untitled
Version 3
Instead of storing the cart info at the server end, store them at the client’s end using Web Cookies. So, the in every HTTP request sent by the client, the cookies will be sent too. This will allow our EC2 instances to remain stateless.
Problem: Security risk as the cart info in cookies can be altered (cookies must be validated) and cookies size must be less than 4KB
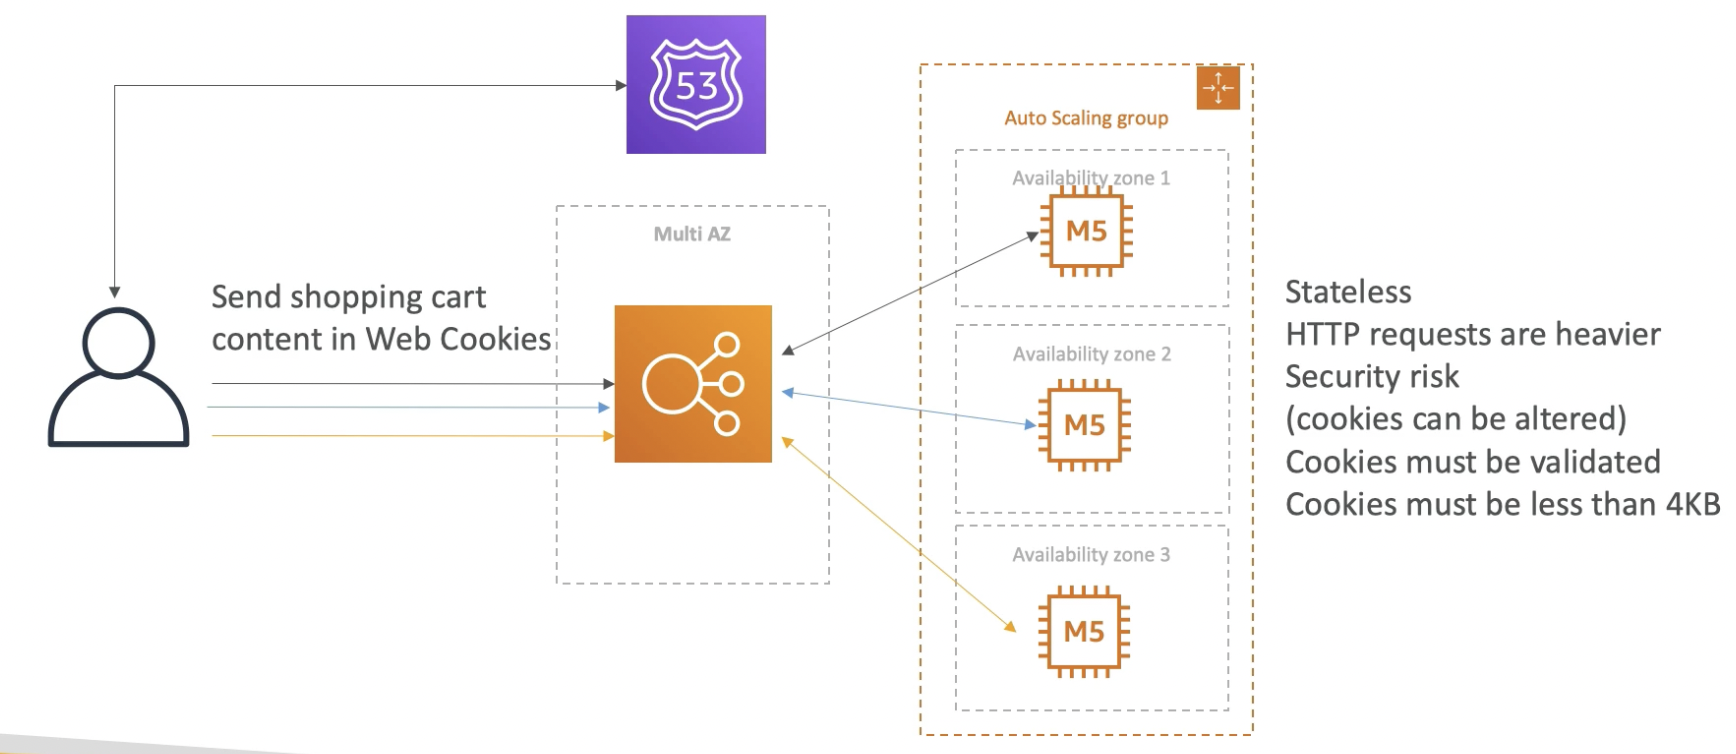
Untitled
Version 4 (Server Session)
Instead of web cookies, store the cart info in ElastiCache cluster which will give us a sesion id. Store the session id as a user cookie. The session id will be sent in the user request, which will be used by the EC2 instances to access the session data from ElastiCache (sub millisecond latency).
EC2 instances will remain stateless (easily scalable horizontally)
Much more secure as attackers can’t modify the content of the ElastiCache.
DynamoDB can be used as an alternative to ElastiCache.
Problem: can’t store catalog and user data (address) permanently
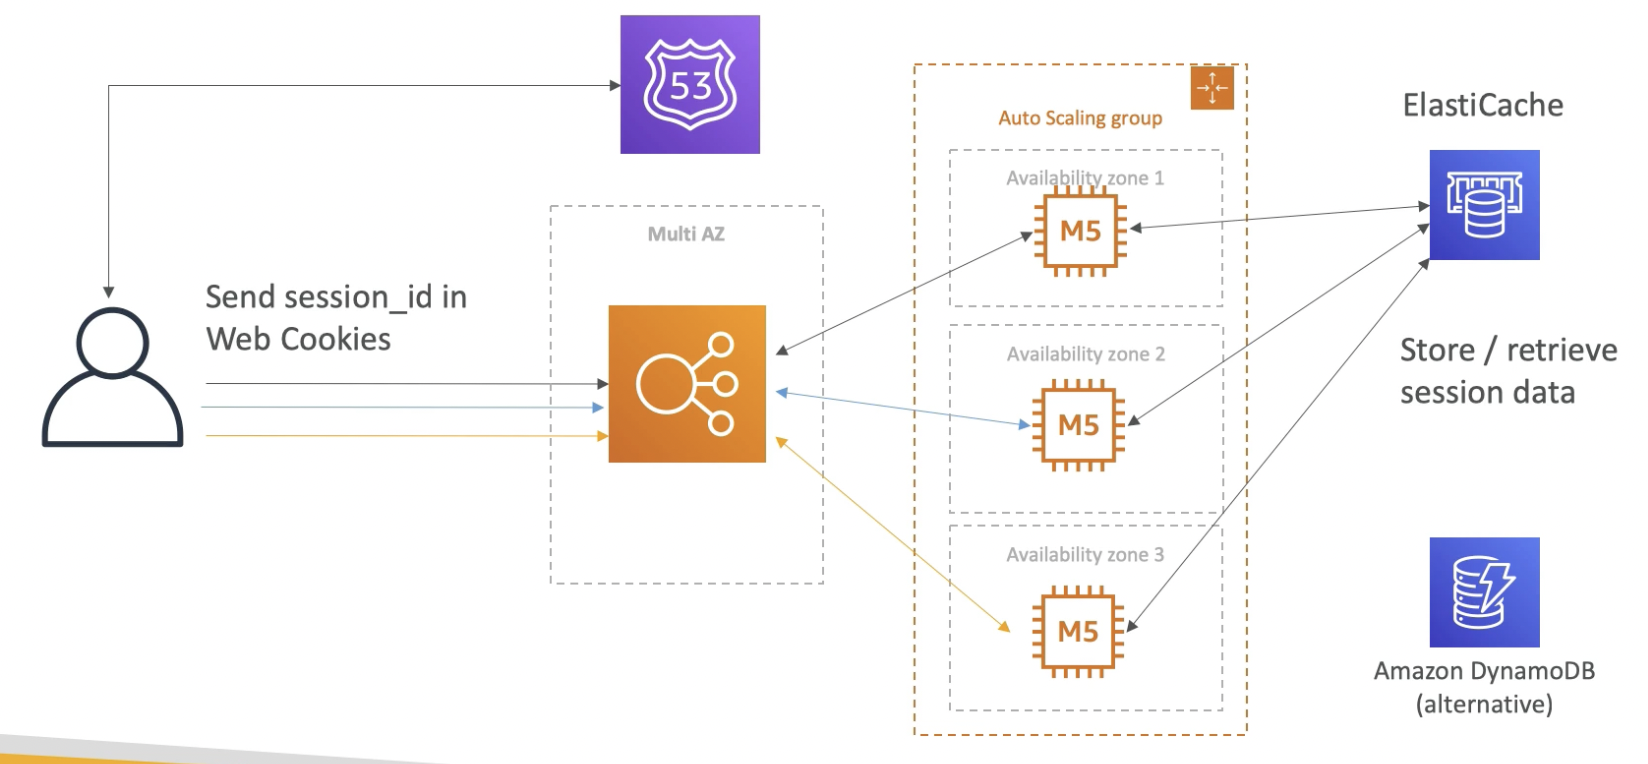
Untitled
Version 5
Add RDS to store catalog and user data permanently. EC2 remains stateless.
Problem: Most of the incoming requests are to read data from the database, so we need to scale the reads.

Untitled
Version 6
Add read replicas to scale the reads (upto 5 read replicas).
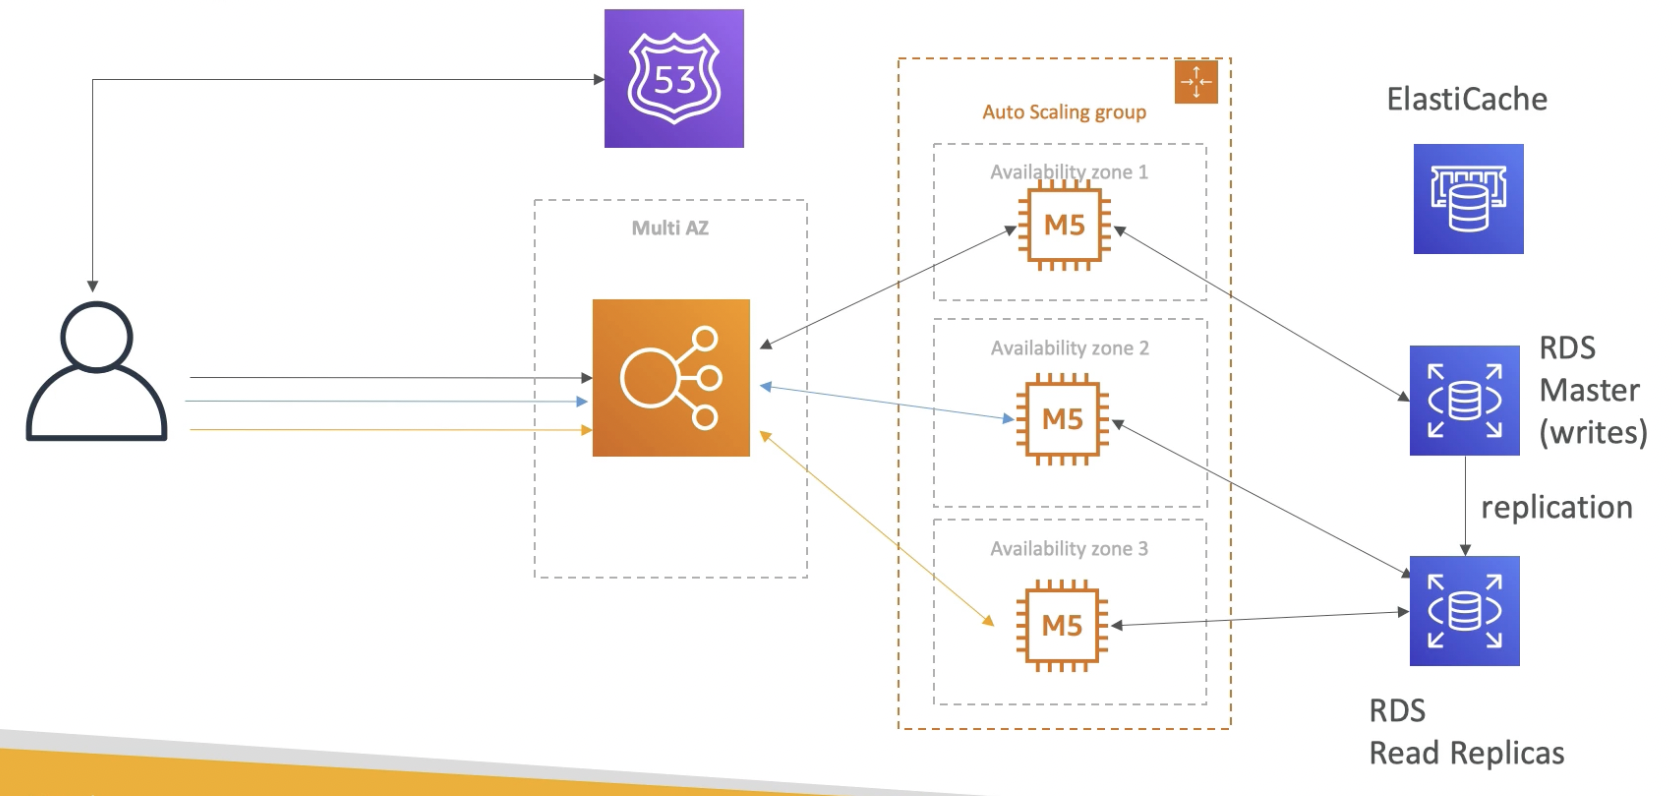
Untitled
Version 6 (alternative)
We can implement Write Through
Use elasticache to cache the reads. So, if another EC2 instance reads the same data, it will first be checked in the cache and if it’s a miss, then it will be fetched from the RDS and stored in the cache. Requires cache maintenance on the application side (difficult).

Untitled
Enhancements
Enable Multi AZ for ElastiCache and RDS
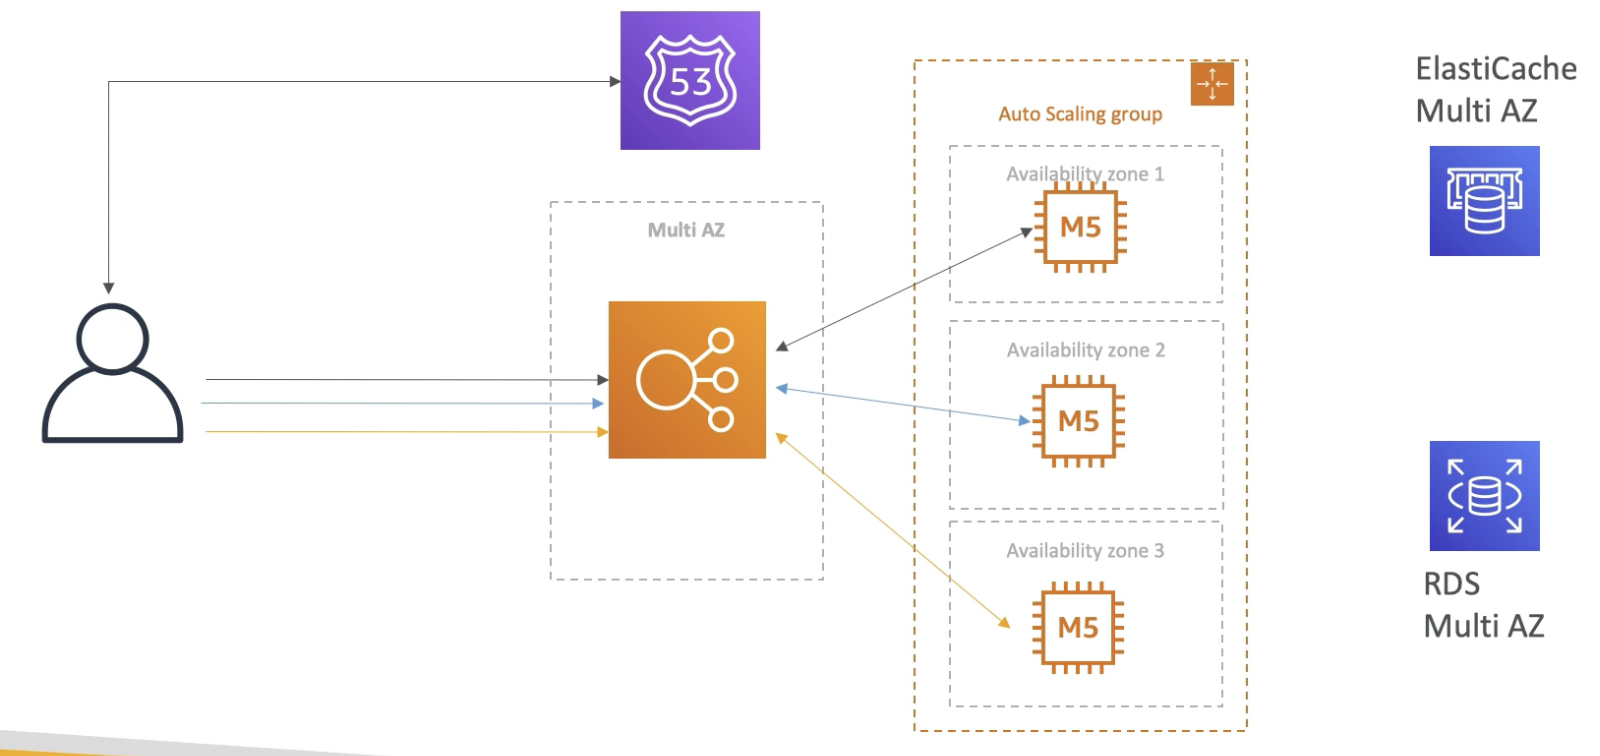
Untitled
Configure security groups
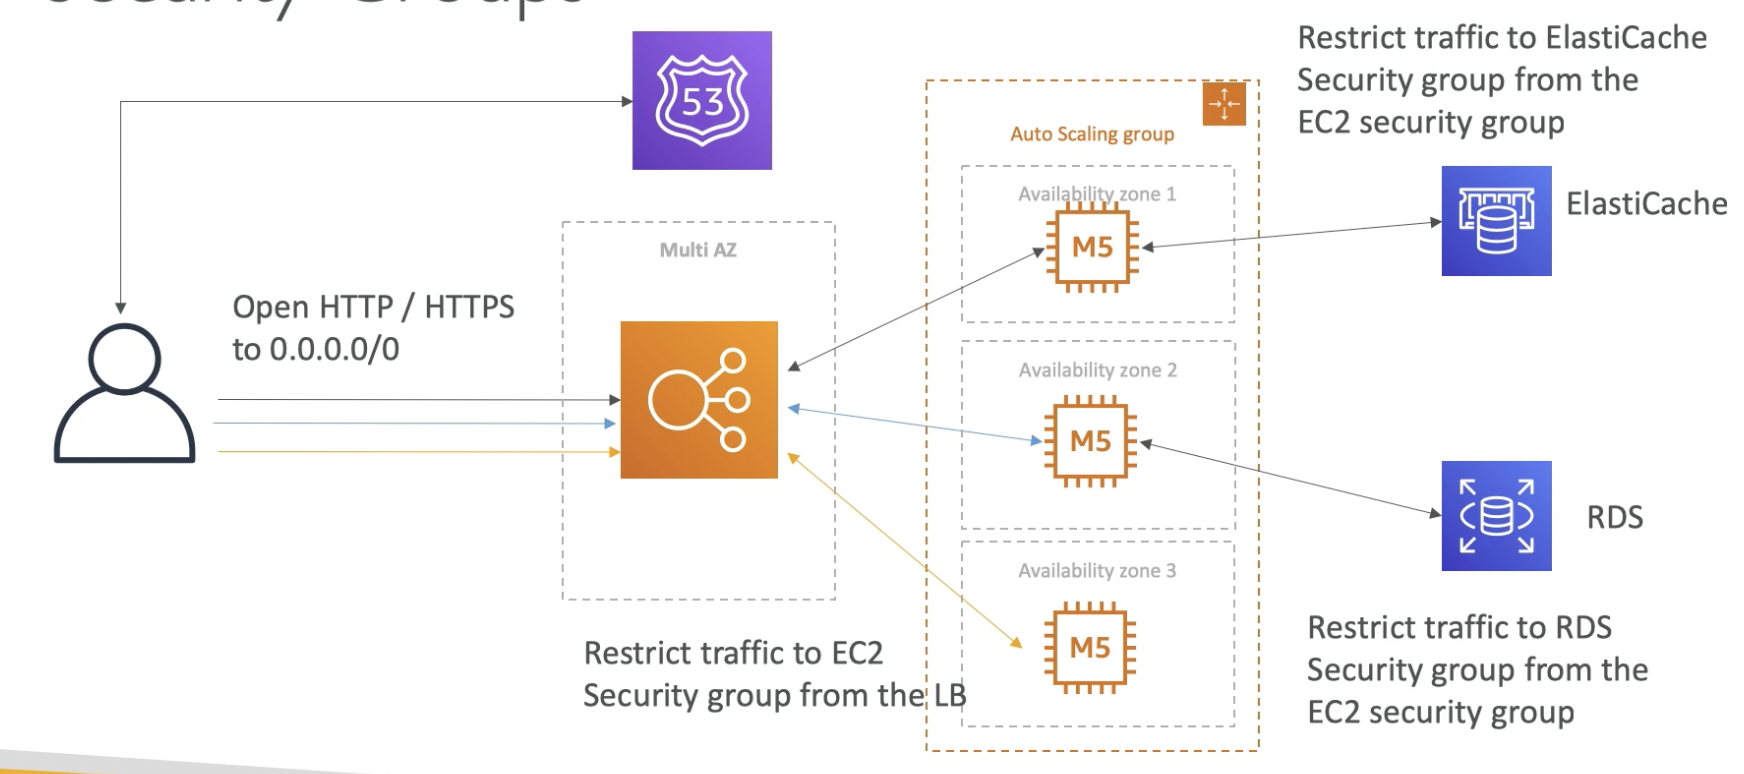
Untitled
Outro
.png)
MyWordPress.com
We are trying to create a fully scalable WordPress website. We want that website to access and correctly display picture uploads. Our user data, and the blog content should be stored in a MySQL database.
Version 1
Multi-AZ ASG and ELB along with Aurora running MySQL engine instead of RDS because Aurora is easier to scale and operate.
Problem: Cannot store images in Aurora

Version 2
Store the uploaded image into each attached EBS volume of the EC2 instances.
Problem: EBS volumes are bound to an AZ, so if another instance gets connected to the user at a later point in time, it will not have the uploaded image. So, this approach can work in case of a single instance but scalability is a problem.
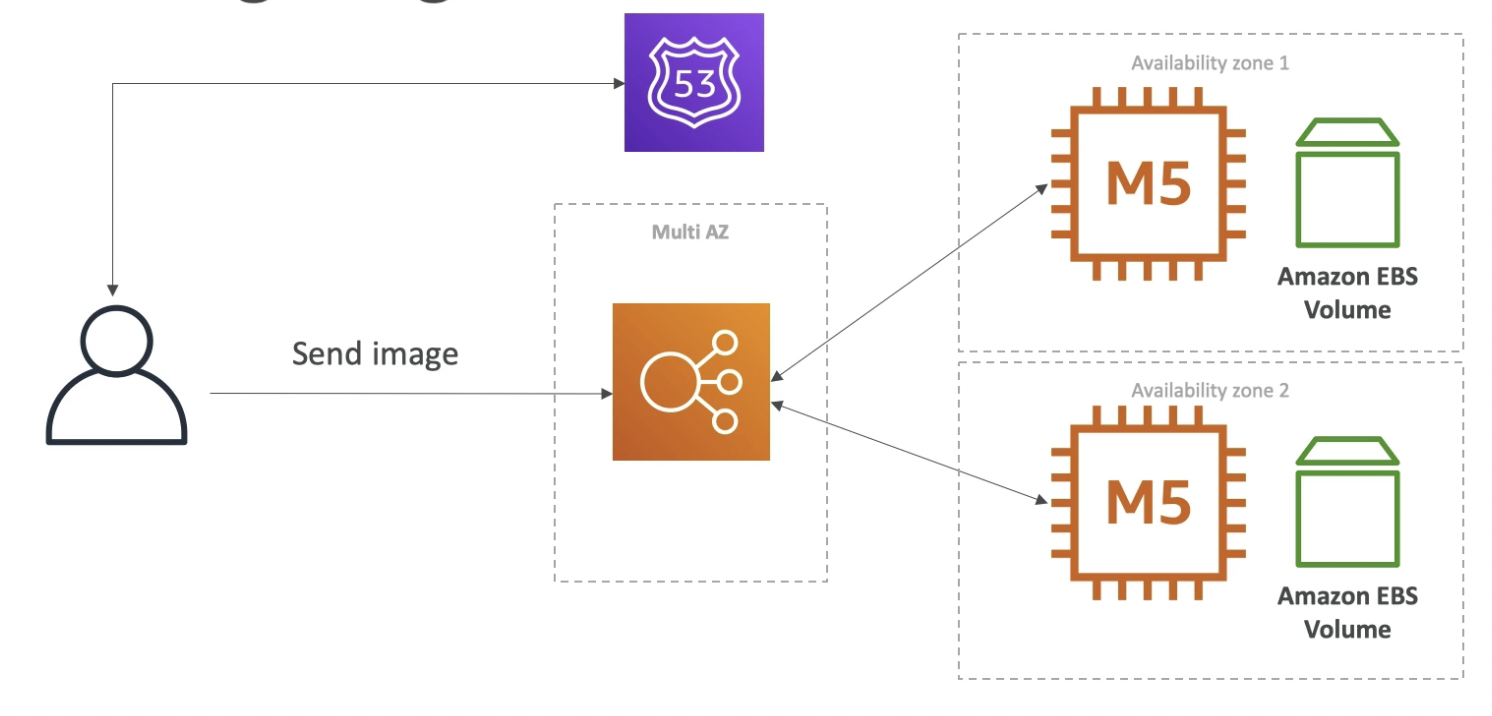
Untitled
Version 3
Instead of using EBS (which is bound to an AZ), use EFS (elastic file system) which is a common scalable storage that can be accessed by multiple EC2 instances using ENI (elastic network interfaces). This way, there is a common storage and scalability issue is resolved.
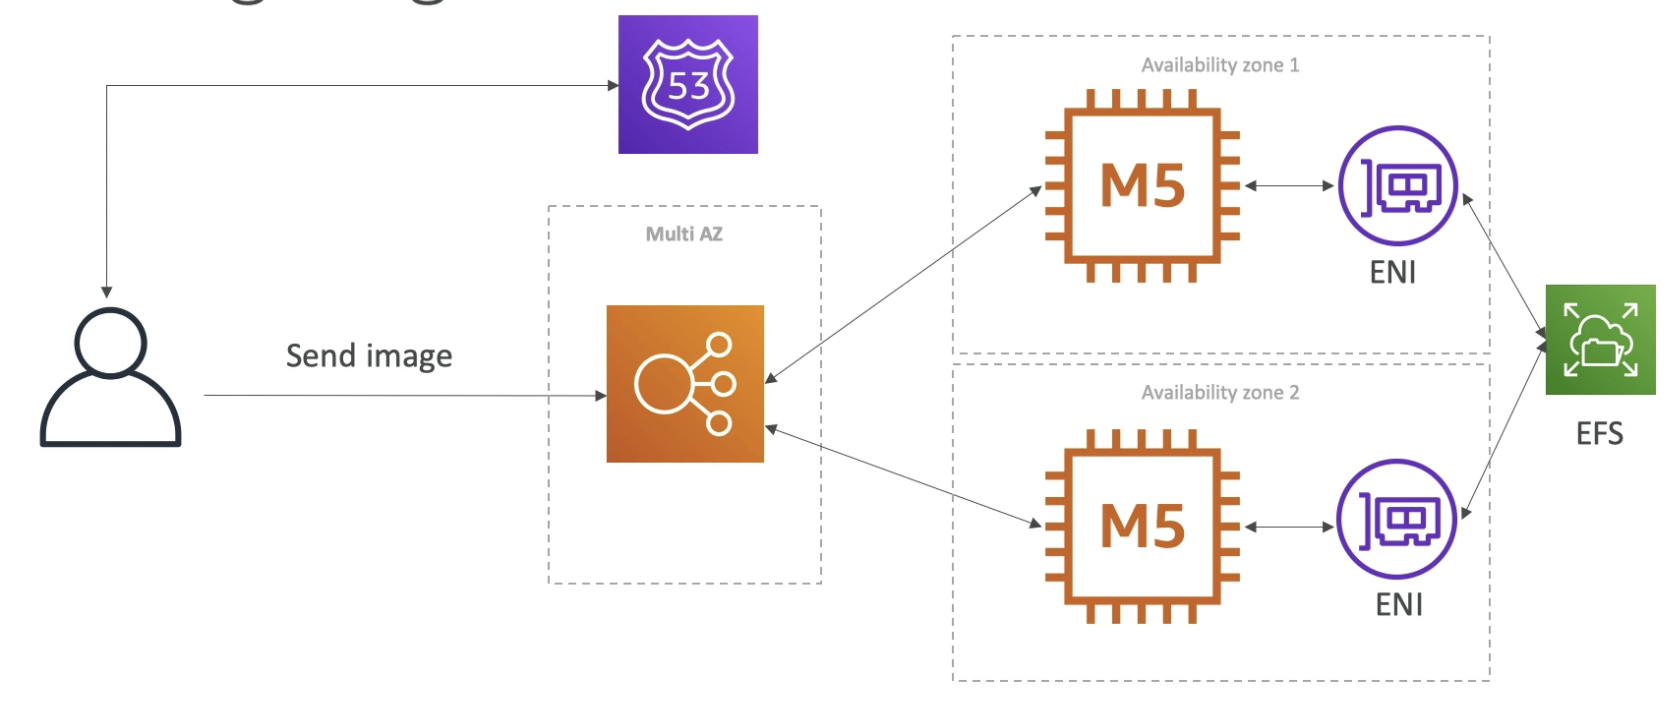
Untitled
Outro
.png)
Instantiating Applications Quickly
EC2 Instances:
- Use a Golden AMI: Install your applications, OS dependencies etc.. beforehand and launch your EC2 instance from the Golden AMI. This is good for static configurations that will remain the same for every EC2 instances that we want to launch.
- Bootstrap using User Data: This is good for dynamic configurations that need to be fetched specifically for each EC2 instance. Example private IP, region etc.
- Hybrid: mix of Golden AMI and User Data (Elastic Beanstalk)
RDS Databases:
- Restore from a snapshot: the database will have schemas and data ready!
EBS Volumes:
- Restore from a snapshot: the disk will already be formatted and have data!
Beanstalk
Typical 3-tier Web App Architecture
This architecture (consisting of a public subnet, private subnet along with some database and cache) will be followed in pretty much every application that we build.
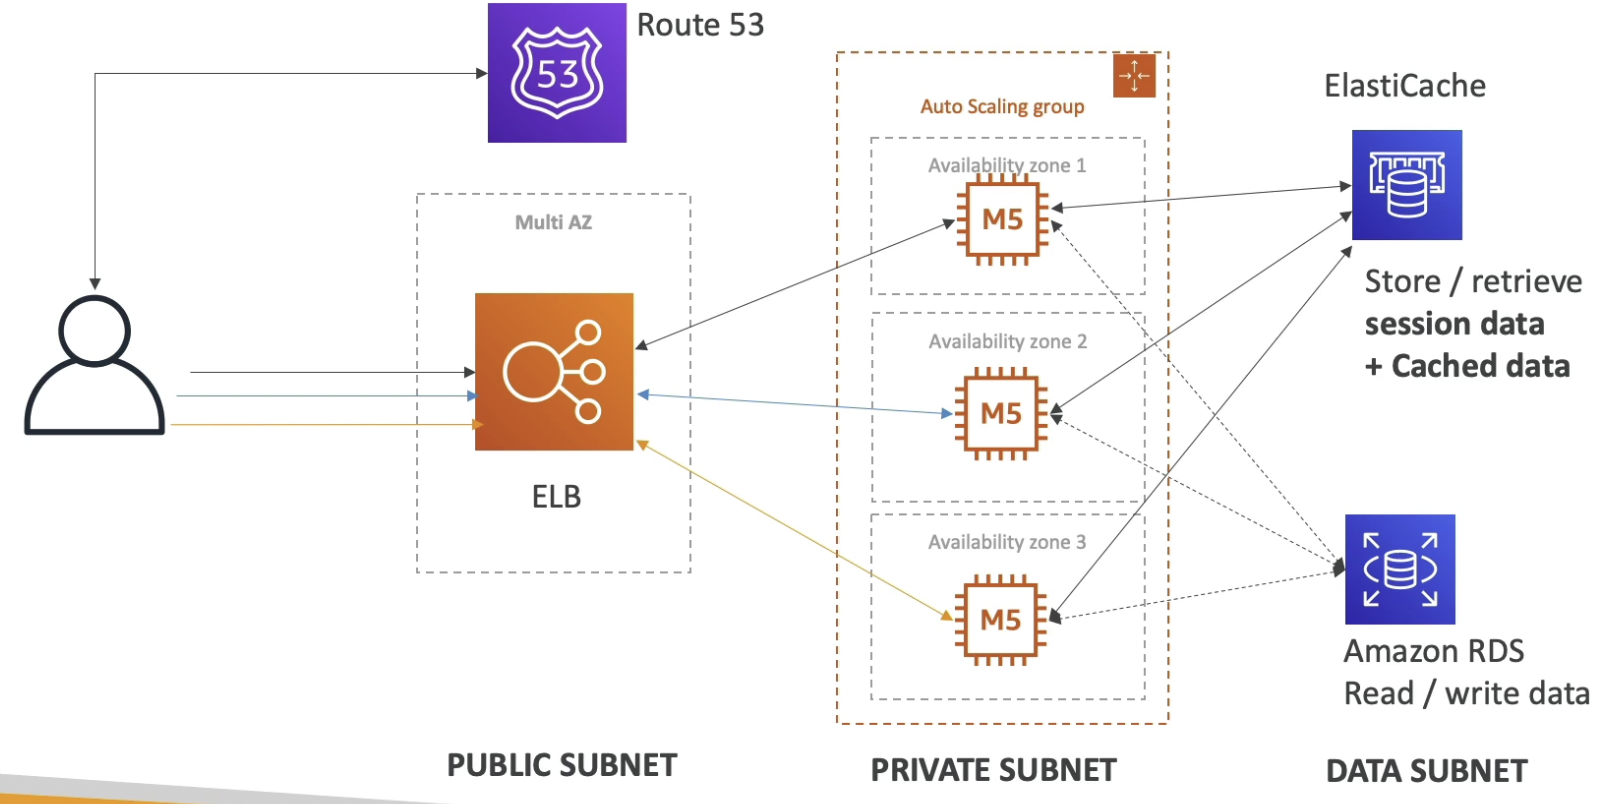
Elastic Beanstalk
Theory
Intro
- Elastic Beanstalk is a developer centric view of deploying an application on AWS. It re-uses all the components required to setup the web app architecture.
- Managed by AWS
- Automatically handles capacity provisioning, load balancing, scaling, application health monitoring, instance configuration, etc. but we still have full control over the configuration but it will be bundled in a single interface under Beanstalk.
- Just the application code is the responsibility of the developer
- Beanstalk is free but you pay for the underlying instances
Components
- Application: collection of Elastic Beanstalk components (environments, versions, configurations, etc.)
- Application Version: an iteration of your application code
- Environment: Collection of AWS resources running an application version (can only have one application version at a time inside an environment). You can create multiple environments (dev, test, prod, etc.)
- Tiers: Web Server Environment Tier & Worker Environment Tier
Process
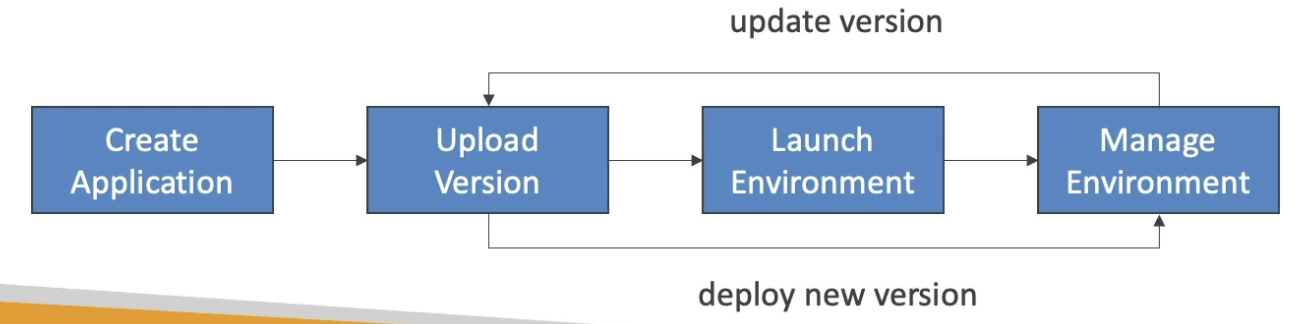
Supported Platforms
- Go
- Ruby
- Java SE
- Packer Builder
- Java with Tomcat
- Single Container Docker
- NET Core on Linux
- Multi-container Docker
- NET on Windows Server
- Preconfigured Docker
- Node.js
- PHP
- Python
- If not supported, you can write your custom platform (advanced)
Web Server Tier vs Worker Tier
Web Environment (Web Server Tier): clients requests are directly handled by EC2 instances through a load balancer.
Worker Environment (Worker Tier): clients’s requests are put in a SQS queue and the EC2 instances will pull the messages to process them. Scaling depends on the number of SQS messages in the queue.
⛔ Web and worker environments can be combined together where the web environment pushes the tasks in the worker environment to complete them.
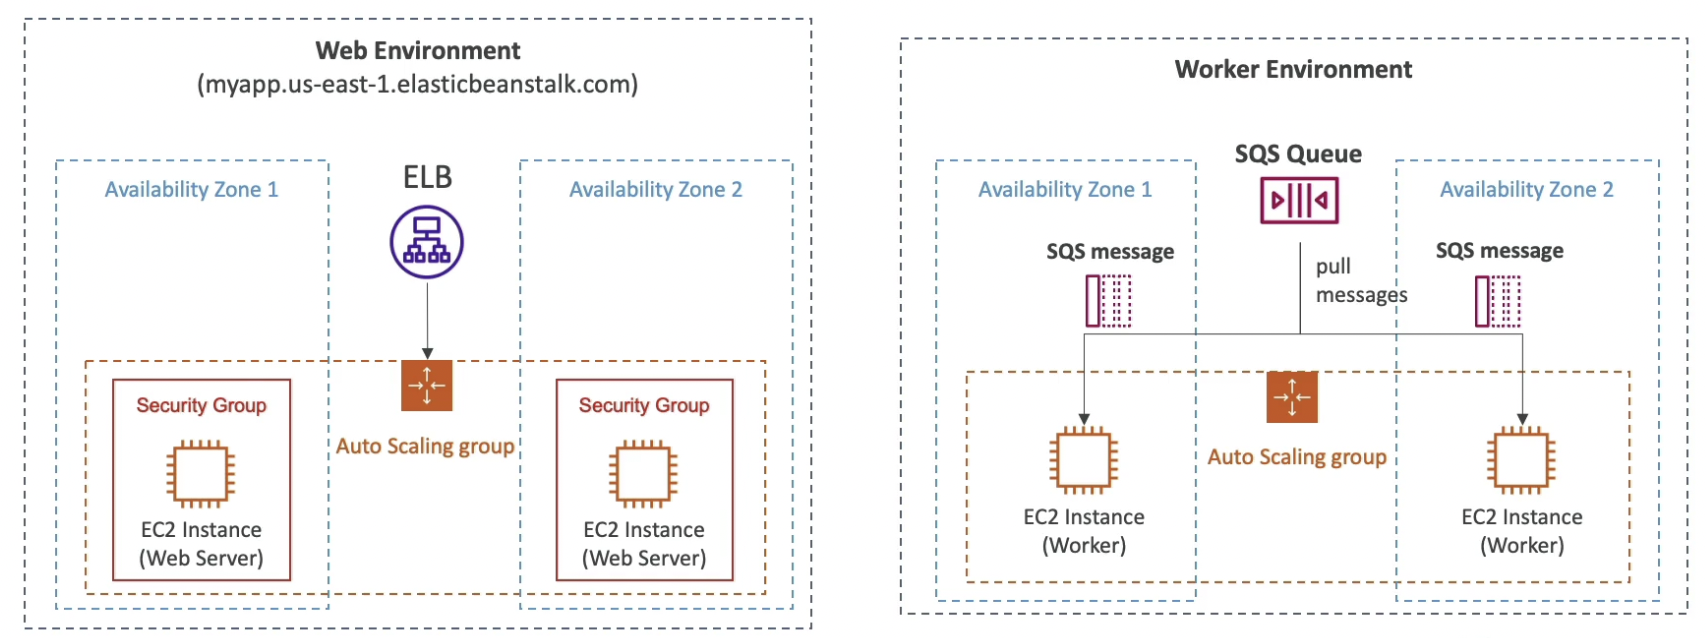
Create a Beanstalk web-application
Elastic Beanstalk → Create application
- Configure more options will allow you to configure the environment.
- Single instance application (with an elastic IP) is free-tier enabled.
Once the application is deployed, all of the required services like ASG, ELB, EC2 along with databases and security groups will be automatically configured.
To delete the beanstalk environment, go to actions → terminate environment
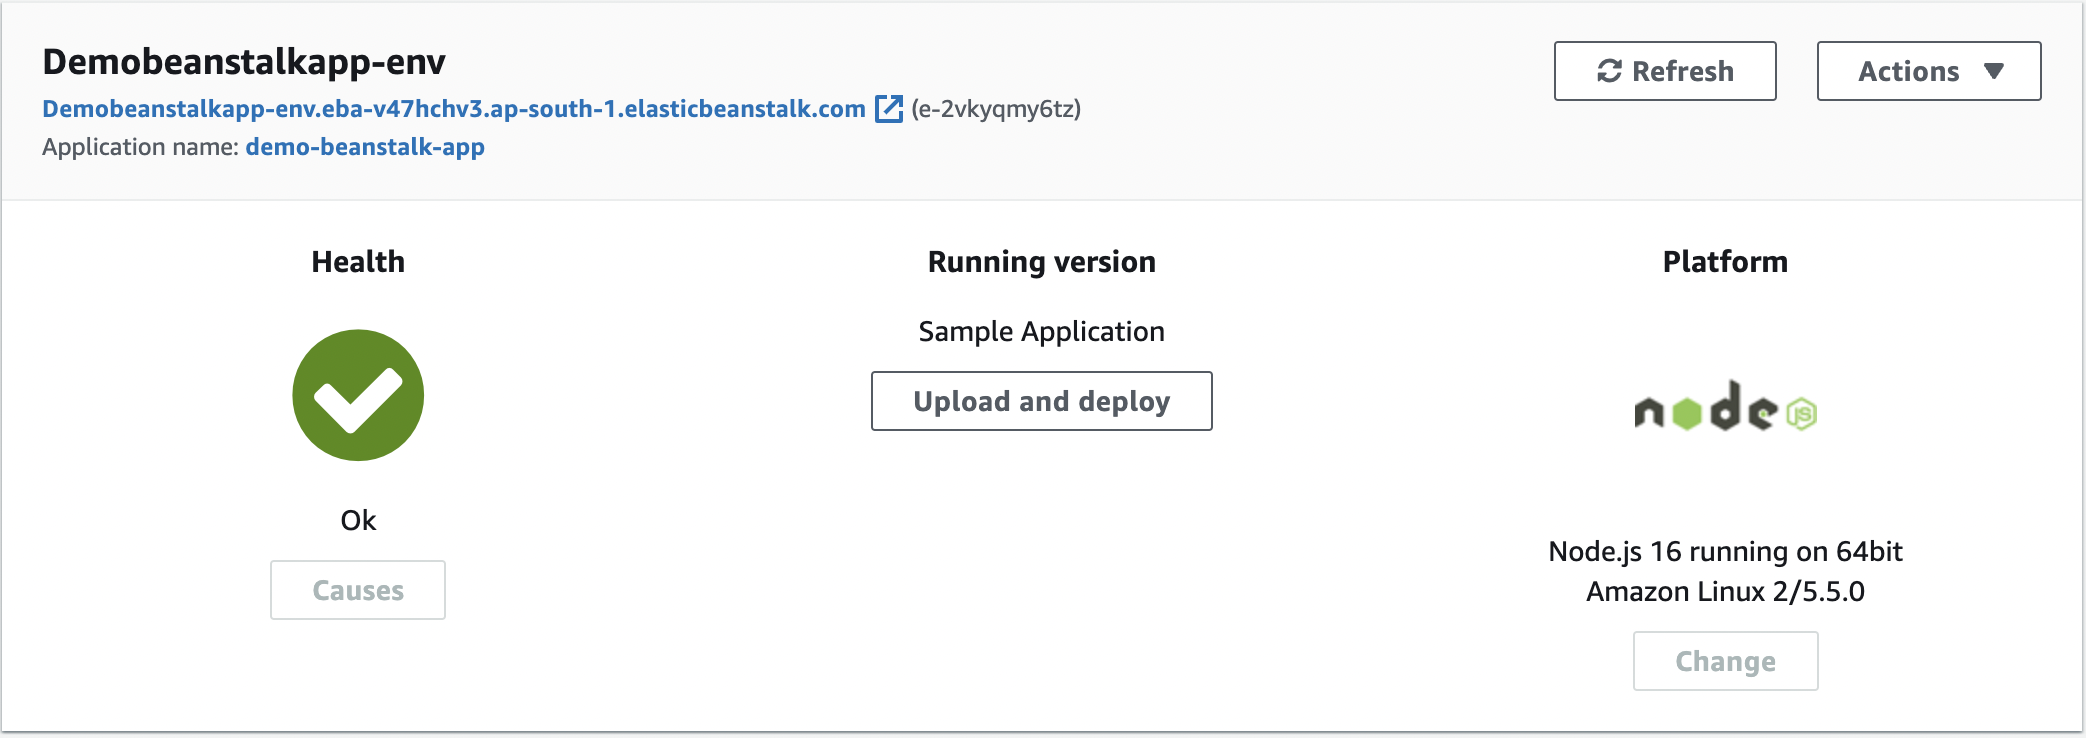
Section 12: Amazon S3 Introduction
Section 12: Amazon S3 Introduction
Intro
- S3 is a global AWS service
- Amazon S3 allows us to store objects (files) in “buckets” (directories)
- Buckets must have a globally unique name
- Buckets are defined at the region level
- Naming convention
- No uppercase
- No underscore
- 3-63 characters long
- Not an IP
- Must start with lowercase letter or number
- Objects (files) have a key (the full path to the object):
- s3://my-bucket/my_file.txt
- s3://my-bucket/my_folderl/another_folder/my_file.txt
- The key is composed of prefix + object name
- s3://my-bucket/my_folderl/another_folder/my_file.txt
- There’s no concept of “directories” within buckets (just keys with very long names that contain slashes). However, the UI will trick you to think otherwise by displaying S3 buckets as containing folders.
- Object values are the content of the body:
- Max Object Size is 5TB, but if uploading an object of more than 5GB, must upload it in parts (multi-part upload).
- Objects can have Metadata (list of text key / value pairs - system or user metadata)
- Objects can have Tags (Unicode key / value pair up to 10) - useful for security / lifecycle
- Objects will have a Version ID (if versioning is enabled)
Buckets & Objects - Hands on
- Create an S3 bucket
S3 → Create bucket
- Upload files
Select the bucket → Upload
- View uploaded file
Select the object → Open
This will use a pre-signed URL (containing temporary access credentials to allow us to view the file in browser). If we click on the Object URL (unsigned), we will get access denied as the S3 bucket is not public.
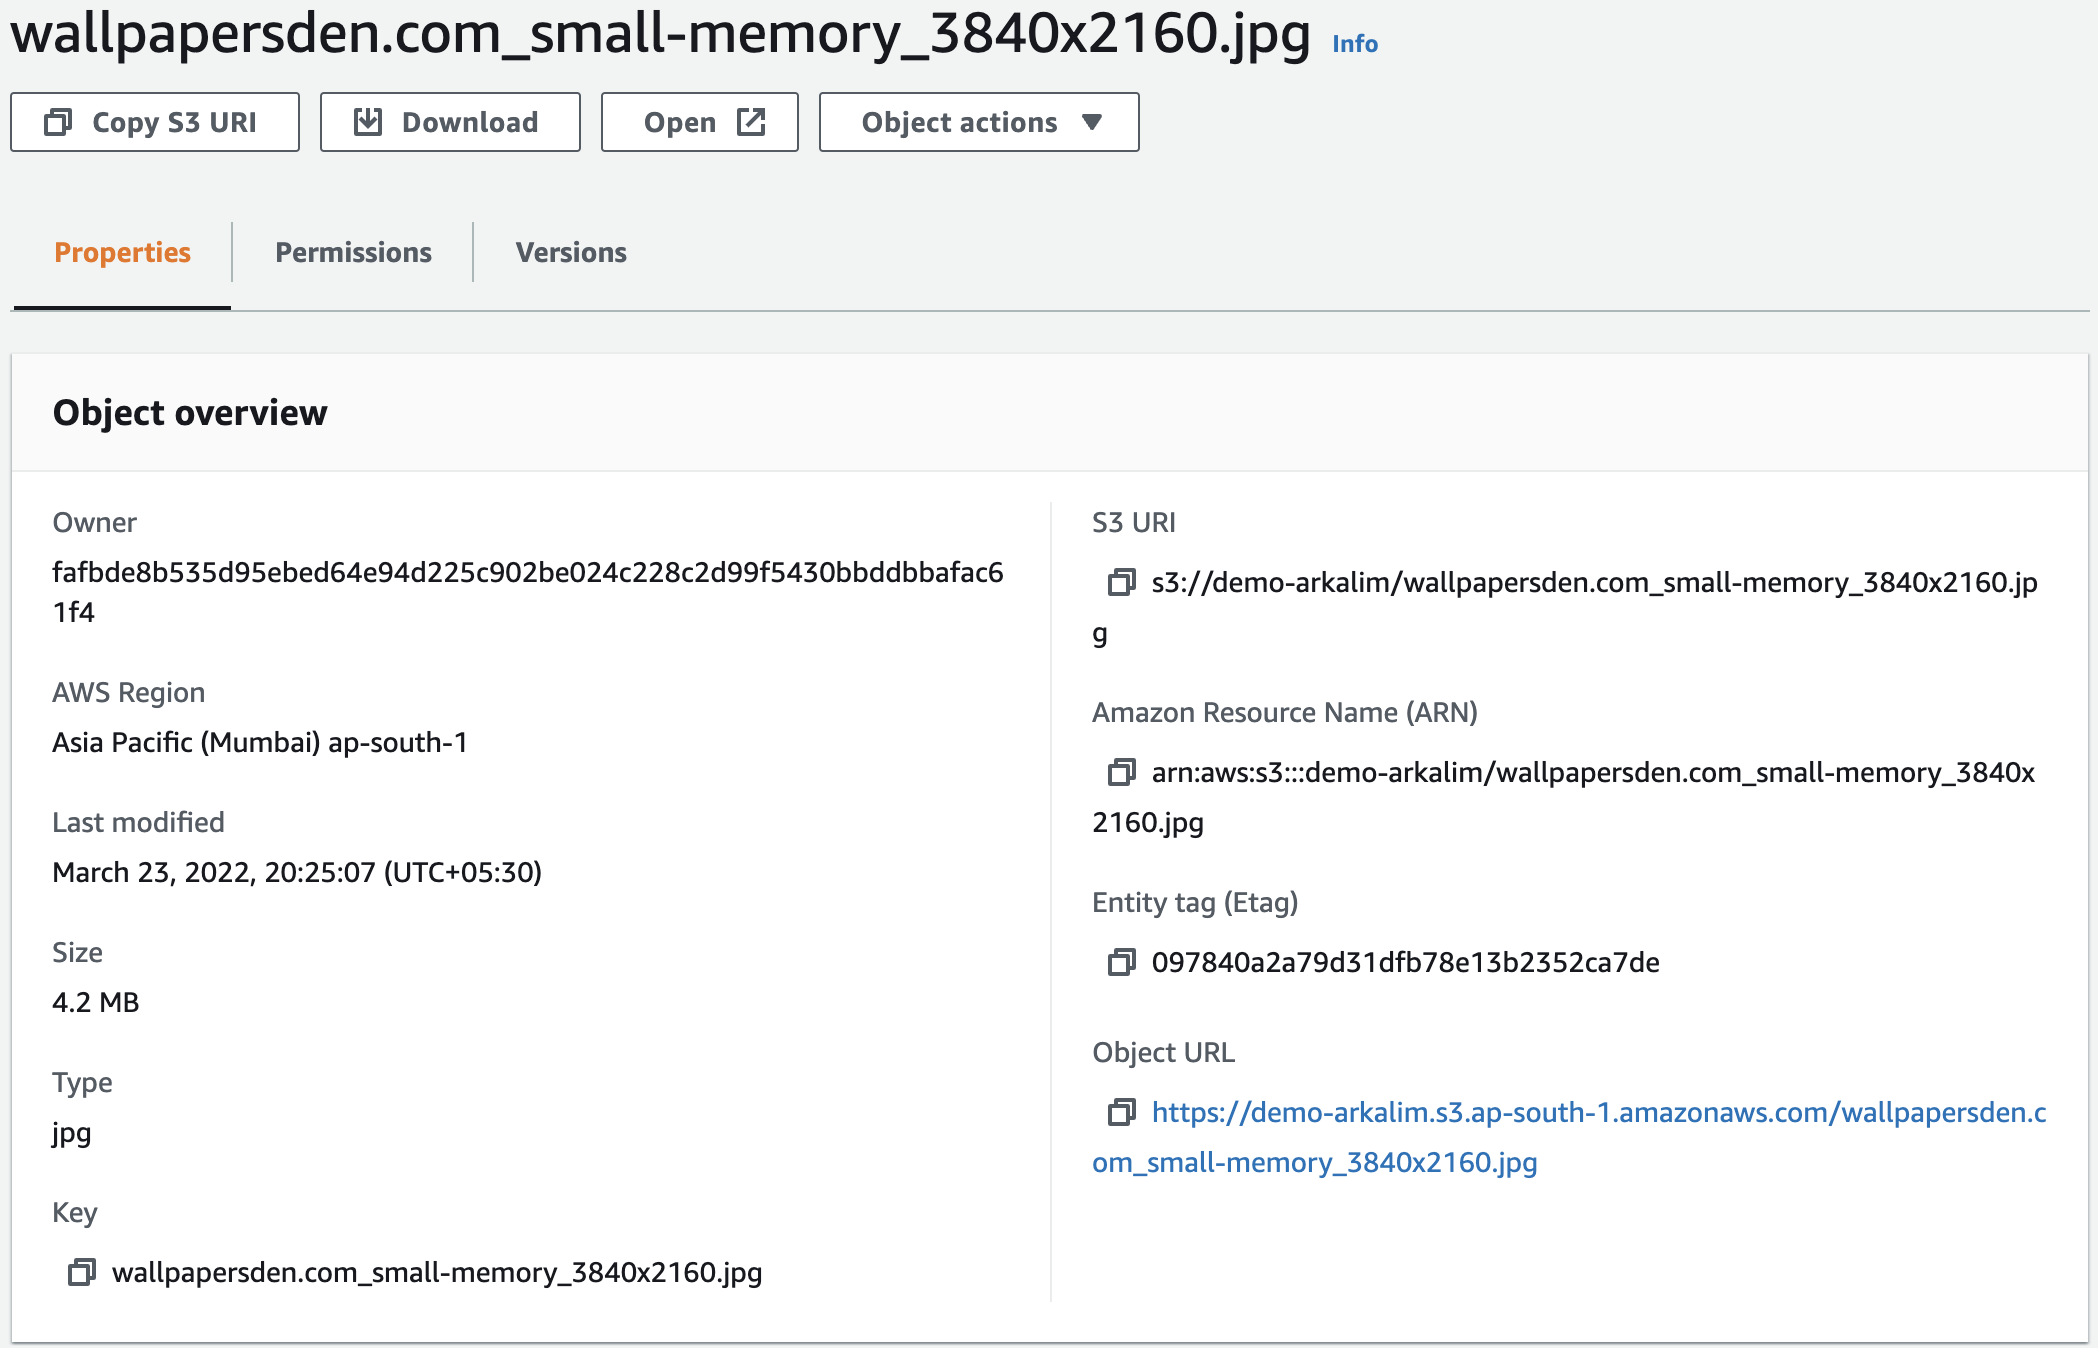
- Create an S3 bucket
Security: Bucket Policy
Intro
Types of security in S3:
- User based (works using IAM policies that define which API calls should be allowed for a specific user from IAM console)
- Note: an IAM principal can access an S3 object if
- The user IAM permissions Allow it OR the resources policy ALLOWS it
- AND there’s no explicit Deny
- Encryption: encrypt objects in Amazon S3 using encryption keys
Resource Based
Bucket Policies (bucket wide rules from the S3 console) - allows cross account access of S3 resources
JSON based policies
- Resources: can be buckets or objects
- Effect: Allow / Deny
- Actions: Set of APIs to Allow or Deny
- Principal: The account or user to apply the policy to

Use S3 bucket for policy to:
- Grant public access to the bucket - Use Bucket Policy
.png)
- EC2 Instance access - Use IAM roles
%201.png)
- User Access to S3 - IAM permissions
.png)
- Grant bucket access to another account (Cross Account)
.png)
- Bucket setting: Block public access
.png)
- Force objects to be encrypted at upload
- Grant public access to the bucket - Use Bucket Policy
new →
⛔ An IAM principal can access an S3 object if the user lAM permissions allow it OR the resource policy ALLOWS it AND there’s no explicit DENY. Example if the User policy allows the resource to be accessed but if the resource policy explicitly denies it, then access is restricted.
- Object Access Control List (ACL) - finer grain
- Bucket Access Control List (ACL) - less common
new →
- Public access can be applied at the bucket level or the object level when uploading objects into the bucket
Networking:
- Supports VPC Endpoints (to allow resources inside the VPC connect to S3 without public internet)
Logging and Audit:
- S3 Access Logs can be stored in other S3 bucket
- API calls can be logged in AWS CloudTrail (service to log API calls)
User Security:
- MFA Delete: MFA can be required in versioned buckets to delete objects
- Pre-Signed URLs: URLs that are valid only for a limited time (ex: premium video service for logged in users)
Bucket settings to Block Public Access
- Block public access to buckets and objects granted through
- new access control lists (ACLs)
- any access control lists (ACLs)
- new public bucket or access point policies
- Block public and cross-account access to buckets and objects through any public bucket or access point policies
- These settings were created to prevent company data leaks
- If you know your bucket should never be public, leave these on. These settings can be set at the account level
- Block public access to buckets and objects granted through
Hands on
Create bucket policy
Select S3 bucket → Permissions → Bucket Policy → Edit → Policy Generator
Type of policy: S3 bucket policy
- Statement to deny upload if SSE is disabled during uploading

Untitled
- Statement to deny upload if SSE-S3 is not used for SSE during uploading

Untitled
Copy generated policy and paste it as JSON.
If we now try to upload without SSE-S3 encryption, we get access denied error.
- Statement to deny upload if SSE is disabled during uploading
Block public access of all S3 buckets in the account
S3 → Block Public Access settings for this account → Edit
S3 Static Websites
Theory
- S3 can host static websites and have them accessible on the public internet
- The website URL will be
<bucket-name>.s3-website-<AWS-region>.amazonaws.com
- If you get a 403 (Forbidden) error, make sure the bucket policy allows public reads
Hands on
- Disable Server side encryption
- In the S3 bucket upload:
- index.html
<html>
    <head>
        <title>My First Webpage</title>
    </head>
    <body>
        <h1>I love coffee</h1>
        <p>Hello world!</p>
    </body>

    <img src="coffee.jpg" width=500/>

    <!-- CORS demo -->
    <div id="tofetch"/>
    <script>
        var tofetch = document.getElementById("tofetch");

        fetch('http://demo-other-origin-stephane.s3-website.ca-central-1.amazonaws.com/extra-page.html')
        .then((response) => {
            return response.text();
        })
        .then((html) => {
            tofetch.innerHTML = html
        });
    </script>
</html>
- error.html
<h1>Uh oh, there was an error</h1>
- coffee.jpg
- index.html
- Properties → Static website hosting → Edit → Enable
- Permissions → Enable public access (otherwise 403 error)
- Permissions → Add policy to allow any principal to read objects from S3

Untitled
The website link will be available under the Properties tab

Untitled
Versioning
Theory
- You can version your files in Amazon S3. It is enabled at the bucket level.
- When versioning is enabled, if you upload a file with a key that is already existing in the bucket, S3 will increment the version of that file.
- It is best practice to version your buckets to protect against unintended deletes.
- It also provides the ability to restore to a previous version.
- Any file that is not versioned prior to enabling versioning will have version “null”
- Suspending versioning does not delete the previous versions, it just disables it for the future.
Hands on
- Enable versioning for a bucket
Select the bucket → Properties → Edit bucket versioning
We can toggle “List Versions” to view all the versions for the files. Here, coffee.jpg was first uploaded before the versioning was enabled, that’s why the old version has id = null.

Untitled
- Deleting a versioned file
Without the versions of the file listed, delete the file.
If a versioned file is deleted, it’s not actually removed from S3, instead it is marked as “Deleted”. To restore the file, view the versions and delete the “Delete marker”.
To permanently delete a versioned file, select the current version from the list and delete it.
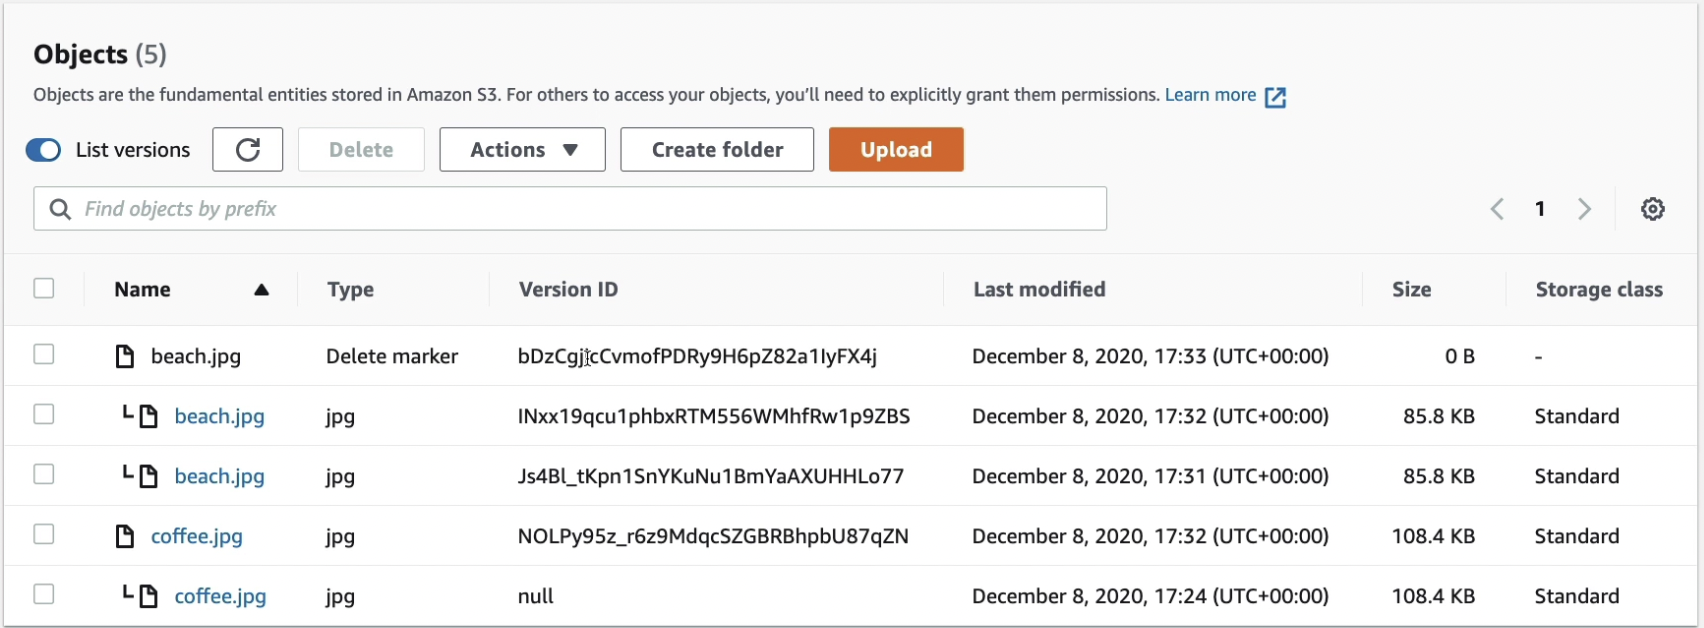
Untitled
- Enable versioning for a bucket
S3 Replication
.png)
.png)
S3 Storage Classes
Durability and Availability
.png)
We can move between classes manually or using S3 lifecycle configurations.
Types of S3 storage classes,
Amazon S3 Standard - General Purpose
.png)
Amazon S3 Standard - Infrequent Access (IA) & One Zone-Infrequent Access
.png)
Amazon S3 Glacier
- Amazon S3 Glacier Instant Retrieval
- Amazon S3 Glacier Flexible Retrieval
- Amazon S3 Glacier Deep Archive
.png)
Amazon S3 Intelligent Tiering
.png)
Outro
.png)
.png)
Encryption
Theory
Two types of encryption:
Server Side Encryption (SSE)
SSE-S3
- Encrypts S3 objects using keys handled & managed by S3
- AES-256 encryption type
- HTTP or HTTPS can be used
- Must set header:
"x-amz-server-side-encryption": "AES256"in the request to signal S3 to encrypt the send object.
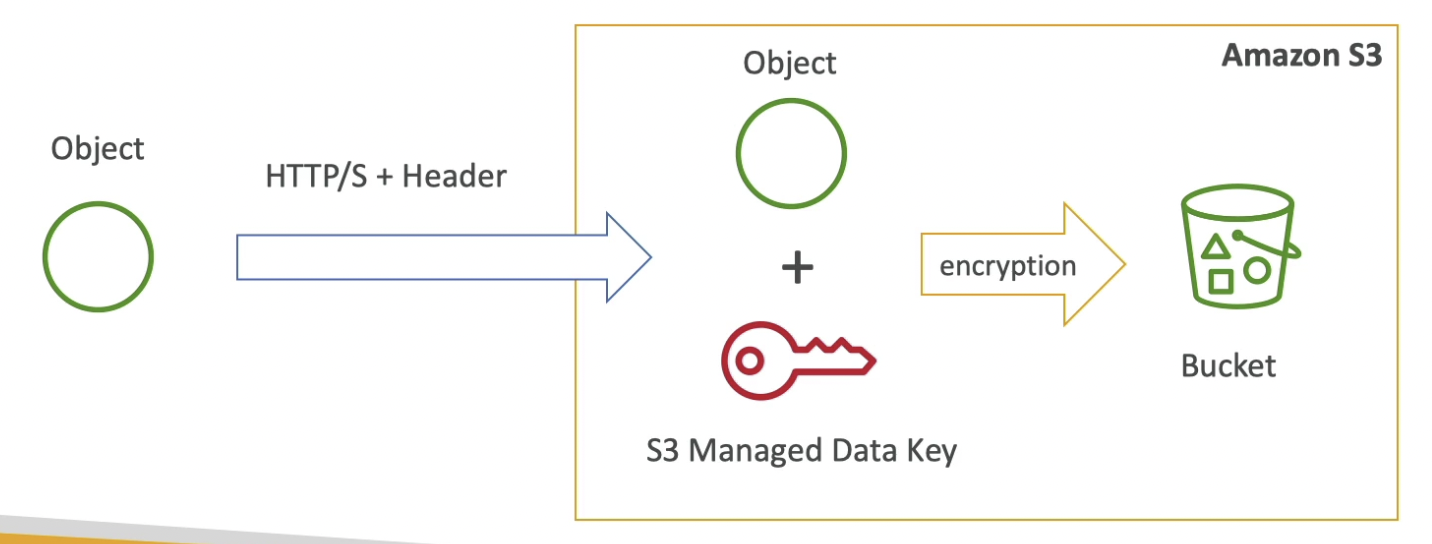
Untitled
SSE-KMS
- Encryption using keys handled & managed by KMS (Key Management Service)
- HTTP or HTTPS can be used
- KMS provides control over who has access to what keys as well as audit trails
- Must set header:
"x-amz-server-side-encryption": "aws:kms"
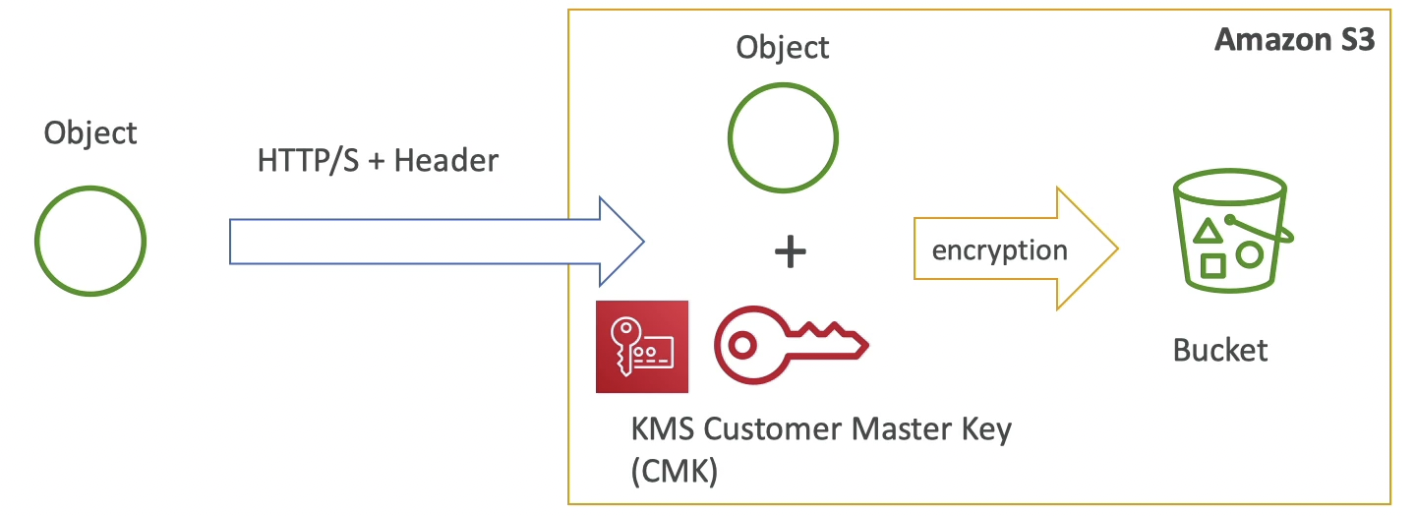
Untitled
SSE-C
- Data keys fully managed by the customer outside of AWS. More work for us.
- Amazon S3 does not store the encryption key you provide for encryption or decryption of the object. After the operation, S3 discards the key.
- HTTPS must be used when sending the request as key (secret) is being transferred.
- Encryption key must provided in HTTPS headers, for every HTTPS request made as S3 doesn’t store the key for future requests.
Client Side Encryption (CSE)
- Client encrypts the object before sending it to S3 and decrypts it after retrieving it from S3.
- Client library such as the Amazon S3 Encryption Client is used to encrypt / decrypt the data on the client’s end.
- Customer fully manages the keys and encryption cycle.

Untitled
Encryption in Transit
- Amazon S3 exposes:
- HTTP endpoint: non encrypted
- HTTPS endpoint: encryption in flight
- You’re free to use the endpoint you want, but HTTPS is recommended. Most clients would use the HTTPS endpoint by default.
- HTTPS is mandatory for SSE-C
- Encryption in flight is also called SSL/TLS
- Amazon S3 exposes:
Hands on
Encrypt a file while uploading to S3
While uploading, Scroll down to properties and enable SSE. This will enable SSE only for this version of the file.
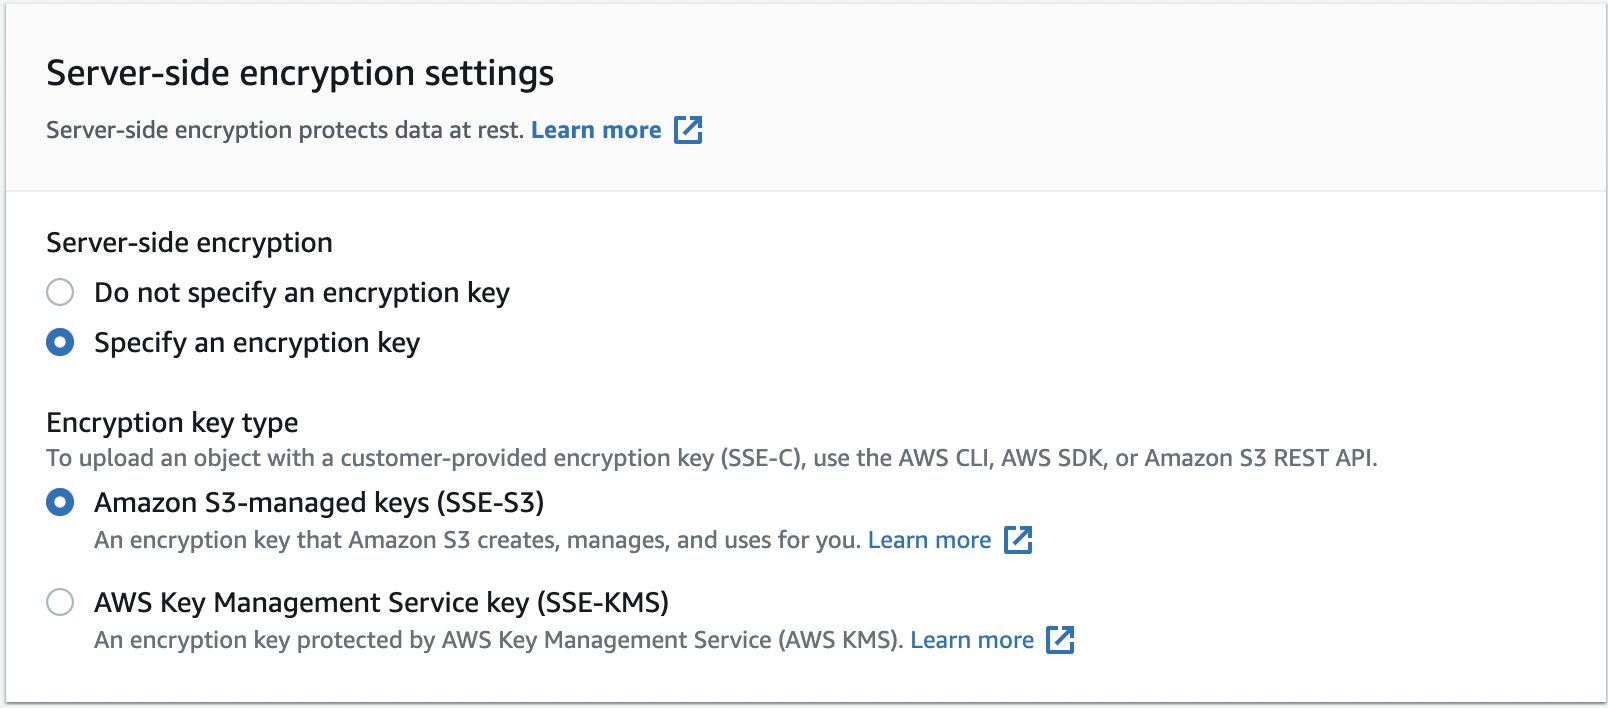
Untitled
Enable SSE by default for a bucket
Select bucket → Properties → Edit default encryption
This will encrypt all the files uploaded to S3 in future by default.

Untitled
Cross Origin Resource Sharing (CORS)
Theory
- An origin is a combination of scheme (protocol), host (domain) and port. Eg: https://www.example.com (implied port is 443 for HTTPS, 80 for HTTP)
- Same origin: http://example.com/app1 & http://example.com/app2 Different origins: http://www.example.com & http://other.example.com
- CORS is a web browser based security to allow requests to other origins while visiting the main origin only if the other origin allows for the requests from the main origin, using CORS Headers (
Access-Control-Allow-Origin&Access-Control-Allow-Methods)
- In the diagram below, web browser is on www.example.com and the server wants to redirect it to www.other.com In this case, the web browser will first send a preflight request to www.other.com via OPTIONS method, which requests permitted communication options for a given URL or server (www.example.com). The cross origin server responds with the methods that www.example.com is allowed to perform.

S3 CORS
Theory
- If a client does a cross-origin request on our S3 bucket, we need to enable the correct CORS headers in the bucket
- You can allow for a specific origin or for * (all origins)
⛔ It’s a popular exam question
In the diagram below, bucket-html contains all the html files and bucket-assets contains all the assets. Both the buckets are enabled as w ebsites. The web browser gets index.html which has an asset to be fetched from bucket-assets (cross-origin). Thus bucket-assets should allow bucket-html to perform this request (by configuring CORS headers).
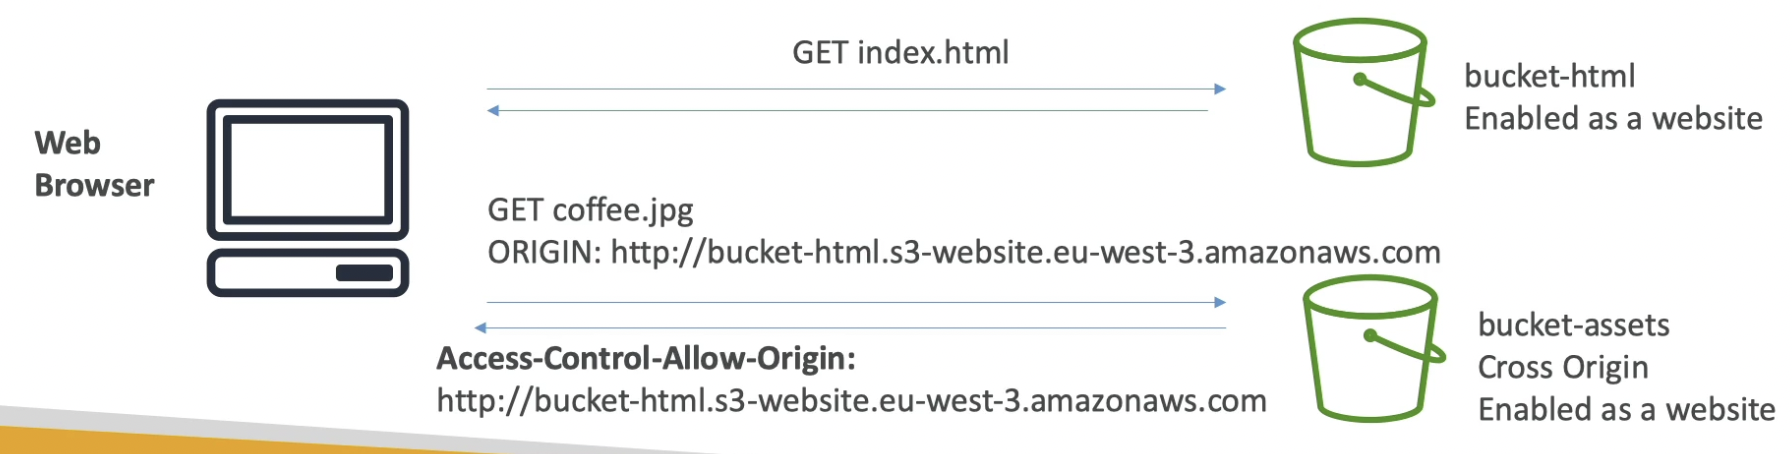
Untitled
Hands on
Make two S3 buckets with website enabled
- Main bucket
Upload
index.htmlcontainingMake sure to update
<public link to cors.html in the cors bucket><html> <head> <title>My First Webpage</title> </head> <body> <h1>I love coffee</h1> <p>Hello world!</p> </body> <!-- CORS demo --> <div id="tofetch"/> <script> var tofetch = document.getElementById("tofetch"); fetch('<public link to cors.html in the cors bucket>') .then((response) => { return response.text(); }) .then((html) => { tofetch.innerHTML = html }); </script></html>
- Cross Origin Bucket
Upload
cors.htmlcontaining<p>This <strong>cors page</strong> has been successfully loaded!</p>
- Main bucket
- If we open the main bucket website, we won’t see the cors.html part and there will be an error in the console

Untitled
- So, we need to allow the main bucket in the CORS settings of cors bucket. Go to cors-bucket → Permissions → CORS → Edit and paste the following.
[ { "AllowedHeaders": [ "Authorization" ], "AllowedMethods": [ "GET" ], "AllowedOrigins": [ "<url of first bucket with http://...without slash at the end>" ], "ExposeHeaders": [], "MaxAgeSeconds": 3000 }]
- Now, if we open the main bucket website, we get no error and the
cors.htmlpart will be fetched successfully.
Untitled
S3 Consistency Model
Strong consistency in S3 as of December 2020:
After:
- successful write of a new object (new PUT)
- overwrite or delete of an existing object (overwrite PUT or DELETE)
Any:
- subsequent read request immediately receives the latest version of the object (read after write consistency)
- subsequent list request immediately reflects changes (list consistency)
Available at no additional cost, without any performance impact
Section 13: AWS SDK, IAM Roles & Policies
Section 13: AWS SDK, IAM Roles & Policies
AWS Policy Simulator
This online tool allows us to check what API calls an IAM User, Group or Role is allowed to perform.
https://policysim.aws.amazon.com/
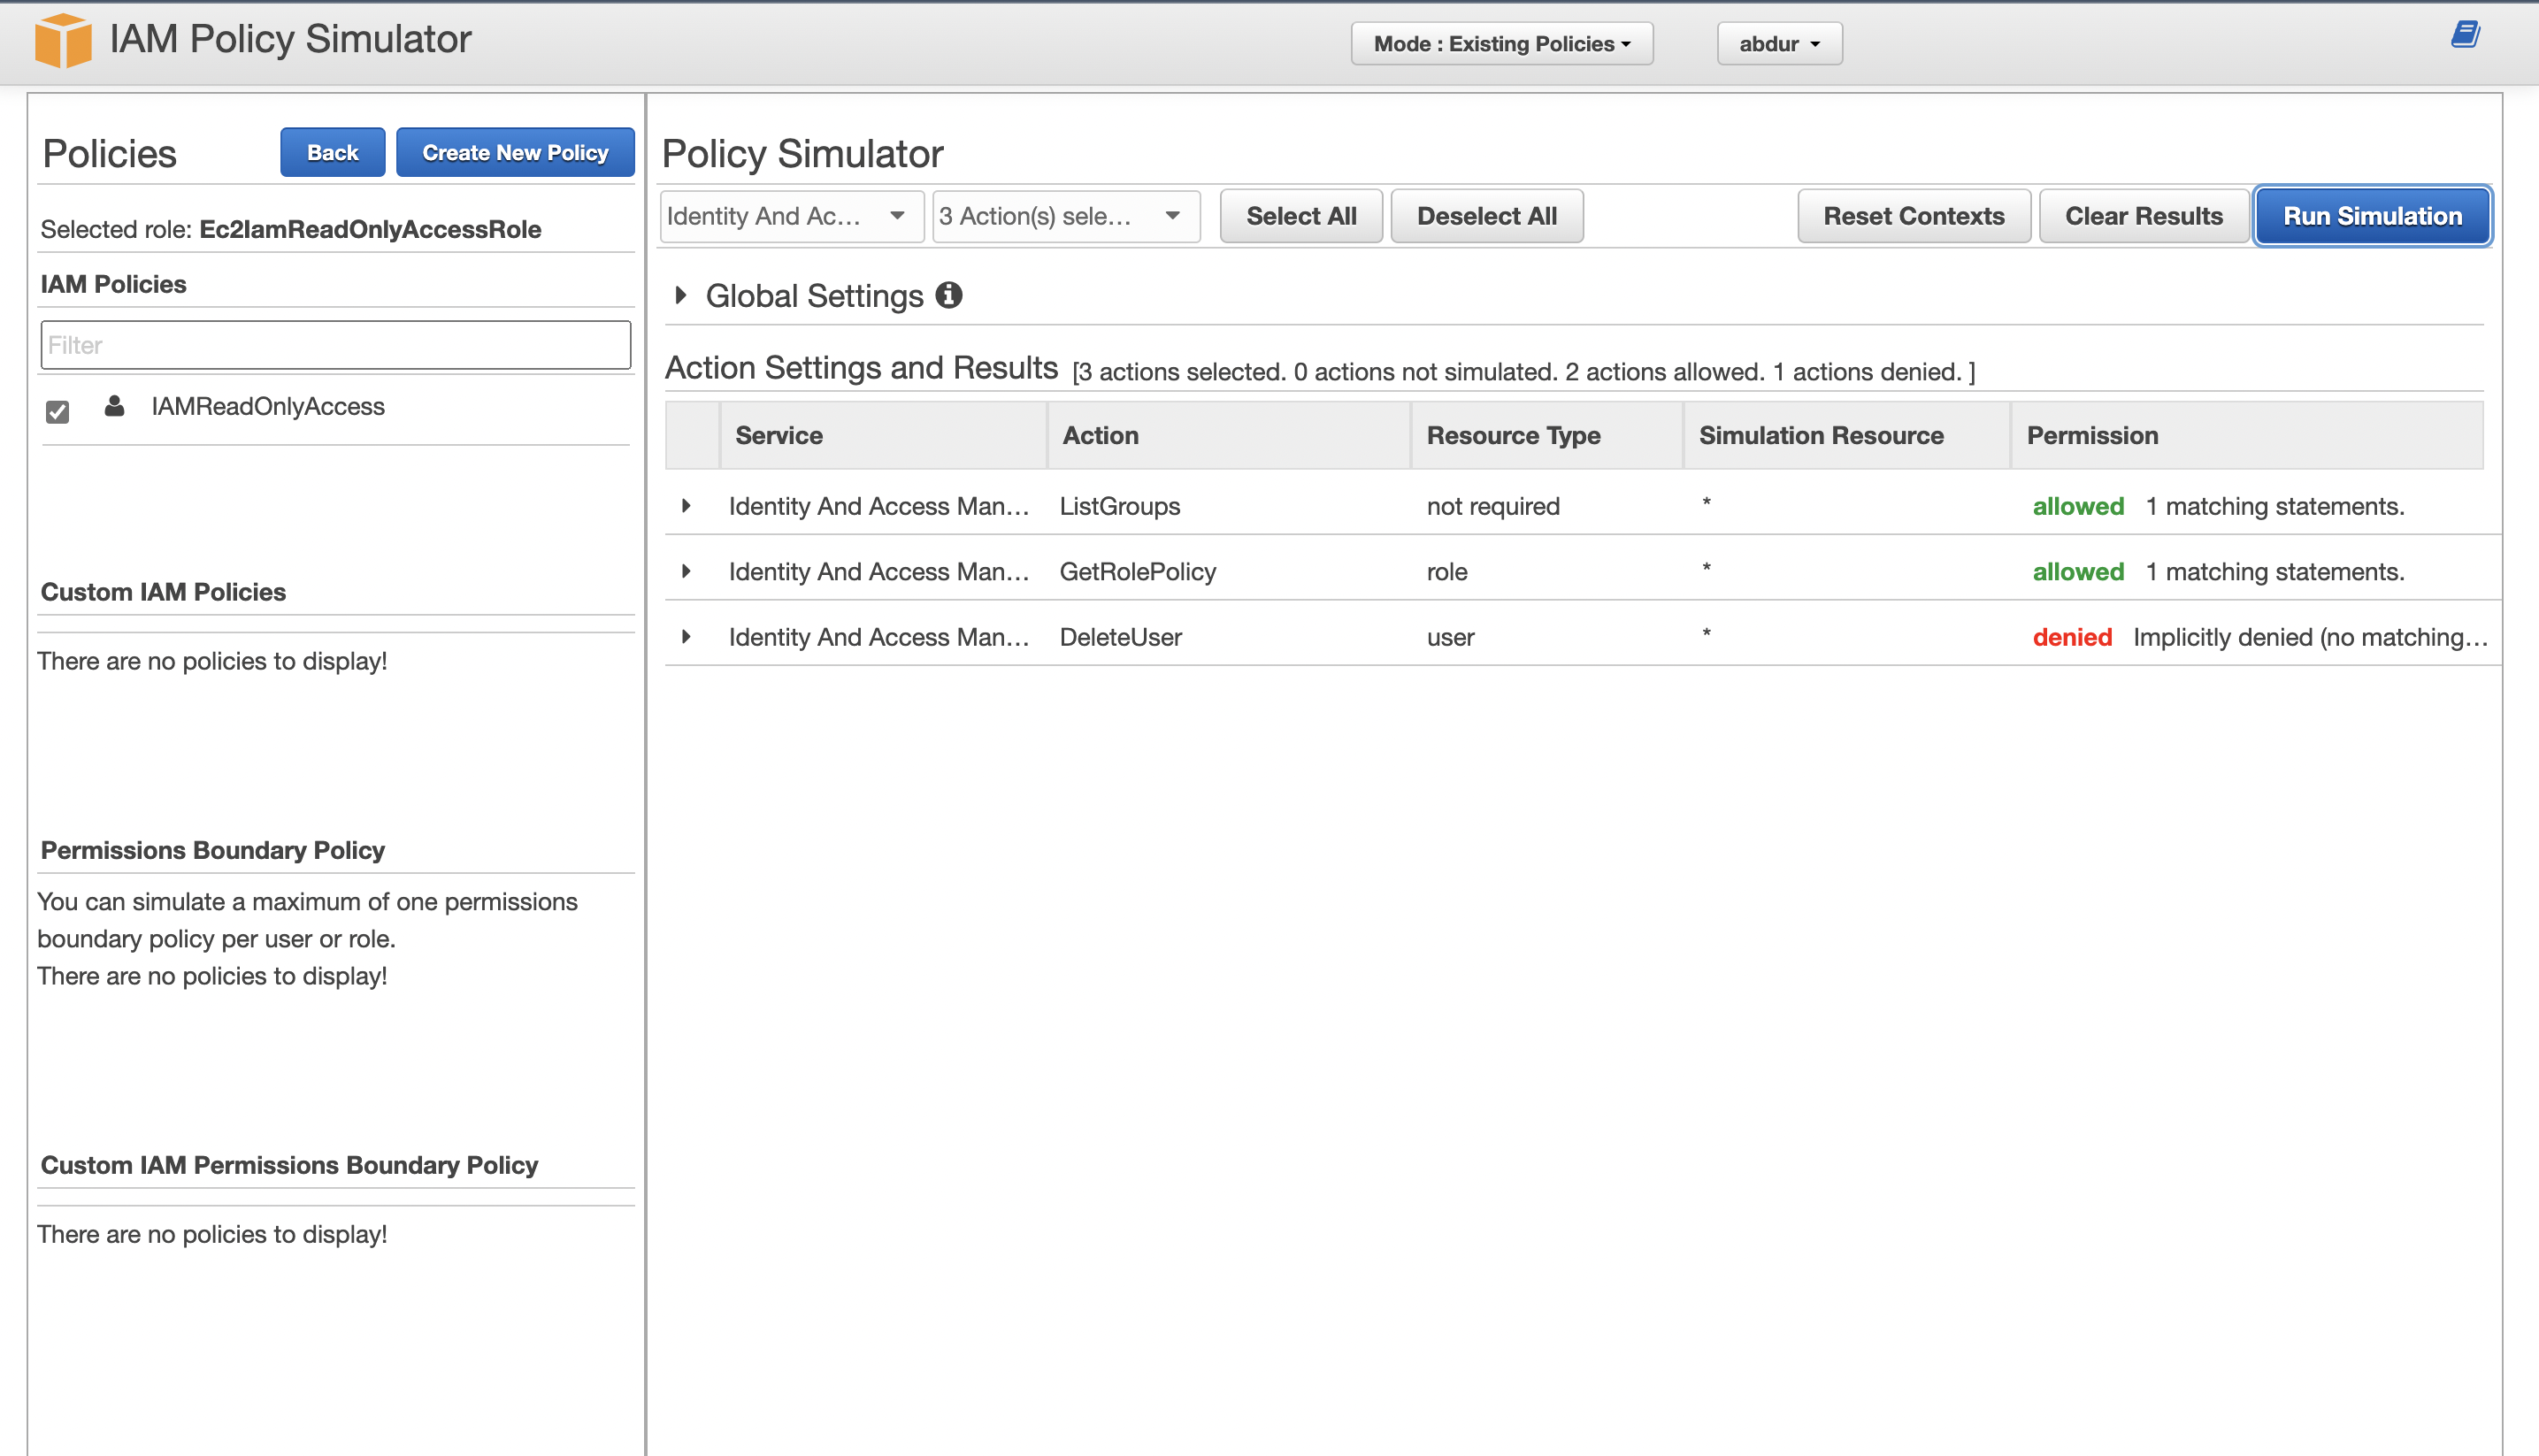
EC2 Instance Metadata
Theory
- AWS EC2 Instance Metadata is powerful but one of the least known features to developers
- It allows AWS EC2 instances to “learn about themselves” without using an IAM Role for that purpose
- The URL fetch the metadata is http://169.254.169.254/latest/meta-data This URL is internal to AWS and can only be hit from the instance.
- You can retrieve the IAM Role name from the metadata, but you cannot retrieve the IAM Policy.
- Remember the difference:
- Metadata = Info about the EC2 instance
- Userdata = launch script of the EC2 instance
Hands on
- curl http://169.254.169.254/latest/meta-data/identity-credentials/ec2/security-credentials/ec2-instance
- SSH into your EC2 instance
ssh -i EC2Tutorial.pem ec2-user@13.234.78.195
- Hit the metadata URL
[ec2-user@ip-172-31-44-172 ~]$ curl http://169.254.169.254/latest/meta-dataami-idami-launch-indexami-manifest-pathblock-device-mapping/events/hibernation/hostnameidentity-credentials/instance-actioninstance-idinstance-life-cycleinstance-typelocal-hostnamelocal-ipv4macmetrics/network/placement/profilepublic-hostnamepublic-ipv4public-keys/reservation-idsecurity-groups
- We can modify the curl request to get specific Metadata
[ec2-user@ip-172-31-44-172 ~]$ curl http://169.254.169.254/latest/meta-data/security-groupslaunch-wizard-1
AWS SDK
- Used to perform actions on AWS directly from the code without using CLI
- AWS CLI uses Python SDK (boto3)
- We have to use SDK when coding against AWS services such as DynamoDB
- Supported languages
- Java
- .NET
- Node.js
- PHP
- Python (named boto3 / botocore)
- Go
- Ruby
- C++
💡 If you don’t specify or configure a default region, then us-east-1 - N. Virginia will be chosen by default by the SDK
Section 14: Advanced Amazon S3
Section 14: Advanced Amazon S3
S3 Lifecycle Rules (With S3 Analytics)
Intro
.png)
.png)
Scenario 1
.png)
Scenario 2
.png)
S3 Analytics
.png)
S3 Requester Pays
- In general, bucket owners pay for all Amazon S3 storage and data transfer costs associated with their bucket
- With Requester Pays buckets, the requester pays the cost of the request and the data download from the bucket. The bucket owner only pays for the storage.
- Helpful when you want to share large datasets with other accounts
- The requester must be authenticated in AWS (cannot be anonymous)
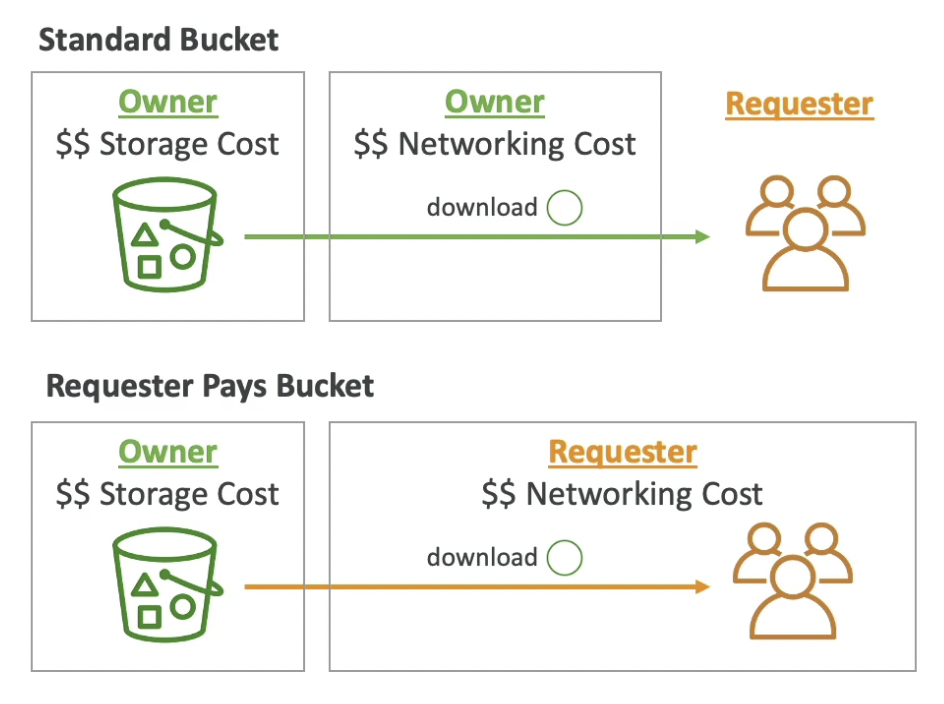
S3 Event Notification
Theory
- We can configure S3 to generate events for operations performed on the bucket (ex: S3:ObjectCreated, S3:ObjectRemoved, S3:ObjectRestore, S3: Replication)
- Object name filtering is possible using prefix and suffix matching
- Use case: generate thumbnails of images uploaded to S3
- Can create as many “S3 events” as desired
- S3 event notifications typically deliver events in seconds but can sometimes take a minute or longer
- If two writes are made to a single non-versioned object at the same time, it is possible that only a single event notification will be sent. So, if you want to ensure that an event notification is sent for every successful write, you should enable versioning on your bucket.
- Possible targets for S3 event notifications:
- SNS
- SQS
- Lambda Functions
- Amazon EventBridge
.png)
Hands on
- Create an SQS queue to receive the S3 notifications.
- Edit the access policy of the queue to allow S3 bucket to send messages to the queue.
{ "Id": "Policy1648391999215", "Version": "2012-10-17", "Statement": [ { "Sid": "Stmt1648391992940", "Action": [ "sqs:SendMessage" ], "Effect": "Allow", "Resource": "arn:aws:sqs:ap-south-1:502257142405:s3-notification-queue", "Principal": "*" } ]}
- Select bucket → Properties → Event Notifications → Create
Specify prefix and suffix to trigger this event based on the object name
Destination: SQS queue
- Now, uploading an object to the S3 bucket will send a notification to the queue
{ "Records": [ { "eventVersion": "2.1", "eventSource": "aws:s3", "awsRegion": "ap-south-1", "eventTime": "2022-03-27T14:41:35.322Z", "eventName": "ObjectCreated:Put", "userIdentity": { "principalId": "AWS:AIDAXJ4G3ZKC2IKTBJ3ZT" }, "requestParameters": { "sourceIPAddress": "49.37.79.214" }, "responseElements": { "x-amz-request-id": "WT356ZHV6M3C72CF", "x-amz-id-2": "wMTXMM/phl+rNx0EGoWuYCvmAr0Fx4msr70T6kU1guTdI1ZriH0zD+f8Nt9FkysnjJqUiQ3+ycp3pdJWEhU2RFKaqtJp0vlF" }, "s3": { "s3SchemaVersion": "1.0", "configurationId": "object-created-event", "bucket": { "name": "demo-arkalim", "ownerIdentity": { "principalId": "AK8ZF569RJE3E" }, "arn": "arn:aws:s3:::demo-arkalim" }, "object": { "key": "wallpapersden.com_small-memory_3840x2160.jpg", "size": 4424844, "eTag": "097840a2a79d31dfb78e13b2352ca7de", "versionId": "xXYgQ9xaLoQ5Exq8MQPrr9qfQIvEo.x2", "sequencer": "006240779F29A73D7D" } } } ]}
S3 Performance
Baseline performance
- Amazon S3 automatically scales to high request rates and it has very low latency 100-200 ms for the first byte read
- Your application can achieve at least 3,500 PUT/COPY/POST/DELETE and 5,500 GET/HEAD requests per second per prefix in a bucket.
- There are no limits to the number of prefixes in a bucket.
- Object path ⇒ Prefix (path between the bucket and the file):
- bucket/folder1/sub1/file ⇒ /folder1/sub1/
- bucket/folder1/sub2/file ⇒ /folder1/sub2/
- bucket/1/file ⇒ /1/
- bucket/2/file ⇒ /2/
- If you spread reads across four prefixes evenly, you can achieve 22,000 requests per second for GET and HEAD
Performance optimization
Upload
Multi-part upload
- Recommended for files > 100MB,
- Must use for files > 5GB
- Can help parallelize uploads (speed up transfers)
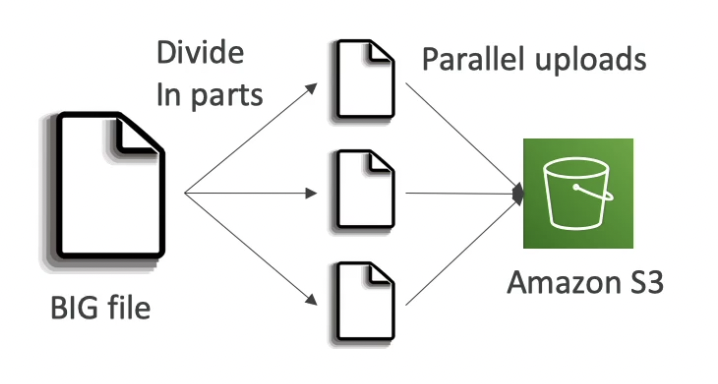
Untitled
S3 Transfer Acceleration
- Increase transfer speed by transferring file to an AWS edge location in the same region using the public internet (fast as the proximity is less) which will forward the data to the S3 bucket in the target region over the high-speed AWS private network (very fast).
- Compatible with multi-part upload

Download
Byte-range fetches (multi-part download)
- Parallelize GET requests by requesting specific byte ranges
- Better resilience in case of failures since we only need to refetch the failed byte range and not the whole file.
- Speeds up download due to parallel fetches of all the byte ranges or if we need to fetch only a certain byte range, we can do that as well.
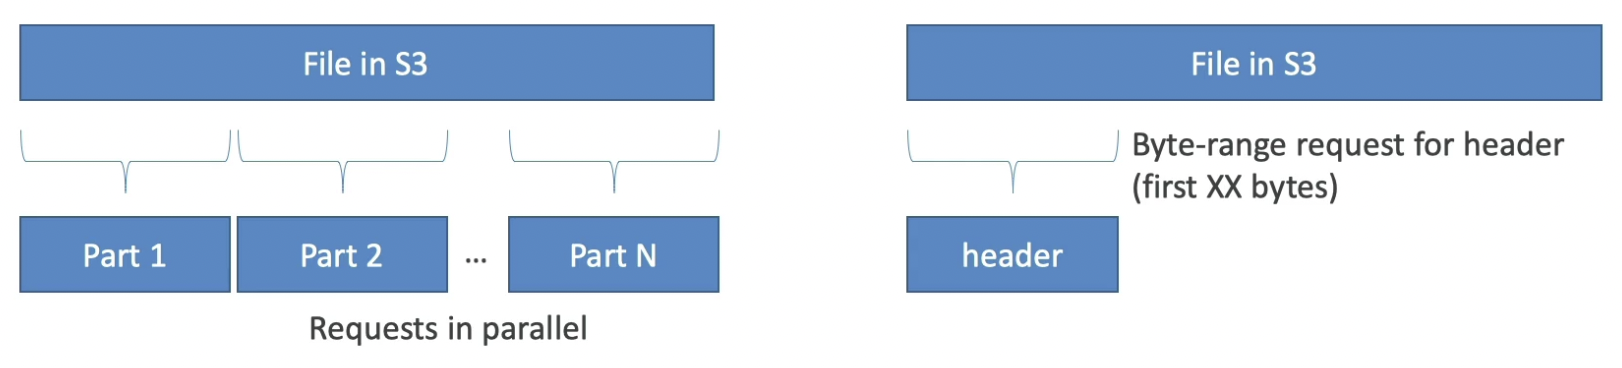
Untitled
new →
KMS Limitation on S3 performance
- If you use SSE-KMS, you may be impacted by the KMS limits
- When you upload, S3 calls the GenerateDataKey KMS API
- When you download, S3 calls the Decrypt KMS API
- The requests made by S3 count towards the KMS quota per second (5500, 10000, 30000 req/s based on region)
- You can request a quota increase using the Service Quotas Console ensure that KMS doesn’t create a bottleneck in your S3 performance

Untitled
S3 Select & Glacier Select
- Retrieve less data from files using SQL by performing server side filtering
- Can filter by rows & columns (SQL statements)
- Less network transfer, less CPU cost on the client-side
Example: get some rows from a CSV file on S3
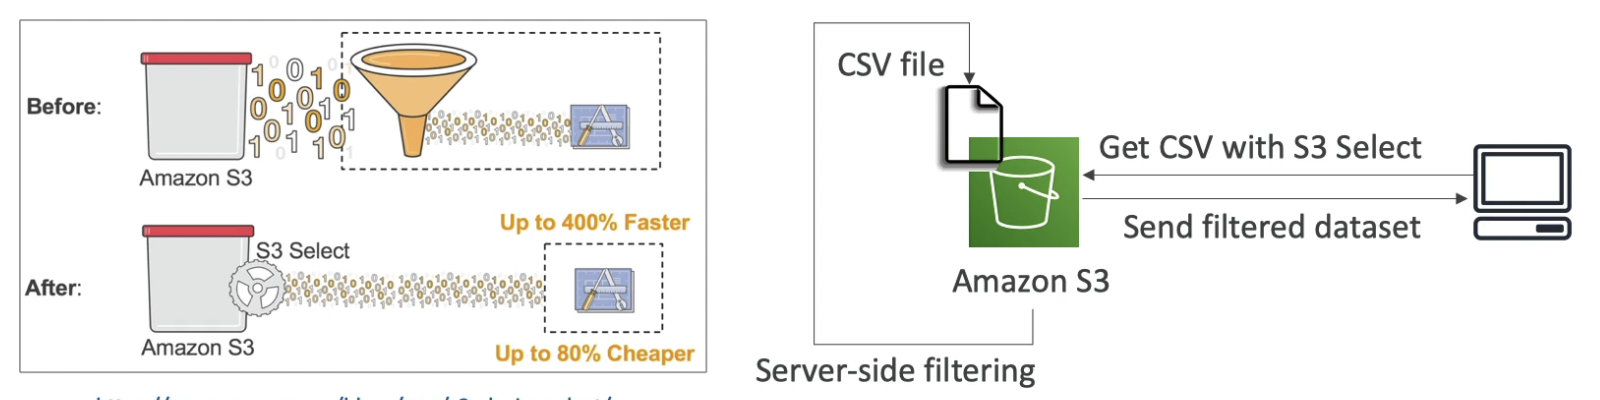
S3 Batch Operations
.png)
S3 Default Encryption
Theory
- One way to “force encryption” is to use a bucket policy and refuse any API call to PUT an S3 object without encryption headers:
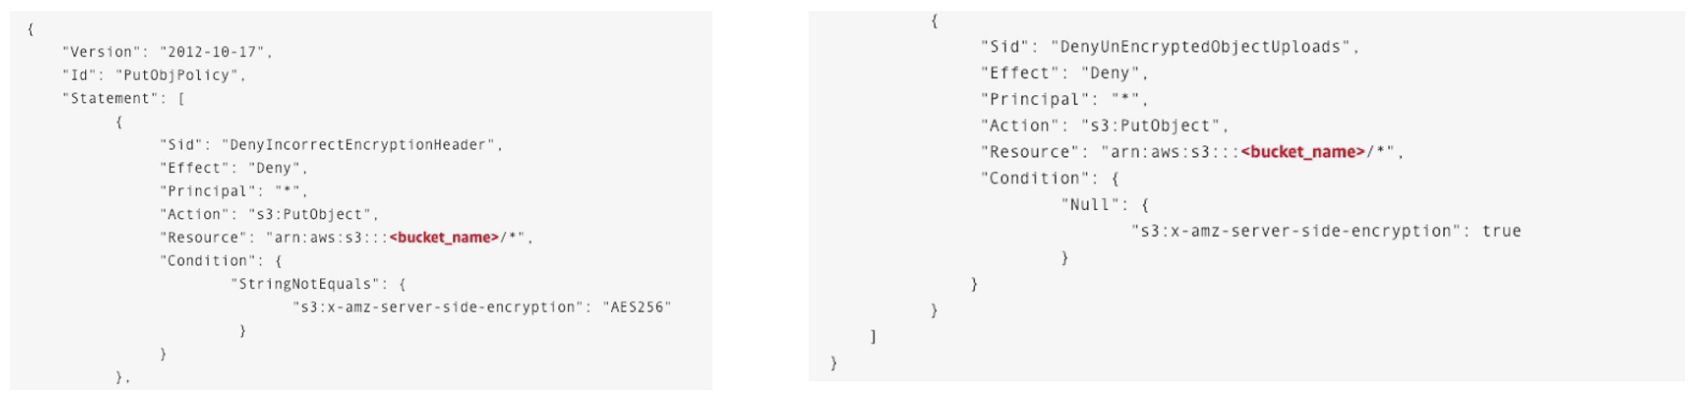
Untitled
- Another way is to use the “default encryption” option in S3.
- If default encryption is enabled and you don’t specify any encryption while uploading a file, the default encryption settings will be applied. Else, you can specify the encryption settings to override the default.
- Note: Bucket Policies are evaluated before “default encryption”, so if you want to ensure that the user uses SSE-S3 by blocking other type of encryption, then use bucket policy but if you just want to ensure that all the objects stored to S3 are encrypted, use default encryption.
- One way to “force encryption” is to use a bucket policy and refuse any API call to PUT an S3 object without encryption headers:
- Hands on
Select bucket → Properties → Default Encryption → Enable
S3 Replication
Theory
- Replicate the contents of an S3 bucket to another bucket possibly in another region and account.
- Must enable versioning in source and destination buckets
- Cross Region Replication (CRR)
- Same Region Replication (SRR)
- Buckets can be in different accounts
- Replication is asynchronous but happens very quickly
- Must give proper lAM permissions to S3 buckets
- Use cases:
- CRR: compliance, lower latency access, replication across accounts
- SRR: log aggregation, live replication between production and test accounts
- After activating replication, only new objects are replicated (not retroactive)
- For DELETE operations:
- Can replicate delete markers from source to target (optional setting)
- Deletions with a version ID are not replicated (to avoid malicious deletes)
- There is no “chaining” of replication. So, if bucket 1 has replication into bucket 2, which has replication into bucket 3. Then objects created in bucket 1 are not replicated to bucket 3.
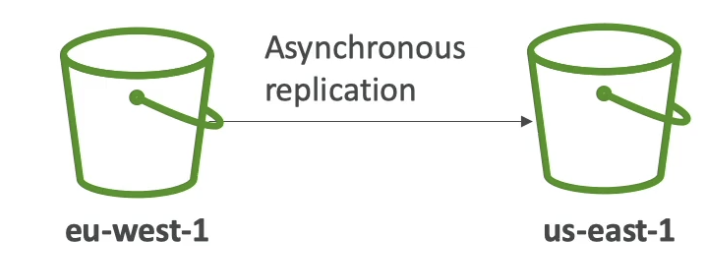
Untitled
Hands on
- Create a replica bucket in another region than the origin bucket and enable versioning for both buckets
- Add a replication rule to the origin bucket
Select the origin bucket → Management → Replication rules → Create
Rule scope: apply to all objects in this bucket
Destination: replica bucket
IAM Role: Create new
Delete marker replication: checked
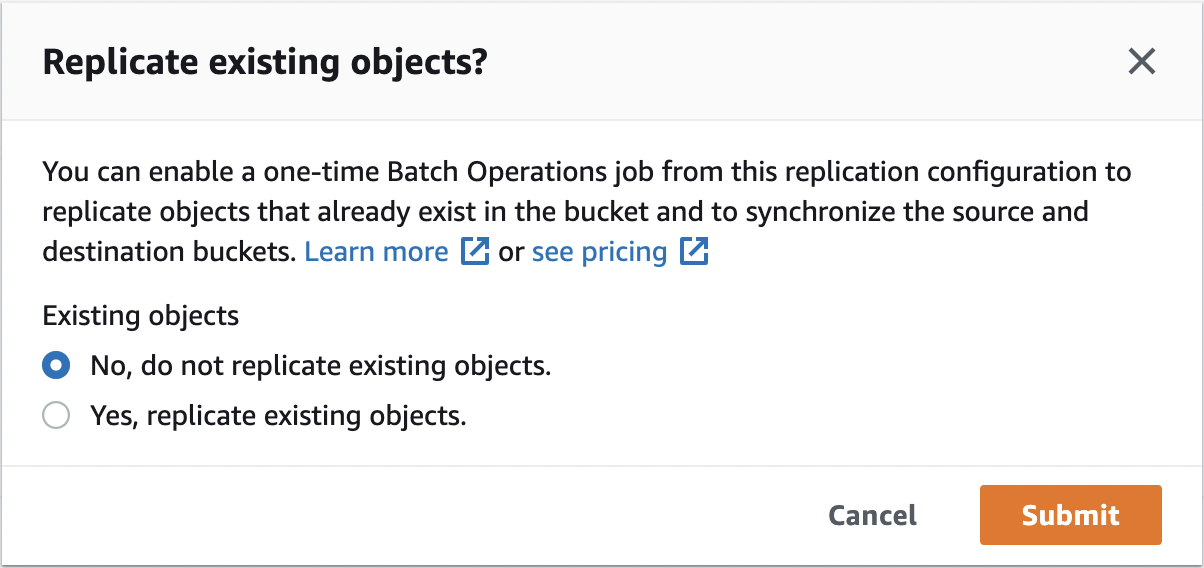
Untitled
Now, any file uploaded to the origin bucket will be replicated to replication bucket with the same version Id.
If we enable delete marker replication, soft deletion will be replicated too.
S3 Storage Classes
Intro
Durability
- Durability is how often does S3 lose data
- S3 has high durability (99.999999999%, 11 9’s) of objects across multiple AZ (if you store 10,000,000 objects with Amazon S3, you can on average expect to incur a loss of a single object once every 10,000 years)
- Durability is the same for all storage classes
Availability
- Availability measures how readily available a service is
- Varies depending on storage class (ex: S3 standard has 99.99% availability ⇒ not available 53 minutes a year).
- Availability has to be taken into account when developing your application.
Following are the S3 classes:
S3 Standard General Purpose
- 99.99% Availability
- Used for frequently accessed data
- Low latency and high throughput
- Sustain 2 concurrent facility failures
- Use Cases: Big Data analytics, mobile & gaming applications, content distribution, etc.
S3 Infrequent Access
- For data that is less frequently accessed, but requires rapid access when needed
- Data can be moved to IA class after a minimum of 30 days in standard class
- Lower cost than S3 Standard but cost on retrieval
- S3 Standard-Infrequent Access
- 99.9% Availability
- Use cases: Disaster Recovery, backups
- S3 One Zone-Infrequent Access
- High durability (99.999999999%) in a single AZ
- Data lost when AZ is destroyed
- 99.5% Availability
- Use Cases: Storing secondary backup copies of on-premise data, or data you can recreate
- S3 Standard-Infrequent Access
S3 Glacier
- Low-cost object storage meant for archiving / backup
- Pricing: price for storage + object retrieval cost
- S3 Glacier Instant Retrieval
- Millisecond retrieval
- Minimum storage duration of 90 days
- Great for data accessed once a quarter
- When you want to archive some data but need it instantly
- S3 Glacier Flexible Retrieval
- Formerly known as Amazon S3 Glacier
- 3 retrieval flexibility (decreasing order of cost):
- Expedited (1 to 5 minutes)
- Standard (3 to 5 hours)
- Bulk (5 to 12 hours) - free
- Minimum storage duration of 90 days
- S3 Glacier Deep Archive
- 2 flexible retrieval:
- Standard (12 hours)
- Bulk (48 hours)
- Minimum storage duration of 180 days
- Lowest cost
- 2 flexible retrieval:
- S3 Glacier Instant Retrieval
- Object cannot be directly accessed, it first needs to be restored which could take some time (depending on the tier) to fetch the object.
S3 Intelligent Tiering
- Moves objects automatically between Access Tiers based on usage
- Small monthly monitoring and auto-tiering fee
- No retrieval charges in S3 Intelligent-Tiering
- Access Tiers:
- Frequent Access (automatic): default tier
- Infrequent Access (automatic): objects not accessed for 30 days
- Archive Instant Access (automatic): objects not accessed for 90 days
- Archive Access (optional): configurable from 90 days to 700+ days
- Deep Archive Access (optional): configurable from 180 days to 700+ days
Can move between classes manually or using S3 Lifecycle configurations.
Comparison
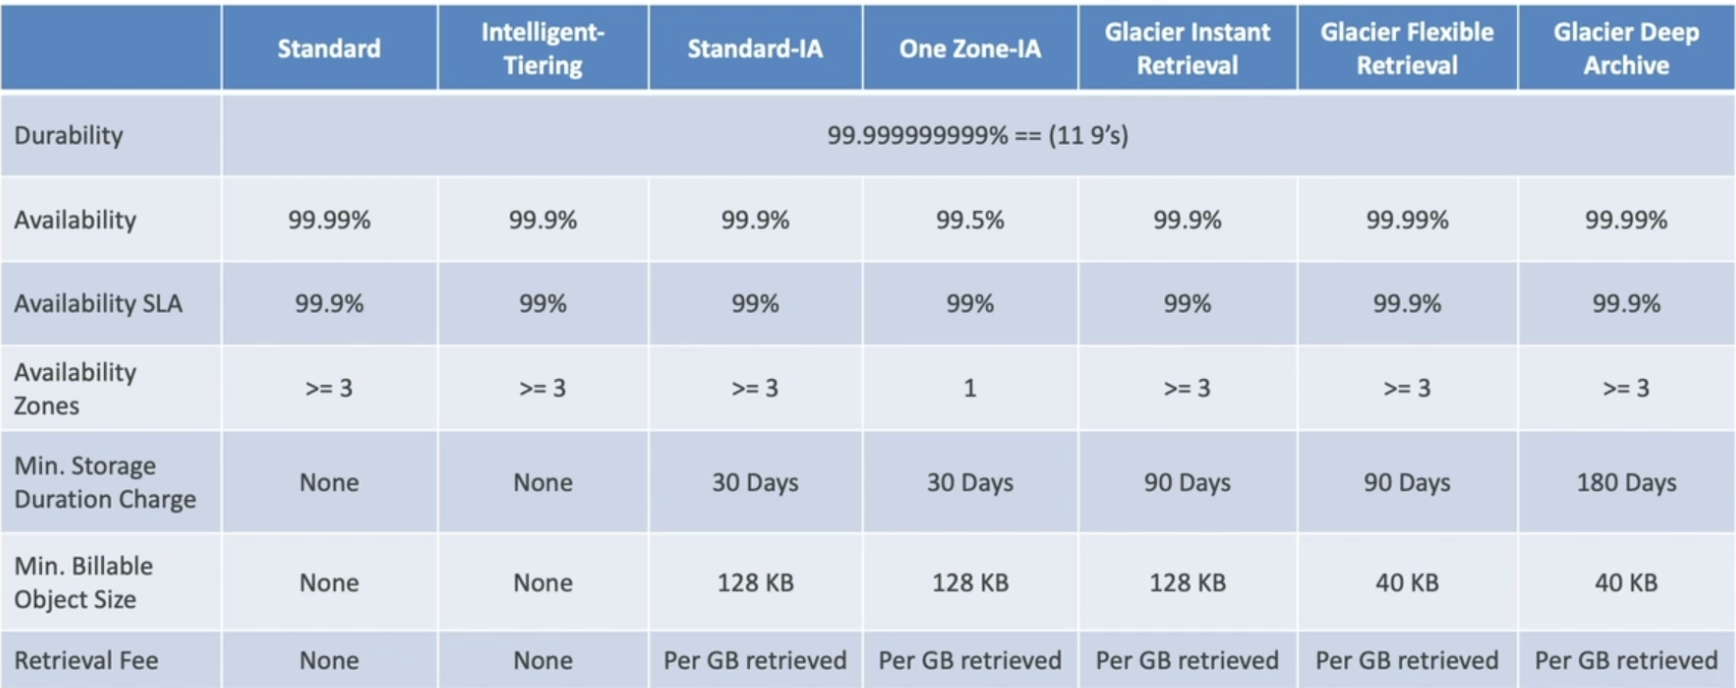

Hands on
When uploading an object in the S3 bucket, we can specify the storage class.

Untitled
Moving between storage classes
- You can transition objects between storage classes based on the image below.
- You cannot transition from any class to every other class (ex: cannot transition from glacier to standard IA, it requires restore and copy)
- For infrequently accessed object, move them to STANDARD_IA
- For archive objects you don’t need in real-time, use GLACIER or DEEP_ARCHIVE
- Moving objects can be automated using a lifecycle configuration (lifecycle rules)
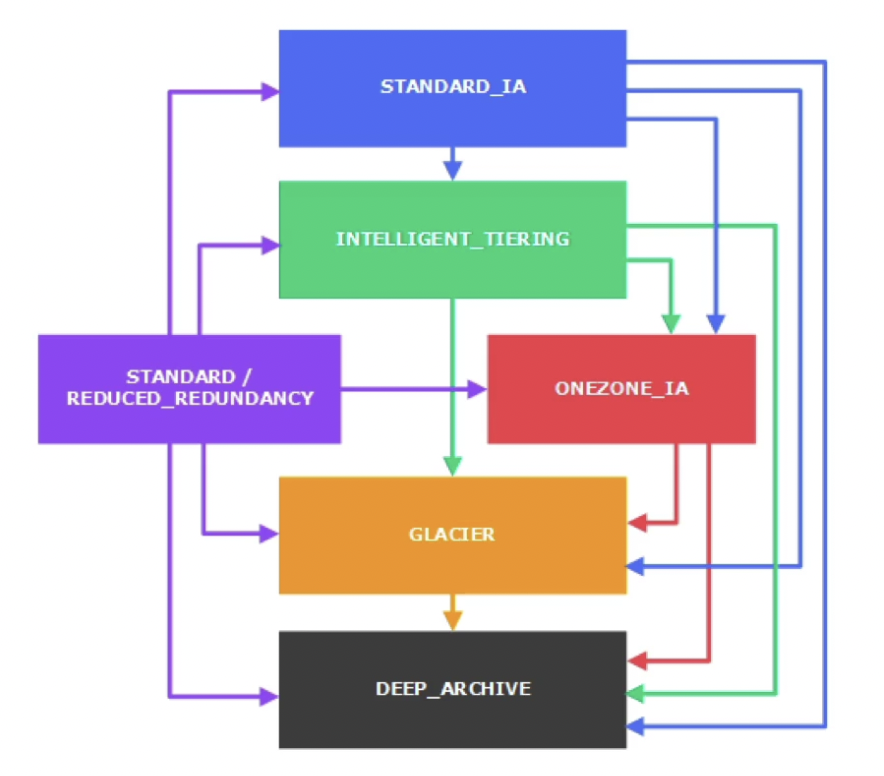
Untitled
Lifecycle rules
Theory
- We can specify some rules for our S3 objects to trigger a transition or deletion actions on them.
- Transition actions: It defines when objects are transitioned to another storage class. Example:
- Move objects to Standard IA class 60 days after creation
- Move to Glacier for archiving after 6 months
- Expiration actions: configure objects to expire (delete) after some time
- Access log files can be set to delete after a 365 days
- Can be used to delete old versions of files (if versioning is enabled)
- Can be used to delete incomplete multi-part uploads
- Rules can be created for a certain prefix (ex
s3://mybucket/mp3/*)
- Rules can be created for certain objects tags (ex Department: Finance)
Example scenarios:
- Scenario 1
Your application on EC2 creates images thumbnails after profile photos are uploaded to Amazon S3. These thumbnails can be easily recreated, and only need to be kept for 45 days. The source images should be able to be immediately retrieved for these 45 days, and afterwards, the user can wait up to 6 hours. How would you design this?
S3 source images can be on STANDARD, with lifecycle configuration to transition them to GLACIER after 45 days.
S3 thumbnails can be on ONEZONE_IA since they can be easily recreated even if the AZ goes down. This will save cost. Also, attach a lifecycle configuration to expire them (delete them) after 45 days.
- Scenario 2
A rule in your company states that you should be able to recover your deleted S3 objects immediately for 15 days, although this may happen rarely. After this time, and for up to 365 days, deleted objects should be recoverable within 48 hours.
We need to enable S3 versioning in order to have object versions, so that “deleted objects” are in fact hidden by a “delete marker” and can be recovered. We will transition these “non-current versions” of the object to S3_IA because they are rarely accessed but if they are, they should be fetched instantly. We can transition afterwards these “non-current versions” to DEEP ARCHIVE as it is the most cost-effective solution given the 48h retrieval time.
Hands on
Select the bucket → Management → Lifecycle rules → Create
Specify a prefix to apply this rule to a folder

Untitled
S3 Analytics
- You can setup S3 Analytics to help determine when to transition objects from Standard to Standard_IA
- Does not work for ONEZONE_IA or GLACIER
- Report is updated daily
- Takes about 24h to 48h hours to first start
- Setting up S3 analytics is a good first step to determine the optimal Lifecycle Rules
Amazon Athena
- Theory
- Athena is a serverless query service to perform analytics on S3 objects
- Uses standard SQL language to query the files.
- S3 objects don’t need to be loaded in Athena, it runs directly on S3.
- Supports CSV, JSON, ORC, AvI and Parquet file formats (built on Presto engine)
- Pricing: $5.00 per TB of data scanned
- Use compressed or columnar data for cost-savings (due to less scan)
- Use cases: Business intelligence / analytics / reporting, analyze & query VPC Flow Logs, ELB Logs, CloudTrail trails, etc.
- Exam Tip: Analyze data in S3 using serverless SQL ⇒ Athena

- Theory
Section 15: Amazon S3 Security
Section 15: Amazon S3 Security
S3 Encryption
.png)
Server Side Encryption - SSE S3
.png)
Server Side Encryption - SSE KMS (Key Management Service)
.png)
.png)
Server Side Encryption - SSE C (Customer)
.png)
Client Side Encryption
.png)
Encryption in Transit (SSL/TLS)
.png)
S3 Default Encryption
.png)
S3 CORS
.png)
.png)
.png)
S3 MFA Delete
Theory
- MFA (multi factor authentication) forces user to generate a code on a device (usually a mobile phone or hardware) before doing destructive operations on S3
- To use MFA-Delete, first enable Versioning on the S3 bucket
- You will need MFA to
- permanently delete an object version
- suspend versioning on the bucket
- You won’t need MFA for
- enabling versioning
- listing deleted versions
- deleting an object (soft delete / marked as deleted)
- Only the bucket owner (root account) can enable/disable MFA-Delete. It cannot be done by an IAM user even if they have admin access.
- MFA-Delete currently can only be enabled using the CLI, SDK or S3 Rest API. It cannot be done through the AWS Console.
Hands on
- Login to your root account on AWS
User → My Security Credentials →
MFA → Copy the ARN for the MFA device (required to enable MFA delete)
Access Keys → Create new access key (required to configure AWS CLI for root account)
- Configure Root profile in CLI
aws configure --profile root-mfa-delete-demo
- Enable MFA Delete for S3
aws s3api put-bucket-versioning --bucket <bucket-name> --versioning-configuration Status=Enabled,MFADelete=Enabled --mfa "<arn-of-mfa-device> <mfa-code>" --profile root-mfa-delete-demo
- Disable MFA Delete for S3
aws s3api put-bucket-versioning --bucket <bucket-name> --versioning-configuration Status=Enabled,MFADelete=Disabled --mfa "<arn-of-mfa-device> <mfa-code>" --profile root-mfa-delete-demo
- Login to your root account on AWS
S3 Access Logs
Theory
- For audit purpose, you may want to log all access to S3 buckets
- Any request made to S3, from any account, authorized or denied, will be logged into another S3 bucket
- That data can be analyzed using data analysis tools or Amazon Athena
- Do not set your logging bucket to be the monitored bucket. It will create a logging loop, and your bucket will grow in size exponentially.
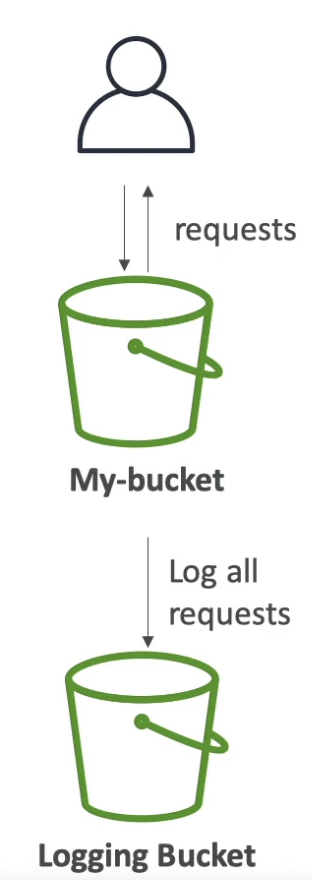

Hands on
- Create a new bucket for logs
- Enable logging for the main bucket
Select bucket → Properties → Server access logging → Edit → Choose the logging bucket → Specify a path to group all the logs for the main bucket under that folder (ex:
/logs)The above step will automatically modify the ACL (access control list) of the logs bucket to allow the main bucket to write log info.
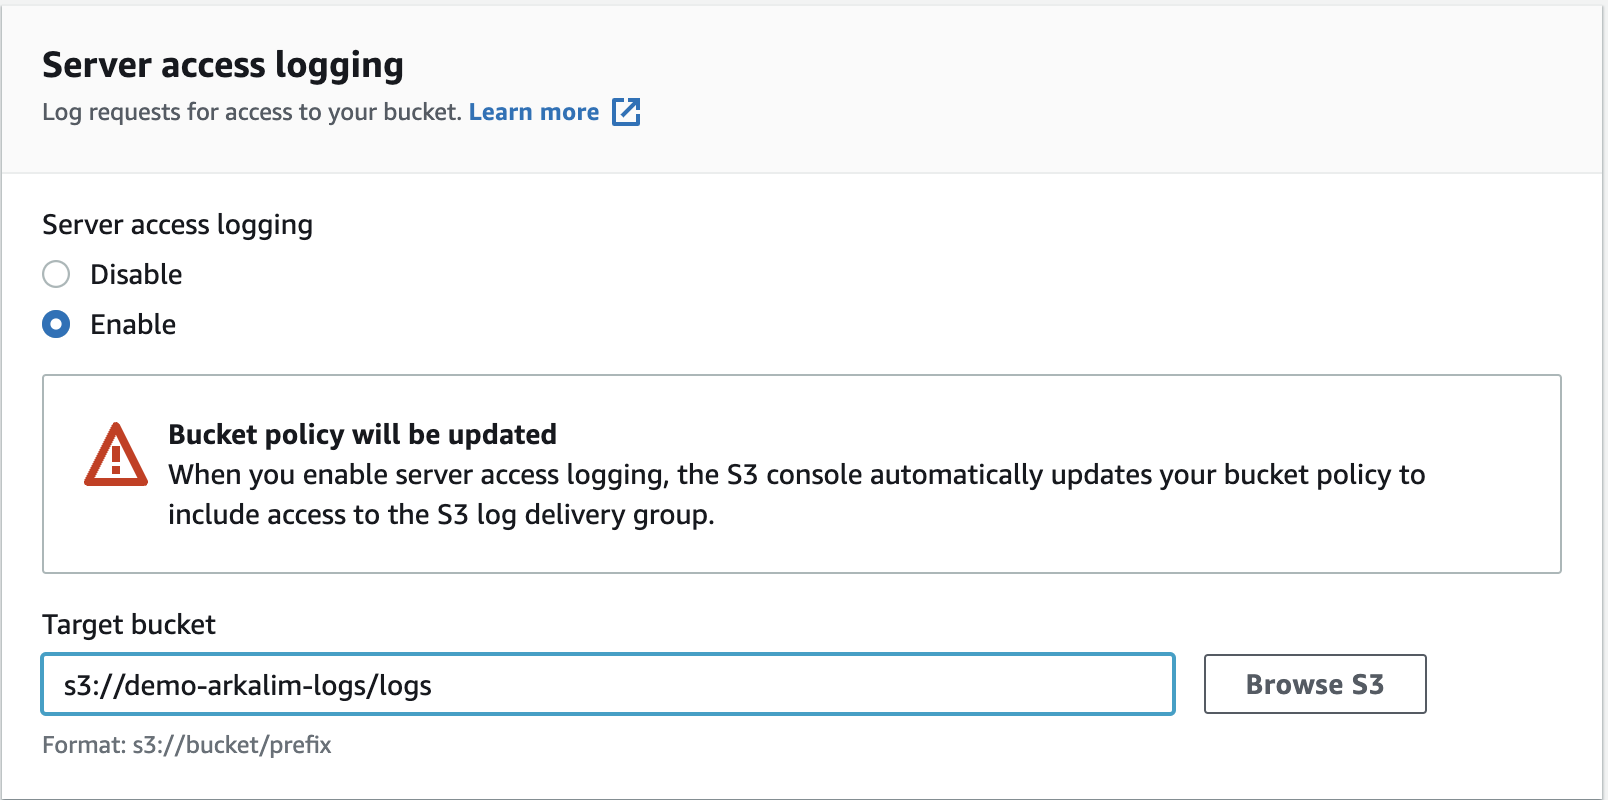
S3 Pre-signed URL
Theory
- Pre-signed URLs for S3 have temporary access token as query string parameters which allow anyone with the URL to temporarily access the resource.
- Can generate pre-signed URLs using SDK or CLI
- Pre-signed URL for Downloads (easy, can use the CLI)
- Pre-signed URL for Uploads (harder, must use the SDK)
- Valid for a default of 3600 seconds (1h), can change timeout with
-expires-in [TIME_BY_SECONDS]argument
- Users given a pre-signed URL inherit the permissions of the person who generated the URL for GET / PUT request
- Use cases
- Allow only logged-in users to download a premium video on your S3 bucket
- Allow an ever changing list of users (difficult to manage permissions) to download files by generating URLs dynamically
- Allow temporarily a user to upload a file to a precise location in our bucket (ex: uploading their profile picture)
Hands on
- click on file you want to share → object action → share with pre signed URL → set minutes/hours → create pre signed URL and share it.
Glacier Vault Lock
- It allows us to lock the data after writing it once (WORM - Write Once Read Many model)
- Lock the policy from future edits (no one can change the data or policy)
- Helpful for compliance and data retention
S3 Object Lock
- Adopt a WORM (Write Once Read Many) model
- Block an object version deletion for a specified amount of time
- Object retention can be based on:
- Retention Period: specifies a fixed period to secure the S3
- Legal Hold: same protection but no expiry date/retention period.
- Legal Hold can be freely placed and removed using the s3:PutObjectLegalHold IAM permission.
- Modes:
- Retention Governance mode: users can’t overwrite or delete an object version or alter its lock settings unless they have special permissions
- Retention Compliance mode: a protected object version can’t be overwritten or deleted by any user, including the root user in your AWS account. When an object is locked in compliance mode, its retention mode can’t be changed, and its retention period can’t be shortened.
S3 Access Points and Object Lambda
.png)
.png)
Section 16: CloudFront & AWS Global Accelerator
Section 16: CloudFront & AWS Global Accelerator
AWS CloudFront
Intro
- Global AWS Service (not tied to a region)
- Provides a global Content Delivery Network (CDN)
- Present outside the VPC
- Improves read performance, content is cached at the edge locations
- 216 Point of Presence globally (edge locations)
- DDoS (distributed DoS) protection, integration with Shield & AWS Web Application Firewall
- Can expose external HTTPS and can talk to internal HTTPS backends
- Supports HTTP/RTMP protocol (does not support UDP protocol)
- With CloudFront, if a user in NA accesses some file in an S3 bucket in AU, the content will be fetched to an edge location in NA (over the private AWS network) and cached there. This allows the reads to be distributed and therefore reduces load on the main S3 bucket.

Origins for CloudFront
CloudFront working
The client sends the request to CloudFront at an edge location which will forward it to the origin (along with the query string and request headers). The fetched file will be cached at the edge location. So, if another user requests the same file, it will be available at the edge location.

S3 bucket
- For distributing files and caching them at edge locations
- Enhanced security with CloudFront Origin Access Identity (OAl) which allows the S3 bucket to only be accessed by CloudFront.
- CloudFront can be used as an ingress (to upload files to S3)
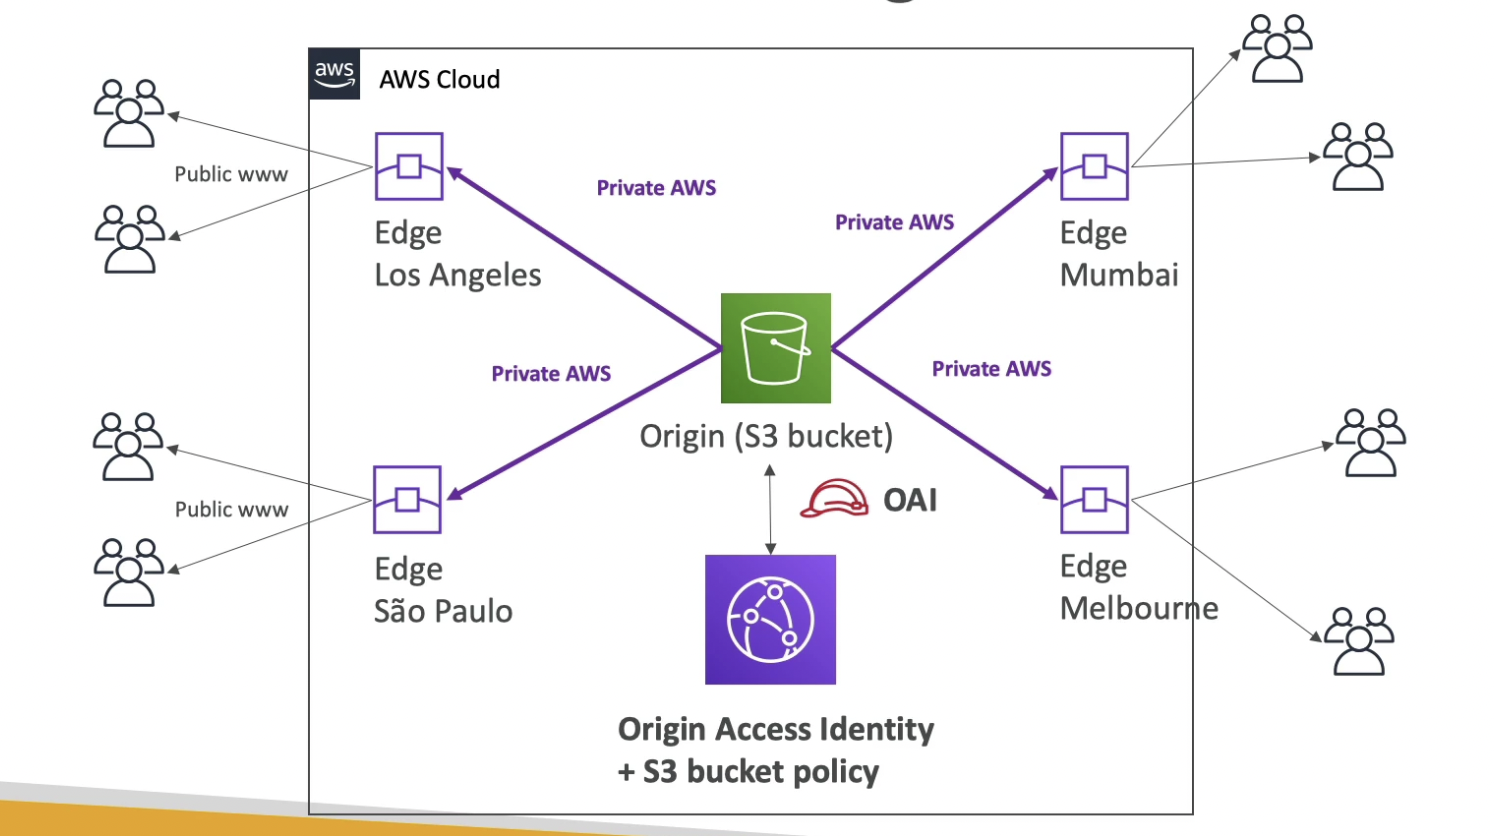
Custom Origin (must use HTTP) ALB or EC2
EC2 instance
In this case, EC2 instance will fetch the content and deliver it to the edge location.
- EC2 instances need to be publicly accessible on HTTP by public IPs of edge locations (range provided by AWS). This is because edge locations are present outside the VPC.

Untitled
Application Load Balancer
Since ALB only needs to be publicly accessible by the public IPs of edge locations, EC2 instances can be private

- S3 website (must first enable the bucket as a static S3 website)
- HTTP backend (on premises)
CloudFront vs S3 Cross Region Replication
CloudFront:
- Global Edge network
- Files are cached for a TTL
- Great for static content that must be available everywhere
S3 Cross Region Replication:
- Must be setup for each region you want replication to happen
- Files are updated in near real-time
- Read only
- Great for dynamic content that needs to be available at low-latency in few regions
Hands on
- Create an S3 bucket
Upload:
- index.html
<html> <head> <title>My First Webpage</title> </head> <body> <h1>I love coffee</h1> <p>Hello world!</p> </body> <img src="coffee.jpg" width=500/></html>
- error.html
<h1>Uh oh, there was an error</h1>
- coffee.jpg
💡 Don’t turn on S3 website
- index.html
- Create a CloudFront distribution
Select the bucket as the origin, create a new OAI and update the bucket policy to allow CF to get objects from it.
Default root object:
index.html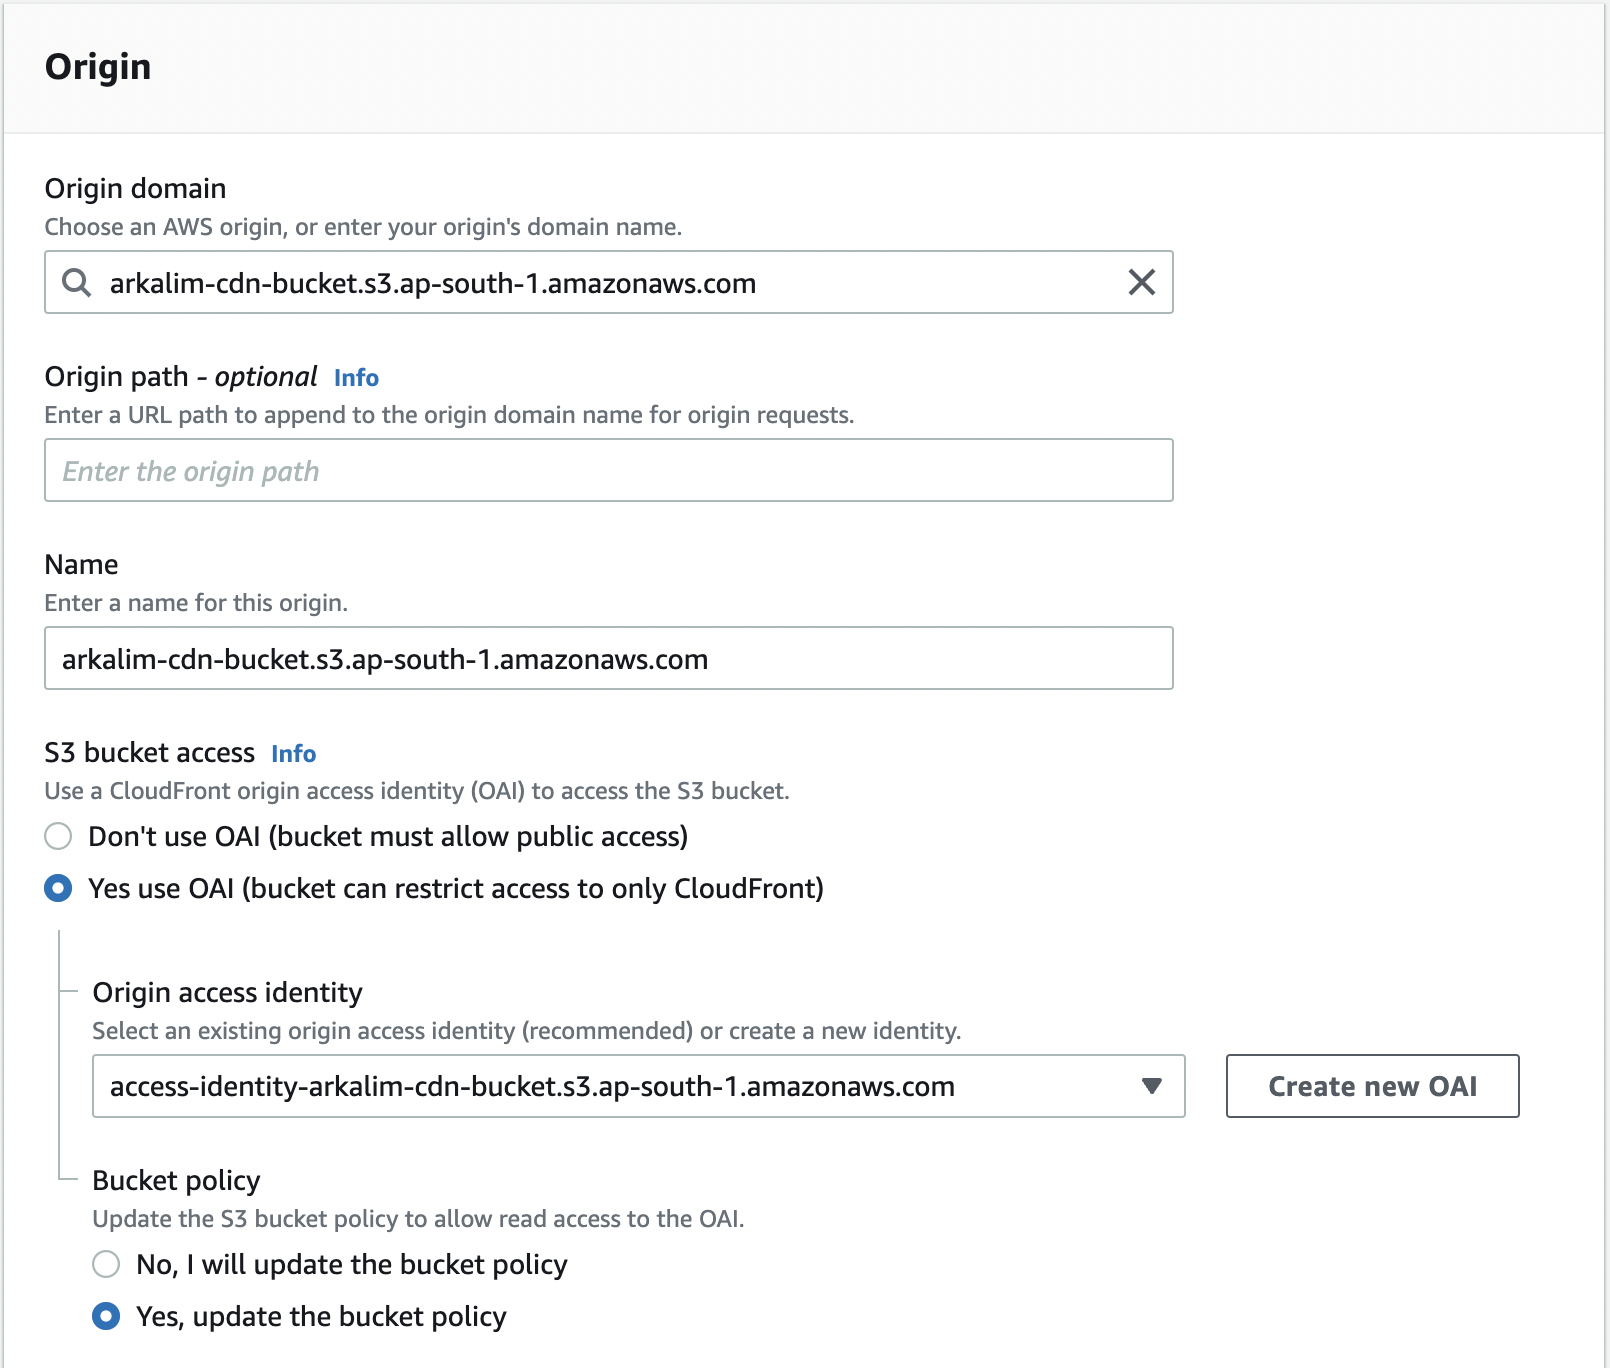
Untitled
Once the distribution is deployed, the distribution domain name can be used to access the files through the CloudFront network. We can also access individual files using the domain name as the base URL.
- Create an S3 bucket
Geo Restriction
- You can restrict who can access your distribution based on their location
- Whitelist: Allow your users to access your content only if they’re in one of the countries on a list of approved countries.
- Blacklist: Prevent your users from accessing your content if they’re in one of the countries on a blacklist of banned countries.
- The “country” is determined using a 3rd party Geo-IP database
- Use case: Copyright Laws to control access to content
Pricing
- CloudFront Edge locations are all around the world
- The cost of data out per edge location varies

- You can reduce the number of edge locations for cost reduction using price classes:
- Price Class All: all regions best performance
- Price Class 200: most regions, but excludes the most expensive regions
- Price Class 100: only the least expensive regions

Cache Invalidation
.png)
Signed URL / Signed Cookies
Intro
- Signed URL / Signed Cookies are used to make a CloudFront distribution private. Ex: You want to distribute paid shared content to premium users over the world.
- Whenever we create a signed URL / cookie, we attach a policy specifying:
- URL / Cookie expiration
- IP ranges to access the data from
- Trusted signers (which AWS accounts can create signed URLs)
- How long should the URL be valid for?
- Shared content (movie, music): make it short (a few minutes)
- Private content (private to the user for long term access): you can make it last for years
- Signed URL ⇒ access to individual files (one signed URL per file)
- Signed Cookies ⇒ access to multiple files (one signed cookie for many files)
Working
We have a CloudFront distribution allowed to get objects securely from S3. Clients will first authenticate or authorize through our application which will then use AWS SDK to generate signed URL from CloudFront and give it to the client to provide limited access to the content. The same concept works for signed cookie.

Untitled
CloudFront Signed URL vs S3 Pre-Signed URL
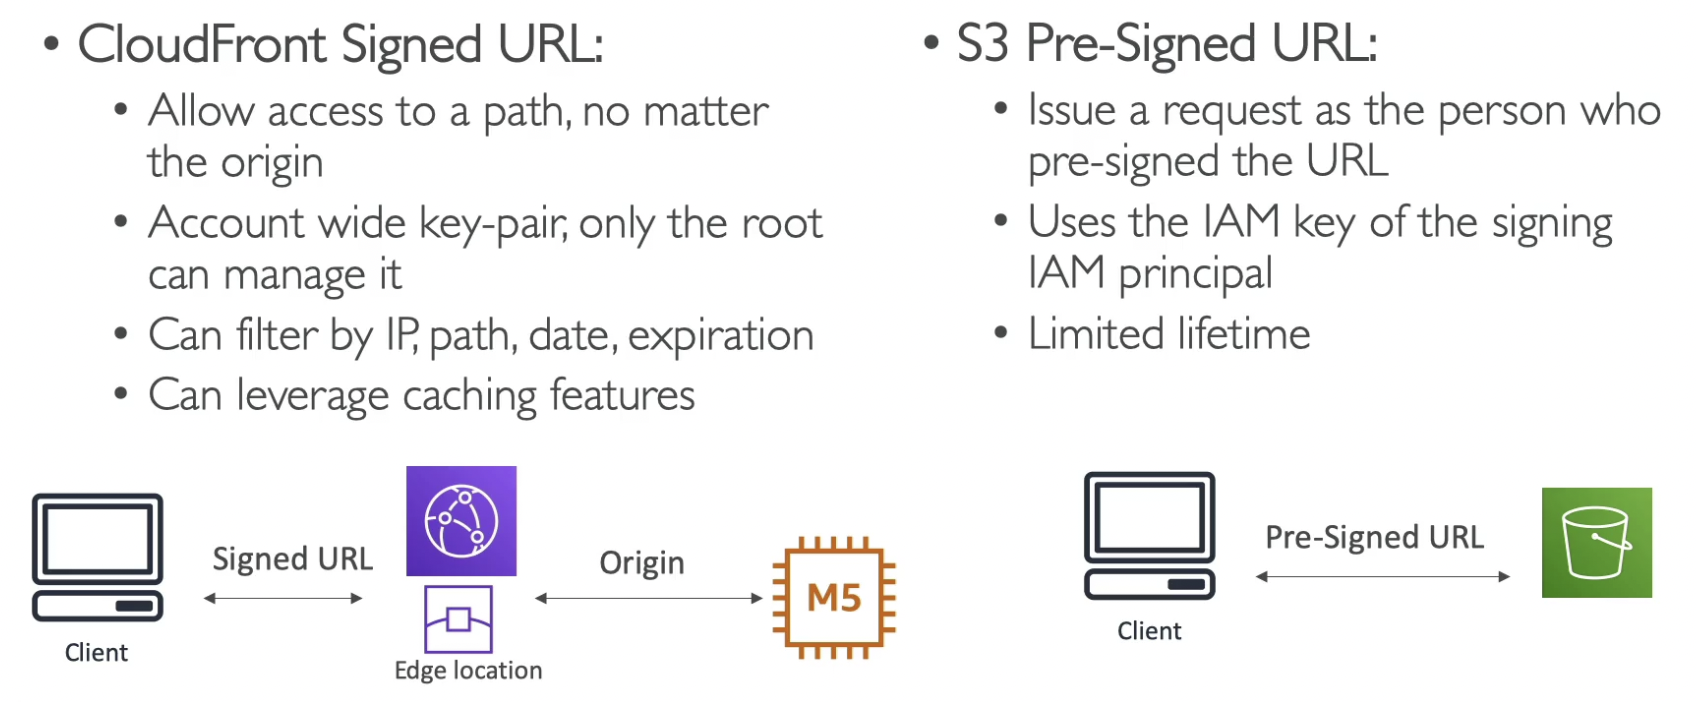
Untitled
Multiple Origin
To route to different kind of origins based on the content type (based on path pattern). We can configure cache behaviors to route to different origins accordingly.
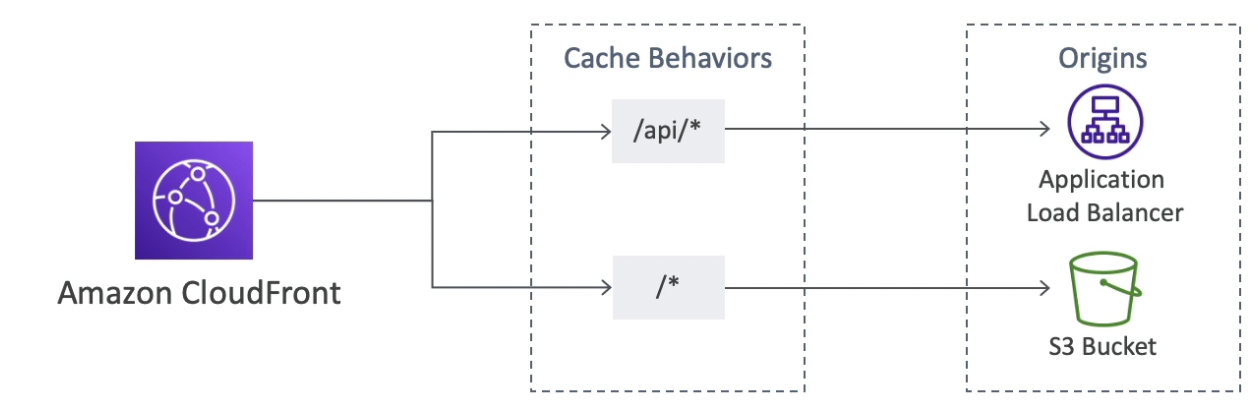
Untitled
Origin Groups (for HA)
- To achieve high-availability and do failover
- Origin Group consists of one primary and one secondary origin. If the primary origin fails, the second one is used.

Untitled
Field Level Encryption
- Used to protect user sensitive information through application stack
- Adds an additional layer of security along with HTTPS
- Sensitive information sent by the user is encrypted at the edge close to user. This encrypted information can only be decrypted by the web server. None of the intermediate services will be able to see the encrypted info.
- Uses asymmetric encryption (public & private key)
- Usage:
- Specify set of fields in POST requests that you want to be encrypted (up to 10 fields)
- Specify the public key to encrypt them
- In the diagram below, the client is sending their credit card info as a sensitive field which is being encrypted at the edge location.
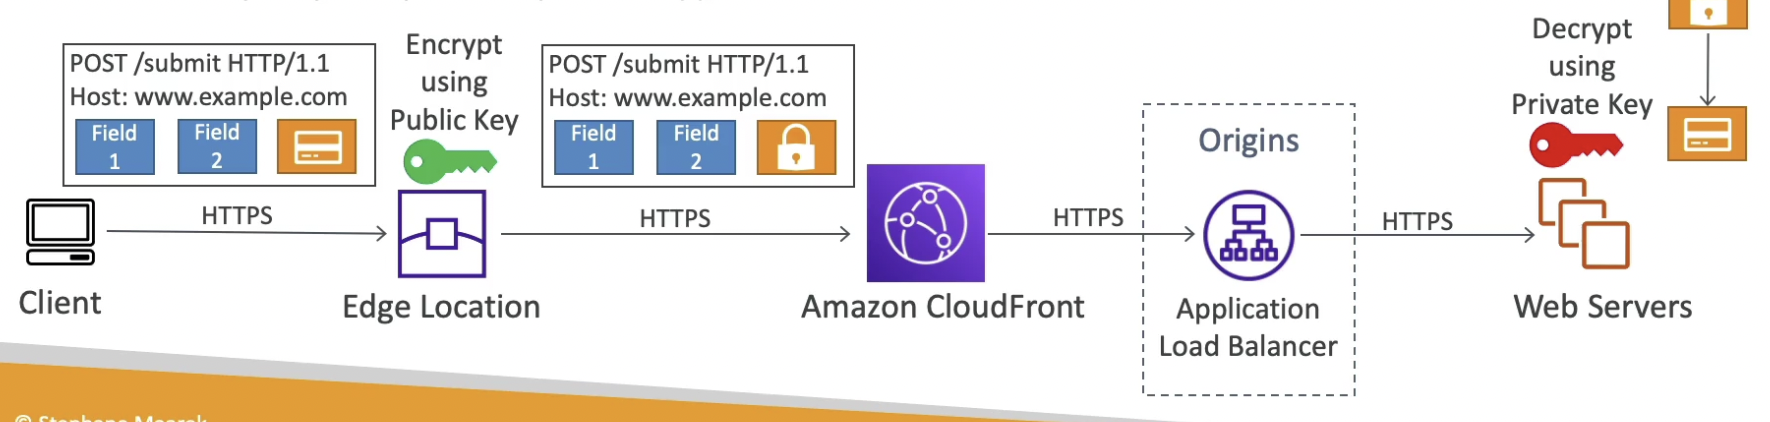
Untitled
AWS Global Accelerator
Theory
AWS Problem to solve
You have deployed an application in a region but have global users who want to access it directly. They will have to use the public internet for this, which can add a lot of latency due to many hops and also increases the chance of lost packets. We wish to go as fast as possible through the private AWS network to minimize latency.
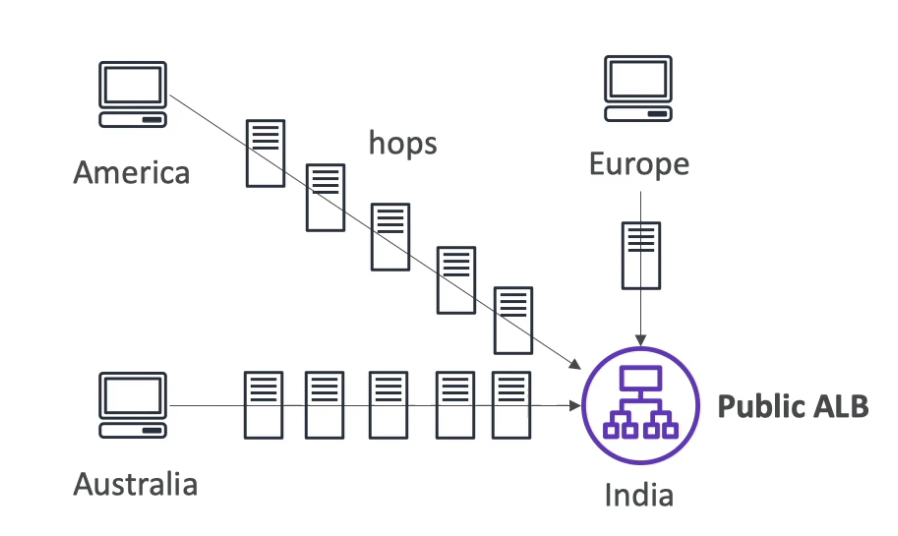
Unicast vs Anycast IP
Unicast IP: one server holds one IP address
Anycast IP: all servers hold the same IP address and the client is routed to the nearest one
AWS Global Accelerator

AWS Global Accelerator is a service that improves the availability and performance of your applications with local or global users. It provides static IP addresses that act as a fixed entry point to your application endpoints in a single or multiple AWS Regions, such as your Application Load Balancers, Network Load Balancers or Amazon EC2 instances. Global Accelerator is a good fit for non-HTTP use cases, such as gaming (UDP), IoT (MQTT), or Voice over IP, as well as for HTTP use cases that specifically require static IP addresses or deterministic, fast regional failover.
- Used to leverage the AWS internal network to route to your application
- 2 anycast public IPs (static) are created for your application globally. Requests from clients hitting these IPs will automatically be routed to the nearest edge location. The Edge locations send the traffic to your application through the private AWS network. The application could be distributed in multiple regions (global).
- No caching is done by Global Accelerator, it only makes our application globally available.
- Works with Elastic IP, EC2 instances, ALB, NLB and can be public or private
- Consistent Performance
- Intelligent routing to lowest latency edge location and fast regional failover
- Client doesn’t cache anything because the 2 anycast IPs are static
- Internal AWS network
- Health Checks
- Global Accelerator performs a health check of your applications
- Helps make your application global (failover less than 1 minute for unhealthy endpoints)
- Great for disaster recovery (thanks to the health checks)
- Security
- only 2 external IP need to be whitelisted
- DDoS protection is built into the Global Accelerator using AWS Shield
Hands on
Create two EC2 instance in different regions
User data:
#!/bin/bashyum update -yyum install -y httpdsystemctl start httpdsystemctl enable httpdEC2_AVAIL_ZONE=$(curl -s http://169.254.169.254/latest/meta-data/placement/availability-zone)echo "<h1>Hello World from $(hostname -f) in AZ $EC2_AVAIL_ZONE </h1>" > /var/www/html/index.html
Create an accelerator
- Listeners
Choose port 80 on TCP for HTTP
Client affinity is the stickiness

Untitled
- Endpoint groups
Endpoints are grouped into regions
Traffic dial is the percentage of traffic to be sent to that endpoint group.

Untitled
- Endpoints
Add endpoints under each endpoint group
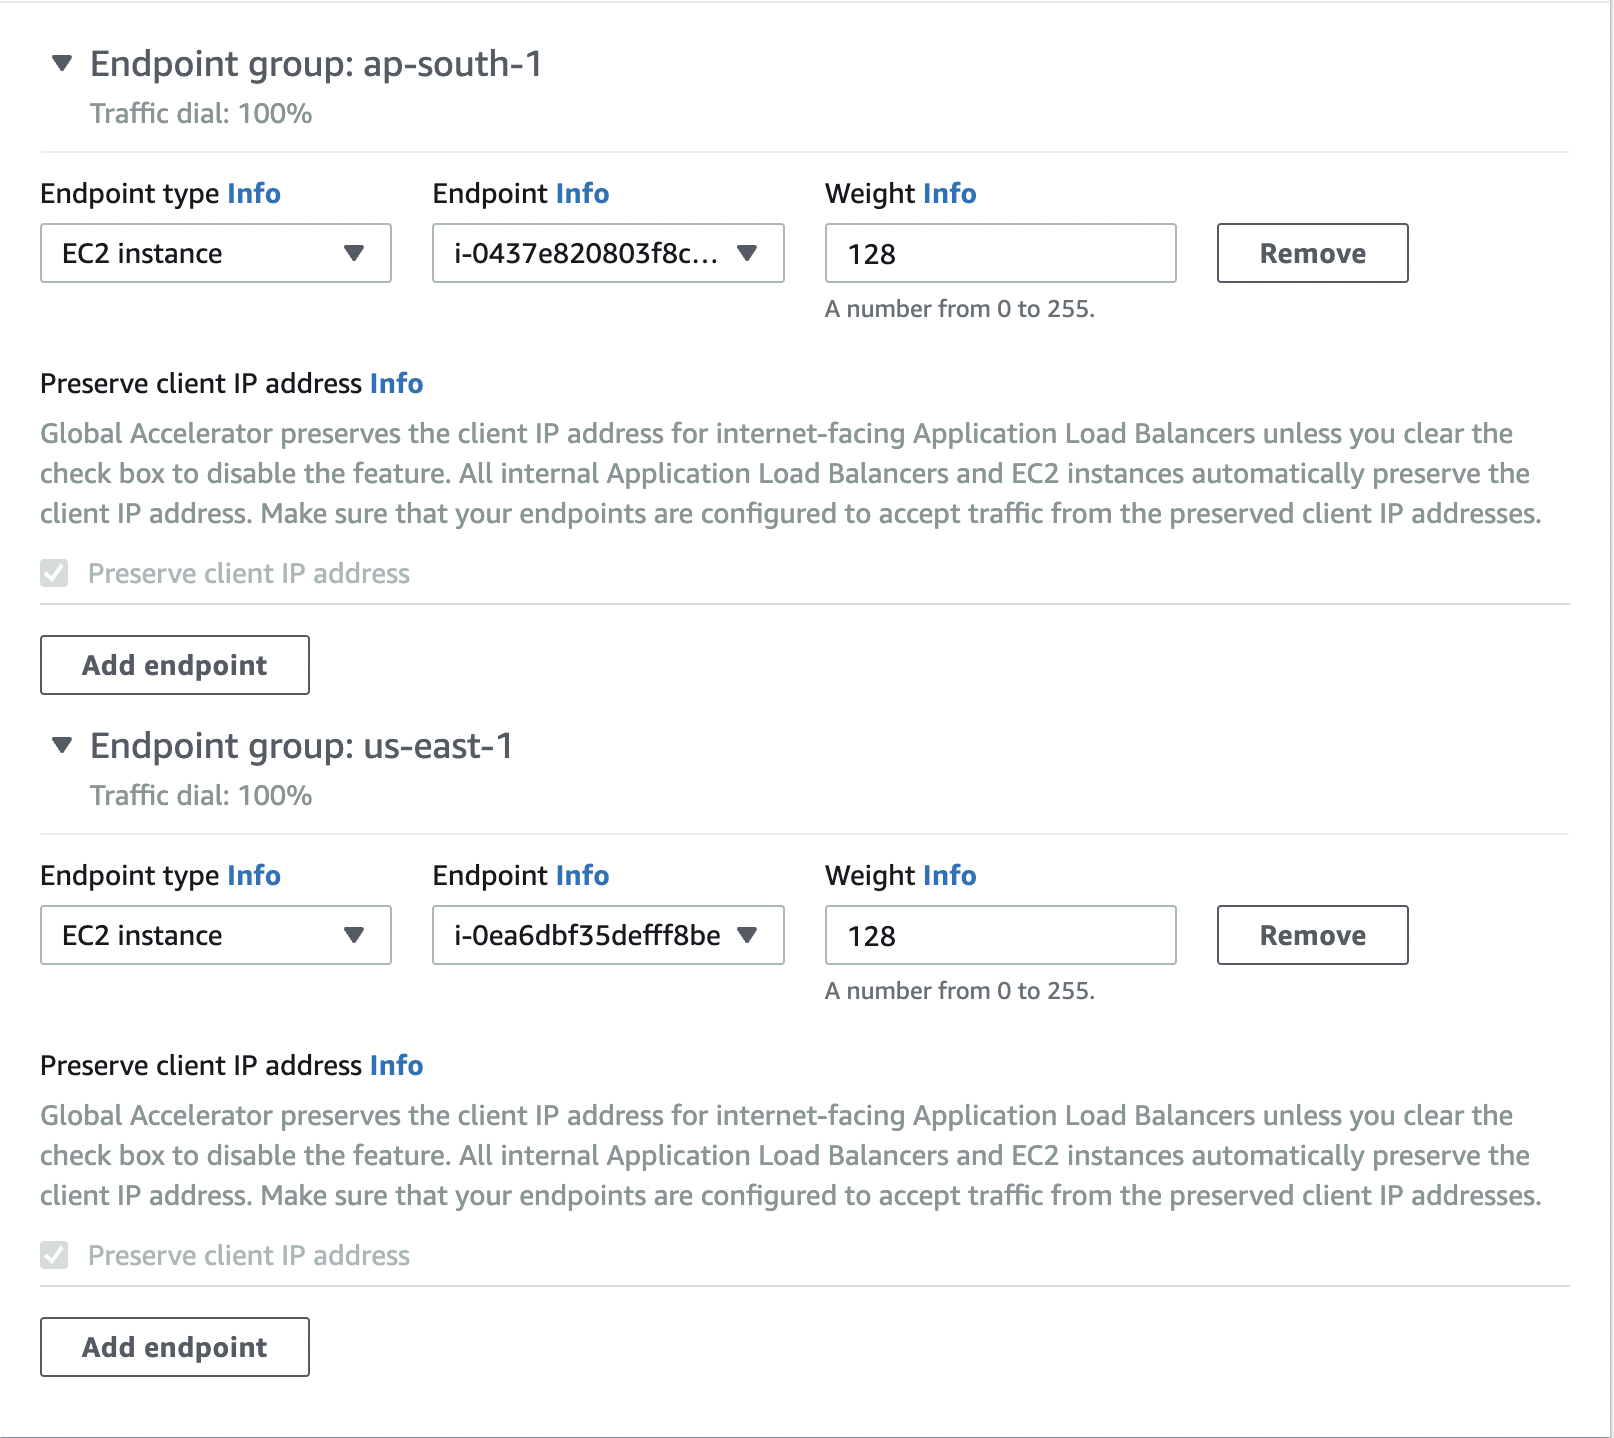
Untitled
- Listeners
Once the accelerator is created, we will get 2 static IPs and a DNS name that we can use to hit the EC2 instances. If one of the instances is down, GlobalAccelerator will automatically switch to the other one using health checks.

Untitled
Global Accelerator vs CloudFront
Similarities:
- They both use the AWS global network and its edge locations around the world
- Both services integrate with AWS Shield for DDoS protection.
CloudFront
- Improves performance for both cacheable content (such as images and videos) and dynamic content (such as API acceleration and dynamic site delivery)
- Content is served at the edge location once it is cached
Global Accelerator
- Improves performance for a wide range of applications over TCP or UDP
- Proxying packets at the edge location to applications running in one or more AWS Regions. So, the packets still make up to the final application and they are served from the application as well. They are not cached at the edge location.
- Good fit for non-HTTP use cases, such as gaming (UDP), loT (MQTT), or Voice over IP
- Good for HTTP use cases that require static IP addresses
- Good for HTTP use cases that required deterministic, fast regional failover
Section 17: AWS Storage Extras
Section 17: AWS Storage Extras
AWS Snow Family
Theory
- Highly-secure & portable devices for:
Data Migration (migrate data into and out of AWS) - Snowcone, Snowmobile, Snowball Edge
Challenges in data migration:
- Limited connectivity & bandwidth
- High network cost
- Shared bandwidth (can’t max out the network)
- Connection instability
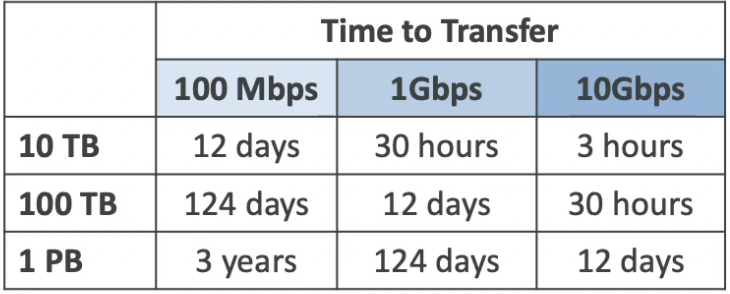
Snow family vs Direct migration to S3
AWS Snow Family contains offline devices to perform data migrations. AWS sends an actual physical device through post on which we upload the data locally. We then have to ship the device back to AWS. They will plug the device in their infrastructure and upload the data to the cloud at a much faster rate.
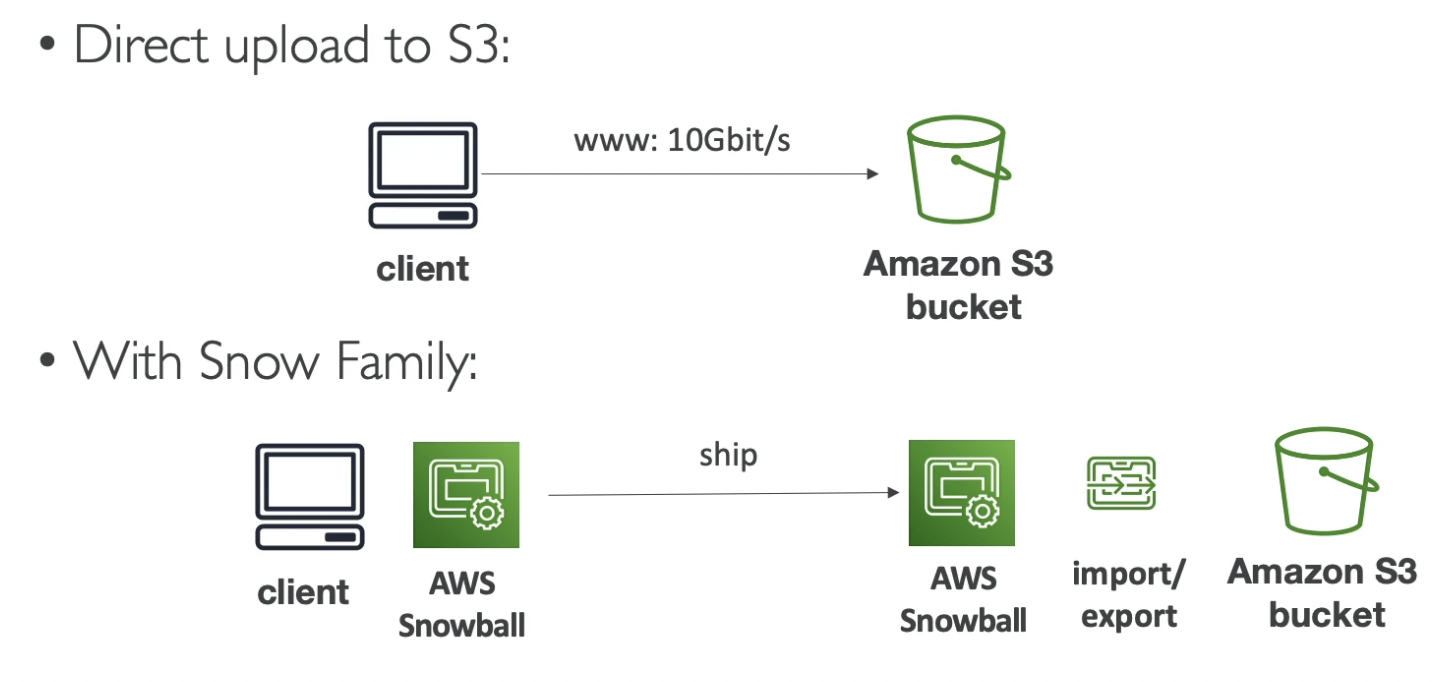
Snow family devices for Data Migration

Usage process
- Request Snowball devices from the AWS console for delivery
- Install the snowball client / AWS OpsHub on your servers
- Connect the snowball to your servers and copy files using the client
- Ship back the device when you’re done (goes to the right AWS facility)
- Data will be loaded into an S3 bucket
- Snowball is completely wiped
💡 Rule of thumb: If it takes more than a week to transfer over the network, use Snowball devices
Edge Computing (collect and process data at the edge) - Snowcone, Snowmobile
What is edge computing
- Process data while it’s being created on an edge location. Edge location could be anything that doesn’t have internet or access to cloud (ex: a truck on the road, a ship on the sea, a mining station underground).
- These locations may have
- Limited / no internet access
- Limited / no easy access to computing power
- We setup a Snowball Edge / Snowcone device to do edge computing
- Use cases of Edge Computing:
- Preprocess data
- Machine learning at the edge
- Transcoding media streams
- Eventually (if need be) we can ship back the device to AWS (for transferring processed data to the cloud)
Snow family devices for Edge Computing
- Snowcone (smaller)
- 2 CPUs, 4 GB of memory, wired or wireless access
- USB-C power using a cord or the optional battery
- Snowball Edge - Compute Optimized
- 52 vCPUs, 208 GiB of RAM
- Optional GPU (useful for video processing or machine learning)
- 42 TB usable storage
- Snowball Edge - Storage Optimized
- Up to 40 CPUs, 80 GiB of RAM
- Object storage clustering available
💡 All the above can run EC2 Instances & AWS Lambda functions locally (using AWS loT Greengrass) Long-term deployment options for reduced cost: 1 and 3 years discounted pricing
- Snowcone (smaller)
- Snow family contains 3 devices:
Snowball Edge
- Physical data transport solution: move TBs or PBs of data in or out of AWS
- Alternative to moving data over the network (and paying network fees)
- Pay per data transfer job
- Provides block storage and Amazon S3-compatible object storage
- Two flavors of Snowball Edge
- Snowball Edge Storage Optimized: 80 TB of HDD capacity for block volume and S3 compatible object storage
- Snowball Edge Compute Optimized: 42 TB of HDD capacity for block volume and S3 compatible object storage
- Use cases:
- Data cloud migrations
- Data center decommissioning
- Disaster recovery by backing up the data

Snowcone
- Small, portable, rugged & secure device used for edge computing, storage, and data transfer
- Light (4.5 pounds, 2.1 kg)
- 8 TBs of usable storage
- Use Snowcone where Snowball does not fit (space-constrained environment)
- Must provide your own battery / cables
- Can be sent back to AWS offline, or connect it to internet and use AWS DataSync to send data

Snowmobile
- Transfer exabytes of data (1 EB = 1,000 PB = 1,000,000 TB)
- Each Snowmobile has 100 PB of capacity (use multiple in parallel if need more)
- High security: temperature controlled, GPS, 24/7 video surveillance
- Better than Snowball if you transfer more than 10 PB
- Highly-secure & portable devices for:
OpsHub
- Historically, to use Snow Family devices, you needed a CLI (hard to use for end users)
- Today, you can use AWS OpsHub (a software you install on your computer / laptop) to manage your Snow Family Devices
- Unlocking and configuring single or clustered devices
- Transferring files
- Launching and managing instances running on Snow Family Devices
- Monitor device metrics (storage capacity, active instances on your device)
- Launch compatible AWS services on your devices (ex: Amazon EC2 instances, AWS DataSync, Network File System (NFS)
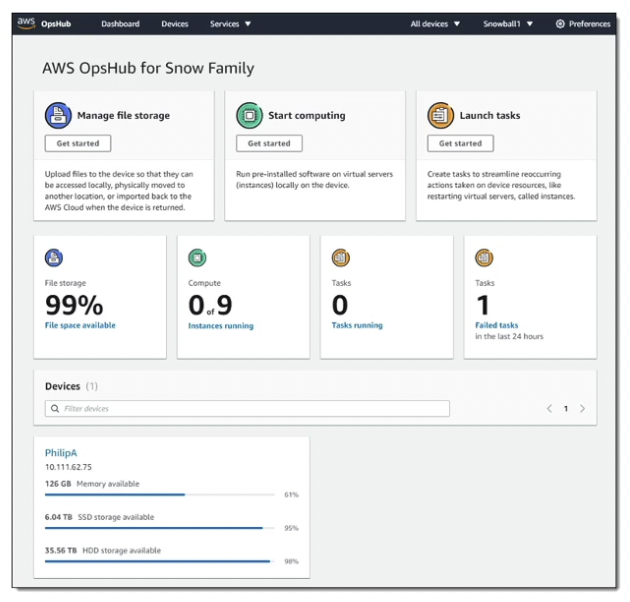
Hands on
Snow Family → Request a device
Snowball into Galcier
- Snowball cannot import to Glacier directly
- You must use Amazon S3 first, in combination with an S3 lifecycle policy to transitions the data into Glacier

Untitled
Amazon FSx
Intro
- It’s a fully-managed AWS service that allows us to launch 3rd party high-performance file systems on AWS.
- Useful when we don’t want to use an AWS managed file system like S3.
.png)
FSx for Windows (shared file system for windows)
- EFS is a shared POSIX system for Linux systems which allows us to create shared file systems on linux. But, we can’t use it for creating shared file system in windows.
- FSx for Windows is a fully managed Windows file system share drive
- Supports SMB protocol, Windows NTFS, Microsoft Active Directory integration, ACLs, user quotas
- can be mounted on Linux EC2 instances
- Support Microsoft Distributed File System (DFS) Namespaces (group files across multiple FS)
- Built on SSD & HDD, scale up to 10s of GB/s, millions of IOPS, 100s PB of data
- SSD - Latency sensitive workloads (database, media processing, data analytics, …..)
- HDD - Broad spectrum of workloads (home directory, CMS,…..)
- Can be accessed from your on-premise infrastructure
- Can be configured to be Multi-AZ (high availability)
- Data is backed-up daily to S3
FSx for Lustre (shared file system for linux distributed computing and HPC)
- Lustre is a type of parallel distributed file system, for large-scale computing. The name Lustre is derived from “Linux” and “cluster”.
- Used for Machine Learning, High Performance Computing (HPC) tasks like Video Processing, Financial Modeling, Electronic Design Automation
- Scales up to 100s GB/s, millions of IOPS, sub-ms latencies
- SSD - low latency, IOPS, intensive workloads, small and random file operations
- HDD - throughput-intensive workloads, large & sequential file operations
- Seamless integration with S3
- Can read S3 buckets as a file system (through FSx)
- Can write the output of the computations back to S3 (through FSx)
- Can be used from on-premise servers
FSx Deployment Options
Scratch File System
- Temporary storage
- Data is not replicated (data is lost if the file server fails)
- High burst (6x faster than persistent file system, 200MBps per TiB throughput)
- Usage: short-term processing, optimize costs
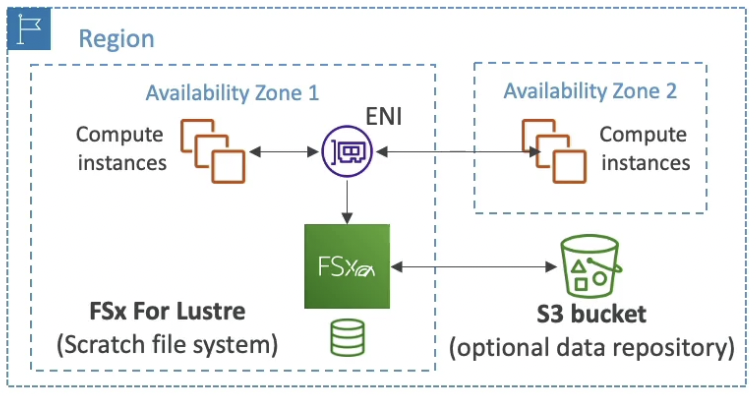
Persistent File System
- Long-term storage
- Data is replicated within same AZ (multiple copies)
- Failed files are replaced within minutes
- Usage: long-term processing, sensitive data

Untitled
FSx for NetApp ONTAP
.png)
FSx for OpenZFS
.png)
Hands on
FSx → Create file system
AWS Storage Gateway
Hybrid Cloud
- AWS is pushing for hybrid cloud (part of your infrastructure is on the cloud and the rest is on-premises)
- This can be due to
- Long cloud migrations
- Security requirements
- Compliance requirements
- IT strategy
- Ex: S3 is a proprietary storage technology (unlike EFS / NFS), so to expose S3 data on-premises, we need AWS storage gateway.
AWS Cloud Storage Native Options
Block Level

File Level

Object Level

AWS Storage Gateway
Theory
- Bridge between on-premises data and cloud data in S3
- Use cases: disaster recovery, backup & restore, tiered storage
- 4 types of Storage Gateway:
S3 File Gateway
- Configured S3 buckets are accessible using the NFS and SMB protocol
- Supports S3 standard, S3 IA, S3 One Zone IA
- Transition to S3 Glacier using a Lifecycle Policy
- Bucket access using lAM roles for each File Gateway
- Most recently used data is cached in the file gateway
- Can be mounted on many servers on-premises
- Integrated with Active Directory (AD) for user authentication
In the diagram below, the file gateway acts as a bridge between the application server and S3. This allows to expand the available storage by leveraging S3. Also, the most used data will be cached at file gateway for low latency access.
.png)
FSx File Gateway
- Equivalent to S3 File Gateway but for Windows FSx
- Native access to Amazon FSx for Windows File Server
- Local cache for frequently accessed data
- Windows native compatibility (SMB, NTFS, Active Directory, etc.)
- Useful for group file shares and home directories
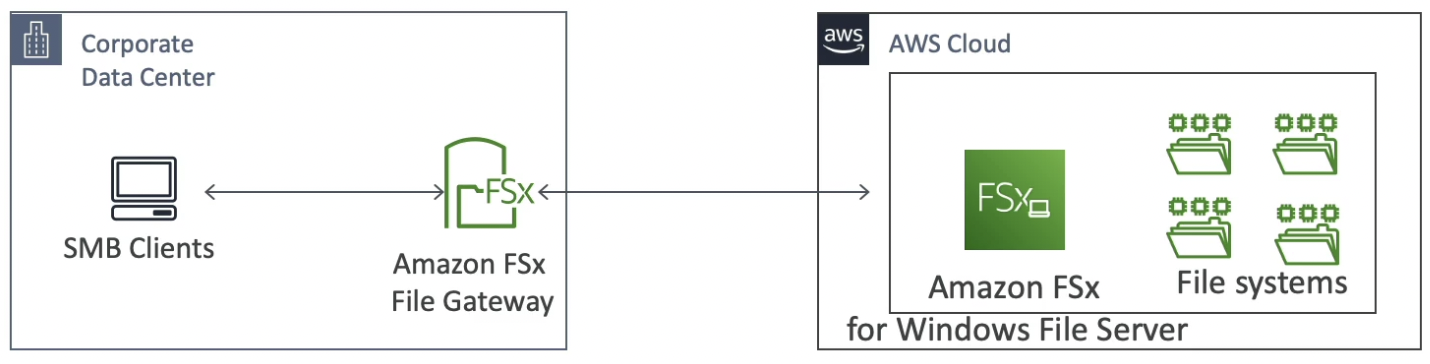
Volume Gateway
- Block storage using iSCSI protocol backed by S3
- On-premises storage volumes are backed by EBS snapshots which can help restore these volumes later
- Two kinds of volumes:
- Cached volumes: low latency access to most recent data
- Stored volumes: entire dataset is on premise, scheduled backups to S3
Here, the primary purpose of cloud storage is to backup on-premises storage volumes
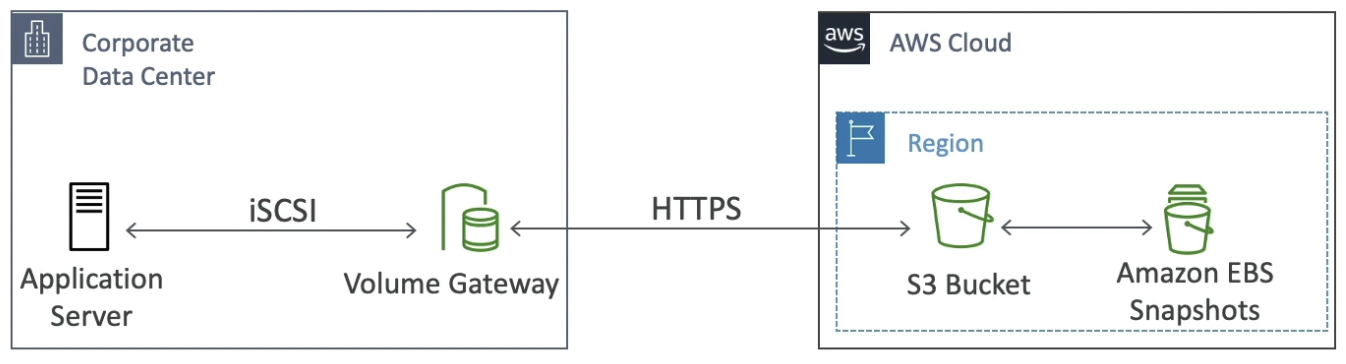
Tape Gateway
- Some companies have backup processes using physical tapes
- With Tape Gateway, companies use the same processes but, in the cloud Virtual Tape Library (VTL) is backed by Amazon S3 and Glacier
- Back up data using existing tape-based processes (and iSCSI interface)
- Works with leading backup software vendors
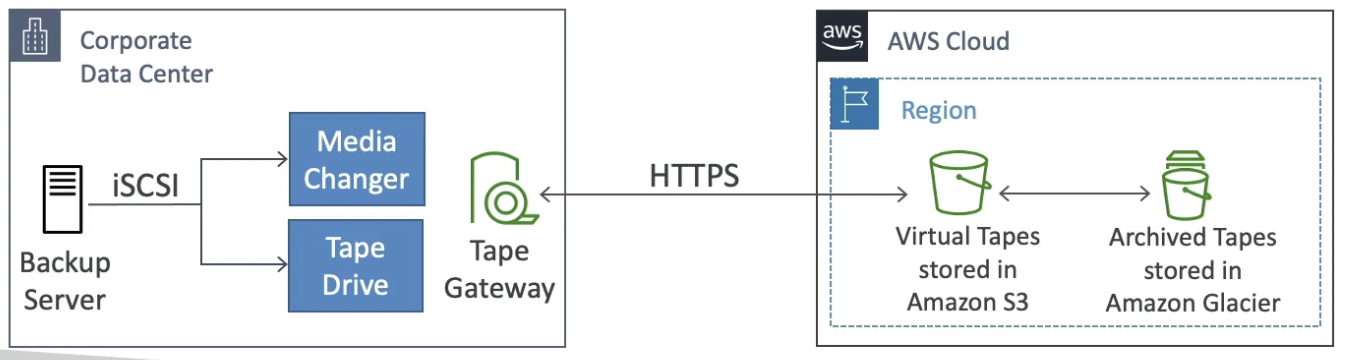
Storage Gateway - Hardware appliance
- Using Storage Gateway means you need on-premises virtualization. If you don’t have virtualization available, you can use a Storage Gateway - Hardware Appliance. It is a mini server that you need to install on-premises.
- You can buy it on amazon.com
- Works with File Gateway, Volume Gateway, Tape Gateway (not FSx)
- Has the required CPU, memory, network, SSD cache resources
- Helpful for daily NFS backups in small data centers

Outro
.png)
AWS Transfer Family
- A fully-managed service for file transfers in and out of S3 or EFS using the FTP protocol (instead of using proprietary methods)
- Supported Protocols
- FTP (File Transfer Protocol) - unencrypted in flight
- FTPS (File Transfer Protocol over SSL) - encrypted in flight
- SFTP (Secure File Transfer Protocol) - encrypted in flight
- Managed infrastructure, Scalable, Reliable, Highly Available (multi-AZ)
- Pay per provisioned endpoint per hour + fee per GB data transfers
- Store and manage users’ credentials within the service or integrate with existing authentication systems (Microsoft Active Directory, LDAP, Okta, Amazon Cognito or custom authentication system)
- Usage: sharing files, public datasets, CRM, ERP, etc.
Clients can either connect directly to the FTP endpoint or optionally through Route 53. Also, Transfer Family will need permission to read or put data into S3 or EFS.
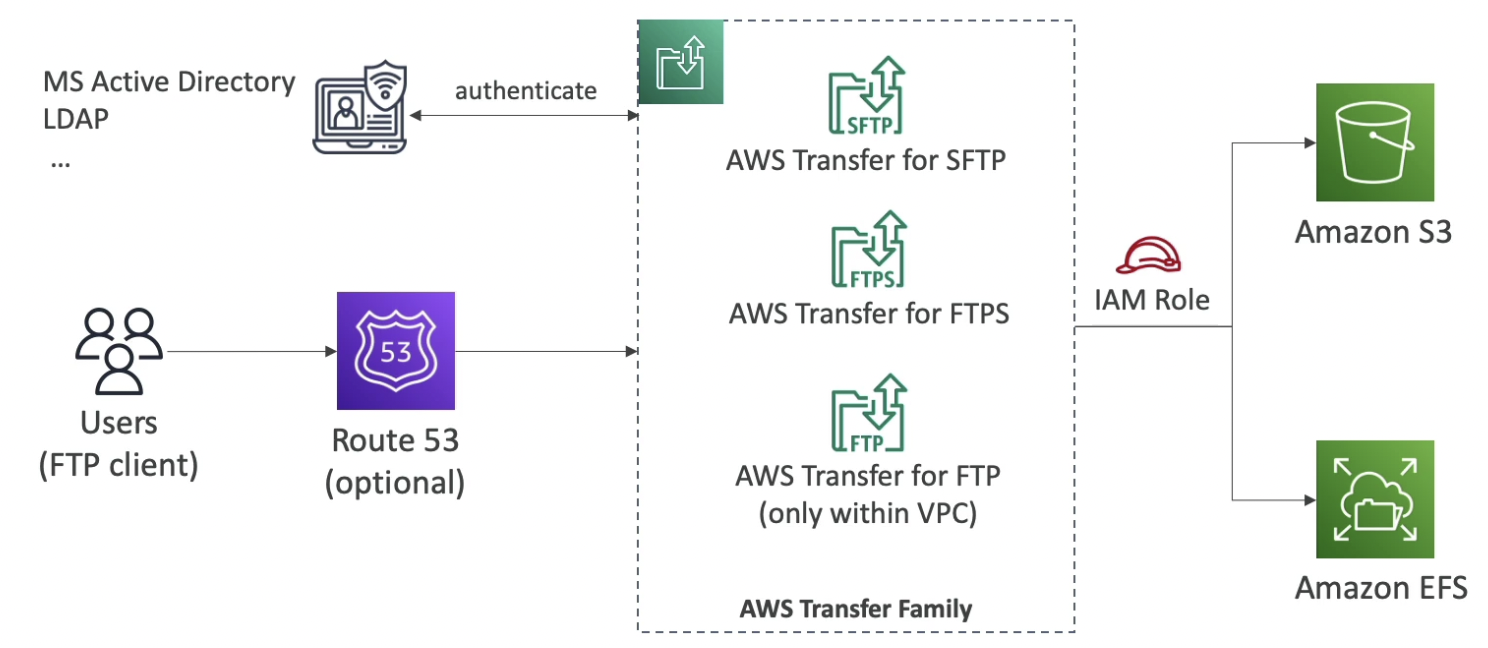
DataSync
.png)
.png)
.png)
Storage Comparison
- S3
- Object storage
- Serverless (auto-scaling)
- No need to provision capacity ahead of time
- Glacier
- Object archival
- Rare retreival
- EBS Volumes
- Network storage for one EC2 instance at a time
- Bound to an AZ (to move to another AZ, need to create a snapshot)
- Instance Storage
- Physically attached storage to the EC2 instance
- Extremely high IOPS
- If the instance goes down, data is lost
- EFS
- Network file system for linux
- POSIX file system
- Shared across AZ
- FSx for Windows
- Just like EFS but for windows
- FSx for Lustre
- High performance computing (HPC)
- Supports Linux
- High IOPS
- Integrated with S3 in backend
- FSx for NetApp ONTAP
- High OS compatibility for any Network file system
- FSx for OpenZFS
- Managed ZFS file system
- Storage Gateway
- bridge between on-premises storage and AWS
- Transfer Family
- FTP, FTPS, SFTP interface on top of the amazon S3 or Amazon EFS
- DataSync
- Schedule data sync from on-premises to AWS or AWS to AWS
- Snow Family
- Move large amounts of data physically to the AWS cloud into S3
- Database
- For specific workloads, usually with indexing and querying
- S3
Section 18: Decoupling applications: SQS, SNS, Kinesis, ActiveMQ
Section 18: Decoupling applications: SQS, SNS, Kinesis, ActiveMQ
Application Communication
- Deployed services need to communicate with one another to do useful stuff.
- There are two patterns of application communication
- Synchronous (application → application)
- Asynchronous / Event-based (application → queue → application)

- Synchronous between applications can be problematic if there are sudden spikes of traffic and one of the services gets overwhelmed. In that case, it’s better to asynchronously decouple your applications. We can use 3 services for this:
- SQS: queue model
- SNS: pub/sub model
- Kinesis: real-time streaming model for large amount of data
- These services can scale independently from our application
SQS - Simple Queue Service
Decoupling
- SQS acts a buffer that stores message temporarily allowing us to decouple applications
- Multiple producers can send messages into a queue and multiple consumers can poll the queue for any message
- Once a consumer reads a message from the queue, the consumer deletes that message from the queue.

Intro
- Fully managed service, used to decouple applications
- Oldest offering (over 10 years old)
- Two types:
Standard Queue
- Unlimited throughput (can publish any number of message per second into the queue)
- Unlimited number of messages in queue
- Default retention of messages: 4 days (max: 14 days)
- Low latency (<10 ms on publish and receive)
- Max message size: 256KB
- Can have duplicate messages (at least once delivery)
- Can have out of order messages (best effort ordering)
- Messages are put into the SQS queue using the SendMessage API using the SDK
- Consumers could be EC2 instances or Lambda functions
- Consumers could receive a maximum of 10 messages at a time
- Only when the consumer has completed processing a message, it is removed from the queue.
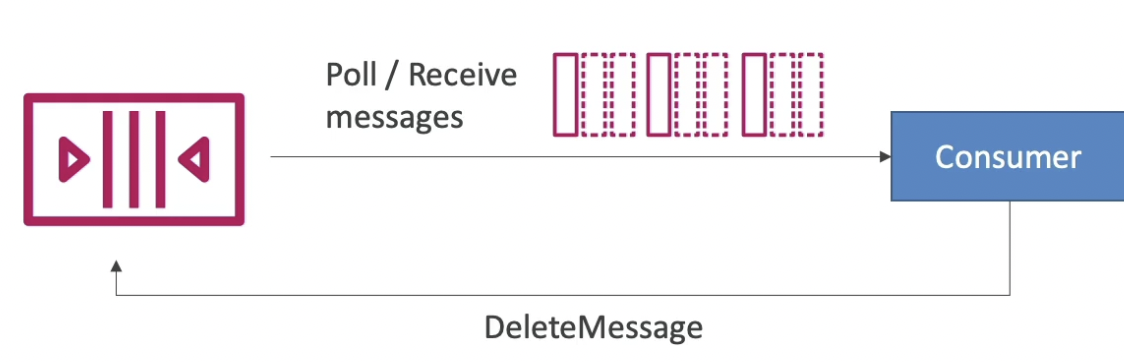
FIFO Queue
- Unlike standard queues, FIFO queues guarantees ordering of messages
- Limited throughput: 300 msg/s without batching or 3000 msg/s with batching
- Exactly-once send capability (FIFO queues automatically remove duplicates)
- Messages are processed in order by the consumer
- The queue name must end with
.fifoto be considered a FIFO queue
- Sending messages to a FIFO queue requires:
- Group ID: for ordering of messages
- Message deduplication ID: for deduplication of messages

If you don’t use a Group ID, messages are consumed in the order they are sent, with only one consumer

If you want to scale the number of consumers, you want messages to be “grouped” if they are related to each other. Then you use a Group ID (similar to Partition Key in Kinesis). Messages will be ordered and grouped for each group ID.
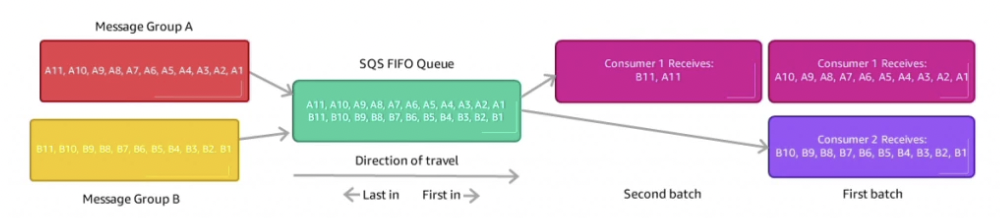
Producing Messages
.png)
Consuming Messages
.png)
Outro
.png)
SQS with ASG
We can attach an ASG to the consumer instances which will scale based on the Queue Length (approximate number of messages in the queue) CW metric. If the queue length goes above a certain threshold, a CW alarm will be triggered which will trigger the ASG to scale.
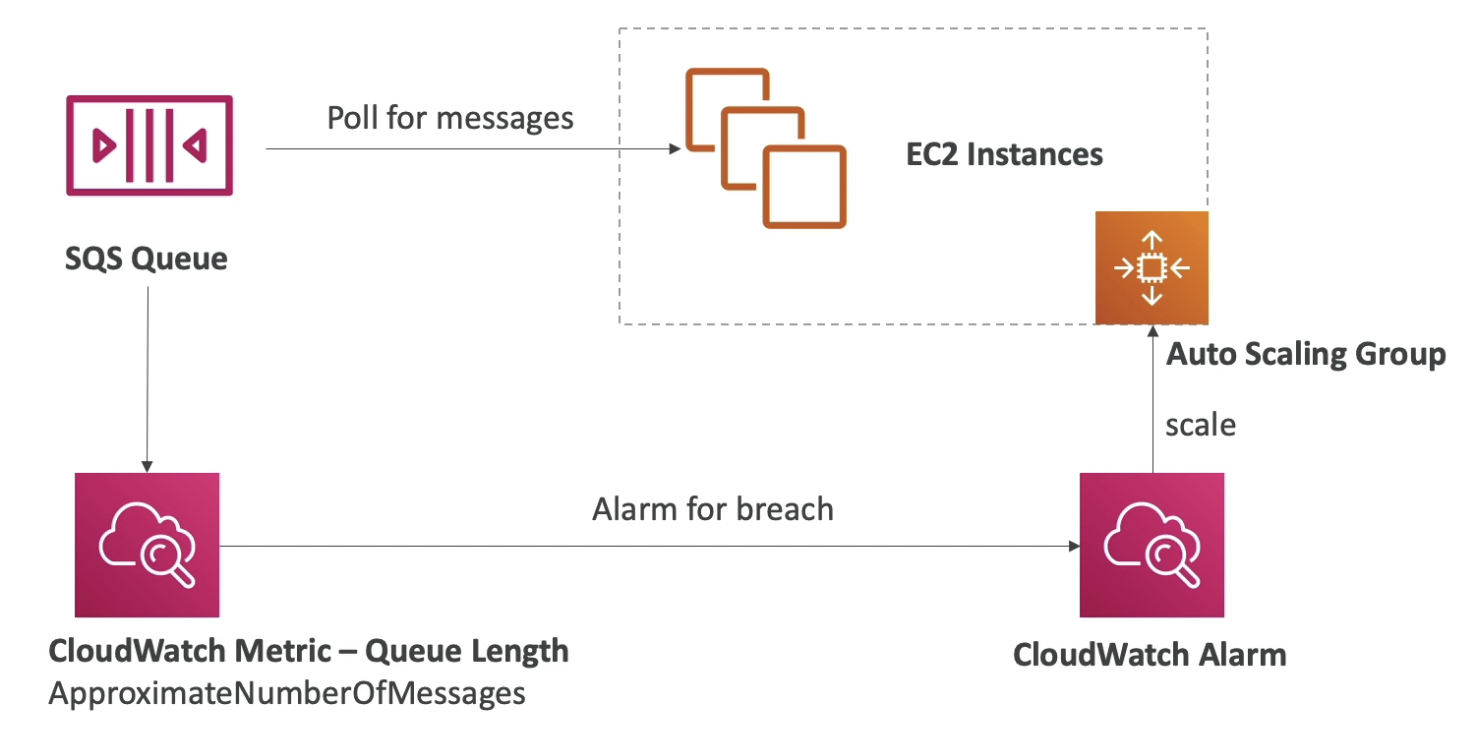
Decoupling Application Tiers
For a video processing website, we can decouple the front-end and back-end using an SQS queue. This way both front-end and back-end can scale independently of each other within their own ASG. The front-end is only responsible for sending the requests (messages) into the queue. The back-end is only responsible for polling the messages and processing the video. Since, SQS has unlimited capacity and throughput. This system is reliable.
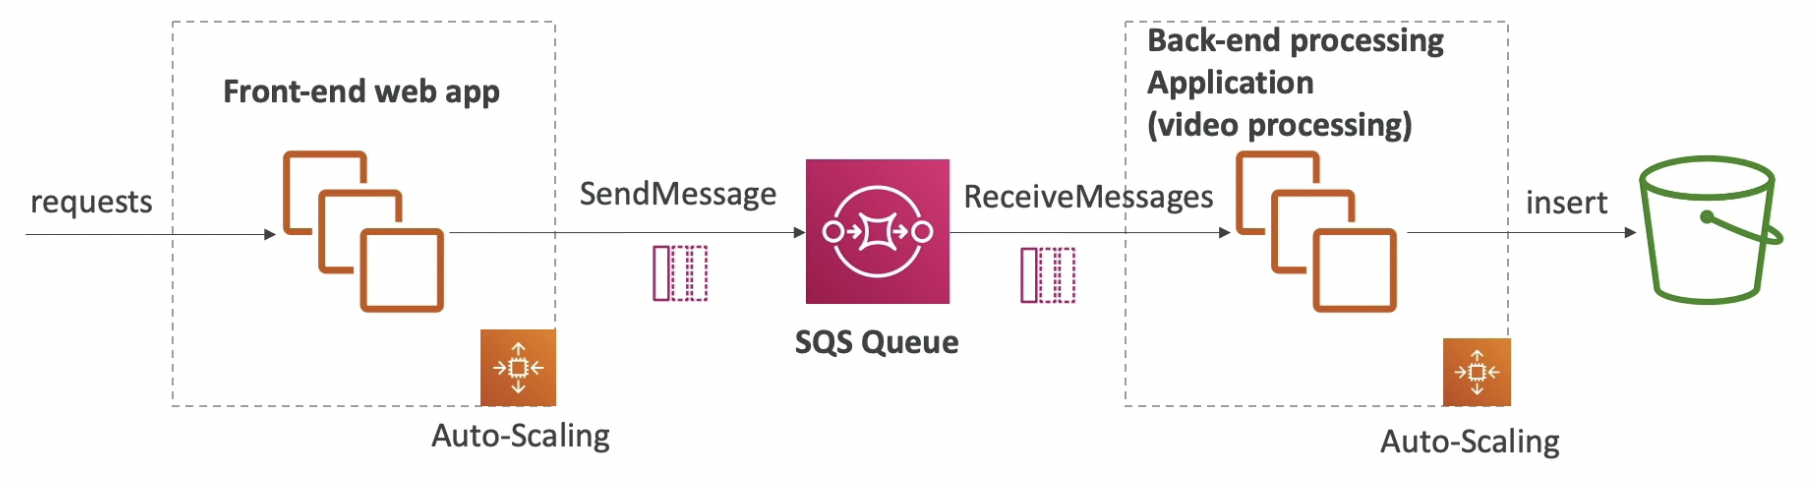
Security
Encryption:
- In-flight encryption using HTTPS API
- At-rest encryption using KMS keys
- Client-side encryption if the client wants to perform encryption / decryption themselves
Access Controls:
- IAM policies to regulate access to the SQS API
- SQS Access Policies (similar to S3 bucket policies)
- Useful for cross-account access to SQS queues
- Useful for allowing other services (SNS, S3, etc.) to write to an SQS queue
Message Visibility Timeout
- After a message is polled by a consumer, it becomes invisible to other consumers
- By default, the “message visibility timeout” is 30 seconds which means the message has 30 seconds to be processed by a consumer otherwise it will be visible in the queue and may get picked by another consumer.
- After the message visibility timeout is over, the message is visible in the SQS queue
- If a message is not processed within the visibility timeout, it will be processed twice. However, a consumer could call the Change MessageVisibility API to change the visibility timeout for that specific message. This will get the consumer more time to process the message.
- Visibility timeout can be configured for the entire queue also:
- If visibility timeout is high (hours), and the consumer crashes, re-processing of the pending message will take a lot of time
- If visibility timeout is too low (seconds), we may get duplicate processing of messages

Long Polling
- When a consumer requests messages from the queue, it can optionally “wait” for messages to arrive if there are none in the queue. This is called Long Polling.
- LongPolling decreases the number of API calls made to SQS
- It also reduces the latency of your application as any incoming message during the polling will be read instantaneously.
- The wait time can be between 1 sec to 20 sec (20 sec preferable)
- Long Polling is preferable to Short Polling
- Long polling can be enabled at the queue level or at the API level by the consumer using WaitTimeSeconds

SQS + ASG
.png)
.png)
.png)
Hands on
- Create Queue
SQS → Create Queue
In-transit encryption is enabled by default, we can configure at-rest encryption as well.
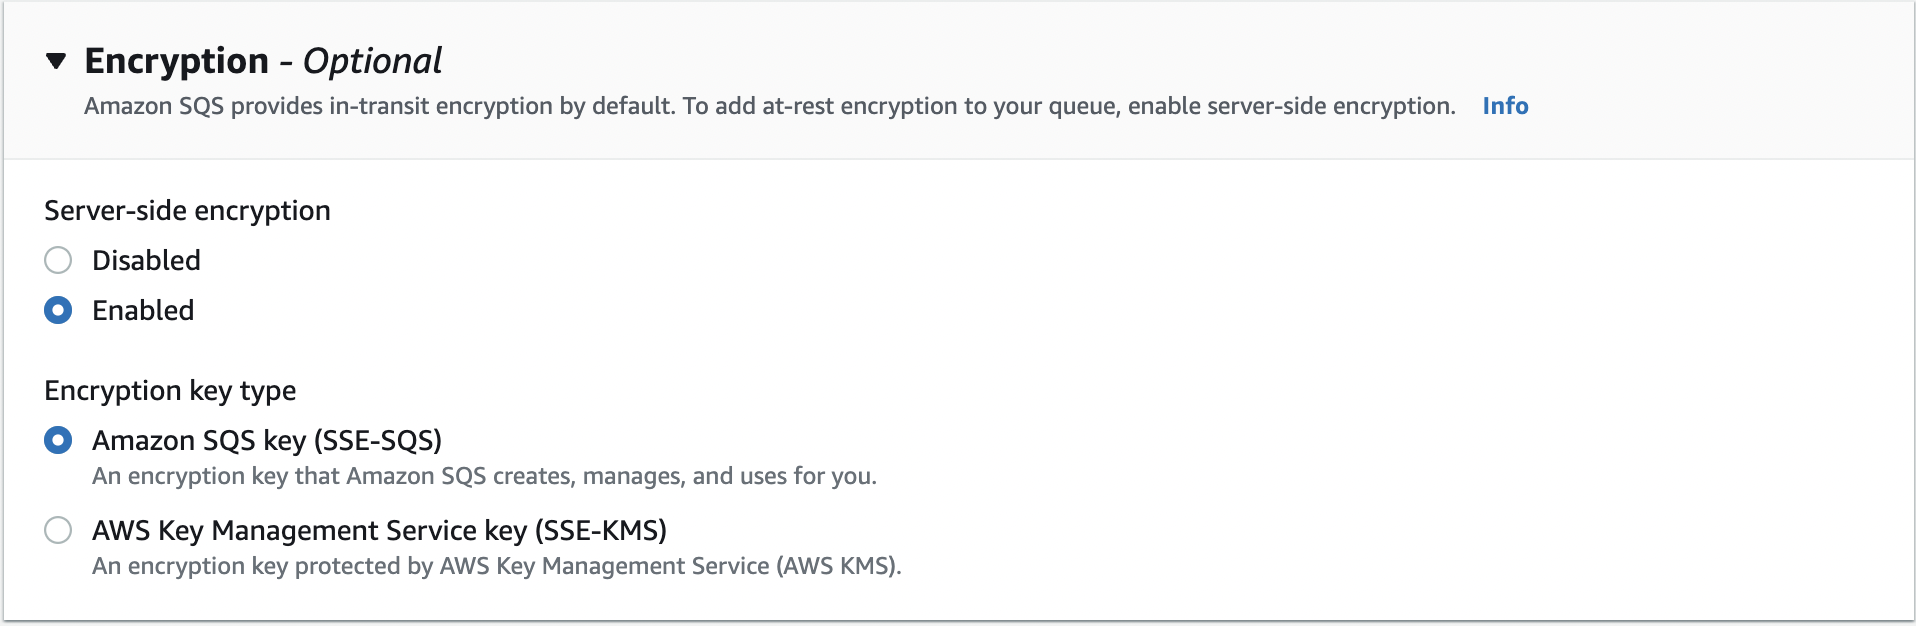
Untitled
- Send messages
Select queue → Send and receive messages
Attributes allow us to send key-value pairs of data along with the stringified message.
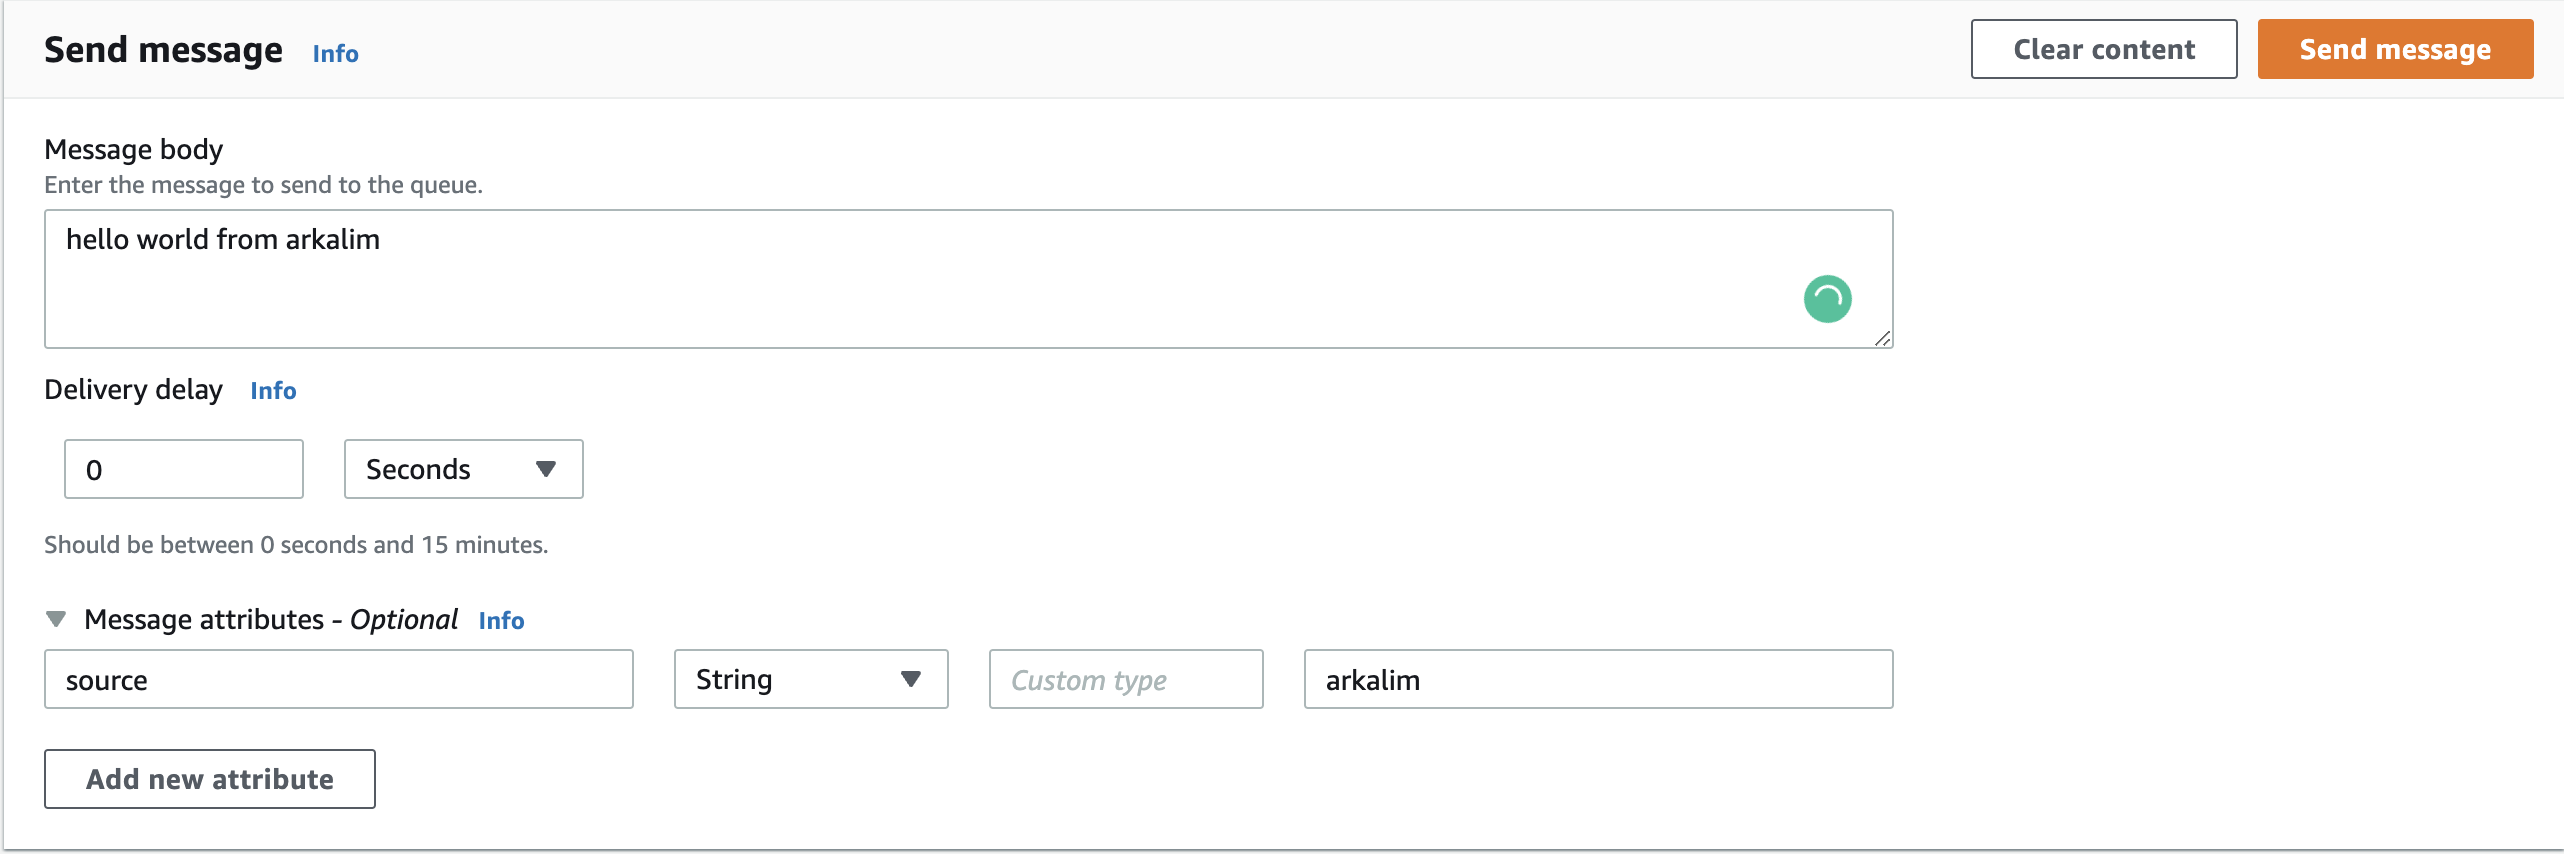
Untitled
- Receive messages
To receive messages present in the queue, click on “poll for message”
If we don’t delete the messages, they will remain in the queue and will be received every time we poll.

Untitled
- Purge queue
Empties the queue of all the messages.
- Publish S3 events into SQS
- Create S3 bucket
- Modify SQS access policy to allow the S3 bucket to send messages to it
To modify:
- Resource: queue ARN
aws:SourceArn: change the bucket name
aws:SourceAccount: account ID (top right hand corner)
{ "Version": "2012-10-17", "Id": "example-ID", "Statement": [ { "Sid": "example-statement-ID", "Effect": "Allow", "Principal": { "Service": "s3.amazonaws.com" }, "Action": [ "SQS:SendMessage" ], "Resource": "arn:aws:sqs:us-east-1:502257142405:arkalim-queue", "Condition": { "ArnLike": { "aws:SourceArn": "arn:aws:s3:*:*:arkalim-demo-bucket" }, "StringEquals": { "aws:SourceAccount": "502257142405" } } } ]}The sample policy JSON can be found by googling
Granting permissions to publish event notification messages to a destination
- Enable S3 notifications with the SQS queue as destination (will not work if the previous step is missed)
- Upload anything in the bucket and poll the queue for messages
- Dead Letter Queues
- Create another SQS queue with a high message retention period
- Edit the original queue to configure the DQL

Untitled
Now, if a message doesn’t get processed even after appearing 3 times in polling, it will be removed from the original queue and put into DLQ.
- Delay Queues
Set the Delivery Delay parameter to a non-zero value for any SQS queue.
- Create Queue
Delay Queue
- Delay a message (consumers don’t see it immediately) (max delay: 15 minutes)
- Default is 0 seconds (message is available right away)
- Delivery delay parameter can be set at the queue level
- Can override the default queue delay for a specific message using the DelaySeconds parameter in the message.

Dead Letter Queue
- It is just a normal SQS queue which is used to store failing to be processed messages in another queue.
- If a consumer fails to process a message within the Visibility Timeout, the message goes back to the queue. We can set a threshold of how many times a message can go back to the queue. After the MaximumReceives threshold is exceeded, the message goes into a dead letter queue (DLQ). This prevents unnecessary resource wastage on that specific message which might be corrupted in the first place.
- Useful for debugging
- Make sure to process the messages in the DLQ before they expire (good to set a retention of 14 days in the DLQ)
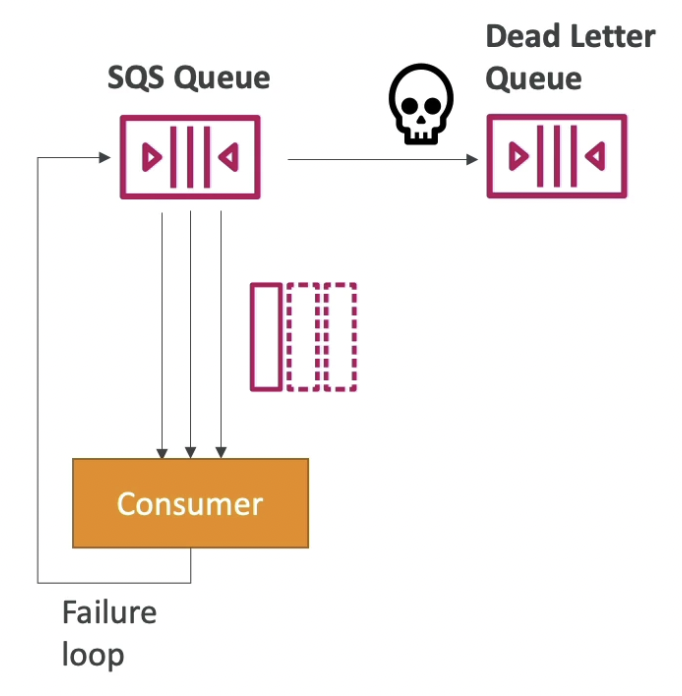
Untitled
SQS with ASG
SQS doesn’t provide any metric for scaling out of the box. We need to create a custom CW metric = Queue length / Number of EC2 instances. If the number is high ⇒ number of pending messages in the queue is too high or number of instances are too low. We can set CW alarms for different thresholds to step scale the ASG.

This allows us to make responders scalable using ASG.

Access Policy
Cross-account access
Example: EC2 service in another AWS account polling for messages in the queue.
Principal
{ “AWS”: [11112223333] }means allow anyone from that account.
Publish S3 notifications to an SQS queue
Example: When an object is uploaded to an S3 bucket, the S3 notification should be sent to the queue.
Here, the principal allows all the AWS accounts to access the queue but the condition restricts it to that bucket (unique globally) and the bucket owner account.
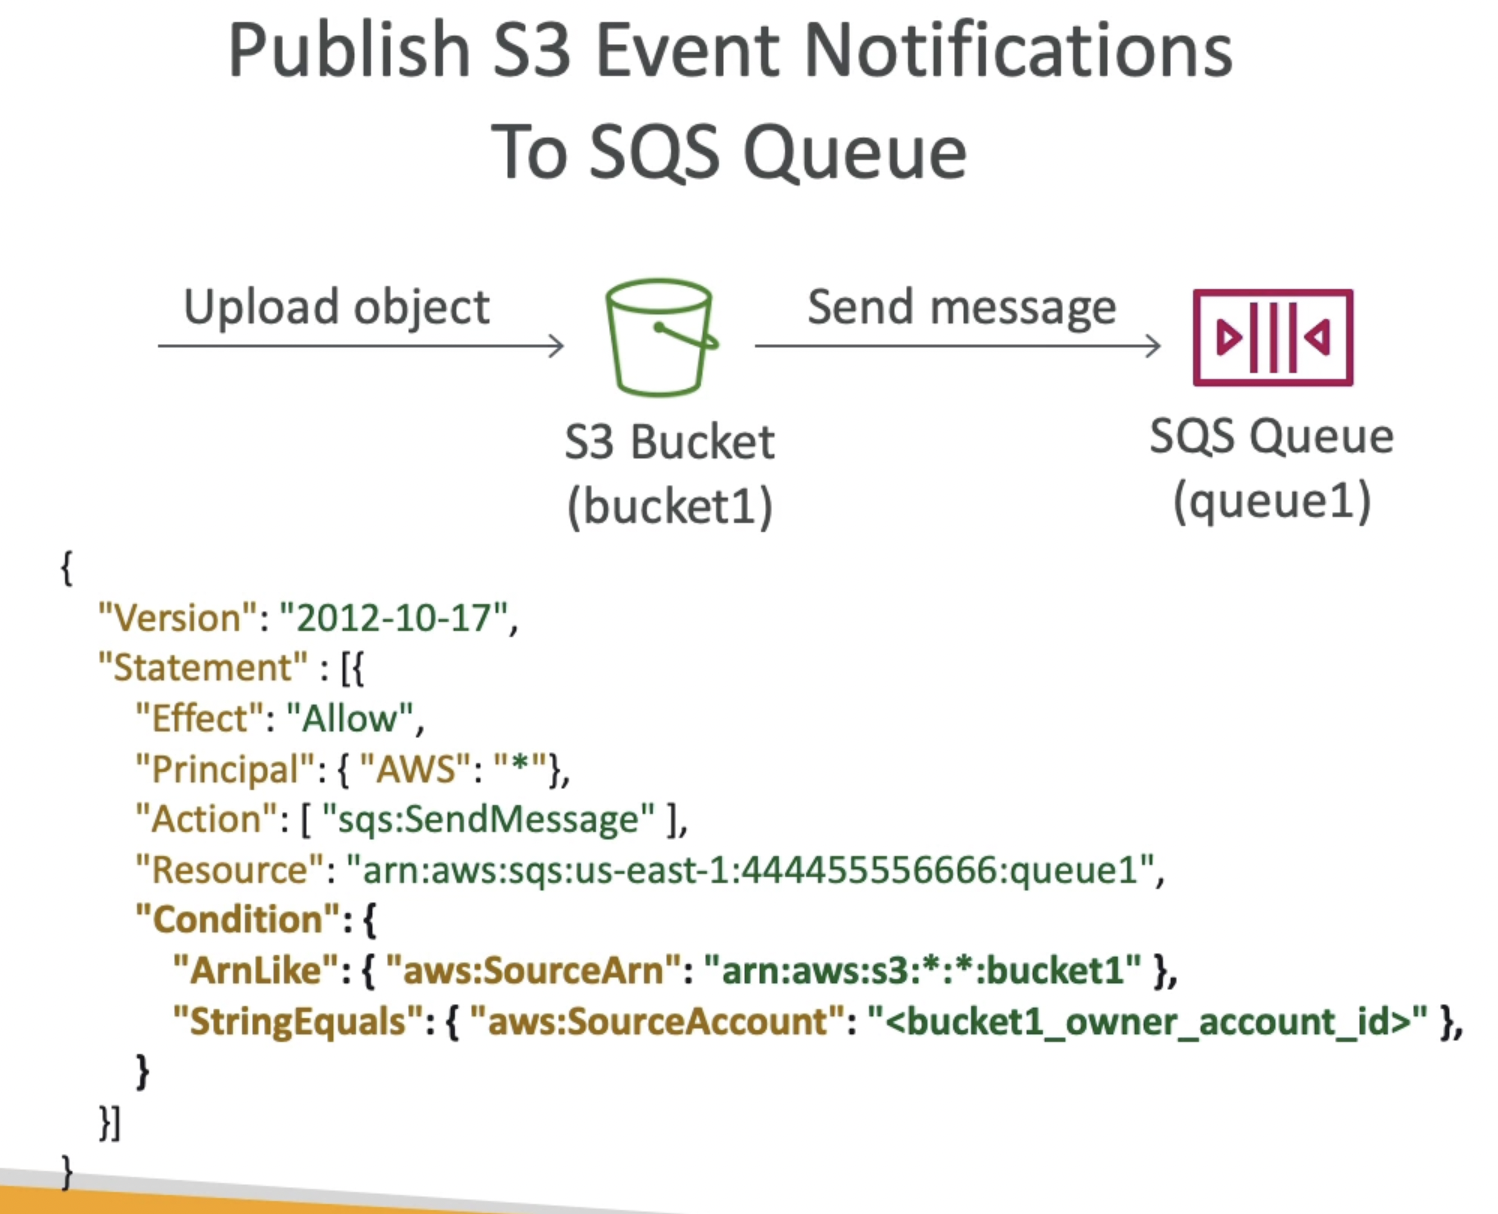
Request-Response System
The idea is to build a request-response system where both the requesters and responders can scale independently. The requester sends the request into a request queue with attributes “correlation ID” and “reply to”. This request will be picked by one of many responders in an ASG. The request will be processed and it will be sent to the right response queue along with the same “correlation ID”. The “correlation ID” will help the requester identify which response corresponds to their request.
To implement this pattern: use the SQS Temporary Queue Client which leverages virtual queues instead of creating / deleting SQS queues (cost-effective).

SNS - Simple Notification Service
Broadcastings message
If we want to broadcast a message to multiple receivers, we write direct integrations where the sender individually sends to every receiver. But this is cumbersome and difficult to build. Also, if the sender fails to send this message to one of the receivers, this could cause imbalance.
SNS provides a publisher - subscriber model where the publisher publishes a message to an SNS topic and all the subscribers will instantly receive these messages.

SNS Intro
- The “event producer” only sends message to one SNS topic
- Each subscriber to the topic will get all the messages (note: new feature to filter messages)
- Up to 100,000 topics limit
- Up to 12,500,000 subscriptions per topic
- Subscribers can be:
- SQS
- HTTP / HTTPS (need to specify how many times the delivery should be retried in case of failure)
- Lambda
- Emails
- SMS messages
- Mobile Notifications
- Many AWS services can send data directly to SNS for notifications (some are listed below:
.png)
Publishing Messages
- Topic Publish (using the SDK)
- Create a topic
- Create subscriptions
- Publish to the topic
- Direct Publish (for mobile apps SDK)
Works with Google GCM, Apple APNS, Amazon ADM, etc. to publish mobile notifications
- Create a platform application
- Create a platform endpoint
- Publish to the platform endpoint
- Topic Publish (using the SDK)
Security
- Encryption:
- In-flight encryption by default using HTTPS API
- At-rest encryption using KMS keys (optional)
- Client-side encryption if the client wants to perform encryption/decryption themselves
- Access Controls:
- lAM policies to regulate access to the SNS API
- SNS Access Policies (similar to SQS access policies)
- Useful for cross-account access to SNS topics
- Useful for allowing other AWS services (like S3) to write to an SNS topic
- Encryption:
SNS + SQS Fanout Pattern
- Intro
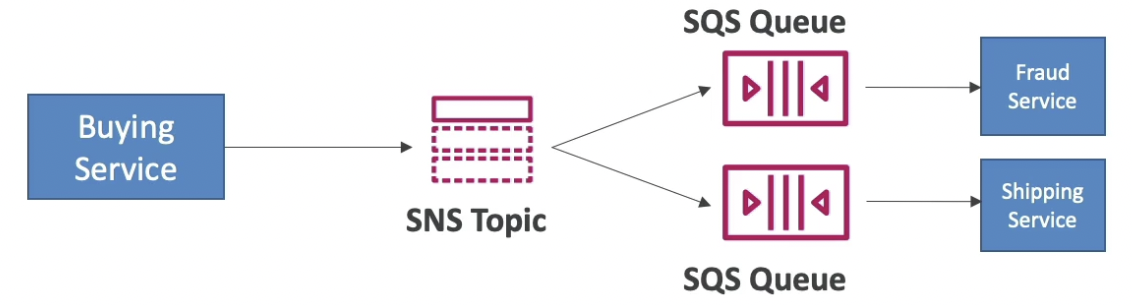
- If the publisher sends message individually to each SQS queue without the use of SNS, there might be failure in between when the publisher application crashes after sending the message to just 1 or 2 queues.
- Fully decoupled, no data loss
- SQS allows for: data persistence, delayed processing and retries of work
- Ability to add more SQS subscribers over time
- Make sure your SQS queue access policy allows for SNS to write
- S3 events to multiple queues
- For the same combination of: event type (e.g. object create) and prefix (e.g. images/) you can only have one S3 Event rule. In simple terms, S3 events cannot be fanned out directly.
- If you want to send the same S3 event to multiple SQS queues and other AWS services, use SNS.

- SNS FIFO + SQS FIFO fan out
Fan out with ordering or messages and deduplication.
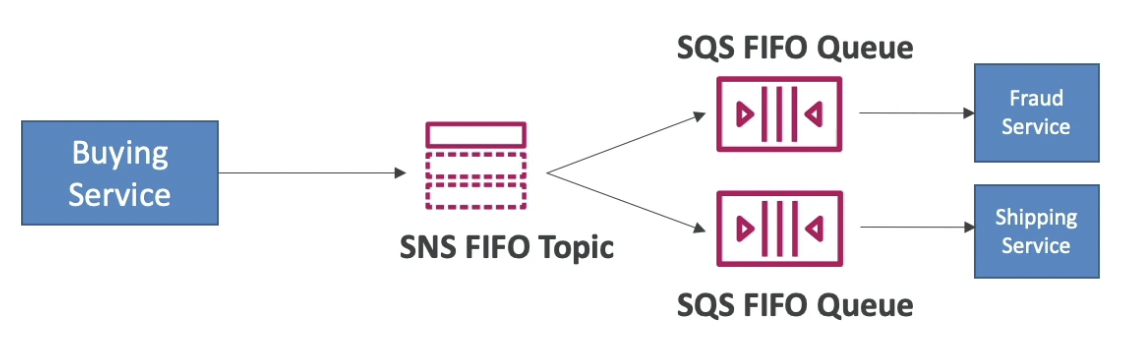
.png)
- Intro
FIFO Topic
- FIFO topic guarantees ordering of messages in the topic.
- Similar features as SQS FIFO:
- Ordering by Message Group ID (all messages in the same group are ordered)
- Deduplication using a Deduplication ID or Content Based Deduplication
- Can only have SQS FIFO queues as subscribers
- Limited throughput (same throughput as SQS FIFO) because only SQS FIFO queues can read from FIFO topics.
- The topic name must end with
.fifo

.png)
Message Filtering
- JSON policy used to filter messages sent to SNS topic’s subscriptions.
- Each subscriber will have its own filter policy.
- If a subscription doesn’t have a filter policy, it receives every message

Hands on
- Create an SNS Topic
SNS → Create Topic
- Create Subscription
Select the topic → Create subscription
Protocol: email
Subscription filter policy: configure if you want to filter messages received by this subscriber
- Create an SNS Topic
Kinesis
Intro
Amazon Kinesis Data Streams (KDS) is a massively scalable and durable real-time data streaming service. It can continuously capture gigabytes of data per second from hundreds of sources such as website clickstreams, database event streams, financial transactions, social media feeds, IT logs, and location-tracking events.
- Makes it easy to collect, process, and analyze streaming data in real-time
- Ingest real-time data such as: Application logs, Metrics, Website clickstreams, loT telemetry data, etc.
- Four services:

Kinesis Data Streams
- Kinesis streams scale their throughput using shards. The more the number of shards, higher the throughput (manual scaling).
- Mostly used to ingest data in real time
- Producers could be applications, or client. They use the SDK, Kinesis Producer Library (KPL) or Kinesis Agent to publish a record on the stream. A record consists of a partition key (used to partition data coming from multiple publishers) and data blob (max 1MB).
- Throughput of publishing on a stream will be 1MB/sec per shard or 1000 msg/sec per shard.
- Consumers use the SDK or Kinesis Client Library (KCL) to consume the records. Consumption throughput could be of two types as mentioned below (second one has higher throughput but more expensive).
- Billing is per shard provisioned, can have as many shards as you want
- Retention between 1 day (default) to 365 days
- Ability to reprocess (replay) data
- Once data is inserted in Kinesis, it can’t be deleted (immutability)
- Data that shares the same partition goes to the same shard (ordering)
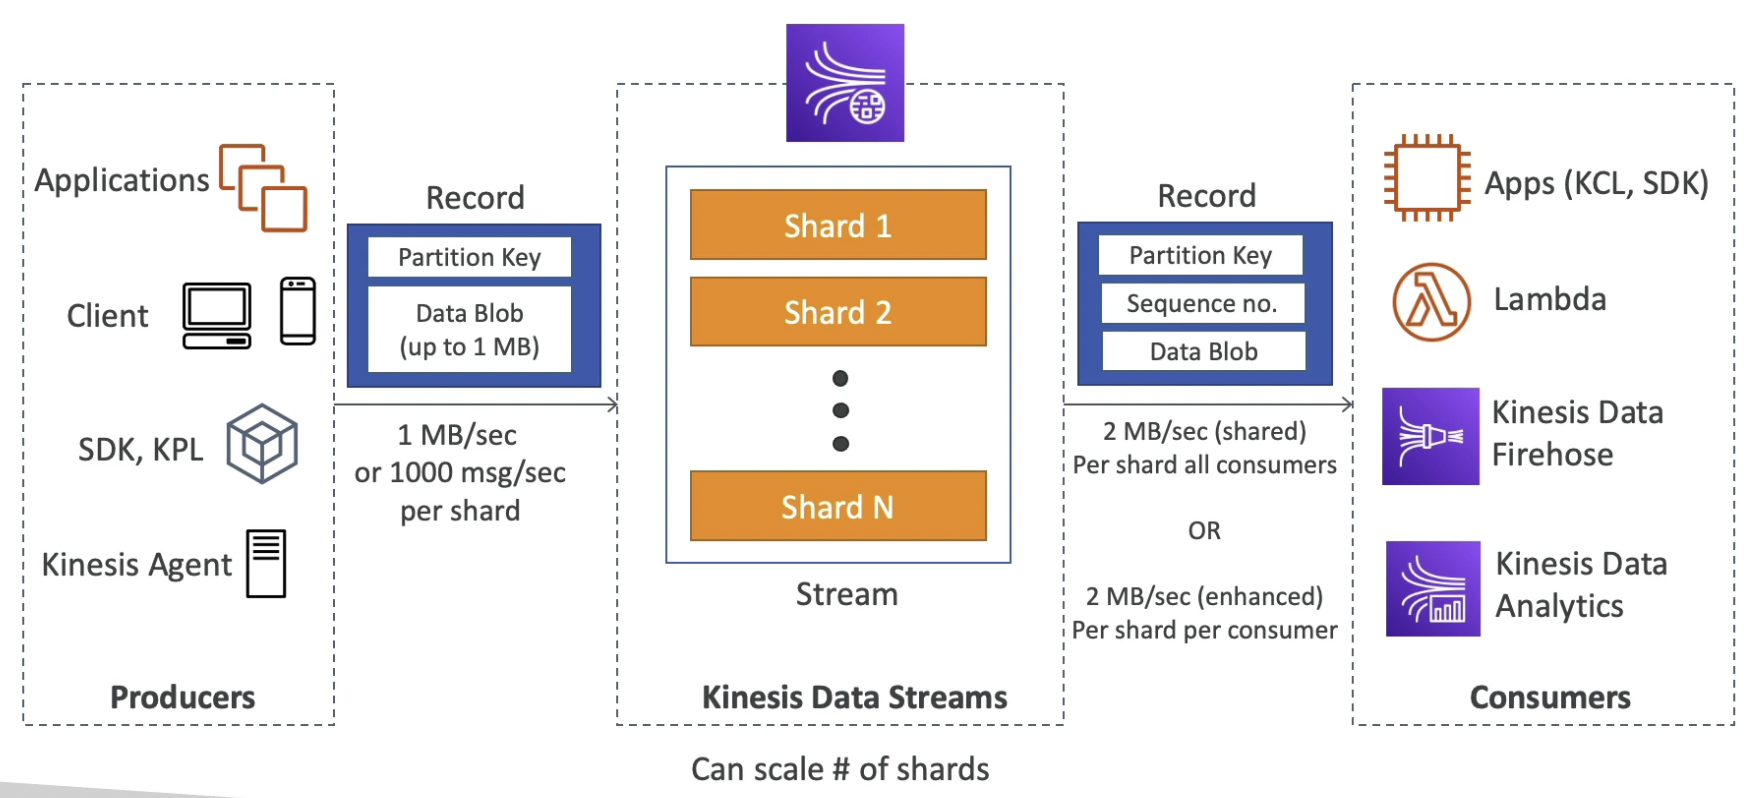
.png)
.png)
Kinesis Data Firehose
- Firehose is used to store data into a target location.
- Firehose writes data in batches efficiently (not real time).
- Fully Managed Service, no administration required, automatic scaling, serverless
- Destinations:
- AWS: Redshift, Amazon S3, ElasticSearch
- 3rd party partner: Splunk, MongoDB, DataDog, NewRelic, etc.
- Custom: send to any HTTP endpoint
- Pay for data going through Firehose, provisioning not required
- Near Real Time (60 seconds latency minimum) for non full batches (limited throughput) or if the data is < 1 MB. These number can be configured, but these are the minimum values. Higher the buffer size (batch size), higher the write efficiency.
- Supports many data formats, conversions, transformations, compression
- Supports custom data transformations using AWS Lambda
- Can send failed or all data to a backup S3 bucket
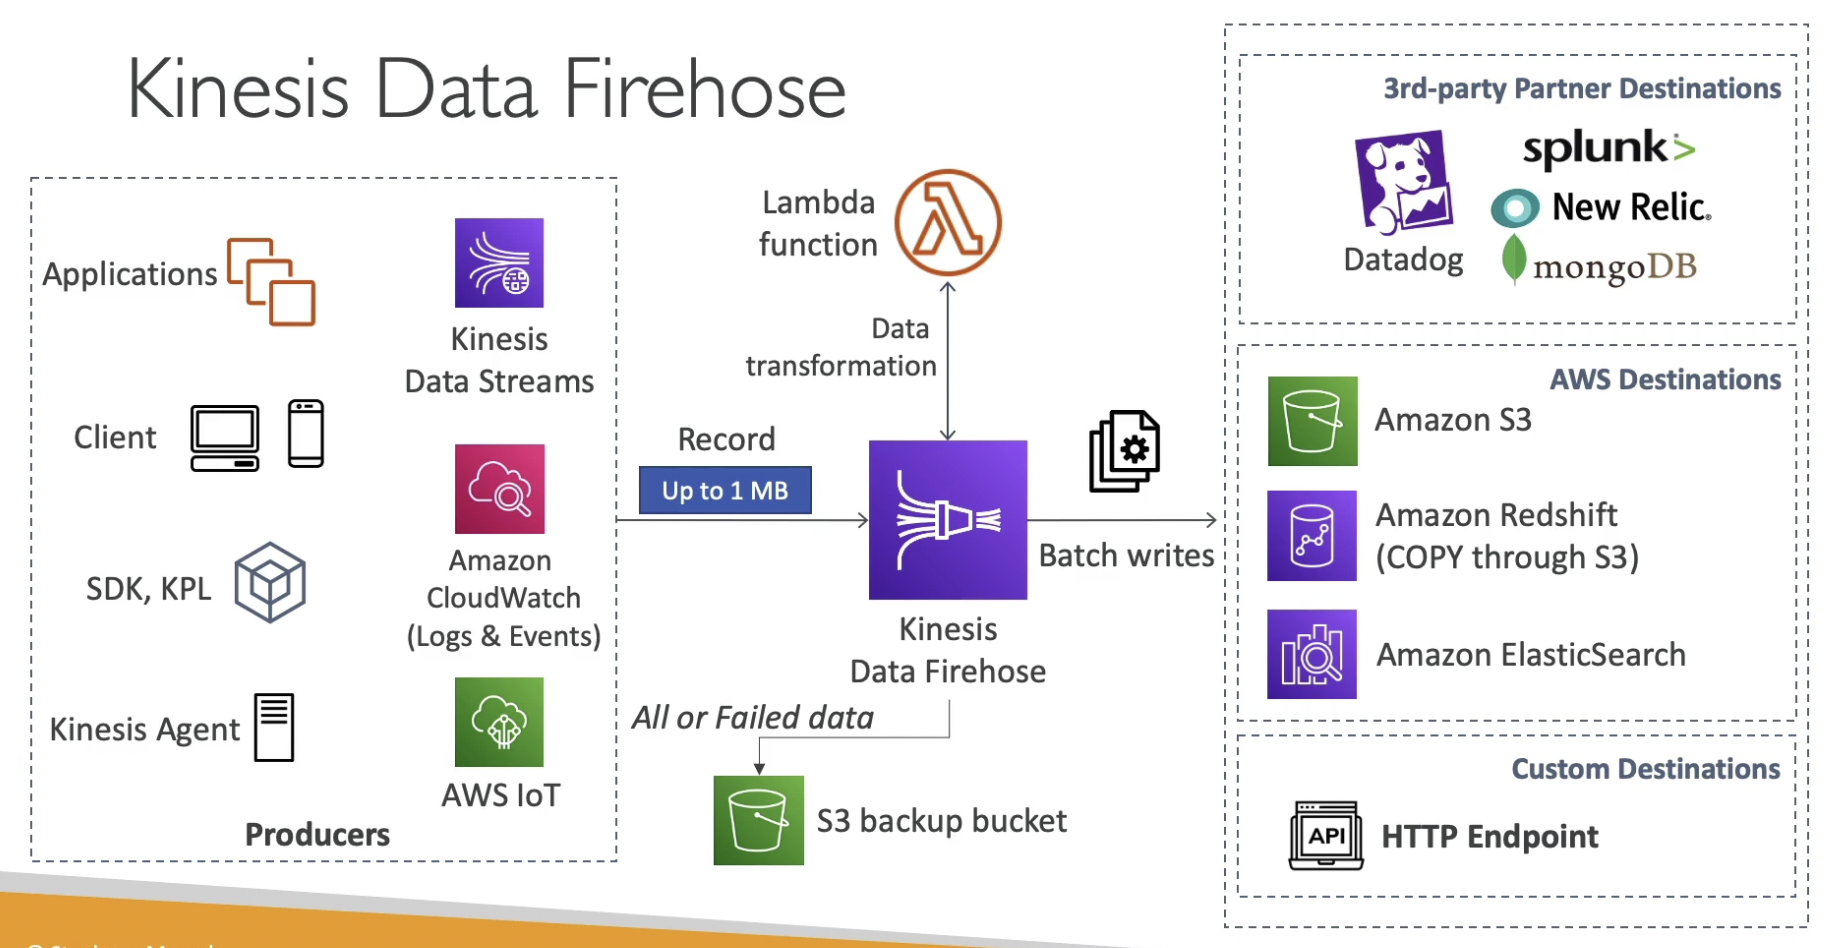
Data Stream vs Firehose
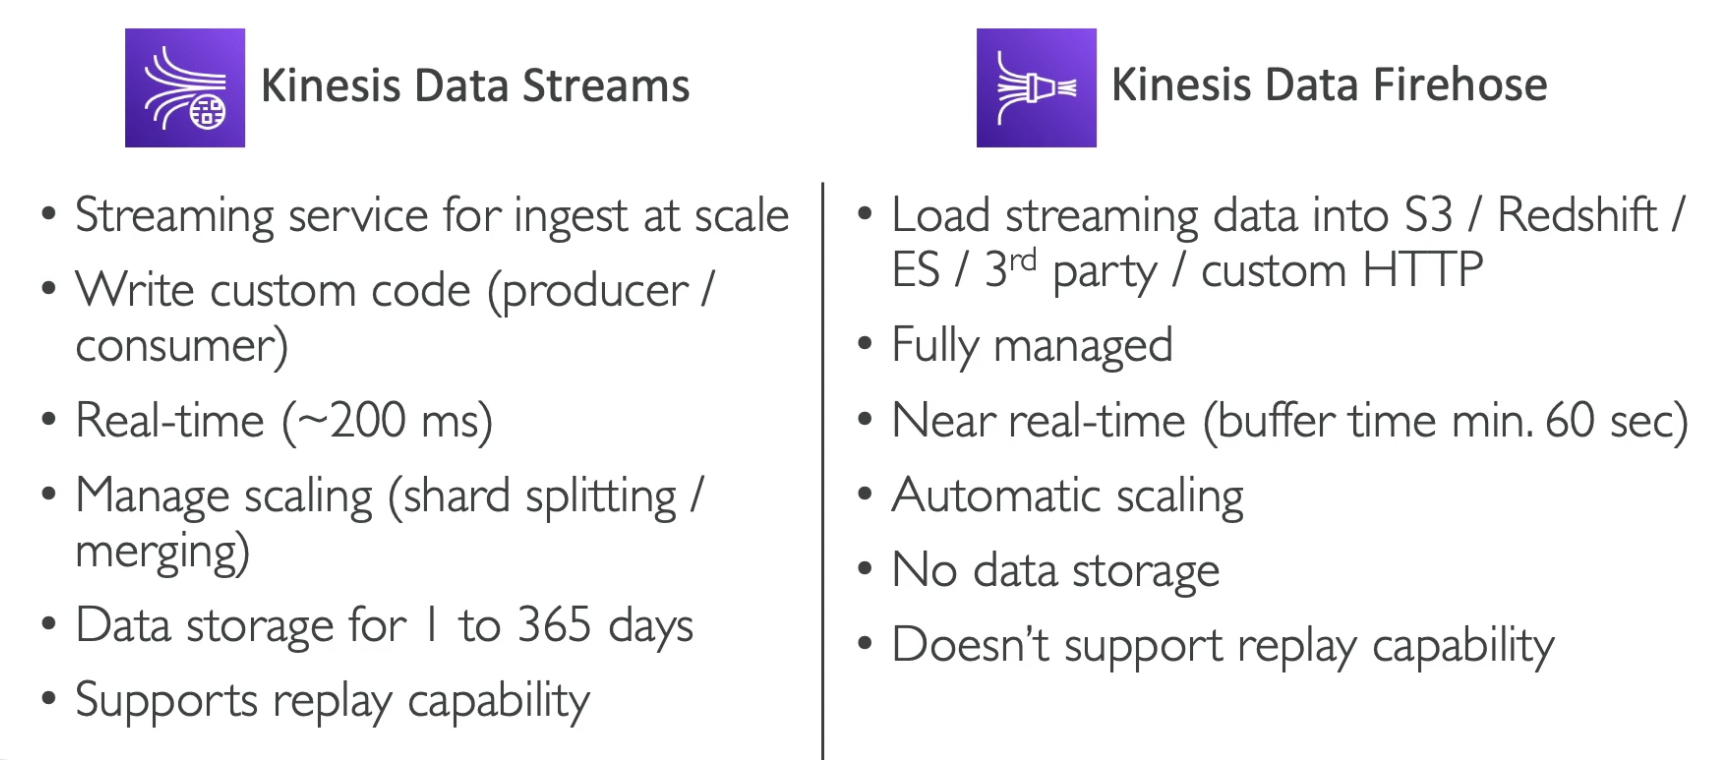
Ordering data into Kinesis
Imagine you have 100 trucks each having unique ID (truck_1 truck_2, truck_100) on the road sending their GPS positions regularly into AWS. You want to consume the data in order for each truck, so that you can track their movement accurately. How should you send that data into Kinesis?
Answer: send using a “Partition Key” = value of the “truck id”. The same key will always go to the same shard. Which key should go to which shard is determined by Kinesis using a hash function. Data will be ordered in each shard.
💡 Number of consumers = number of shards (one consumer per shard)
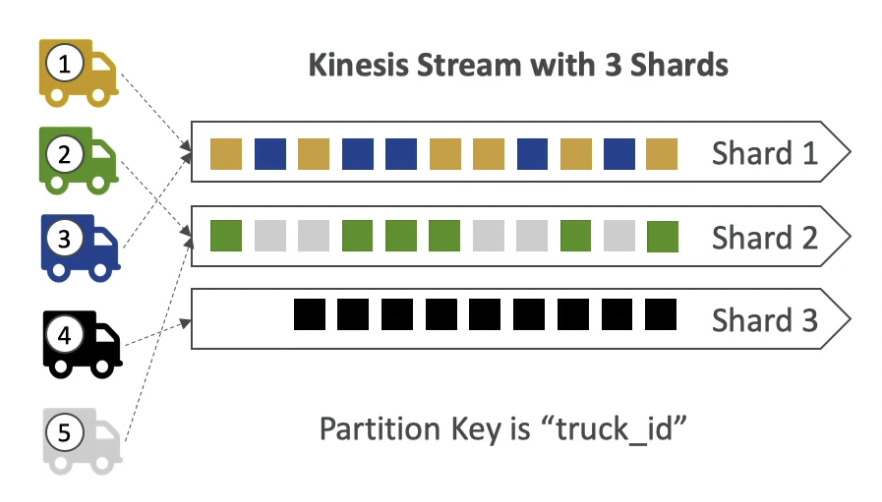
It’s better to solve the above problem using a SQS FIFO queue.
- You only have one SQS FIFO queue
- You will have 100 Group ID
- You can have up to 100 Consumers (due to the 100 Group ID)
- You have up to 300 messages per second (or 3000 if using batching) - throughput limitation
.png)
- You only have one SQS FIFO queue
Hands on
- Create a Kinesis Data Stream
- Create a Kinesis Firehose and configure it to read data from the data stream and write into an S3 bucket.
SQS vs SNS vs Kinesis
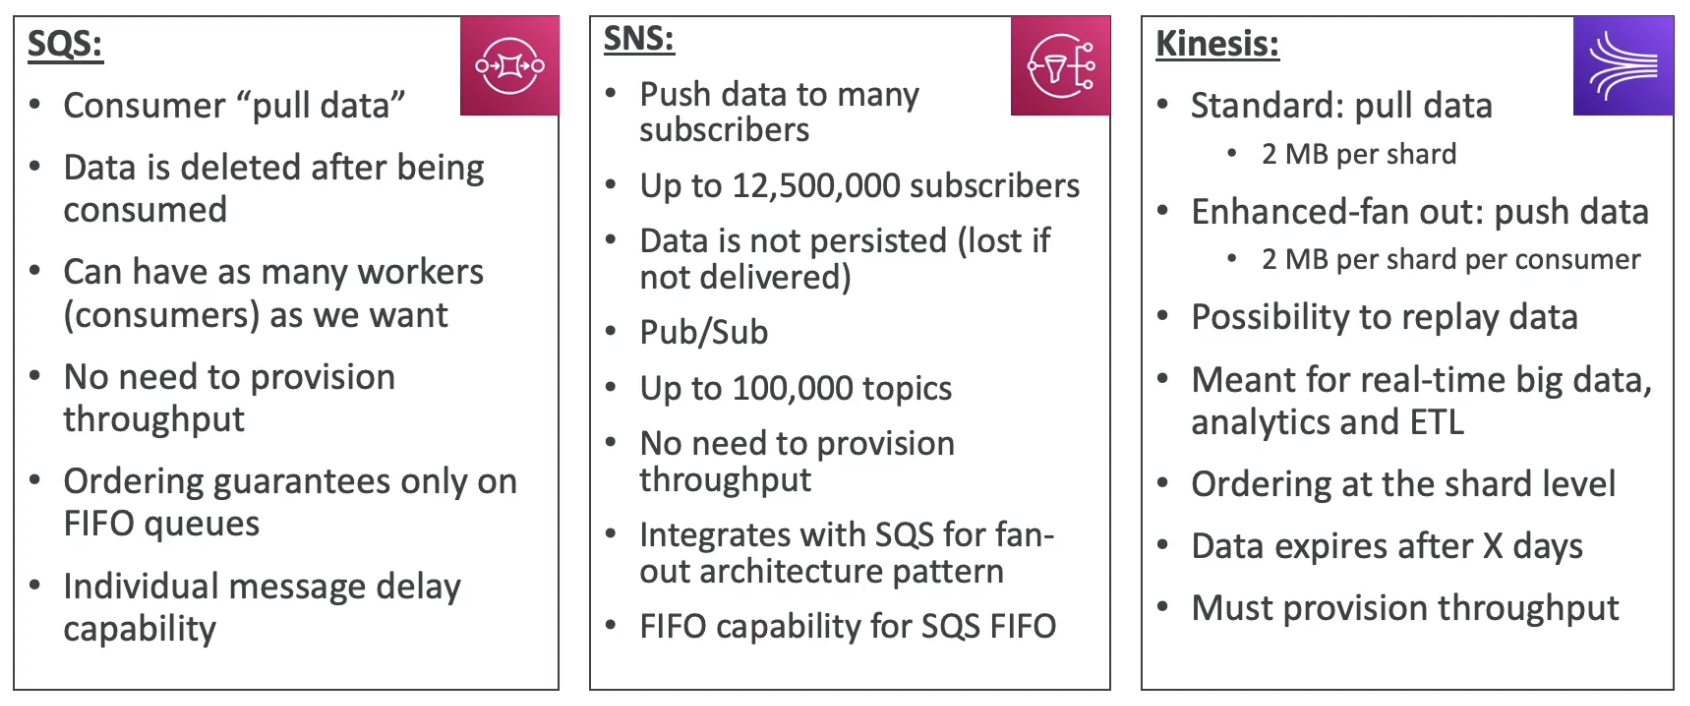
Amazon MQ
- SQS & SNS are “cloud-native” services, and they’re using proprietary protocols from AWS that are not standards in the market.
- If you have some traditional applications running from on-premise, they may use open protocols such as: MQTT, AMQP, STOMP, Openwire, WSS, etc.
- When migrating to the cloud, instead of re-engineering the application to use SQS and SNS, we can use Amazon MQ (managed Apache ActiveMQ)
- Amazon MQ is a managed message broker service for RabbitMQ, Active MQ
- Amazon MQ doesn’t “scale” as much as SQS / SNS because it is provisioned
- Amazon MQ runs on a dedicated machine, can run in HA (high availability) with failover
- Amazon MQ has both queue feature (SQS) and topic features (SNS)
- High availability in Amazon MQ works by leveraging MQ broker in multi AZ (active and standby). EFS (NFS that can be mounted to multi AZ) is used to keep the files safe in case the main AZ is down. If the main AZ is down, failover happens.
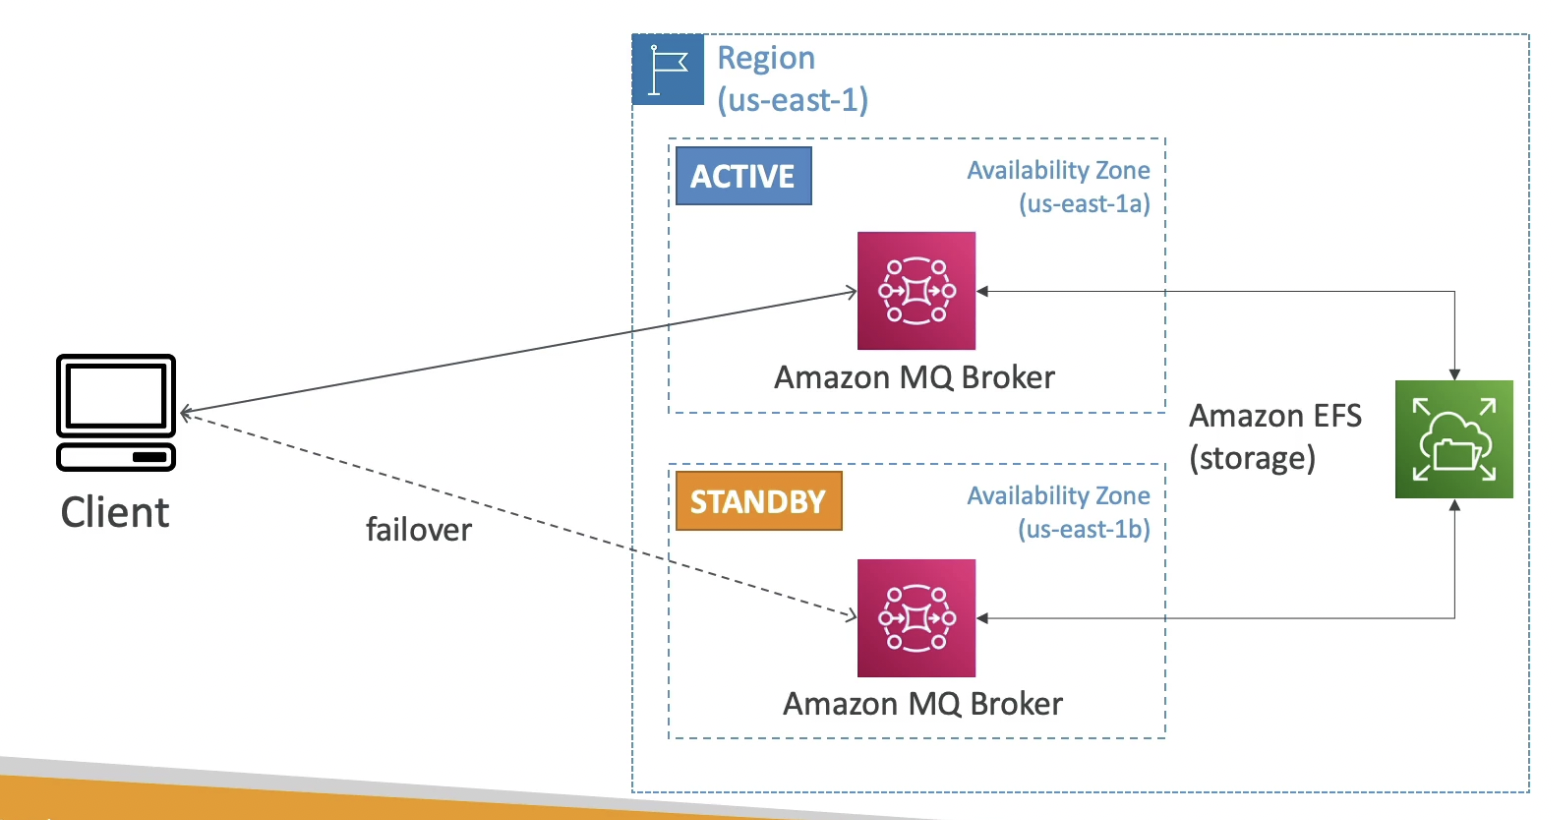
Section 19: Containers on AWS: ECS, Fargate, ECR & EKS
Section 19: Containers on AWS: ECS, Fargate, ECR & EKS
Docker
Intro
- Docker is a software development platform to deploy apps
- Apps are packaged in containers that can be run on any OS
- Apps run the same, regardless of where they’re run
- Any machine
- No compatibility issues
- Predictable behavior
- Less work
- Easier to maintain and deploy
- Works with any language, any OS, any technology
- We can run a bunch of Docker containers on an EC2 instance. These docker containers could internally be running anything. But from the EC2 instance’s perspective, it only sees docker containers.
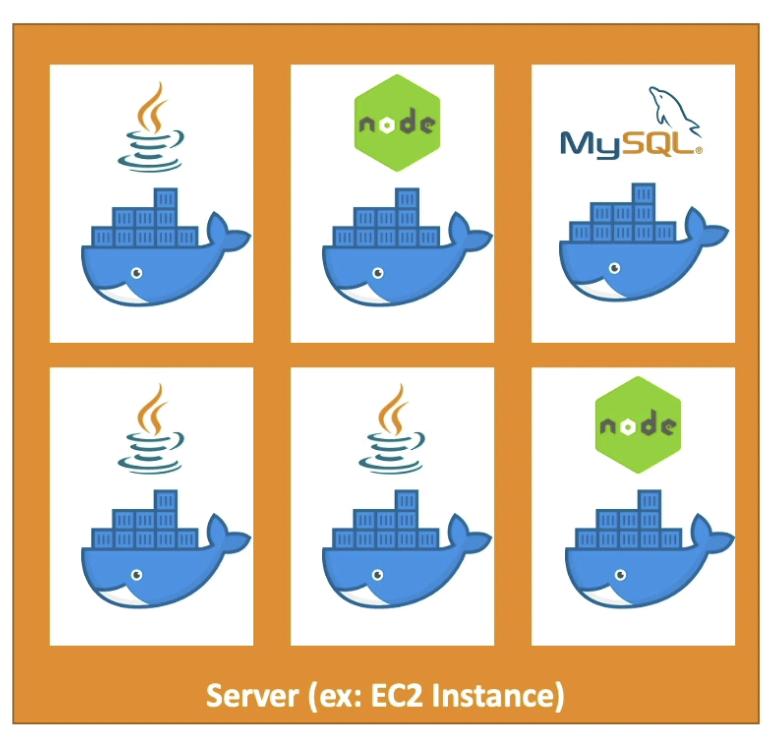
- Docker containers are created from Docker images which are stored in Docker Repositories.
- Docker Repositories:
- Public:
- Docker Hub https://hub.docker.com/ where we can find base images for many technologies or OS like Ubuntu, Java, MySQL, NodeJS, etc.
- Public: Amazon ECR Public
- Private:
- Amazon ECR (Elastic Container Registry)
- Public:
Docker vs VM
- Docker is “sort of” a virtualization technology, but not exactly
- In case of VMs, every virtual OS is isolated from each other. They don’t share resources.
- In case of Docker, many lightweight containers share the same resource. So, we can run many containers on the same hardware.
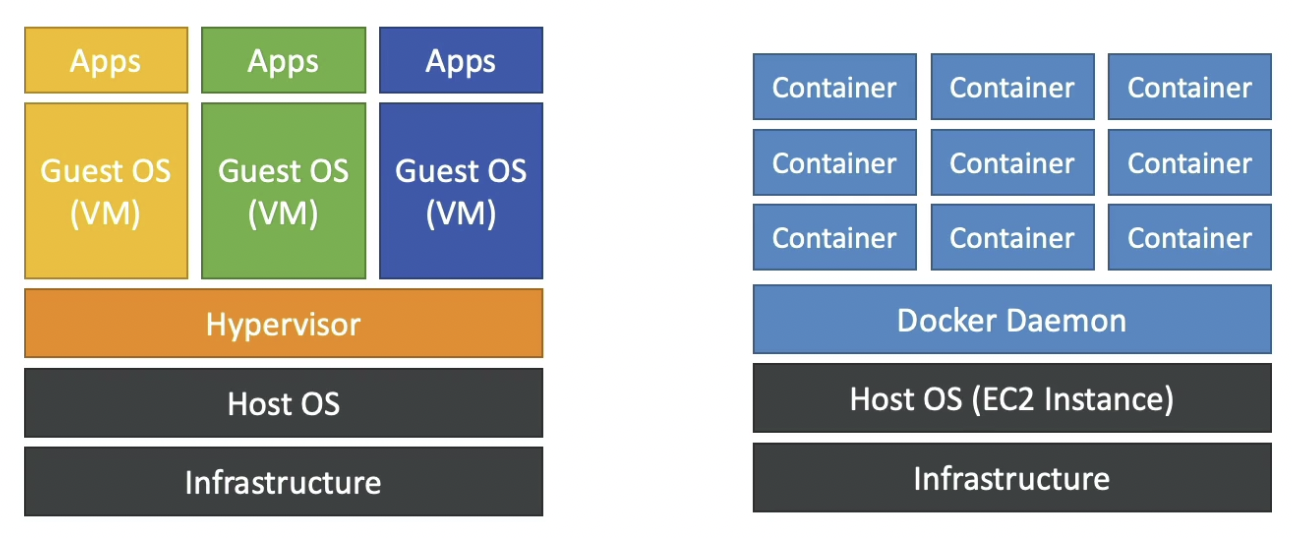
Docker lifecycle
- First create a docker file
- Building the docker file will give docker image
- Running the docker image will give docker container
- Optionally, you can push the docker image to a repository and pull from there and run.
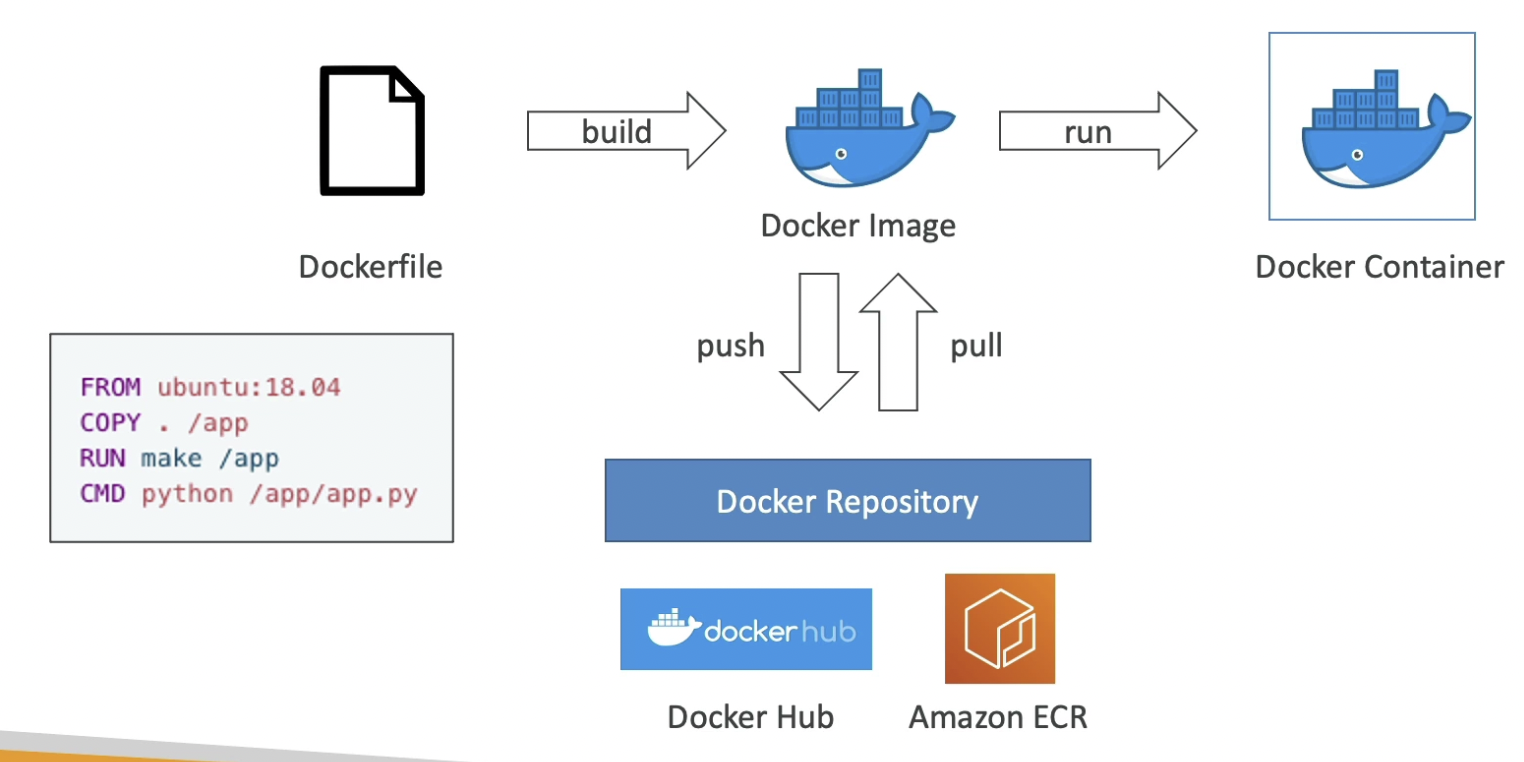
ECS - Elastic Container Service
Intro
- Allows us to launch Docker containers on AWS
- You must provision & maintain the infrastructure (EC2 instances)
- AWS takes care of starting / stopping containers
- ECS has integrations with ALB
- The EC2 instances will be the underlying hardware for containers to run. When a new container is to be launched, ECS will check all the available EC2 instances to check for available resources to determine where to launch the container.

Launch Types
Amazon EC2 launch type for ECS
.png)
new →
Inside a VPC spanning multiple AZ, there is an ECS cluster spanning multiple AZ. Inside the ECS cluster, there will be an ASG responsible for launching container instances (EC2). On every EC2 instance, ECS agent will be running (happens automatically if you choose the AMI for ECS when launching the instance) which registers these instances to the ECS cluster. This will allow the ECS cluster to run Docker containers (ECS tasks) on these instances.
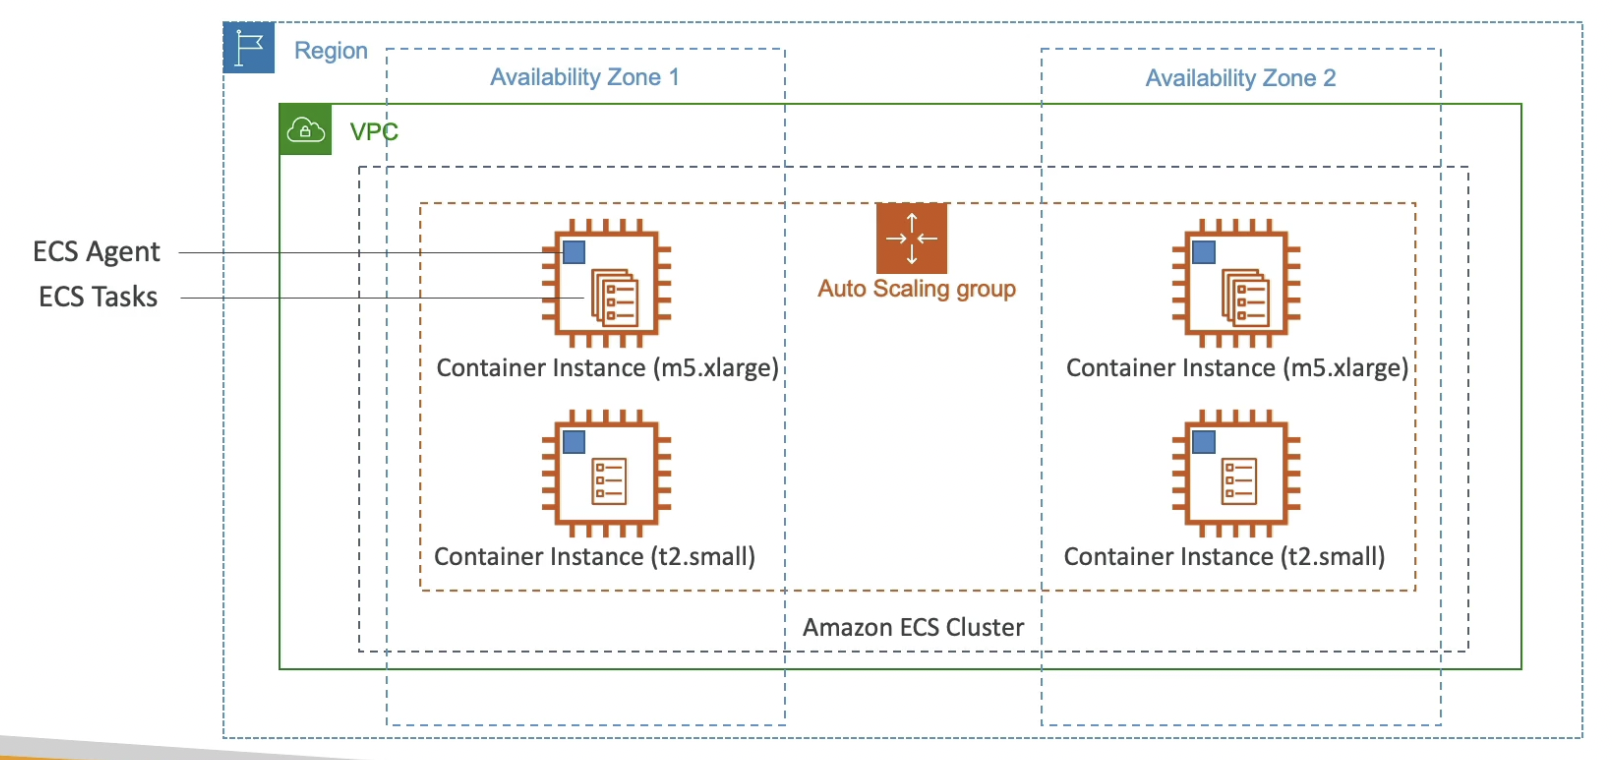
Fargate launch type for ECS
.png)
new →
VPC and ECS cluster are setup the same way as in EC2 launch type, but instead of using ASG with EC2 instances, we have a Fargate cluster spanning multiple AZ. The fargate cluster will run ECS tasks anywhere within the cluster and attach an ENI (with a unique private IP) to each task. So, if we have a lot of ECS tasks, we need sufficient free private IPs.
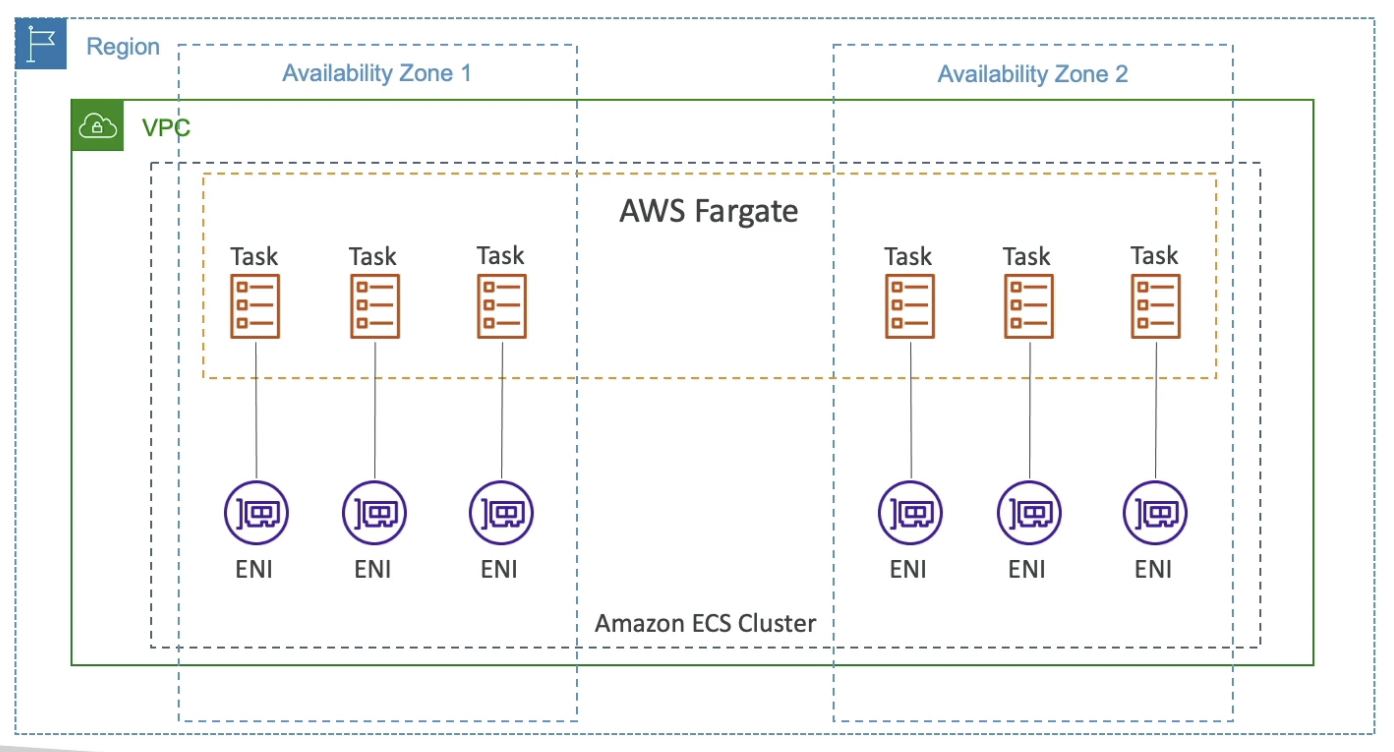
Fargate
- Launch Docker containers on AWS without worrying about infrastructure management
- You do not provision the infrastructure (no EC2 instances to manage) - simpler
- Serverless
- AWS just runs containers for you based on the CPU / RAM you need. You won’t know where these containers are running.

IAM Roles for ECS tasks
EC2 Instance Profile (IAM role for the EC2 instance):
- Used by the ECS agent to:
- Make API calls to ECS service
- Send container logs to Cloud Watch Logs
- Pull Docker image from ECR
- Reference sensitive data in Secrets Manager or SSM Parameter Store
- Used by the ECS agent to:
ECS Task Role:
- ECS Task Role allows the ECS tasks to access resources within AWS.
- Allow each task to have a specific role
- Use different roles for the different ECS Services you run
- Task Role is defined in the task definition
.png)
Load Balancing
Load Balancing for EC2 launch type
- Dynamic port is assigned to randomly ECS tasks
- Once the ALB is registered to a service in the ECS cluster, it will find the right port on your EC2 Instances
- You must allow on the EC2 instance’s security group any port from the ALB security group because it may attach on any port.

Load Balancing for Fargate launch type
- Each task has a unique IP but same port (80)
- You must allow on the ENI’s security group the task port (80) from the ALB security group
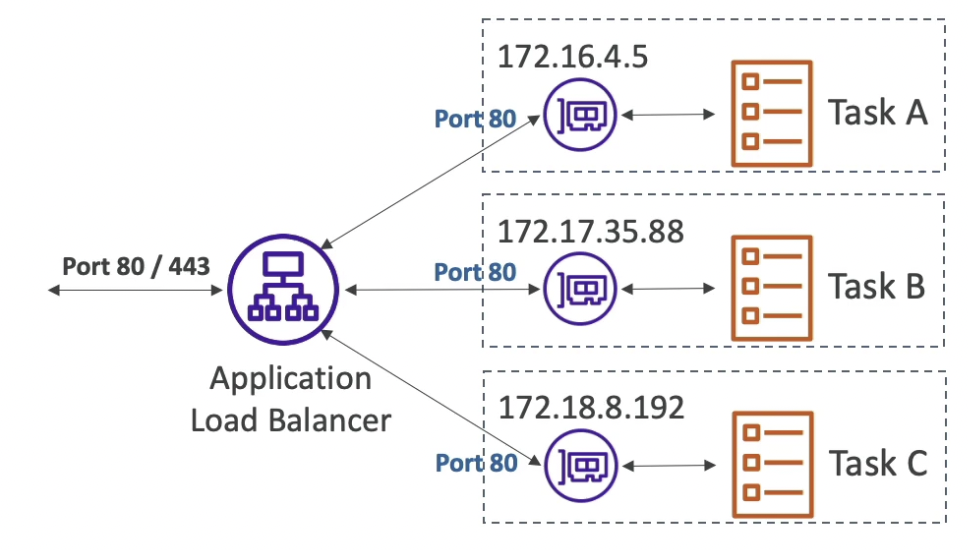
ECS + EFS
- EFS volumes are used as storage for ECS tasks
- Works for both EC2 Tasks and Fargate tasks
- Ability to mount EFS volumes onto tasks
- Tasks launched in any AZ will be able to share the same data in the EFS volume since EFS spans multi AZ.
- Fargate + EFS ⇒ serverless + data storage without managing servers
- Use case: persistent multi-AZ shared storage for your containers
- AWS S3 cannot be mounted as a file system.
.png)
Scaling
ECS Service Auto Scaling
.png)
.png)
.png)
new →
Fargate - on Service CPU usage
Only need to scale the service by adding more tasks
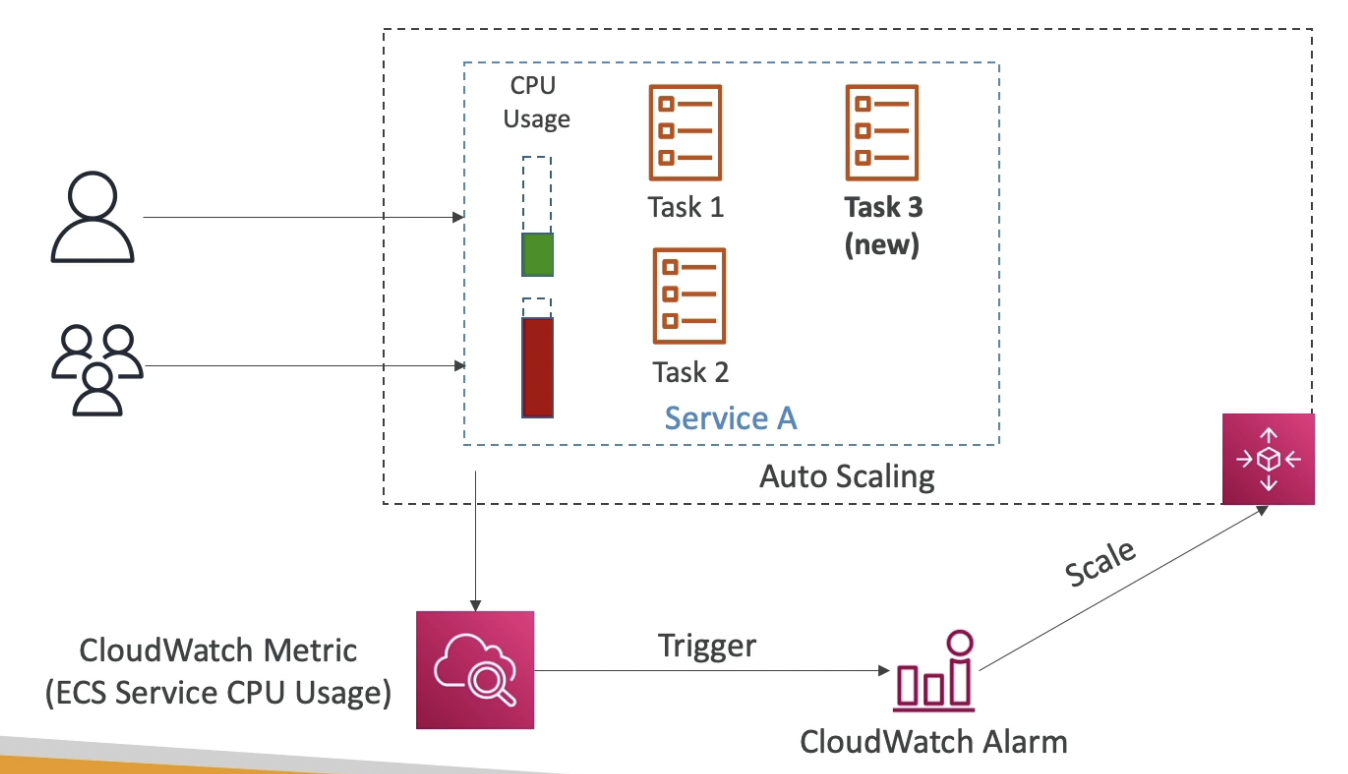
Untitled
EC2 - on Service CPU usage
Along with the service, we also need to scale the ECS cluster by adding more EC2 instances otherwise we will run out of resources to run new tasks.

Untitled
Fargate - on SQS queue length

Untitled
EC2 - on SQS queue length
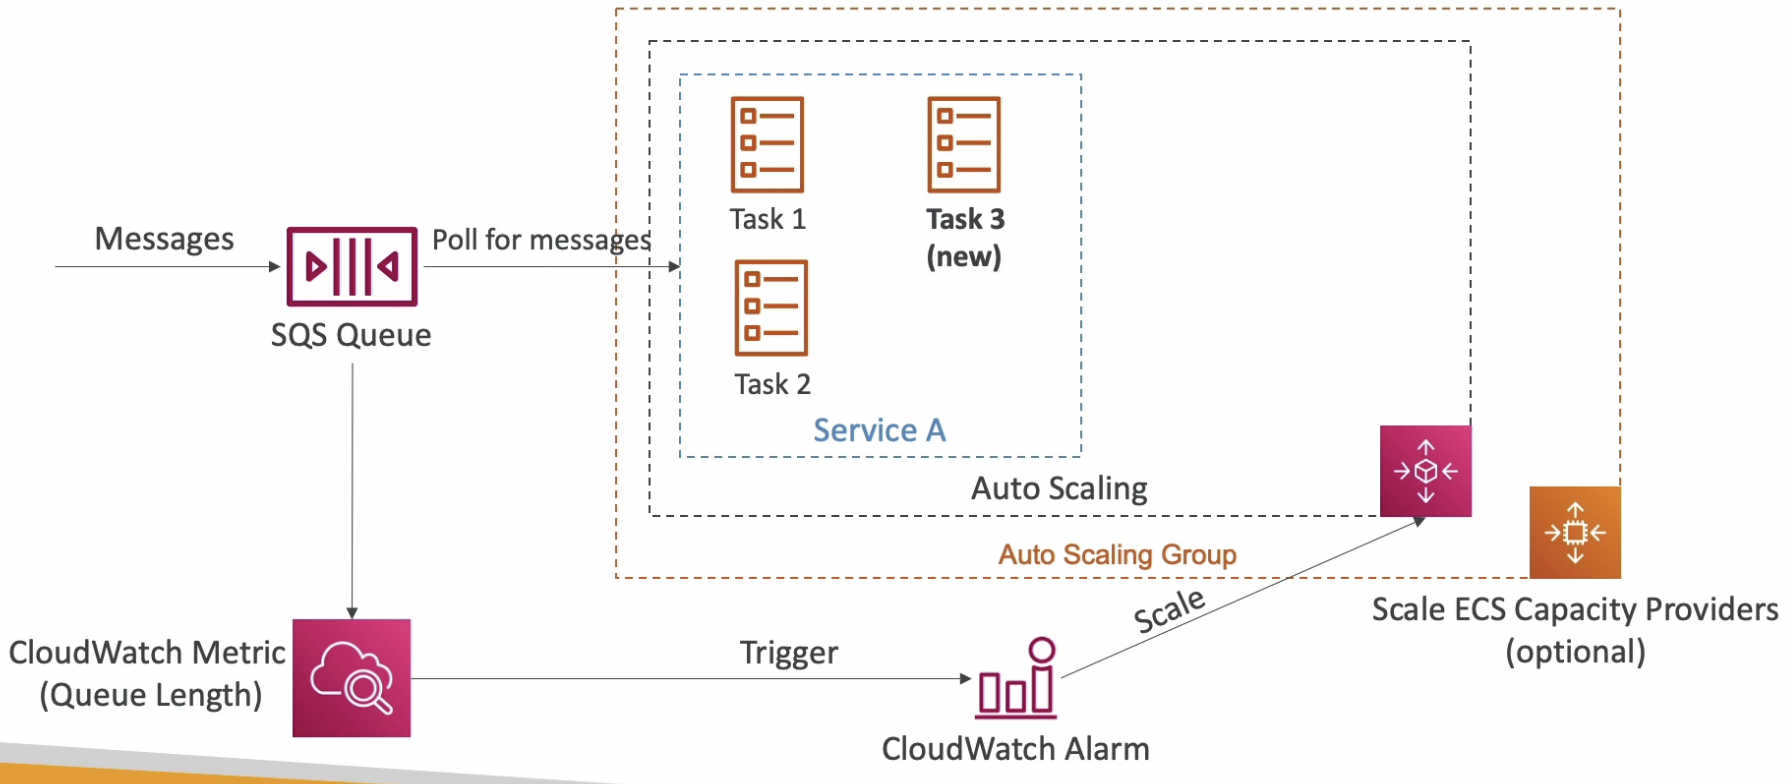
Untitled
ECS Tasks invoked by EventBridge
Example: When the user uploads an object to S3, create an ECS task to process the object and store the result in DynamoDB.
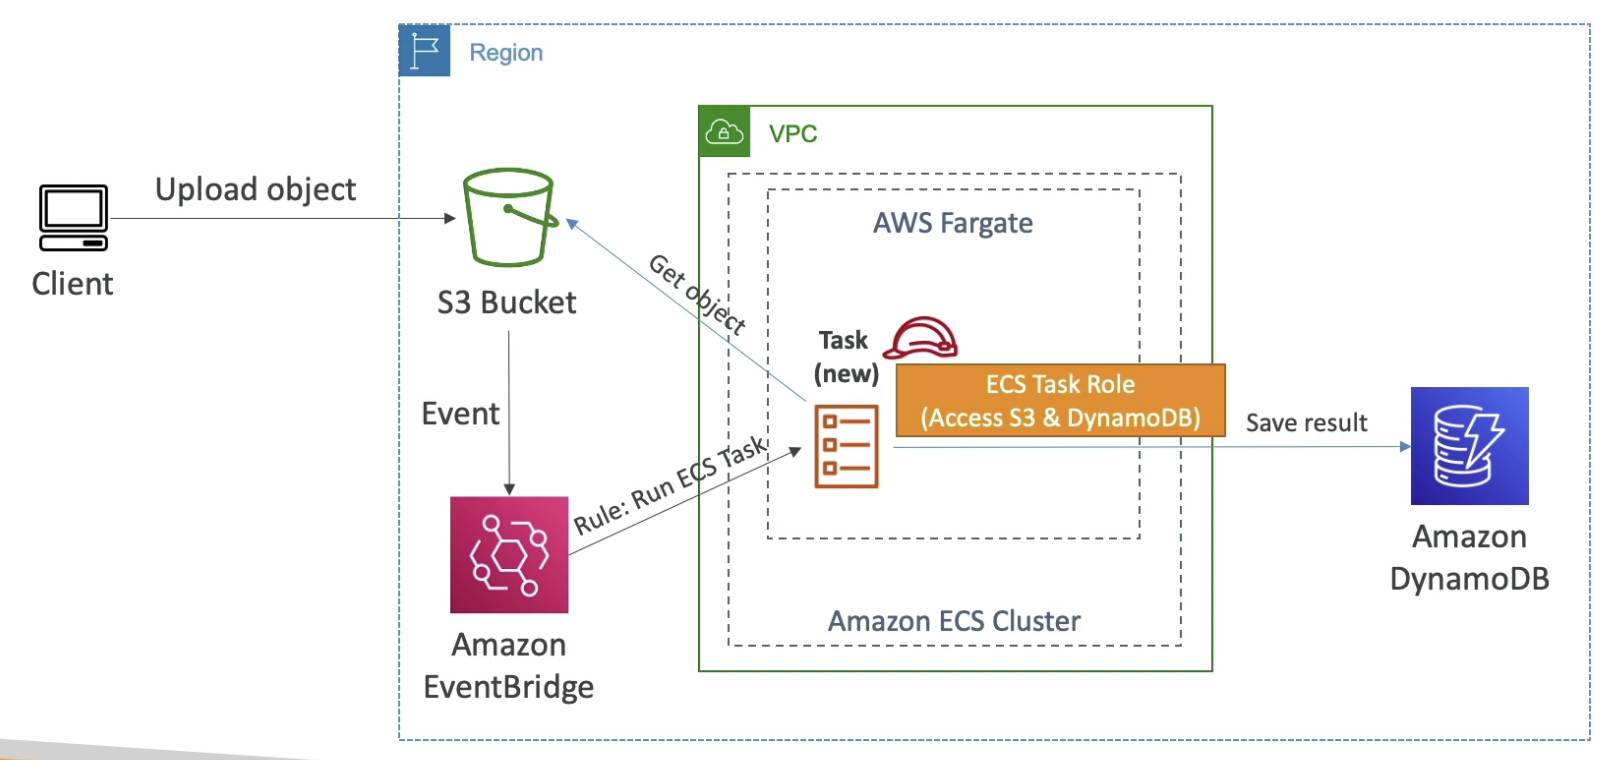
.png)
.png)
new →
ECS Services & Tasks
Inside the ECS cluster, we can have multiple services running which span multiple instances each running some tasks. We can use ALBs to send requests to each of these tasks.
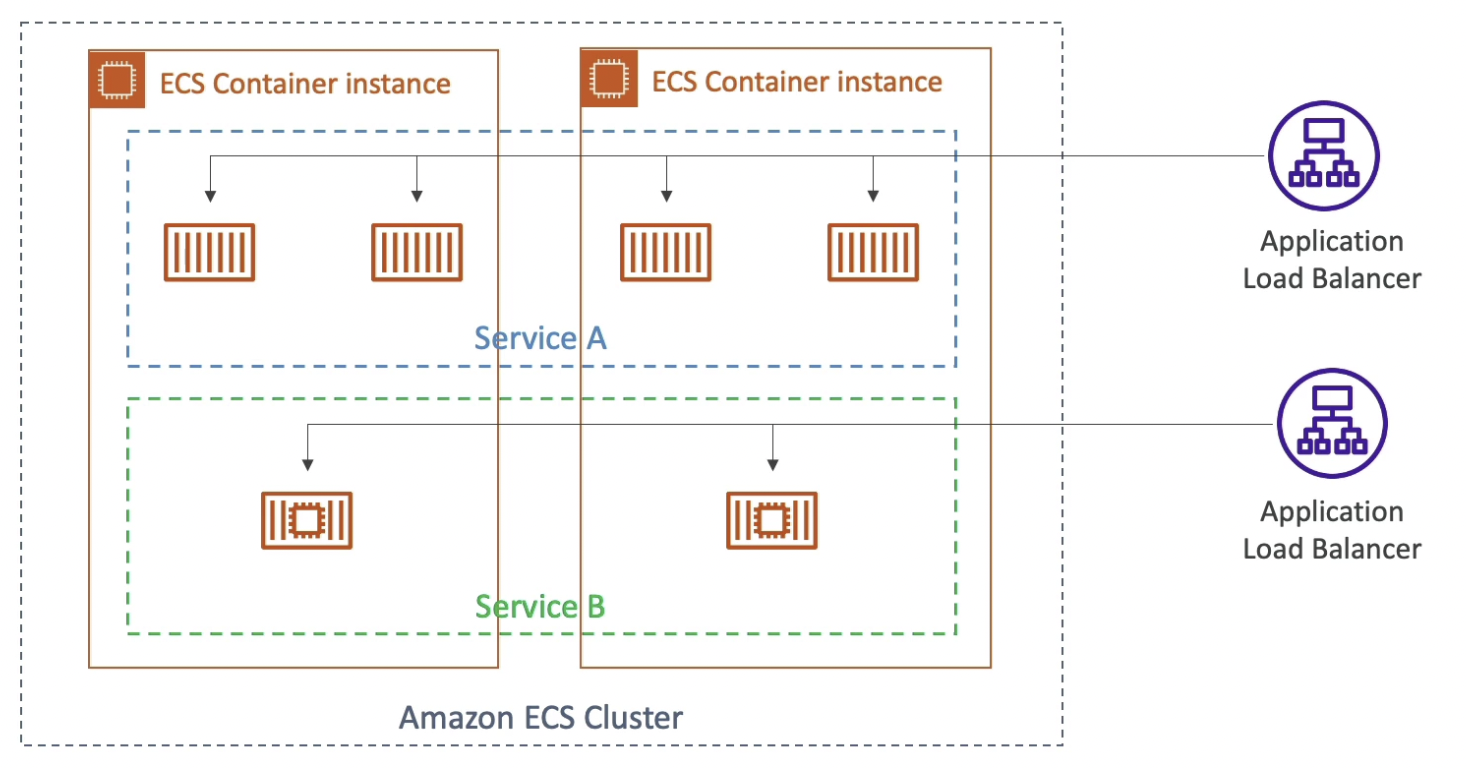
Rolling Updates
When we need to update an ECS service, we need to do it gradually to avoid system downtime.
In the ECS service update screen, we have two settings:
- Minimum healthy percentage - determines how many tasks, running the current version, we can terminate while staying above the threshold.
- Maximum percentage - determines how many new tasks, running the new version, we can launch while staying below the threshold.
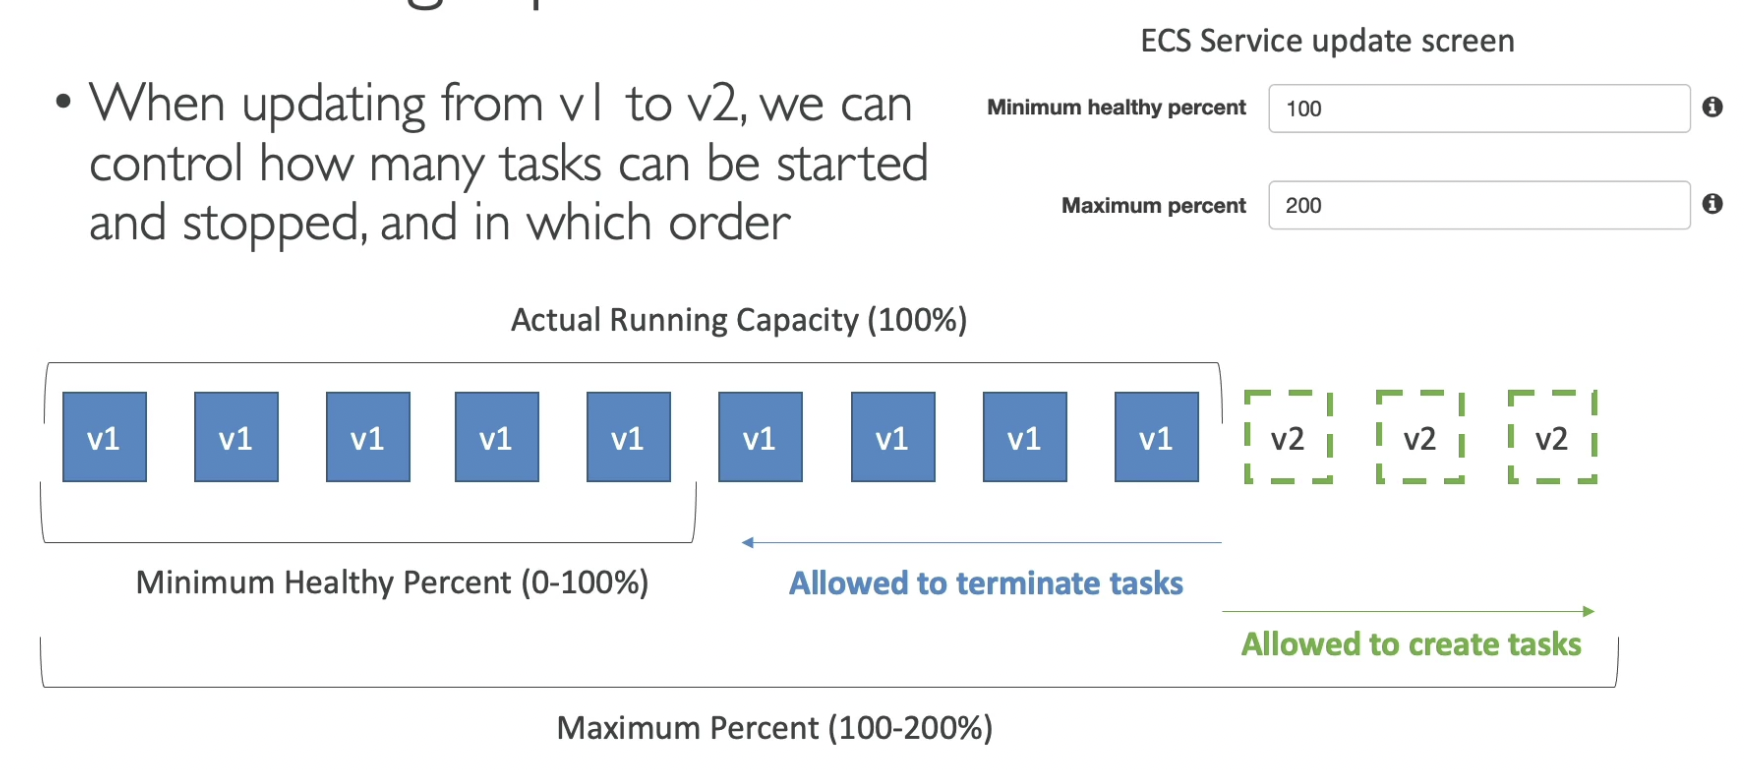
Untitled
Example: Min: 50% and Max: 100% and starting number of tasks 4
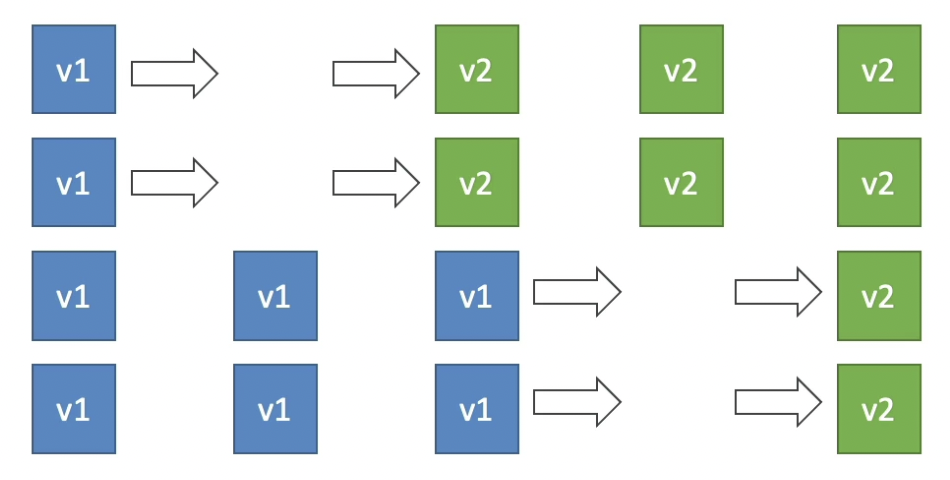
Untitled
Example: Min: 100% and Max: 150% and starting number of tasks 4

Untitled
Hands on
ECS → Get started → Create a sample app
This will create an ECS cluster.
Once ready, the public IP of the task can be used to request the container on port 80.

Untitled
ECR - Elastic Container Registry
- It is a AWS managed Docker repository
- Store, manage and deploy containers on AWS
- Only pay for the storage you use to store docker images
- Fully integrated with ECS & IAM for security
- Storage is backed by Amazon S3
- Supports image vulnerability scanning, version, tag, image lifecycle
- Whenever a task has to be created, the image is pulled from the ECR. IAM role is used for security.
- We can upload Docker images on ECR manually from our systems or we can use a CICD service like CodeBuild.
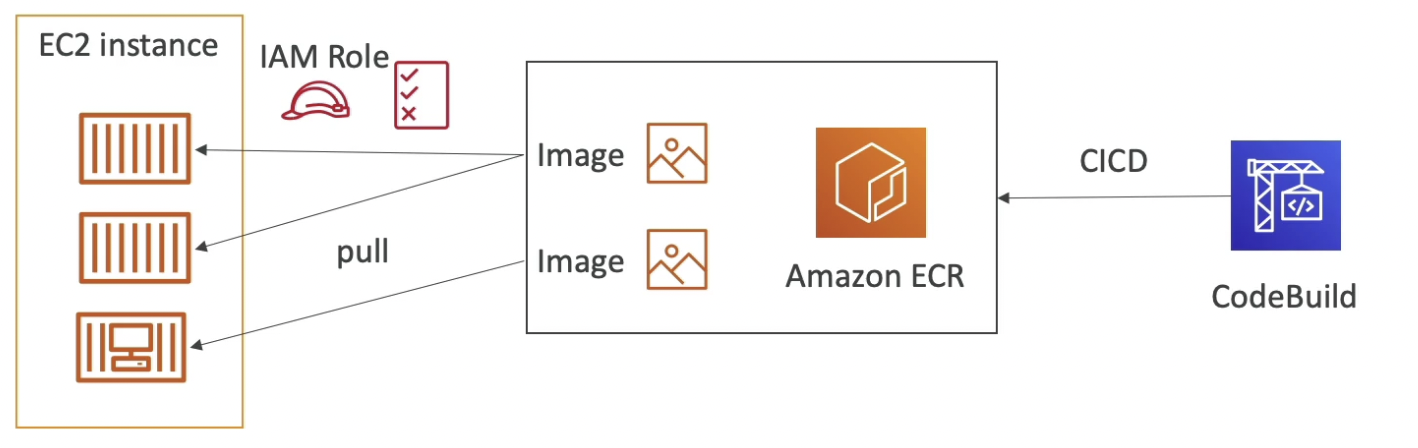
EKS - Elastic Kubernetes Service
- Amazon’s managed Kubernetes (open source)
- It is a way to launch managed Kubernetes clusters on AWS
- Kubernetes is an open-source system for automatic deployment, scaling and management of containerized (usually Docker) applications
- It’s an alternative to ECS, similar goal but different API
- EKS supports EC2 if you want to to deploy worker nodes or Fargate to deploy serverless containers inside the EKS cluster
- Use case: if your company is already using Kubernetes on-premises or in another cloud, and wants to migrate to AWS using Kubernetes
- Kubernetes is cloud-agnostic (can be used in any cloud provider). So, it is much more standardized.
- Inside the EKS cluster, we have EKS nodes (EC2 instances) and EKS pods (tasks) within them. We can use a private or public load balancer to access these EKS pods.

.png)
.png)
AWS App Runner
.png)
Section 20: Serverless Overview from a Solution Architect Perspective
Section 20: Serverless Overview from a Solution Architect Perspective
Serverless
- Serverless is a new paradigm in which the developers don’t have to manage servers. They just deploy code.
- Serverless does not mean there are no servers, it means you just don’t manage / provision / see them.
- Initially, serverless was just about deploying function as a service (FaaS).
- Serverless was pioneered by AWS Lambda but now also includes anything that’s not required to be managed by the developers such as:
- AWS Lambda
- DynamoDB
- AWS Cognito
- AWS API Gateway
- Amazon S3
- AWS SNS & SQS
- AWS Kinesis Data Firehose
- Aurora Serverless
- Step Functions
- Fargate
.png)
Lambda
Intro
- Virtual functions - no servers to manage
- Limited by time - short executions (max 15 mins)
- Run on-demand
- Scaling is automated, AWS automatically adds more functions to scale horizontally.
- Inexpensive Pricing
- Pay per request (number of invocations) and compute time
- Free tier of 1,000,000 AWS Lambda requests and 400,000 GBs of compute time
- Pay per lambda invocation:
- First 1,000,000 requests are free
- $0.20 per million requests thereafter ($0.0000002 per request)
- Pay per duration: (in increment of ms)
- 400,000 GBs (400,000 seconds of execution at 1 GB RAM consumption) of compute time per month for free
- After that $1.00 for 600,000 GBs
- It is usually very cheap to run AWS Lambda, so it’s very popular
- Integrated with the whole AWS suite of services
- API Gateway - to build REST APIs to invoke lambda functions
- Kinesis - to perform transformations on Kinesis streams
- DynamoDB - to take some action based on a DynamoDB event
- S3 - to take some action based on an S3 notification
- EventBridge - to take some action based on an EB event
- CloudWatch - to get logs for Lambda functions
- SNS - to react to a notification
- SQS - to poll for messages in the queue and process them
- Cognito - to take some action if a user logs in
- Supports many programming languages
- Node.js (JavaScript)
- Python
- Java (Java 8 compatible)
- C# (.NET Core)
- Golang
- C# / Powershell
- Ruby
- any other language using Custom Runtime API (community supported, example Rust)
- Easy monitoring through AWS CloudWatch
- Easy to get more resources per functions (up to 10GB of RAM)
- Increasing RAM will also improve CPU and network
- In order to use containers on lambda, the container image must implement the Lambda Runtime API, otherwise it is preferred to be run on ECS / Fargate. Docker is not designed for Lambda, but for Fargate and ECS.
Serverless thumbnail creation
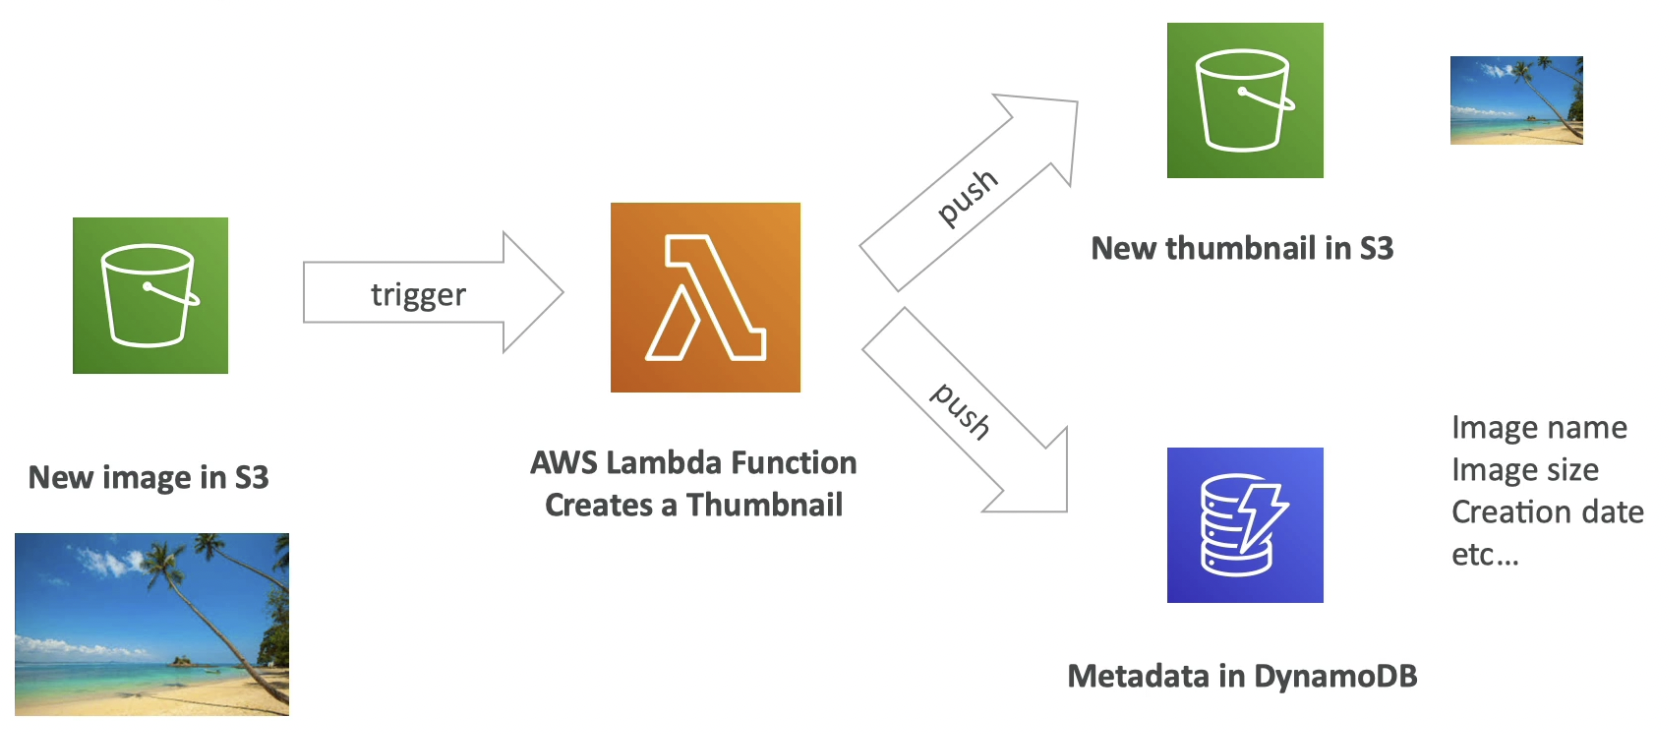
Serverless CRON Job
Instead of running the CRON on an EC2 instance which runs full time. We can setup an EventBridge rule to trigger an event every 1 hour. This event will trigger a lambda function.
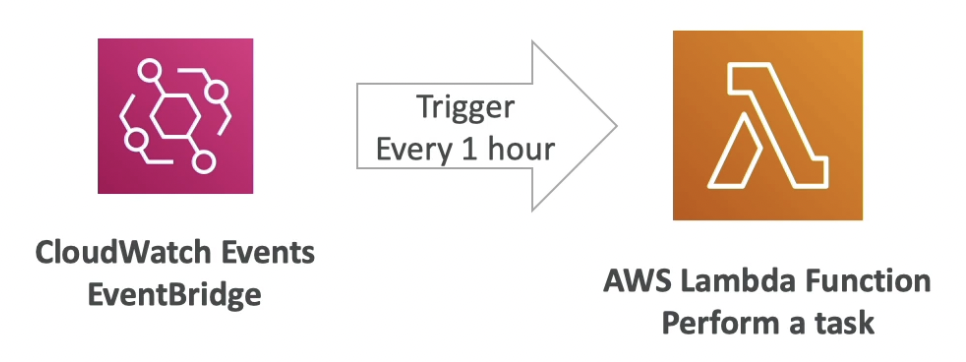
Limits
- Execution:
- Memory allocation: 128 MB - 10GB (1 MB increments)
- Maximum execution time: 900 seconds (15 minutes)
- Environment variables: 4 KB
- Disk capacity in the “function container” (in /tmp): 512 MB to 10 GB
- Concurrent executions: 1000 (can be increased by requesting AWS)
- Deployment:
- Lambda function deployment size (compressed .zip): 50 MB
- Size of uncompressed deployment (code + dependencies): 250 MB
- If more space is needed, can use the
/tmpdirectory to load other files at startup
- Size of environment variables: 4 KB
- Execution:
Lambda@Edge
- You have deployed a CDN using CloudFront. What if you wanted to run a global AWS Lambda alongside each edge location to filter requests before reaching your application?
- For this, you can use Lambda@Edge:
- Deploy Lambda functions alongside your CloudFront CDN
- Customize the CDN content using Lambda
- Build more responsive applications
- You don’t manage servers, Lambda is deployed globally
- Pay for what you use, no provisioning needed
- You can use Lambda to modify CloudFront requests and responses (4 types). You can also generate responses to viewers without ever sending the request to the origin.
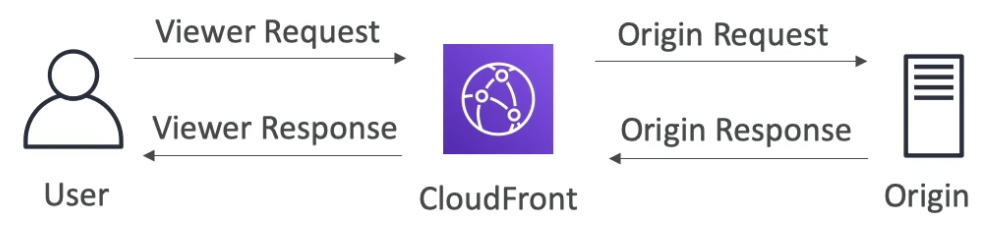
- We can create a global application using Lambda@Edge where S3 hosts a static website which uses client side JS to send requests to CF which will process the request in a lambda function in that edge location to perform some operation like fetching data from DynamoDB.
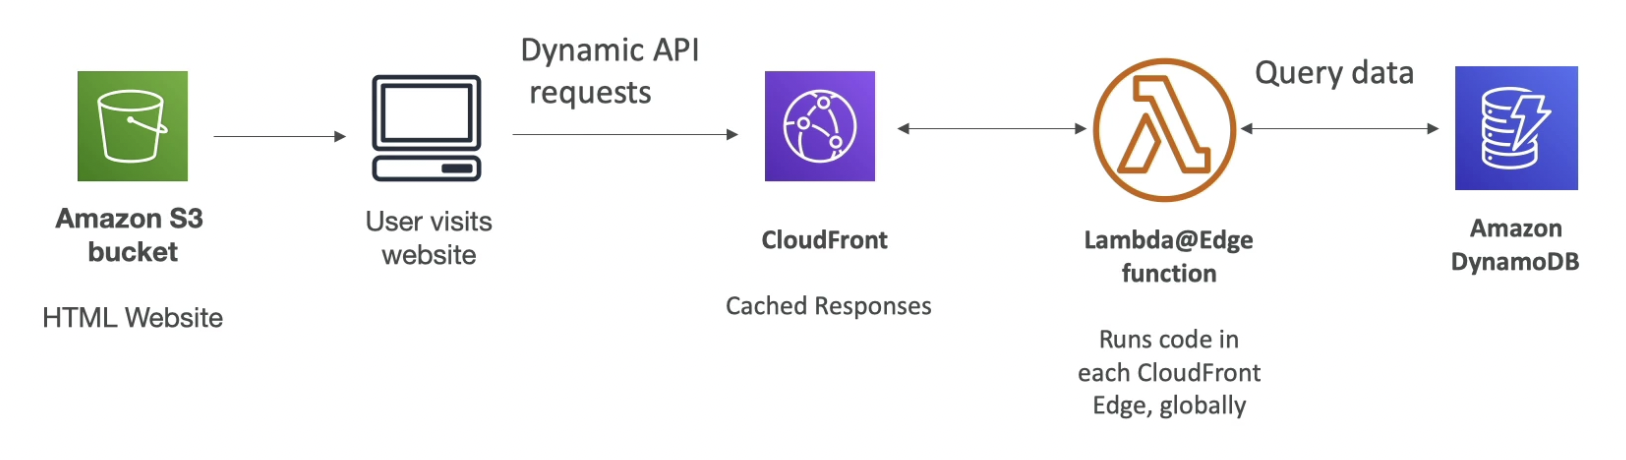
- Use cases
- Website Security and Privacy
- Dynamic Web Application at the Edge
- Search Engine Optimization (SEO)
- Intelligently Route Across Origins and Data Centers
- Bot Mitigation at the Edge
- Real-time Image Transformation
- A/B Testing
- User Authentication and Authorization
- User Prioritization
- User Tracking and Analytics
.png)
.png)
Lambda in VPC
.png)
.png)
.png)
DynamoDB
Intro
- Fully managed, highly available NoSQL DB with replication across multiple AZs
- Not good for joins and aggregations
- Scales to massive workloads (distributed database)
- Millions of requests per seconds, trillions of row, 100s of TB of storage
- Fast and consistent in performance (low latency on retrieval)
- Integrated with IAM for security, authorization and administration
- Enables event driven programming with DynamoDB Streams
- Auto-scaling capabilities, no prior provisioning of storage
- Low cost
- We only create tables in DynamoDB, not databases since it is serverless.
Structure
- DynamoDB is made of Tables
- Each table has a Primary Key (must be decided at creation time)
- Each table can have an infinite number of items (rows)
- Each item has attributes (can be added over time, can be null)
- Maximum size of an item is 400KB (not good for storing large objects)
- Data types supported are:
- Scalar Types: String, Number, Binary, Boolean, Null
- Document Types: List, Map
- Set Types: String Set, Number Set, Binary Set
- Primary key can be a single field or a pair of fields (partition key and sort key)

- DynamoDB is made of Tables
Read/Write Capacity
- Control how you manage your table’s capacity (read/write throughput)
- Provisioned Mode (default)
- Specify the number of reads/writes per second
- Need to plan capacity beforehand
- Pay for provisioned Read Capacity Units (RCU) & Write Capacity Units (WCU)
- Great for predictable workloads
- Possibility to add auto-scaling mode for RCU & WCU (eg. set RCU and WCU to 80% and the capacities will be scaled automatically based on the workload to match the set values)
- On-Demand Mode
- Read/writes automatically scale up/down with your workloads
- No capacity planning needed
- Pay for what you use, more expensive
- Great for unpredictable workloads, steep sudd
DynamoDB Accelerator (DAX)
Intro
DynamoDB Accelerator (DAX) is a fully managed, highly available, in-memory cache for DynamoDB that delivers up to 10x performance improvement. It caches the most frequently used data, thus offloading the heavy reads on hot keys off your DynamoDB table, hence preventing the “ProvisionedThroughputExceededException” exception.
- Fully-managed, highly available, seamless in-memory cache for DynamoDB
- Help solve read congestion by caching
- Microseconds latency for cached data
- Doesn’t require application logic modification (compatible with existing DynamoDB APIs)
- 5 minutes TTL for cache (default)

DAX vs ElastiCache
- DAX is designed to cache the query and scan of DynamoDB items (objects) to make reads faster.
- ElastiCache is good for caching computation results (eg. result of computation of dynamodb item after fetching)

DynamoDB Streams
- Ordered stream of notifications of item-level modifications (create/update/delete) in a table
- Stream records can be
- Sent to Kinesis Data Streams
- Read by AWS Lambda
- Read by Kinesis Client Library applications
- Data Retention for up to 24 hours
- Use cases:
- React to changes in real-time (eg. welcome email to users once they are added into the table)
- Analytics
- Insert into derivative tables
- Insert into ElasticSearch
- Implement cross-region replication
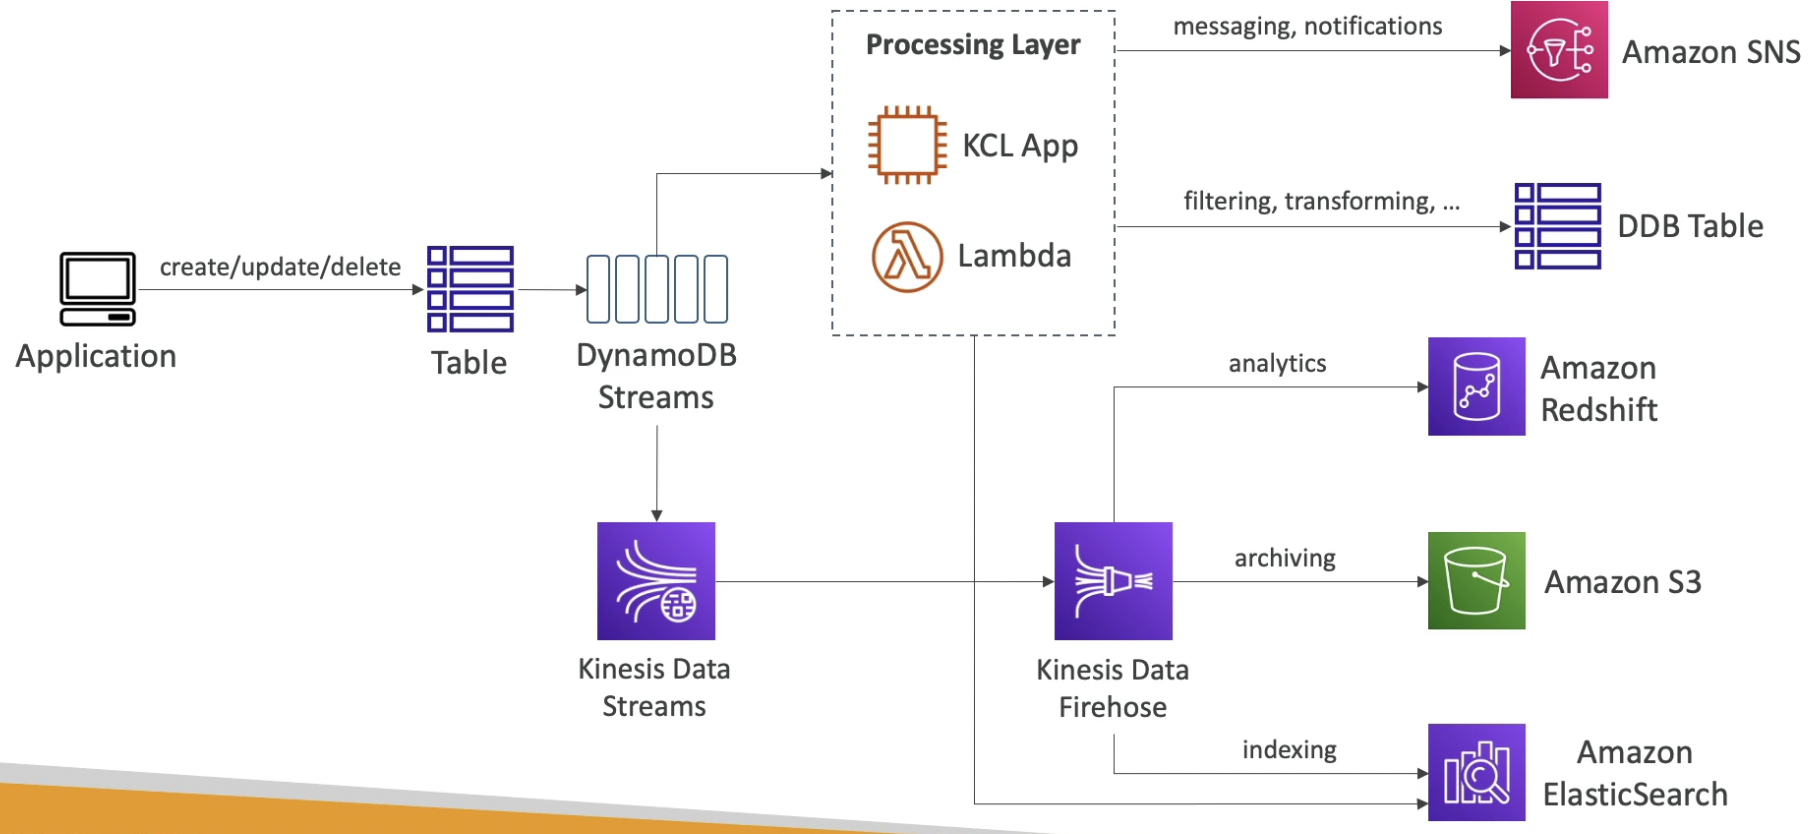
DynamoDB Global Table
- Make a DynamoDB table accessible with low latency in multiple-regions
- Active-Active replication
- Applications can READ and WRITE to the table in any region and the change will automatically be replicated to other tables.
- Must enable DynamoDB Streams as a pre-requisite

Time to Live (TTL)
- Automatically delete items after an expiry timestamp
- Use cases: reduce stored data by keeping only current items, adhere to regulatory obligations, etc.
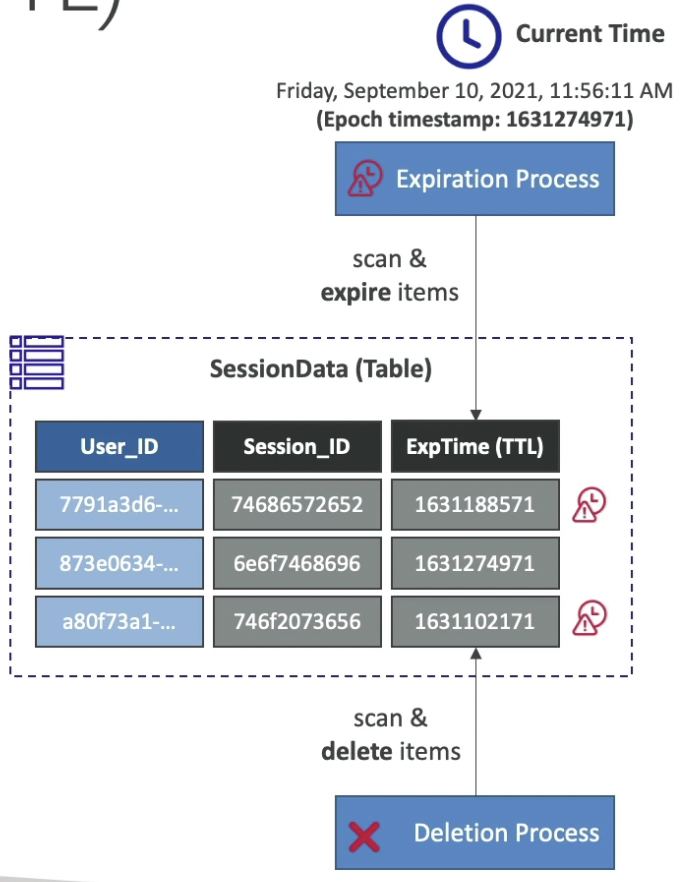
Backups for disaster recovery
.png)
DynamoDB - Integration with Amazon S3
.png)
new →
Indexes
- Global Secondary Indexes (GSI) & Local Secondary Indexes (LSI)
- Indexes allow us to query on attributes other than the Primary Key
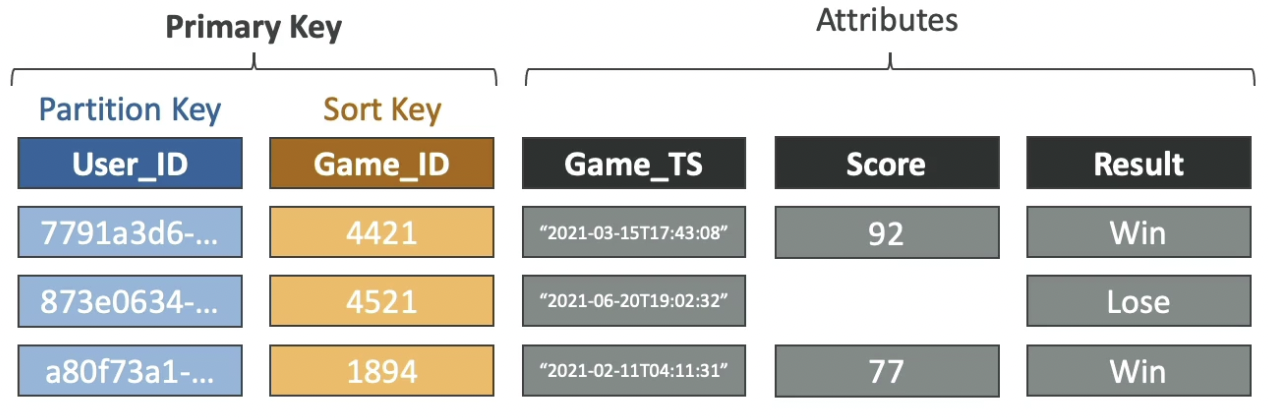
Transactions
Transactions allow us to either write to multiple tables or write to none.
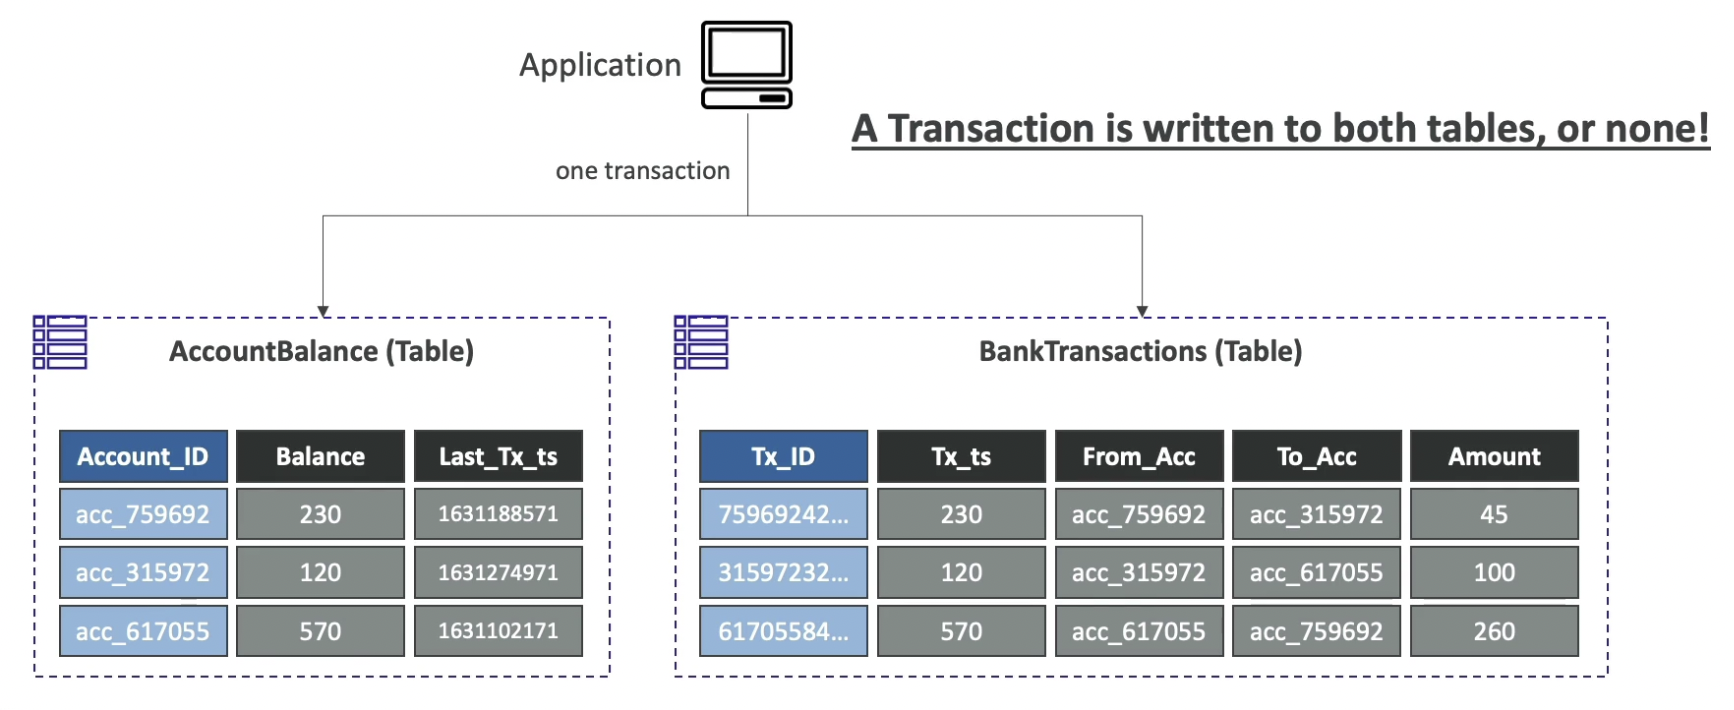
API Gateway
Intro
- Serverless offering from AWS to build REST APIs
- Using this, we can reach our lambda functions through REST APIs and API gateway will proxy the request to lambda.
- Support for the WebSocket Protocol
- Handle API versioning (v1, v2…)
- Handle different environments (dev, test, prod)
- Handle security (Authentication and Authorization)
- Create API keys
- Rate limiting (throttle requests if too many clients are connecting at once)
- Support to import/export to common API standards like Swagger / Open API
- Transform and validate requests and responses
- Cache API responses
- Generate SDK and API specifications
- Using API Gateway, Lambda and DynamoDB, we can build a serverless CRUD application.

Integration
- Lambda Function
- Invoke Lambda function
- Easy way to expose REST API backed by AWS Lambda
- HTTP
- Expose HTTP endpoints in the backend to leverage features like rate limiting, caching, user authentications, API keys, etc.
- Example: internal HTTP API on premise, Application Load Balancer, etc.
- AWS Service
- Expose any AWS API through the API Gateway to add authentication, deploy publicly, rate control, etc.
- Example: start an AWS Step Function workflow, post a message to SQS, etc.
.png)
- Lambda Function
Endpoint types
API Gateway can be deployed in three ways:
- Edge-Optimized (default)
- For global clients
- Requests are routed through the CloudFront Edge locations (improves latency)
- The API Gateway still lives in only one region but it is accessible efficiently through edge locations.
- Regional
- For clients within the same region
- Could manually combine with your own CloudFront distribution for global deployment but this way you will have more control over the caching strategies and the distribution.
- Private
- Can only be accessed from your VPC using an interface VPC endpoint (ENI)
- Use a resource policy to define access
- Edge-Optimized (default)
Hands on
API Gateway → Create REST API → New API
Actions:
- Add method: add a method at the current route
- Add resource: create a new sub route
- Deploy API: deploy the API for use. Once deployed, invoke URL can be used as the base route.
Security
IAM Permissions
- Create an IAM policy authorization and attach to User / Role to allow it to call an API
- API Gateway verifies IAM permissions passed by the calling application
- Good to provide access within your own infrastructure (users or roles within your account)
- Leverages “Sig v4” capability where lAM credential are in headers. If the IAM policy check passes, the API gateway will call the backend.

Untitled
Lambda Authorizer (formerly Custom Authorizer)
- Uses AWS Lambda to validate the token being passed in the header and return an lAM policy to determine if the user should be allowed to access the resource.
- Option to cache result of authentication, so the authorizer lambda will not be called repeatedly for the same client.
- Helps to use OAuth / SAML / 3rd party type of authentication

Untitled
Cognito User Pools
- Cognito fully manages user lifecycle
- You manage your own user pool (can be backed by FB, Google, etc.)
- API gateway verifies identity automatically from AWS Cognito
- No custom implementation (eg. authorization lambda) is required
- Cognito only helps with authentication, not authorization
- Authorization pattern must be implemented in the backend.
- The client (user) first authenticates with Congnito and gets the access token which it passes in the header to API gateway. API gateway validates the token using Cognito and then hits the backend if the token is valid.

.png)
Step Function
.png)
Cognito
Amazon Cognito lets you add user sign-up, sign-in, and access control to your web and mobile apps quickly and easily. Amazon Cognito scales to millions of users and supports sign-in with social identity providers, such as Apple, Facebook, Google, and Amazon, and enterprise identity providers via SAML 2.0 and OpenID Connect.
It is used when we want to give our users an identity so that they can interact with our application.
Cognito User Pools (CUP):
- It is an identity provider (provides sign in functionality for app users)
- Serverless database of user for your mobile apps
- Simple login: Username (or email) / password combination
- Possibility to verify emails / phone numbers and add MFA
- Can enable Federated Identities allowing users to authenticate via third party identity provider like Facebook, Google, SAML, etc.
- Sends back a JSON Web Tokens (JWT) which is used to verify the identity of the user.
- Can be integrated with API Gateway for authentication

Untitled
Cognito Identity Pools (Federated Identity):
- Provide AWS credentials to users (clients) so they can access AWS resources directly
- Integrate with Cognito User Pools as an identity provider
- Process
- Log in to federated identity provider or remain anonymous. The identity provider will return a token.
- Use this token to authenticate to FIP. The FIP will verify the token.
- Once verified, FIP will get the temporary credentials from STS service and send it to user.
- These credentials come with a pre-defined IAM policy stating their permissions
- Example: provide temporary access to write to an S3 bucket after authenticating the user via FaceBook.
Cognito Sync (deprecated):
- Deprecated (use AWS AppSync now)
- Store user preferences, configuration, state of app
- Cross device synchronization (any platform iOS, Android, etc.)
- Offline capability (synchronization when back online)
- Requires Federated Identity Pool in Cognito (not User Pool)
- Store data in datasets (up to 1MB)
- Upto 20 datasets to synchronize
Serverless Application Model (SAM)
- Framework for developing and deploying serverless applications
- All the configuration is YAML code
- Lambda Functions
- DynamoDB tables
- API Gateway
- Cognito User Pools
- SAM can help you to run Lambda, API Gateway, DynamoDB locally for development and debugging
- SAM can use CodeDeploy to deploy Lambda functions
Section 21: Serverless Solution Architecture Discussions
Section 21: Serverless Solution Architecture Discussions
ToDo List App
- Requirements
- Expose as REST API with HTTPS
- Serverless architecture
- Users should be able to directly interact with their own folder in S3
- Users should authenticate through a managed serverless service
- Users can write and read to-dos, but they mostly read them
- The database should scale, and have some high read throughput
- REST API Layer
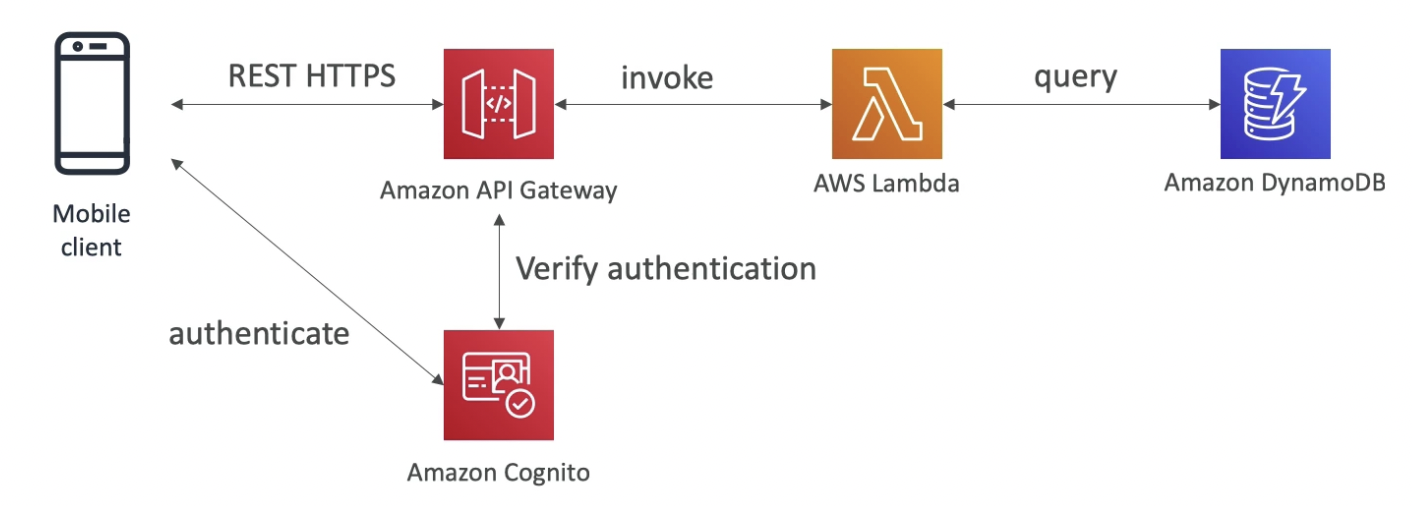
- Giving users access to a folder in S3
Cognito Identity Pool can be used to get temporary credentials after authenticating using CUP.
Pre-signed URL isn’t used since we need to provide access to the bucket and not an object.

- Improving read throughputs
We can implement a DAX layer to cache DynamoDB queries.
Caching can also be implemented as the API gateway level if the read responses don’t change much.

- Requirements
Blogging Website
- Requirements
- This website should scale globally
- Blogs are rarely written, but often read
- Some of the website is purely static files, the rest is a dynamic REST API (public)
- Caching must be implement where possible
- Any new users that subscribes should receive a welcome email
- Any photo uploaded to the blog should have a thumbnail generated
- Serve content globally
CF will distribute the content globally.
Using OAI, S3 bucket policy will only allow CF to access the data in S3. Client’s cannot connect to S3 directly.
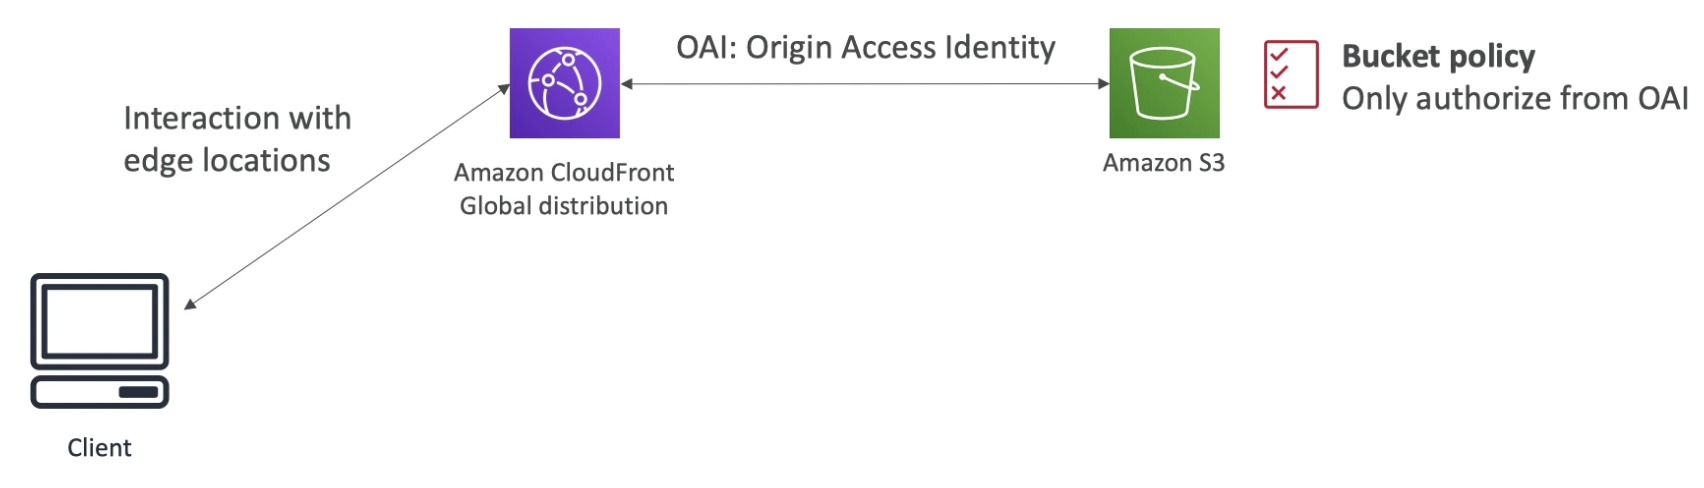
- REST APIs
Since the website will be accessed globally, use DynamoDB global tables.
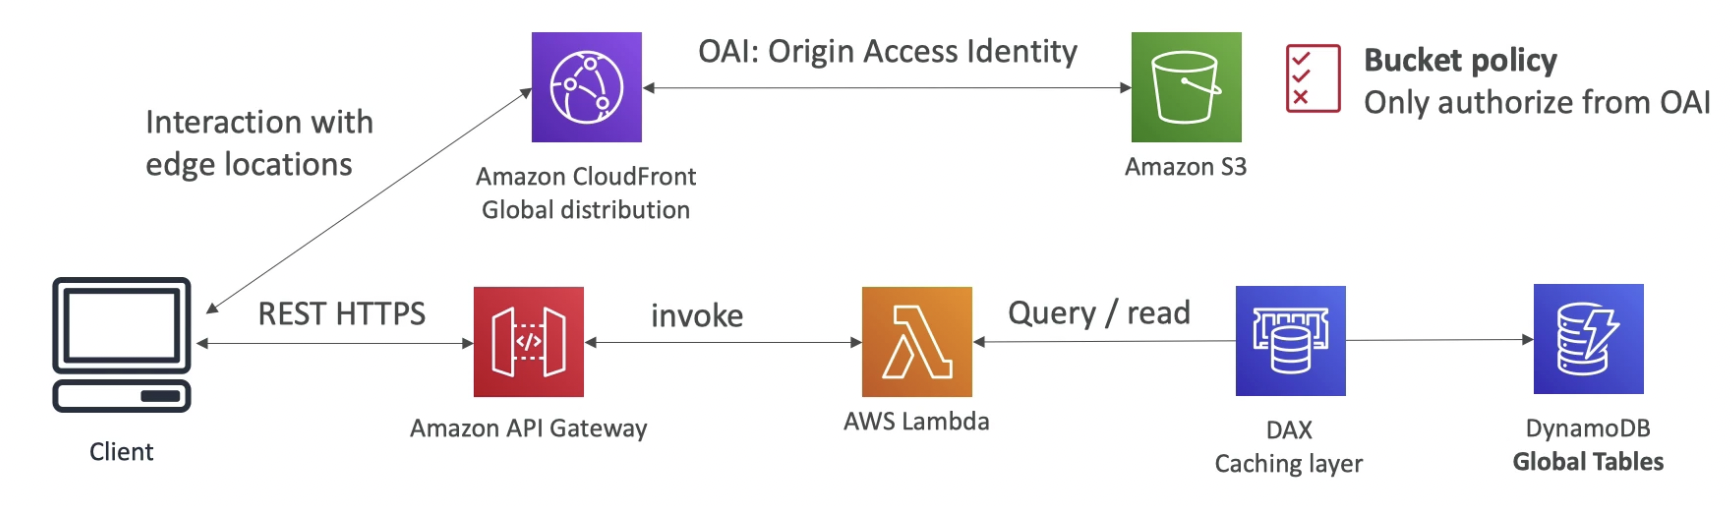
- Welcome email
Use DynamoDB streams to capture item insertion events to invoke a lambda which uses SDK to send emails using Simple Email Service.
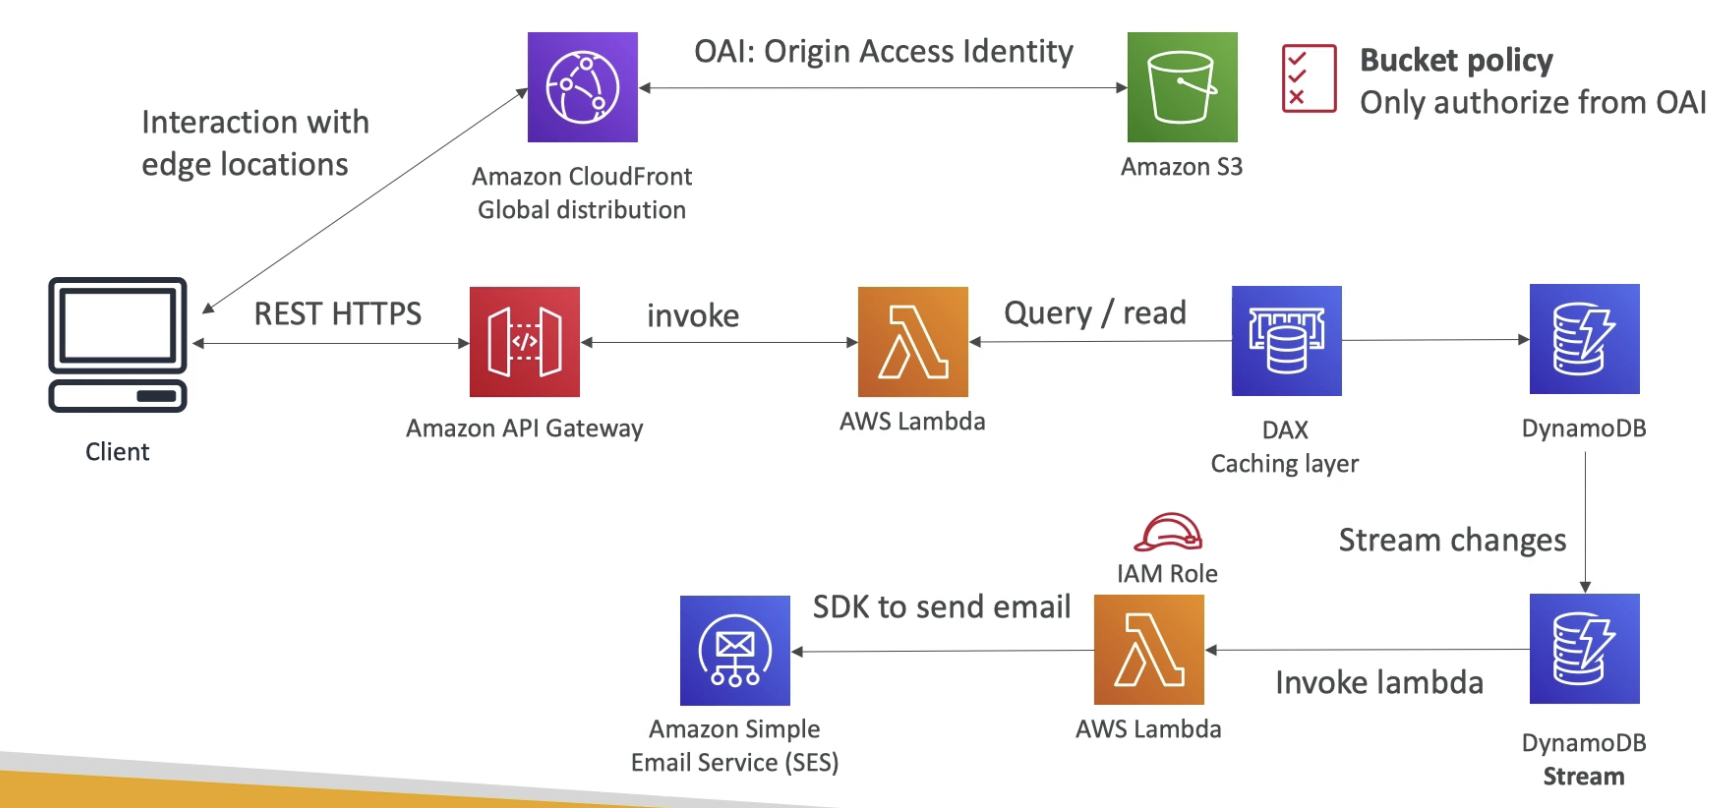
- Thumbnail Generation
User can upload images directly to S3 or through CF (transfer acceleration).

- Requirements
Micro-services Architecture
- Many services interact with each other directly using a REST API
- The architecture for each micro service may vary in form and shape
- Micro-service architecture allows us to have a leaner development lifecycle for each service
.png)
- Each service can scale independently of each other
- Each service has a separate code repository
- Communication between services:
- Synchronous patterns: API Gateway, Load Balancers
- Asynchronous patterns: SQS, Kinesis, SNS
- Challenges with micro-services:
- Repeated overhead for creating each new microservice
- Issues with optimizing server density/utilization
- Complexity of running multiple versions of multiple microservices simultaneously
- Proliferation of client-side code requirements to integrate with many separate services.
- Some of the challenges are solved by Serverless patterns:
- API Gateway, Lambda scale automatically and you pay per usage
- You can easily clone API, reproduce environments
- Generated client SDK through Swagger integration for the API Gateway
Software updates distribution
- Requirements
- We have an application running on EC2, that distributes software updates once in a while
- When a new software update is out, we get a lot of request and the content is distributed in mass over the network. It’s very costly
- We don’t want to change our application, but want to optimize our cost and CPU
- Current state of application
ALB along with EC2 instances in multi AZ with ASG attached for scaling. EFS volume is mounted to each instance as a network storage.
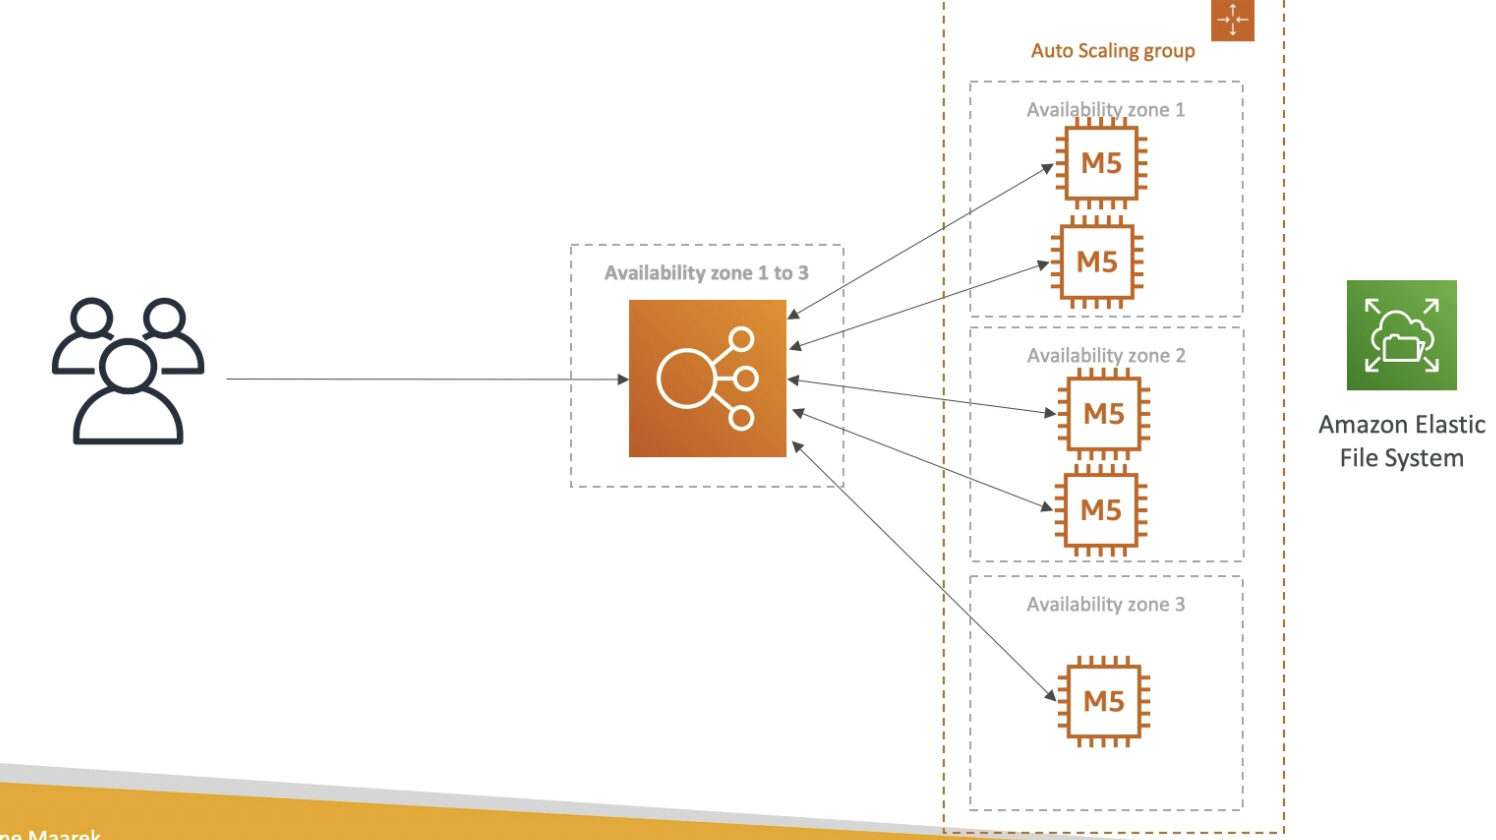
- Optimized solution
Just add CF as the CDN. It will cache the static updates at the edge and will save a lot of cost. Even though the EC2 instances are not serverless, cloudFront is, and will scale for us. Our ASG will not scale as much, and we’ll save tremendously in EC2 costs. We’ll also save in availability, network bandwidth cost, etc.
CF is such an easy way to make an existing application more scalable and cheaper!
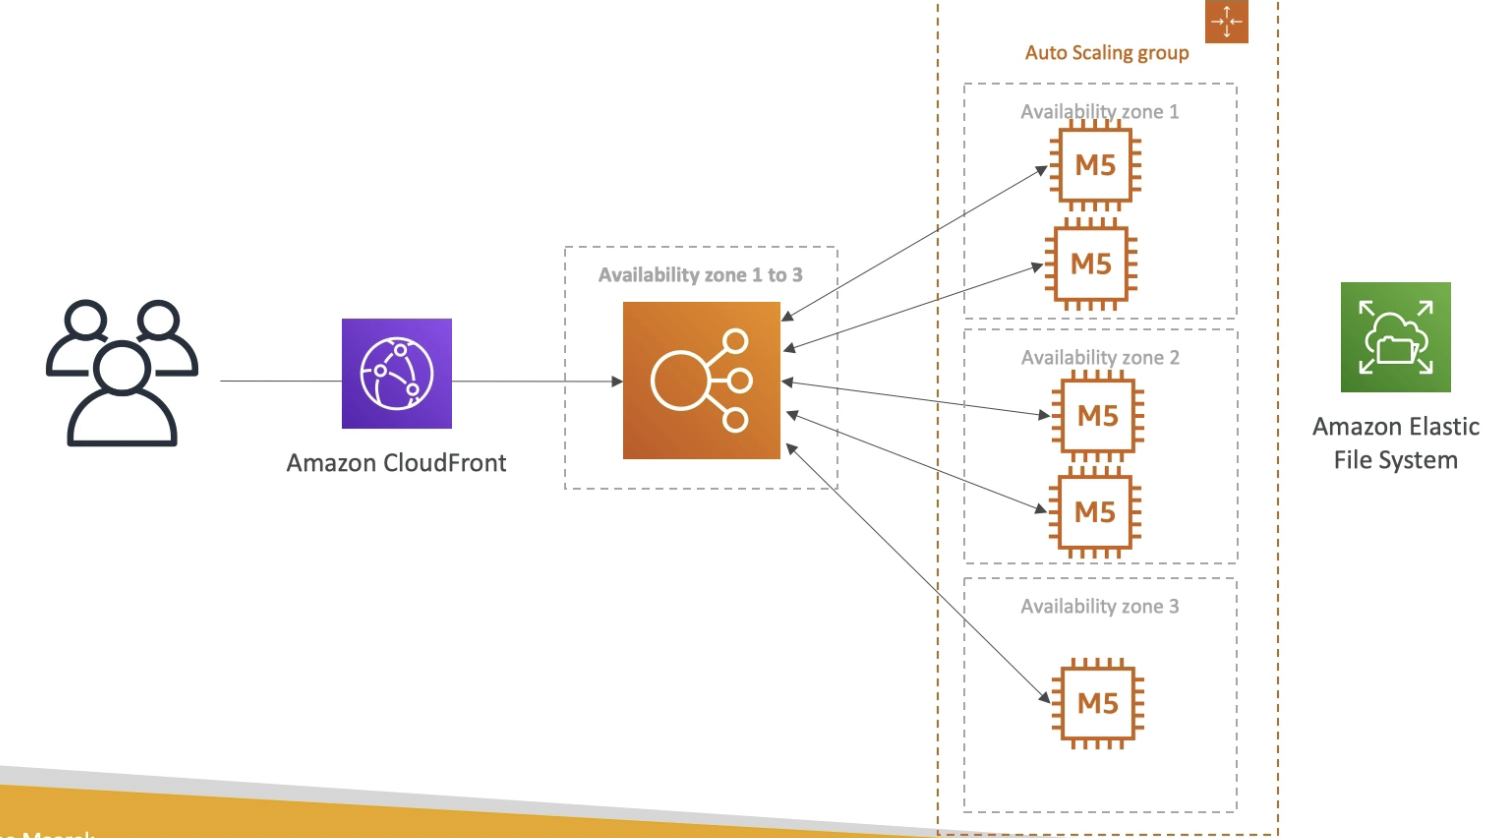
- Requirements
Premium video downloading website
- Requirements
- We sell videos online and users have to pay to buy videos
- Each video can be bought by many different customers
- We only want to distribute videos to users who are premium users
- We have a database of premium users
- Links we send to premium users should be short lived
- Our application is global
- We want to be fully serverless
- Premium Service
Since the user must login to view premium videos, we can use Cognito for authentication. If the user is authenticated, API gateway will send the login info to Lambda which can query the DynamoDB to check whether the authenticated user is premium or not.

- Distribute paid content to premium users
We need to use another API endpoint to get signed URL from CloudFront. The API gateway after verifying the authentication of the client using Cognito, will invoke a lambda function that will query the DB to check if the user is premium. If so, it will use SDK to generate CF pre-signed URL and return it to client. The client will use the signed URL to access paid content via CF.
We are not using S3 signed URL as they are not optimized for global access.
💡 CloudFront signed URLs also have IP restriction security.

- Requirements
Data ingestion pipeline
- Requirements
- We want the ingestion pipeline to be fully serverless
- We want to collect data in real time
- We want to transform the data
- We want to query the transformed data using SQL
- The reports created using the queries should be in S3
- We want to load that data into a warehouse and create dashboards
- Solution
In the example below, data is published by IoT devices. The data go to KDS and then into KDF with a lambda for transformation. KDF writes data into S3 in batches. S3 notifications invoke a lambda that triggers Athena to query the transformed data and store the query results in another S3 bucket for further analysis.
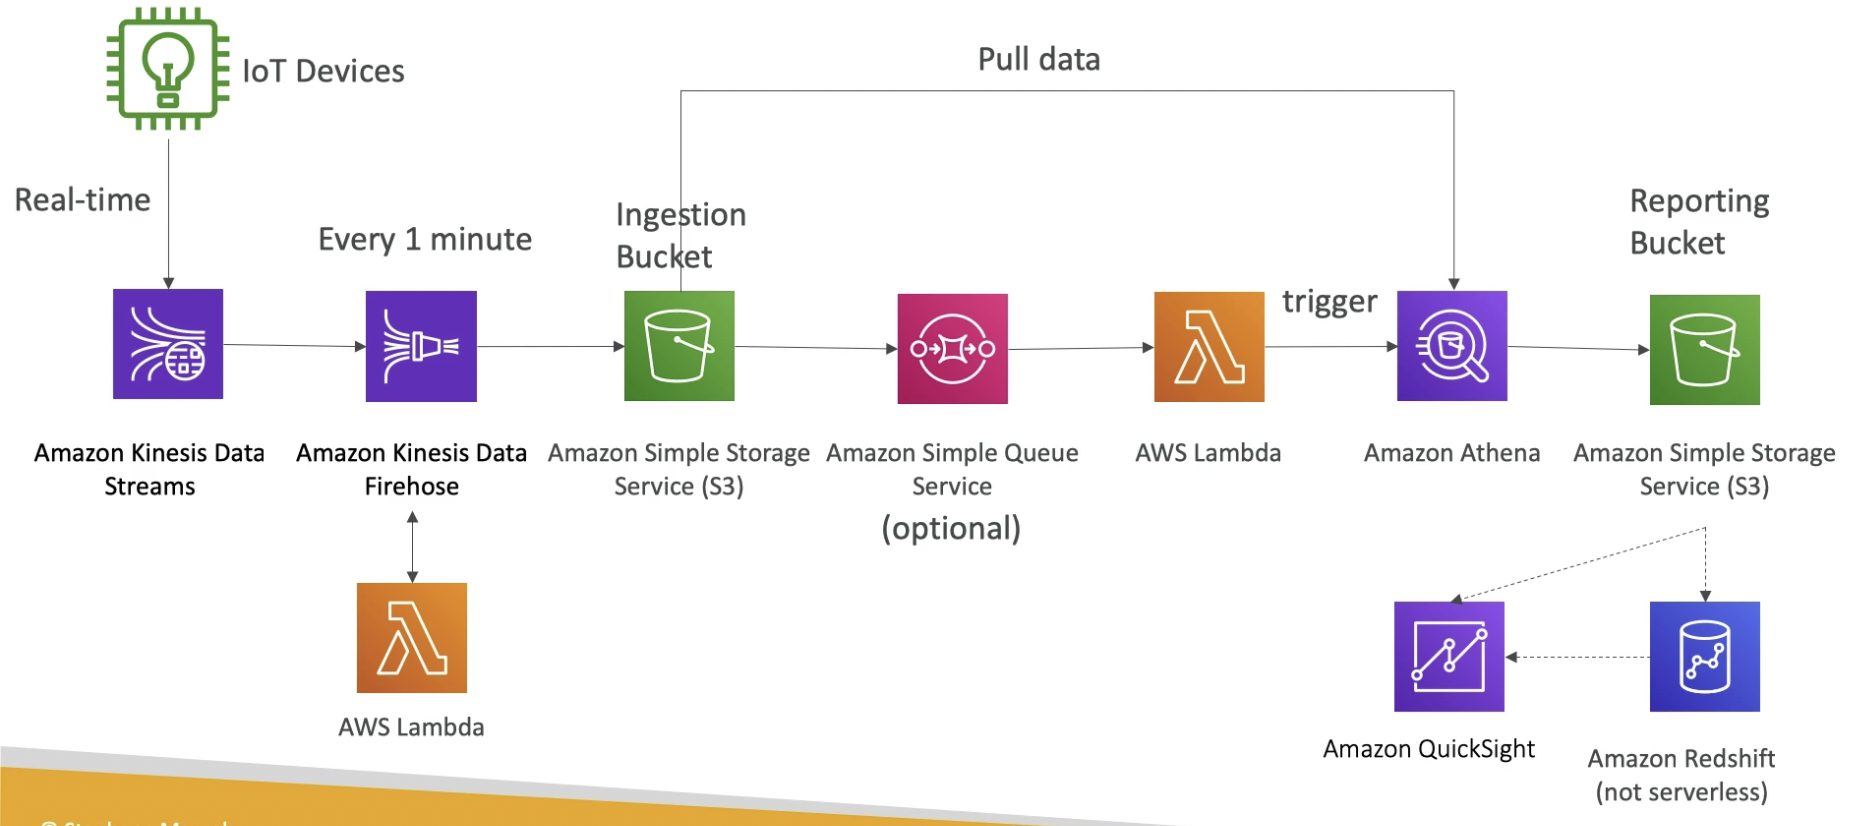
- Requirements
Section 22: Database in AWS
Section 22: Database in AWS
Intro
.png)
.png)
RDS
.png)
Aurora
.png)
ElastiCache
.png)
DynamoDB
.png)
S3
.png)
DocumentDB
.png)
Neptune
.png)
Keyspaces for Apache Cassandra
.png)
QLDB
.png)
Timestream
.png)
.png)
Section 23: Data & Analytics
Section 23: Data & Analytics
Athena
.png)
.png)
.png)
RedShift
.png)
.png)
.png)
.png)
.png)
OpenSearch
.png)
.png)
.png)
EMR
.png)
.png)
QuickSight
.png)
.png)
.png)
AWS Glue
.png)
.png)
.png)
.png)
Lake Formation
.png)
.png)
.png)
KDA
Kinesis Data Analytics for SQL
- Perform real-time analytics on Kinesis Streams using SQL
- Fully managed, no servers to provision
- Automatic scaling
- Real-time analytics
- Pay for actual consumption rate (data processed)
- Output:
- Kinesis Data Stream
- Kinesis Data Firehose
- Can create streams out of the real-time queries
- Use cases:
- Time-series analytics
- Real-time dashboards
- Real-time metrics

Kinesis Data Analytics for Apache Flink
.png)
MSK
.png)
.png)
.png)
.png)
Big Data Ingestion Pipeline
.png)
.png)
.png)
Section 24: Machine Learning
Section 24: Machine Learning
Rekognition
.png)
.png)
Transcribe
.png)
Polly
.png)
.png)
Translate
.png)
Lex + Connect
.png)
Comprehend
.png)
Comprehend Medical
.png)
SageMaker
.png)
Forecast
.png)
Kendra
.png)
Personalize
.png)
Textract
.png)
ML Summary
.png)
/ima
Section 25: AWS Monitoring & Audit: CloudWatch, CloudTrail & Config
Section 25: AWS Monitoring & Audit: CloudWatch, CloudTrail & Config
CloudWatch
Metrics
Intro
- CloudWatch provides metrics for every service in AWS
- Metric is a variable to monitor (CPUUtilization, etc.)
- Metrics are segregated by namespaces (which AWS service they monitor)
- Dimension is an attribute of a metric (instance id, environment, etc.)
- Up to 10 dimensions per metric
- Metrics have timestamps
- We can create CloudWatch dashboards of metrics
EC2 Monitoring
- EC2 instance metrics have metrics “every 5 minutes”
- With detailed monitoring (for a cost), you get a data “every 1 minute”
- Use detailed monitoring if you want to react faster to changes (eg. scale faster for your ASG)
- The AWS Free Tier allows us to have 10 detailed monitoring metrics
- Note: EC2 Memory usage is by default not pushed (must be pushed from inside the instance as a custom metric)
Custom Metrics
- Possibility to define and send your own custom metrics to CloudWatch
- We can create a custom namespace with custom dimensions (attributes) to segment metrics (eg. instanceId, environmentName, etc.)
- Example: memory (RAM) usage, disk space, number of logged in users
- Use API call PutMetricData to send metrics data to CloudWatch
- Metric resolution (StorageResolution API parameter) - frequency of sending metric data:
- Standard: 1 minute (60 seconds)
- High Resolution: 1/5/10/30 second(s) - higher cost
- Accepts metric data points two weeks in the past and two hours in the future (make sure to configure your EC2 instance time correctly)
Logs
Intro
- Used to store generated logs in our application
- Regional service
- Log groups: arbitrary name, usually representing an application
- Log stream: instances within application / log files / containers
- Can define log expiration policies (never expire, 30 days, etc..)
- CloudWatch Logs can send logs to:
- Amazon S3 (exports)
- Kinesis Data Streams
- Kinesis Data Firehose
- AWS Lambda
- ElasticSearch
- Logs can be written using SDK, CloudWatch Logs Agent, CloudWatch Unified Agent (deprecated)
- These services automatically log data in CloudWatch logs:
- Elastic Beanstalk: collection of logs from application
- ECS: collection from containers
- AWS Lambda: collection from function logs
- VPC Flow Logs: VPC specific logs
- API Gateway
- CloudTrail based on filter
- Route53: Log DNS queries
- CloudWatch Logs have metric filters which can be used to filter expressions and use the count to trigger CloudWatch alarms. Example filters:
- find a specific IP inside of a log
- count occurrences of “ERROR” in your logs
- Cloud Watch Logs Insights can be used to query logs and add queries to CloudWatch Dashboards
S3 Export
- Log data can take up to 12 hours to become available for export (not near-real time or real-time)
- The API call is CreateExportTask
- If you want to stream logs from CloudWatch, use Logs Subscriptions instead
Logs Subscriptions
- S3 export is non real-time
- To stream logs, we can apply a subscription filter on logs and then send them to various services in real time.
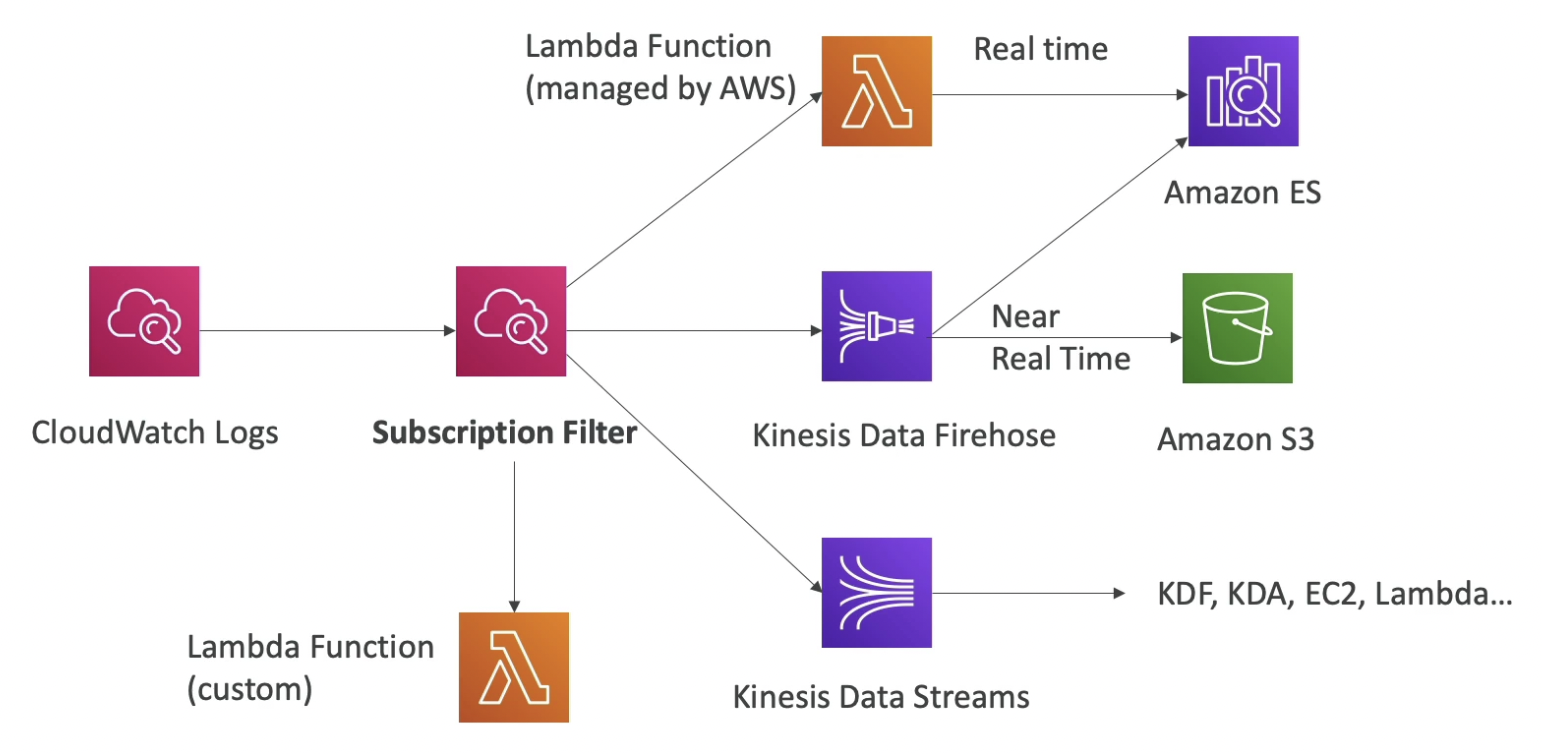
Logs Aggregation (multi-account & multi-region)
Logs from multiple accounts and regions can be aggregated using logs subscription.

CloudWatch Unified Agent & CloudWatch Logs Agent
- By default, no logs from your EC2 machine will go to CloudWatch
- You need to run a CloudWatch agent on EC2 to push the log files
- Make sure lAM permissions allow the instance to push logs to CloudWatch
- The Cloud Watch logs agent can be setup on-premises too
- Both are used to send logs for virtual servers (EC2 instances, on-premise servers, etc.)
- CloudWatch Logs Agent
- Old version
- Can only send logs to CloudWatch
- Cloud Watch Unified Agent
- Can send logs & additional system-level metrics such as:
- CPU (active, guest, idle, system, user, steal)
- Disk metrics (free, used, total), Disk IO (writes, reads, bytes, iops)
- RAM (free, inactive, used, total, cached)
- Netstat (number of TCP and UDP connections, net packets, bytes)
- Processes (total, dead, bloqued, idle, running, sleep)
- Swap Space (free, used, used %)
- Centralized configuration using SSM Parameter Store
- Can send logs & additional system-level metrics such as:
Alarms
Intro
- Alarms are used to trigger notifications for any metric
- Various options to trigger alarm (sampling, %, max, min, etc.)
- Alarm States:
- OK
- INSUFFICIENT_DATA
- ALARM
- Period:
- Length of time in seconds to evaluate the metric before triggering the alarm
- High resolution custom metrics: 10 sec, 30 sec or multiples of 60 sec
- Targets:
- Stop, Terminate, Reboot, or Recover an EC2 Instance
- Trigger Auto Scaling Action (ASG)
- Send notification to SNS (from which you can do pretty much anything)
- Alarms can be created based on Cloud Watch Logs Metrics Filters
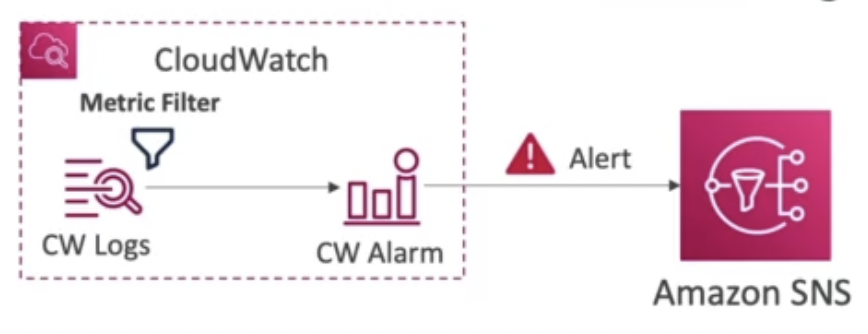
- To test alarms and notifications, set the alarm state to Alarm using CLI
aws cloudwatch set-alarm-state --alarm-name "myalarm" --state-value ALARM --state-reason "testing purposes"
EC2 Instance Recovery using CloudWatch Alarms
EC2 Status Checks:
- Instance status - check the EC2 VM
- System status - check the underlying hardware
If either of the two status checks fail, the EC2 instance is down. At this time, CW alarm will be triggered which will perform instance recovery.
During recovery, the private IP, public IP, elastic IP, metadata and placement group of the instance is preserved.
The alarm can also write to an SNS topic, signifying that the EC2 instance is being recovered.

Hands on
- Launch an EC2 instance
- Create a CloudWatch alarm for max CPU utilization
CloudWatch → Alarms → Create alarm
Namespace: EC2
Metrics: paste the EC2 instance ID → If the metric CPU Utilization doesn’t appear, wait for some time → Once appeared, select the metric
Configure the metric

If the CPU Utilization is greater than 95% for 3 data points (separated by 5 mins), trigger the alarm.
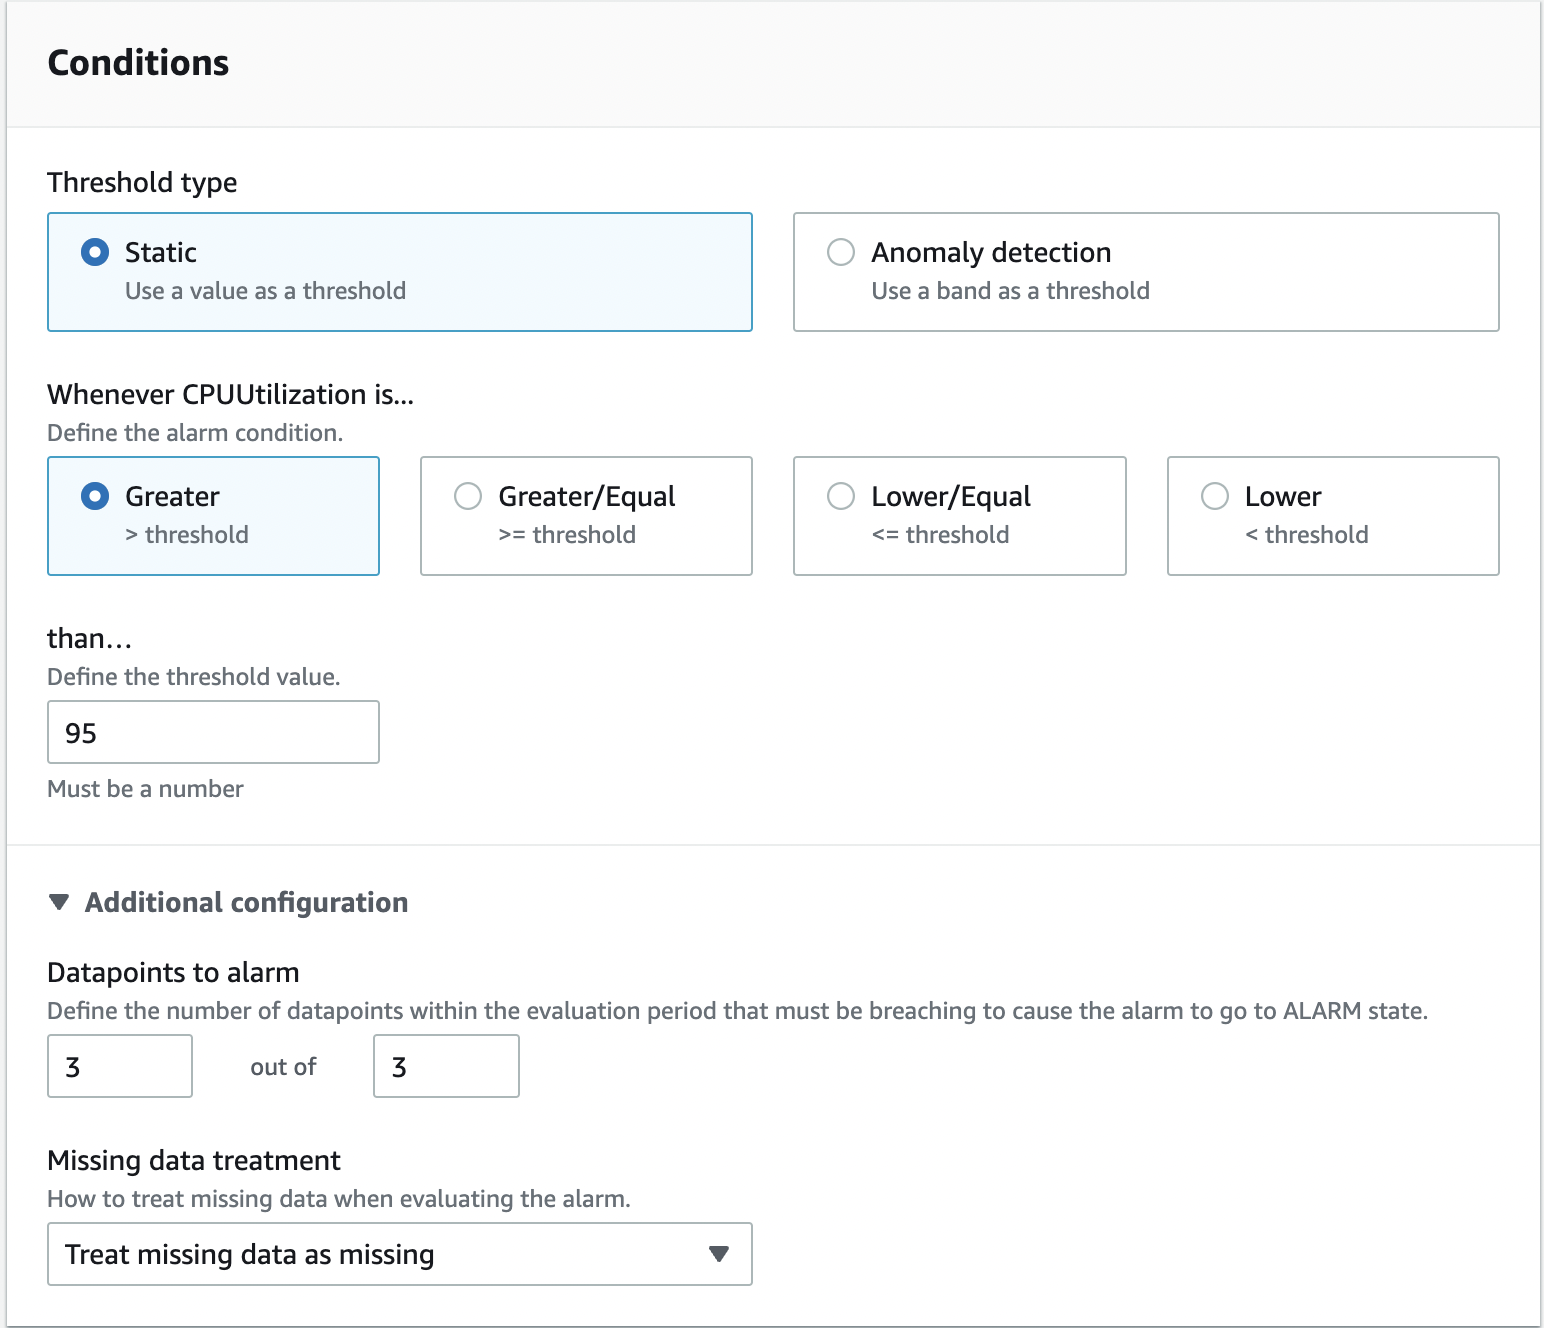
Action will be to stop the EC2 instance.
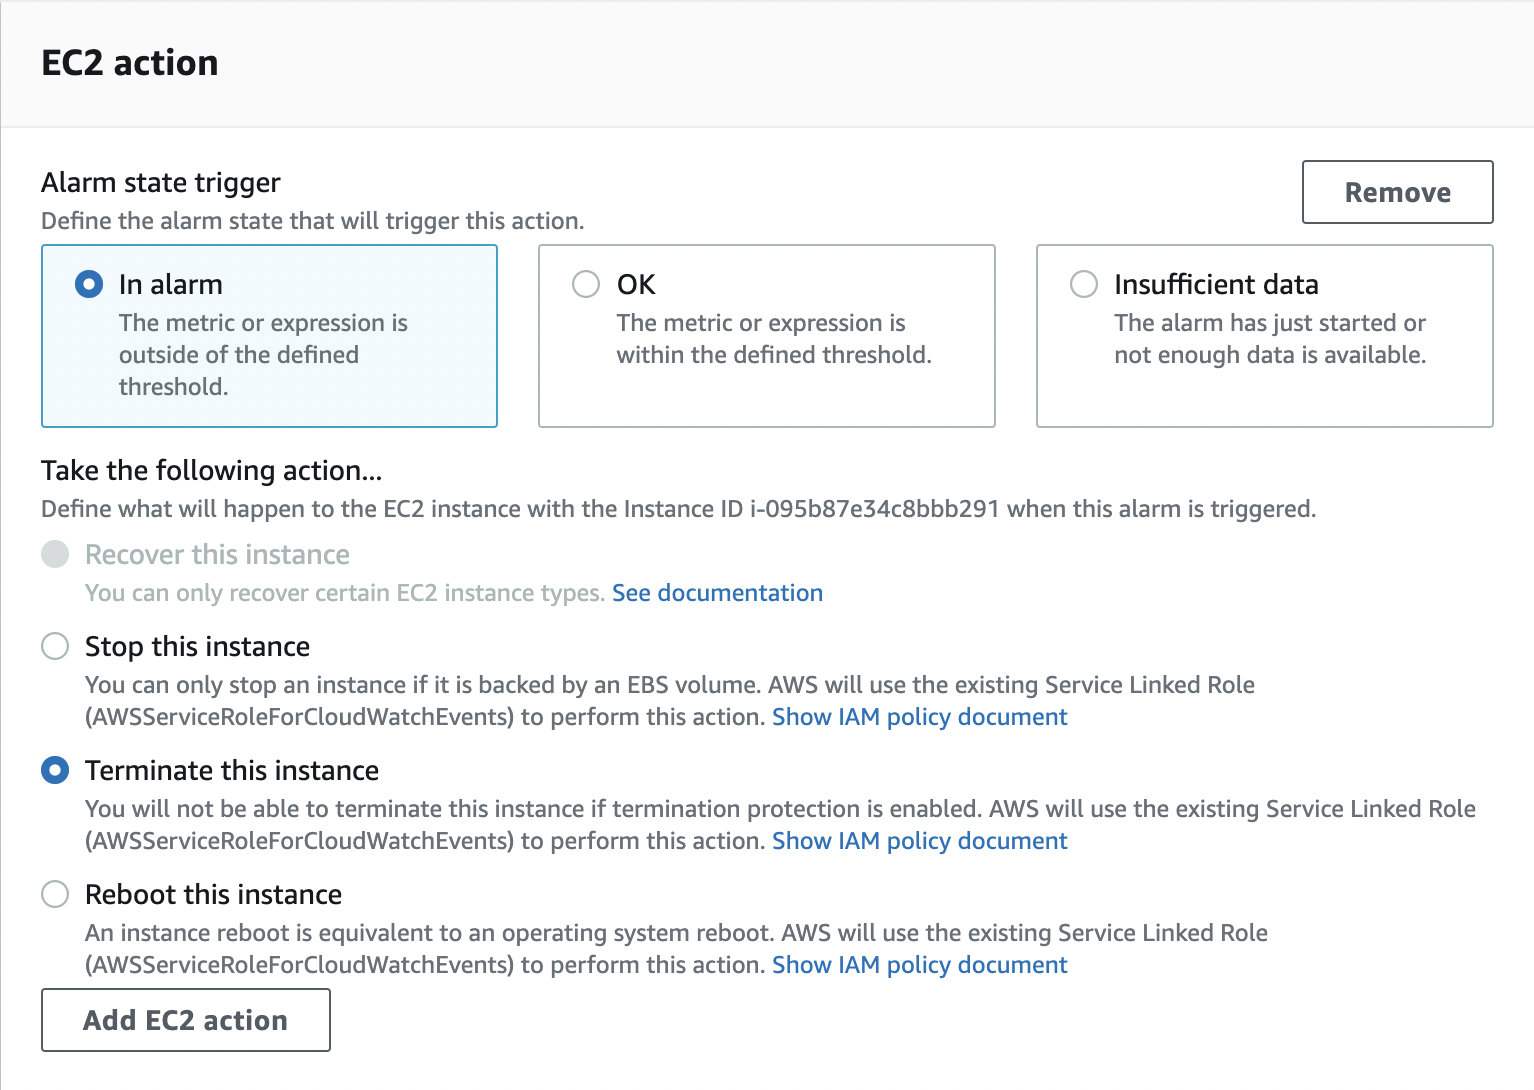
- Set the alarm state to ALARM using AWS CloudShell to trigger the alarm
aws cloudwatch set-alarm-state --alarm-name TerminateEc2OnCpuLoad --state-value ALARM --state-reason testing
Dashboards
- Great way to setup custom dashboards for quick access to key metrics and alarms
- Dashboards are global
- Dashboards can include graphs from different AWS accounts and regions
- You can change the time zone & time range of the dashboards
- You can setup automatic refresh (10s, 1 m, 2m, 5m, 15m)
- Dashboards can be shared with people who don’t have an AWS account (public, email address, 3rd party SSO provider through Amazon Cognito)
- Pricing: 3 dashboards (up to 50 metrics) for free, $3/dashboard/month afterwards
- To create a dashboard: CloudWatch → Dashboards → Create For each graph you add to the dashboard, you can choose the region, service and metric.
new →
Events (now EventBridge)
- Event Pattern: Intercept events from AWS services (Sources)
- Example sources: EC2 Instance Start, CodeBuild Failure, S3, Trusted Advisor
- Can intercept any API call with Cloud Trail integration
- Schedule or Cron to create events on a schedule (example: create an event every 4 hours)
- A JSON payload is created from the event and passed to a target which could be
- Compute: Lambda, Batch, ECS task
- Integration: SQS, SNS, Kinesis Data Streams, Kinesis Data Firehose
- Orchestration: Step Functions, CodePipeline, CodeBuild
- Maintenance: SSM, EC2 Actions
- Uses default event bus (custom & partner event buses are not supported)
EventBridge
Intro
.png)
.png)
Schema Registry
.png)
.png)
Resource based policy
.png)
CloudWatch Insights and Operational Visibility
.png)
.png)
.png)
.png)
.png)
CloudTrail
Intro
- Provides governance, compliance and audit for your AWS Account
- CloudTrail is enabled by default
- Get a history of events / API calls made within your AWS account by:
- Console
- SDK
- CLI
- all AWS Services
- Can put logs from CloudTrail into CloudWatch Logs or S3
- A trail can be applied to All Regions (default) or a single Region to accumulate them into a single bucket.
- Use: if a resource is deleted in AWS, investigate CloudTrail first

Event types
Management Events
- Operations that are performed on resources in your AWS account
- Examples
- Configuring security (IAM AttachRolePolicy)
- Configuring rules for routing data (Amazon EC2 CreateSubnet)
- Setting up logging (AWS CloudTrail CreateTrail)
- By default, trails are configured to log management events.
- Can separate Read Events (that don’t modify resources) from Write Events (that may modify resources)
Data Events
- By default, data events are not logged into CloudTrail (because high volume operations)
- Amazon S3 object-level activity (ex: Get0bject, Delete0bject, Put0bject): can separate Read and Write Events
- AWS Lambda function execution activity (the Invoke API)
Insight Events (for CloudTrail Insights)
- Enable CloudTrail Insights to detect unusual activity in your account
- inaccurate resource provisioning
- hitting service limits
- bursts of AWS IAM actions
- gaps in periodic maintenance activity
- CloudTrail Insights analyzes normal management events to create a baseline and then continuously analyzes write events to detect unusual patterns. If that happens, CloudTrail generates insight events that
- show anomalies in the Cloud Trail console
- can can be logged to S3
- can trigger an EventBridge event for automation

- Enable CloudTrail Insights to detect unusual activity in your account
Event Retention
- Events are stored for 90 days in Cloud Trail, after that they are deleted automatically
- To keep events beyond this period, log them to S3 and use Athena to analyze them when needed

.png)
Hands on
- View Events History
Cloudtrail → Dashboard → Event History
- Create a trail to send events to an S3 bucket and CloudWatch logs
CloudTrail → Trails → Create trail
After some time, the events will appear in the S3 bucket and CloudWatch
- View Events History
AWS Config
Intro
- Helps record configurations and changes over time to rollback the infrastructure if required.
- Questions that can be solved by AWS Config:
- Is there unrestricted SSH access to my security groups?
- Do my buckets have any public access?
- How has my ALB configuration changed over time?
- You can receive alerts (SNS notifications) for any changes
- AWS Config is a per-region service
- Can be aggregated across regions and accounts
- Possibility of storing the configuration data into S3 (analyzed by Athena)
- Can use AWS managed config rules (over 75)
- Can make custom config rules (must be defined in AWS Lambda) such as:
- Check if each EBS disk is of type gp2
- Check if each EC2 instance is t2.micro
- Rules can be evaluated / triggered:
- For each config change (ex. configuration of EBS volume is changed, evaluate the rule)
- And / or: at regular time intervals (ex. every 2 hours, evaluate the rule)
- AWS Config Rules are used only to evaluate the compliance of resources over time, does not prevent actions from happening (no deny)
- Pricing: no free tier, $0.003 per configuration item recorded per region, $0.001 per config rule evaluation per region
Applications
Link AWS Config with CloudTrail to get a full picture of the change in configuration and compliance overtime.
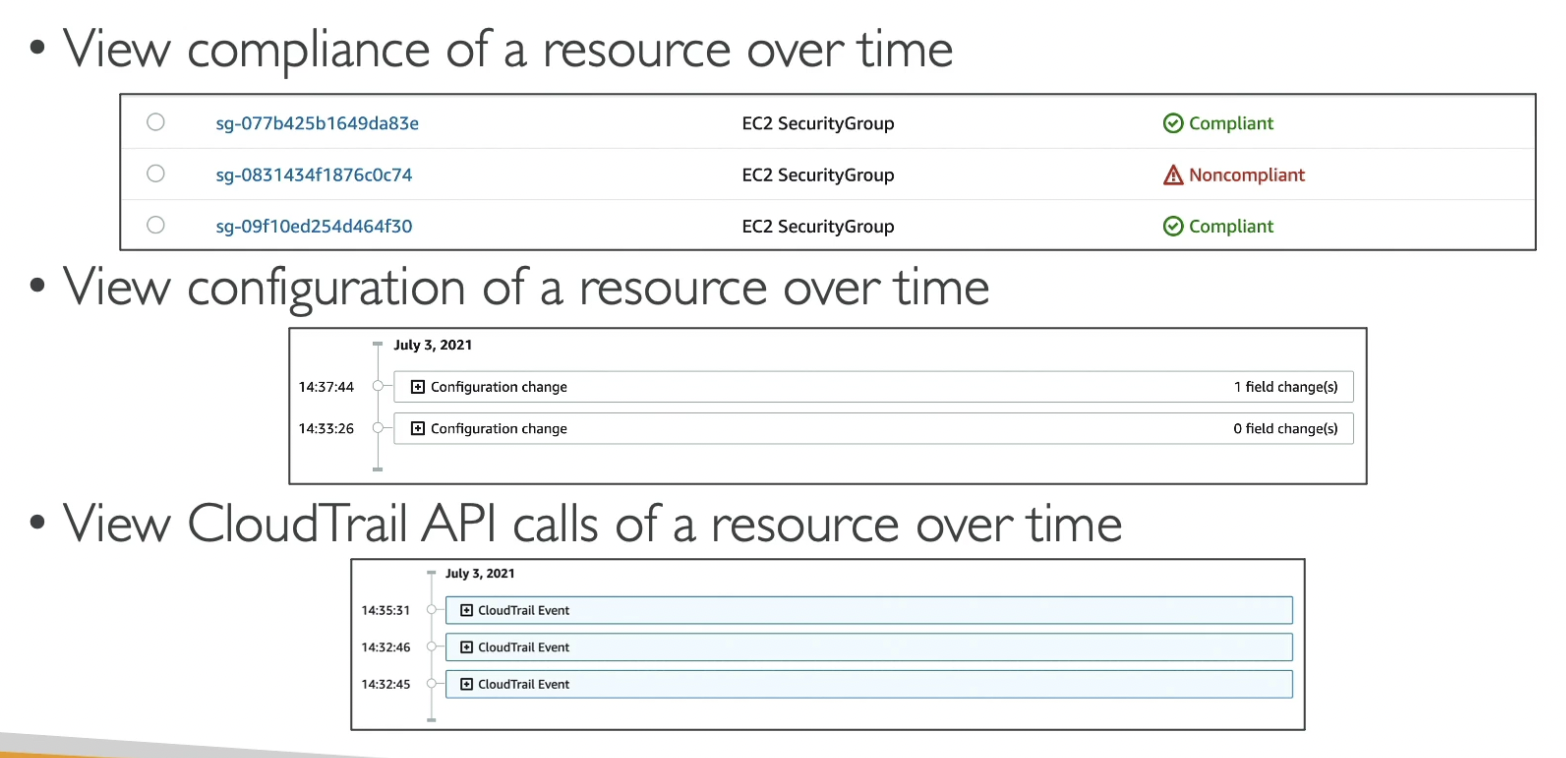
Remediations
- Automate remediation of non-compliant resources using SSM Automation Documents
- Use AWS-Managed Automation Documents or create custom Automation Documents
- Tip: you can create custom Automation Documents that invokes Lambda function to automate something
- You can set Remediation Retries if the resource is still non-compliant after auto remediation
- Ex. if IAM access key expires (non-compliant), trigger an auto-remediation action to revoke unused IAM user credentials.
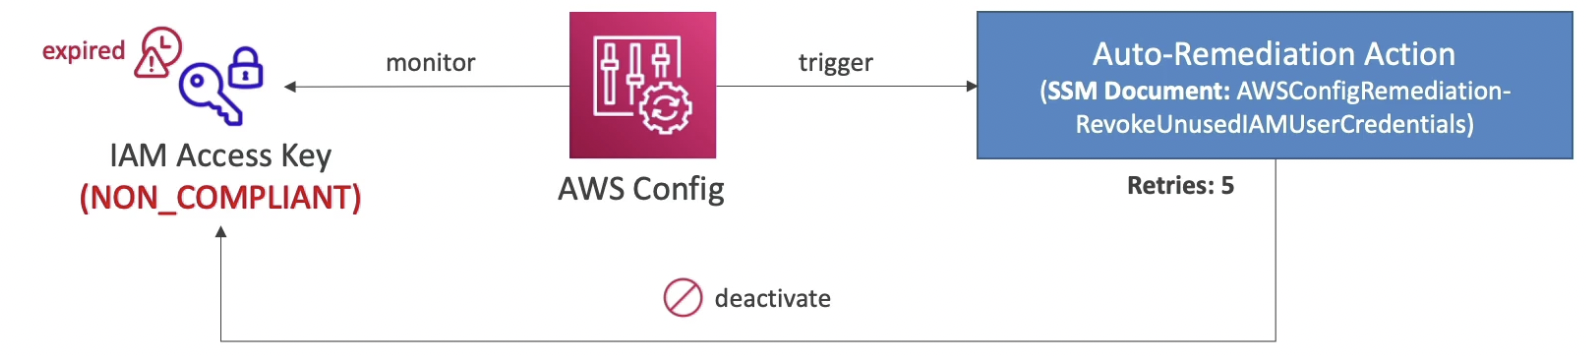
Notifications
- Use EventBridge to trigger notifications when AWS resources are non-compliant

- Ability to send configuration changes and compliance state notifications to SNS (all events or use SNS Filtering or filter at client-side)

- Use EventBridge to trigger notifications when AWS resources are non-compliant
Hands on
Config → Create rules
- We can specify rules that evaluate on resource configuration change to check for things like
- whether or not all the EC2 instances were booted from a specific AMI. If they are not, we can set a remediation policy to terminate those instance.
- whether or not all the security groups restrict HTTP access from the public internet. Those security groups that do are displayed as non-compliant.
- We can specify rules that evaluate on resource configuration change to check for things like
CloudWatch vs CloudTrail vs Config
Theory
- CloudWatch
- Performance monitoring (metrics, CPU, network, etc..) & dashboards
- Events & Alerting
- Log Aggregation & Analysis
- CloudTrail
- Record API calls made within your Account by everyone
- Can define trails for specific resources
- Global Service
- Config
- Record configuration changes
- Evaluate resources against compliance rules
- Get timeline of changes and compliance
- CloudWatch
ELB example
- CloudWatch:
- Monitoring Incoming connections metric
- Visualize error codes as % over time
- Make a dashboard to get an idea of your load balancer performance
- CloudTrail:
- Track who made any changes to the Load Balancer with API calls
- Config:
- Track security group rules for the Load Balancer
- Track configuration changes for the Load Balancer
- Ensure an SSL certificate is always assigned to the Load Balancer (compliance)
- CloudWatch:
Section 26: Identity and Access Management (IAM) - Advanced
Section 26: Identity and Access Management (IAM) - Advanced
AWS Organizations
Intro
- Global service
- Allows to manage multiple AWS accounts
- The main account is the master account, you can’t change it
- Other accounts are member accounts
- Member accounts can only be part of one organization
- Consolidated Billing across all accounts - single payment method
- Pricing benefits from aggregated usage (volume discount for EC2, S3, etc.)
- API is available to automate AWS account creation (on demand account creation)
Multi-account strategies
- Create accounts:
- per department
- per cost center
- per env (dev / test / prod)
- based on regulatory restrictions (using SCP)
- for better resource isolation (ex: VPC so that resources in different accounts can’t talk to one another)
- to have separate per-account service limits
- for isolated account for logging
- Use tagging standards for billing purposes
- Enable CloudTrail on all accounts, send logs to central S3 account
- Send CloudWatch Logs to central logging account
- Establish Cross Account Roles for Admin purposes where the master account can assume an admin role in any of the children accounts
- Create accounts:
Organizational Units (OU)
- We organize all the accounts using OUs.

- Can nest OUs inside other OUs.
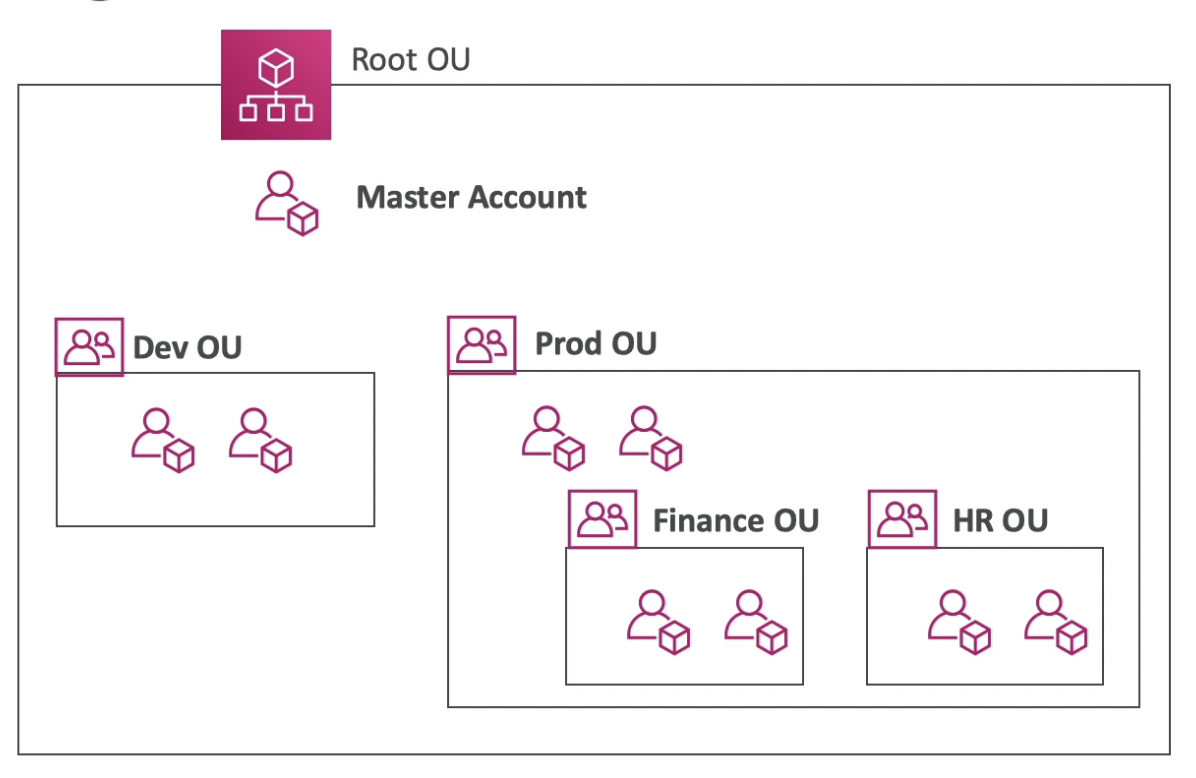
- We organize all the accounts using OUs.
Service Control Policies (SCP)
Intro
- Whitelist or blacklist IAM actions applied at the OU or Account level
- Does not apply to the Master Account
- SCP is applied to all the Users and Roles of the Account, including root user. So, if something is restricted for that account, even the root user of that account won’t be able to do it.
- The SCP does not affect service-linked roles (service-linked roles enable other AWS services to integrate with AWS Organizations and can’t be restricted by SCPs)
- SCP must have an explicit Allow (does not allow anything by default)
- Use cases:
- Restrict access to certain services (for example: can’t use EMR)
- Enforce PCI compliance by explicitly disabling services
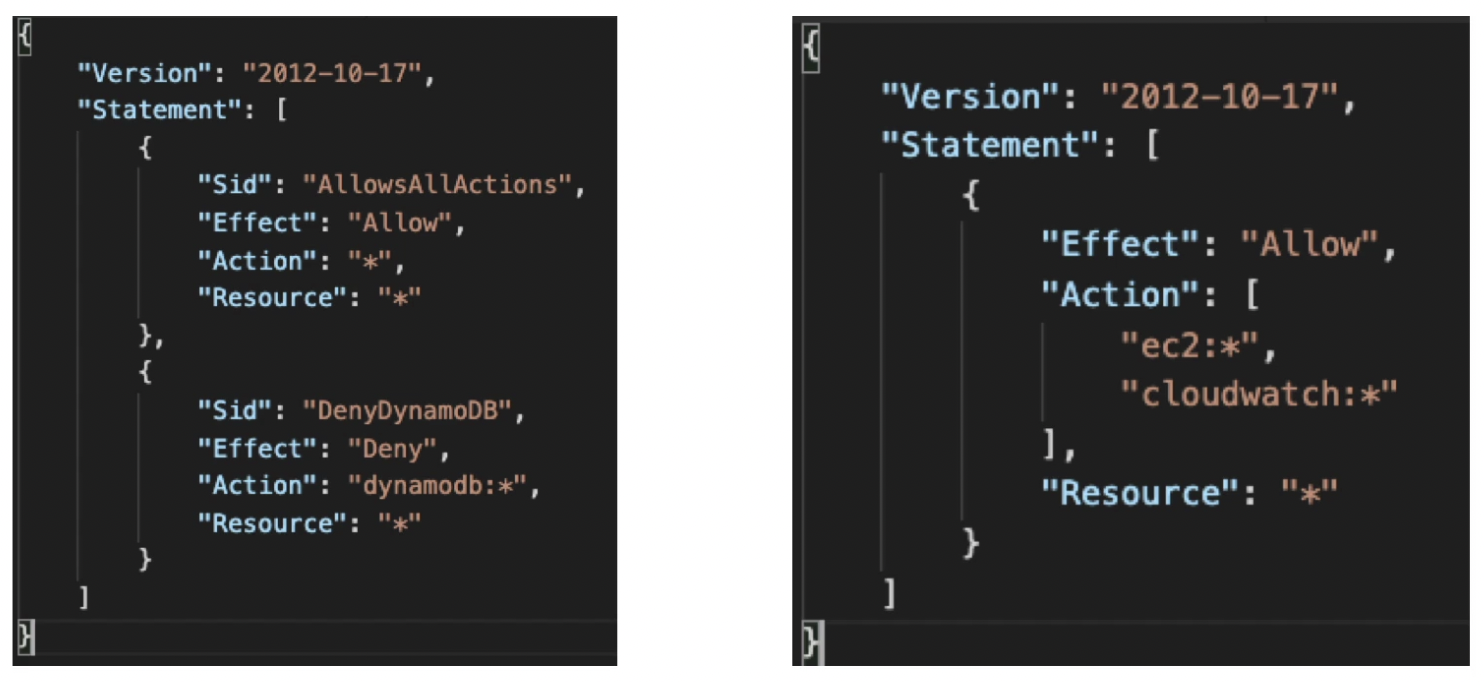
Example
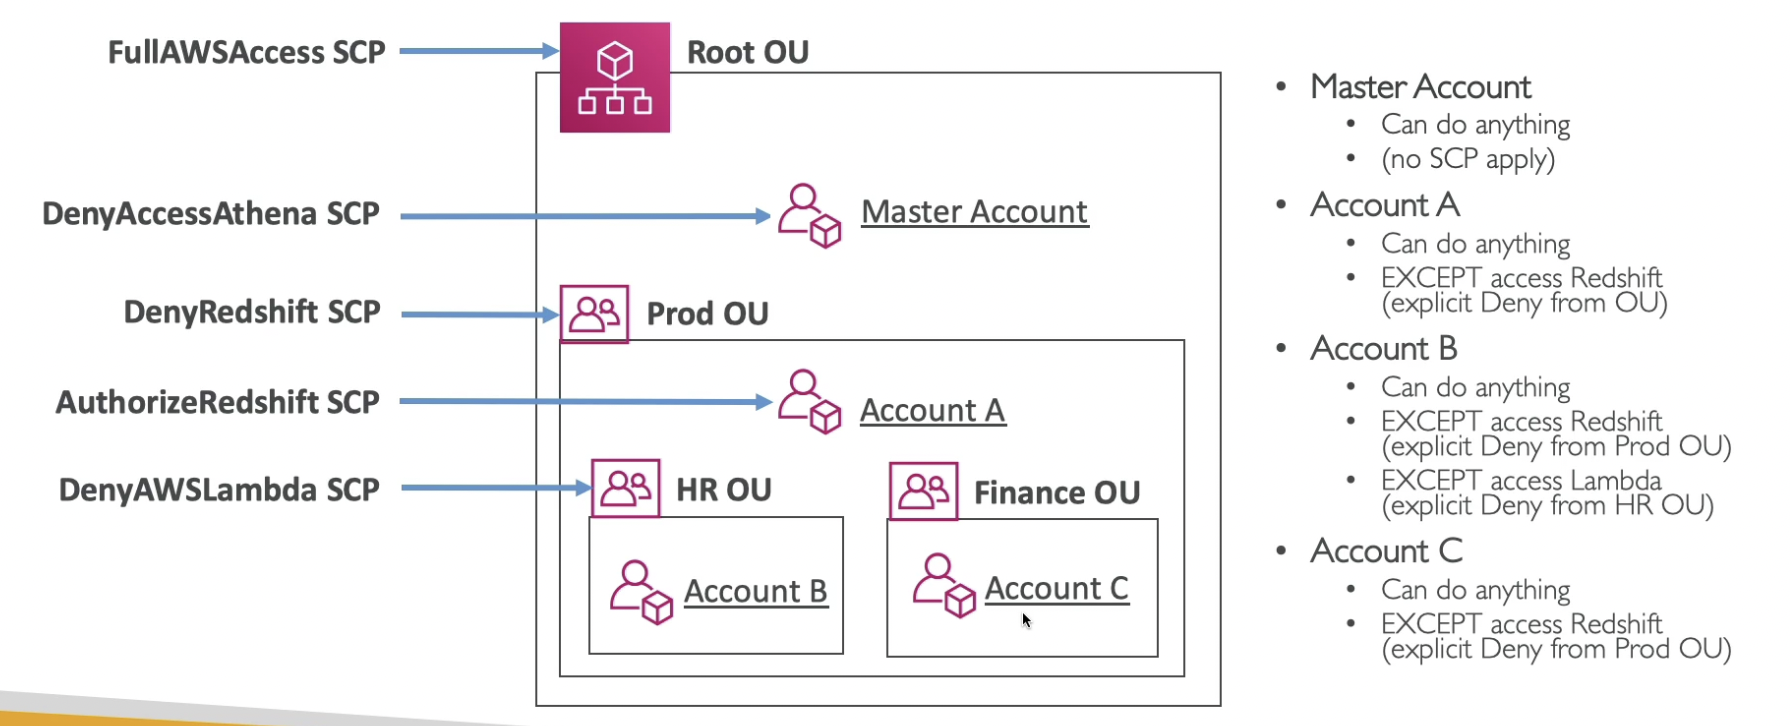
- The Root OU explicitly allows full AWS access, that’s why every account can access anything except the explicit denies.
- Master account will inherit the FullAWSAccess SCP from Root OU. Since, it is the master account, no SCP applies explicitly to it. So, DenyAccessAthena won’t apply to master account.
- “Deny” takes precedence over “Allow”. So, even though Account A has Redshift authorized, the explicit deny from Prod OU will take precedence.
Migrating accounts between organizations
- To migrate accounts from one organization to another
- Remove the member account from the old organization
- Send an invite to the member account from the new organization
- Accept the invite to the new organization from the member account
- To migrate the master account
- Remove the member accounts from the organizations using procedure above
- Delete the old organization
- Repeat the process above to invite the old master account to the new org
- To migrate accounts from one organization to another
Hands on
- Accounts
OUs are like folders in which you can place accounts (files).
Management account is the master account (default in the organization).

Untitled
- Policies
We can create Service Control Policies and attach them to OUs or Accounts to allow or deny access to AWS resources within our organization.

Untitled
- Accounts
IAM Advanced
IAM Conditions
Ways to make your IAM policies bit more restrictive using conditions
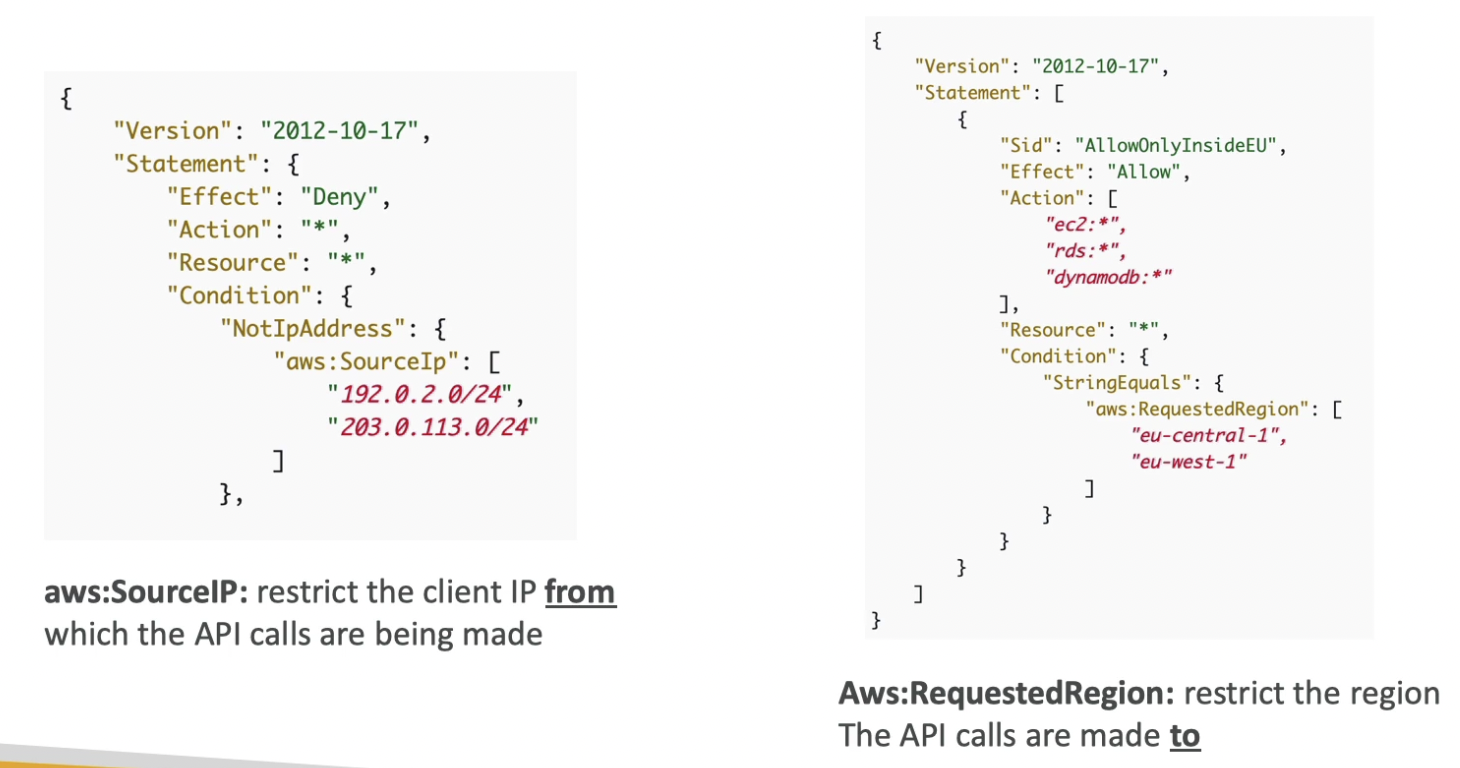
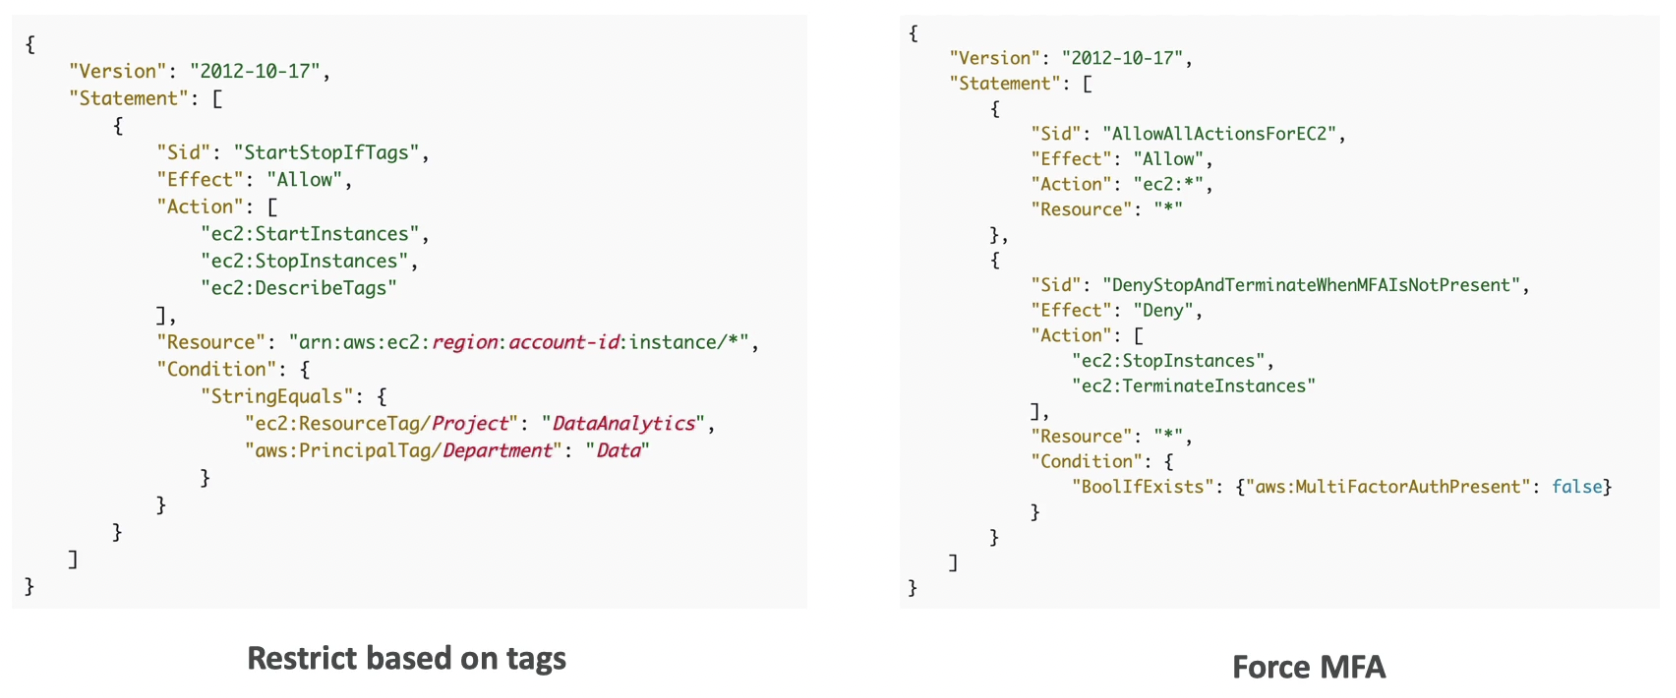
S3 bucket policies & object policies
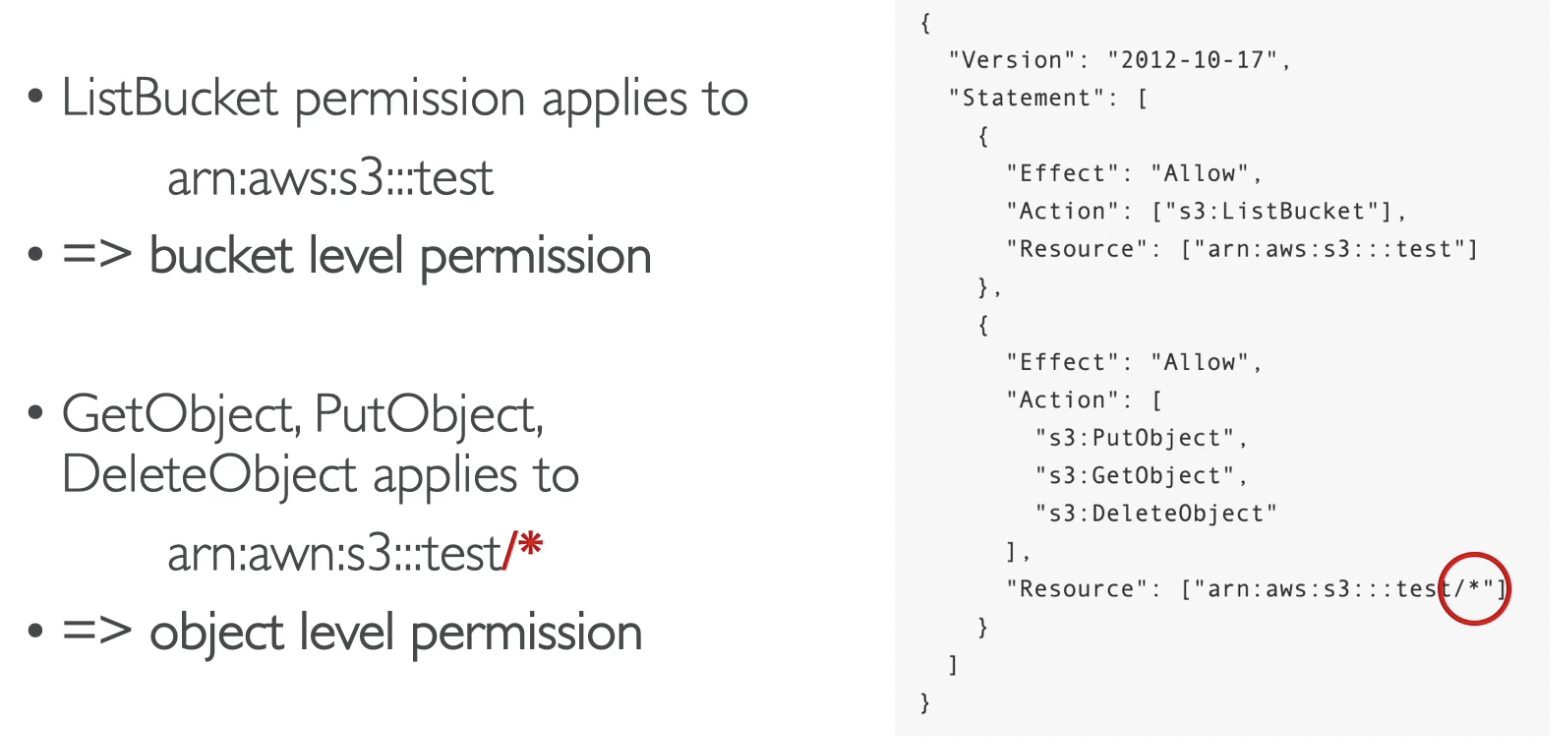
Resource based policies
.png)
IAM Roles vs Resource based policies
- When you assume a role (user, application or service), you give up your original permissions and take the permissions assigned to the role
- When using a resource based policy, the principal doesn’t have to give up his permissions
- Example: User in account A needs to scan a DynamoDB table in Account A and dump it in an S3 bucket in Account B.
- Need to use S3 bucket policy in account B. Cannot use IAM role because first scan the table in account A using the original role then assume another role in account B to write it in S3 bucket, but now you can’t read the scanned data from account A.

- Need to use S3 bucket policy in account B. Cannot use IAM role because first scan the table in account A using the original role then assume another role in account B to write it in S3 bucket, but now you can’t read the scanned data from account A.
- Resource based policies are supported by Amazon S3 buckets, SNS topics, SQS queues
.png)
IAM Permission Boundaries
Intro
- lAM Permission Boundaries are supported for users and roles (not groups)
- Advanced feature to use a managed policy to set the maximum permissions an IAM entity can get
- Even if the user has admin access, the maximum permission is still based on the permission boundary.
- To set permission boundary for a user: IAM → Users → Select user → Permission boundary
- Use cases:
- Delegate responsibilities to non-administrators within their permission boundaries, for example create new IAM users
- Allow developers to self-assign policies and manage their own permissions, while making sure they can’t escalate their privileges (make themselves admin)
- Useful to restrict one specific user (instead of a whole account using organizations & SCP)
- Can be used in combination of SCP and identity-based policy
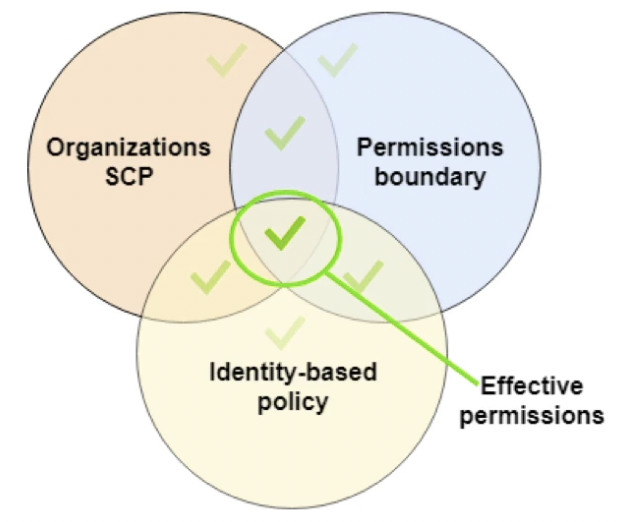
Example
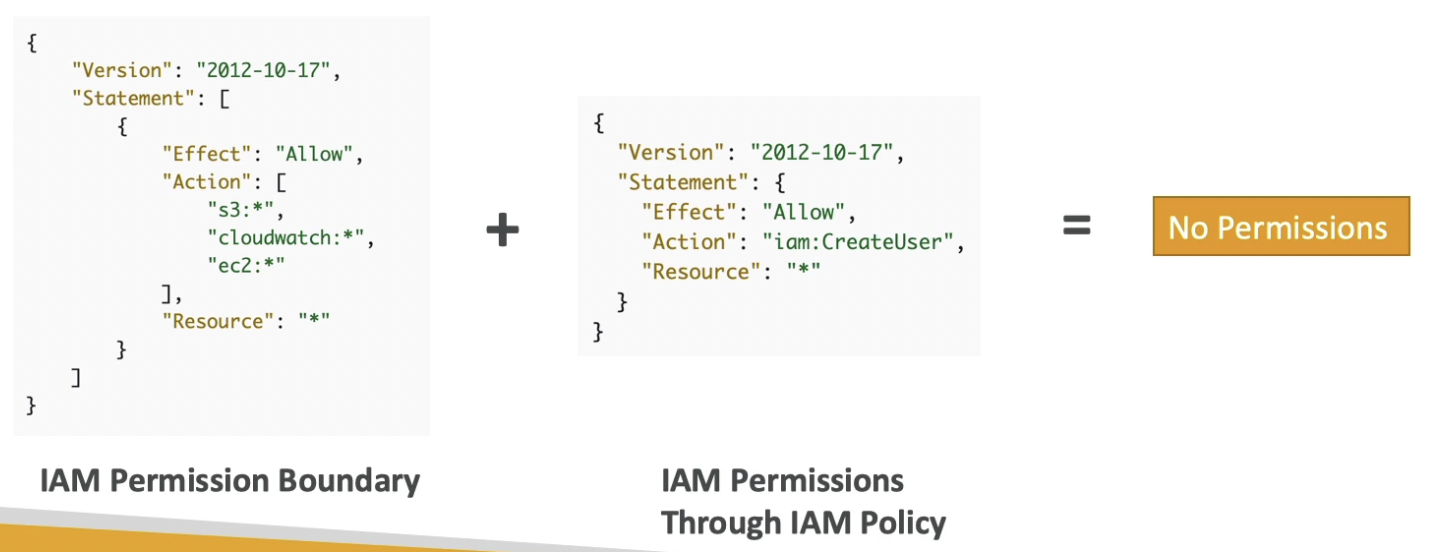
Policy Evaluation Logic
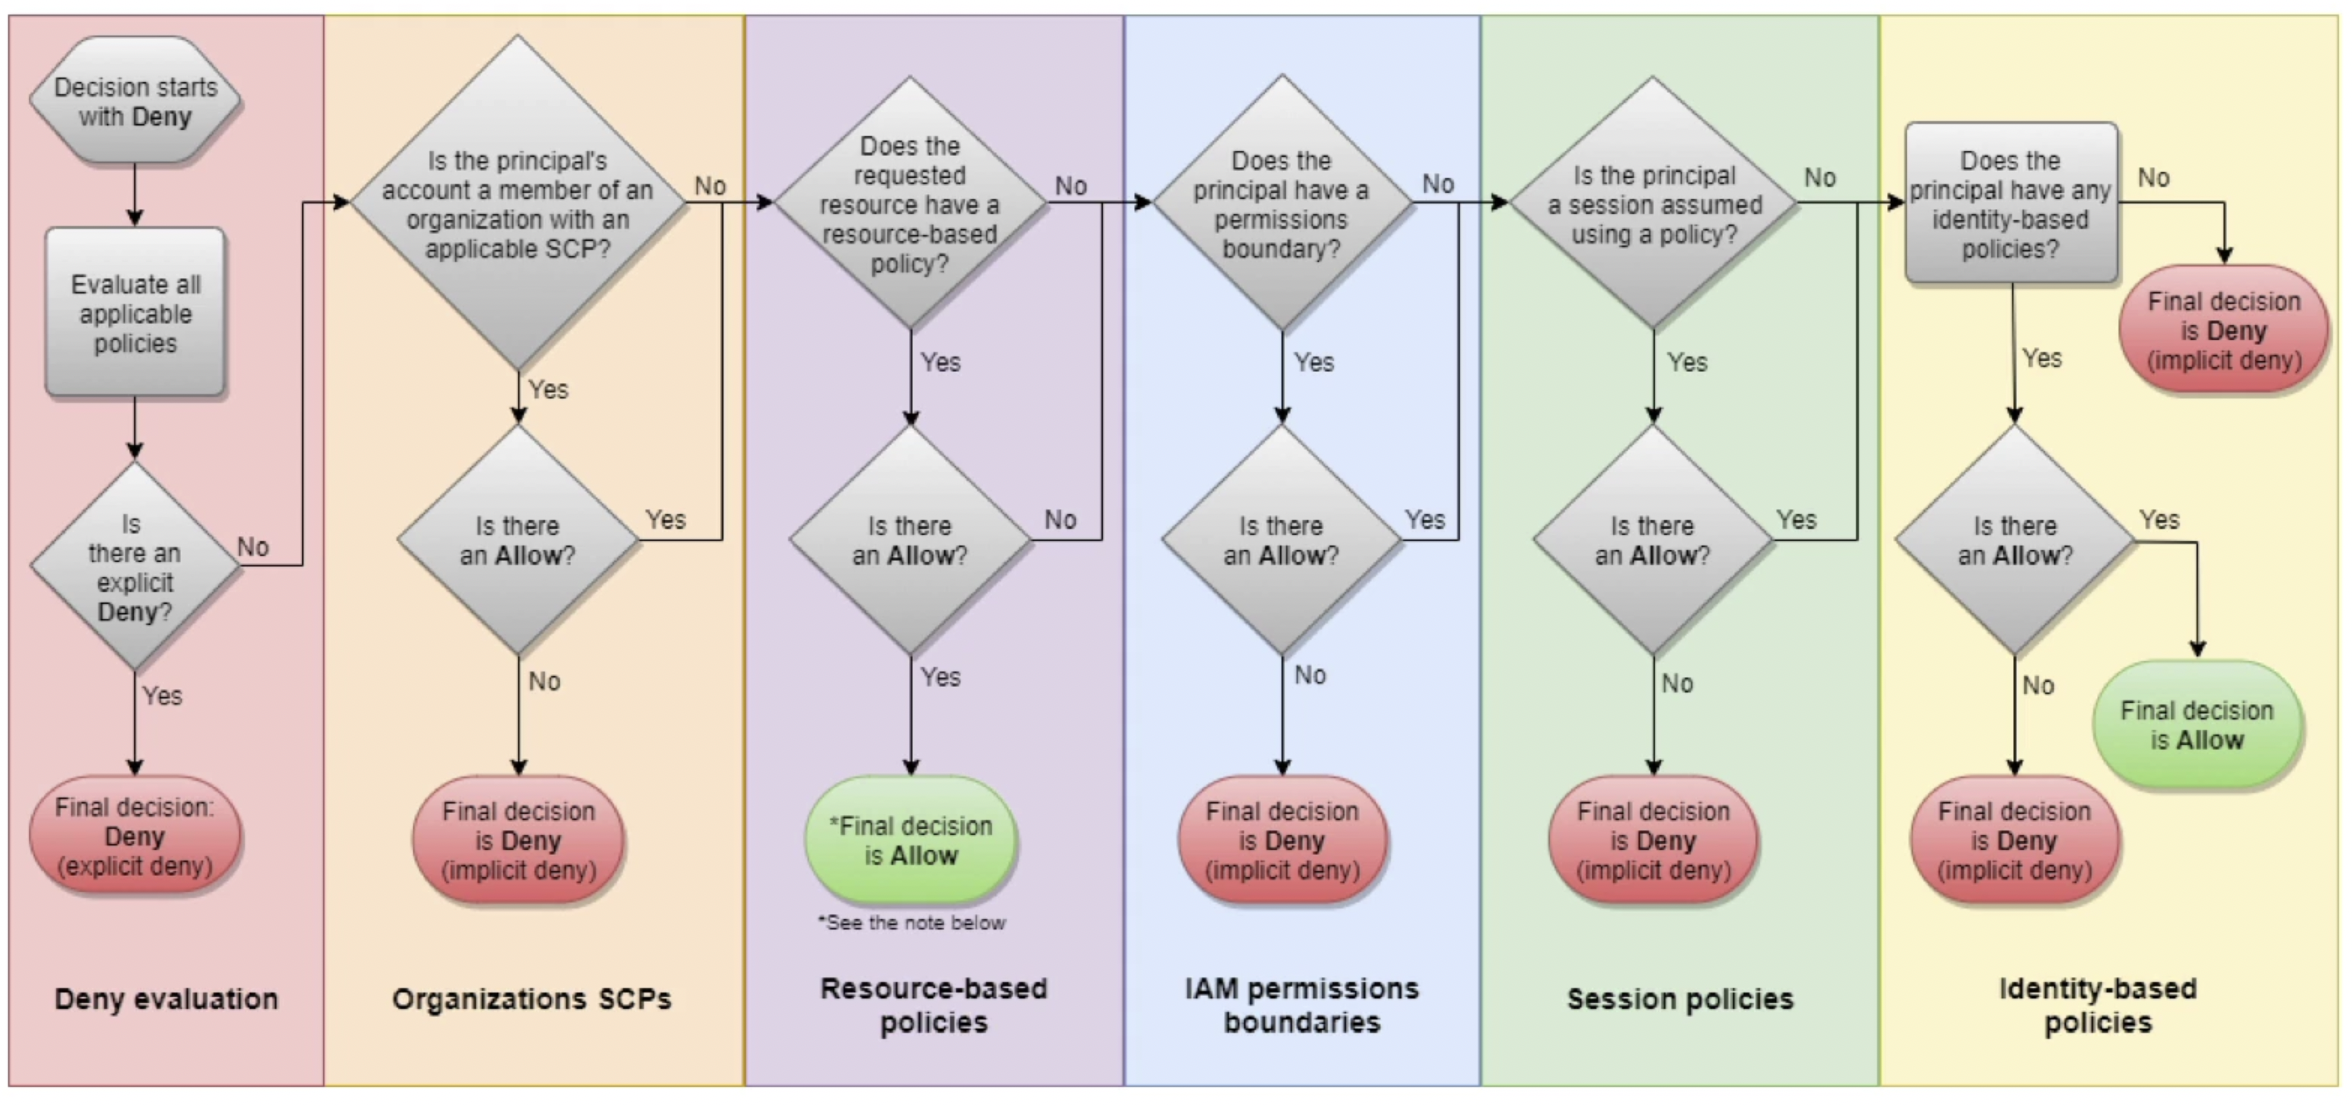
.png)
AWS Cognito
.png)
.png)
.png)
.png)
.png)
.png)
.png)
AWS IAM Identity Center - Single Sign-On (SSO)
.png)
.png)
.png)
.png)
.png)
Microsoft Active Directory (AD)
- It is a way to share login credentials of the users with all the machines within the network.
- Found on any Windows Server with AD Domain Services
- Database of objects: User Accounts, Computers, Printers, File Shares, Security Groups, etc.
- Centralized security management. You can create account, assign permissions, etc.
- Objects are organized in trees. A group of trees is a forest
- There is a domain controller. We will create an account there. Since each windows machine on the network is connected to the domain controller, this user can be logged in from any machine on the network.

AWS Directory Services
Used to extend the network by involving services like EC2 to be a part of the AD to share login credentials.
AWS Managed Microsoft AD
- Create your own AD in AWS to share login credentials between on-premise and AWS AD
- Manage users on-premise and on AWS Managed AD
- Supports MFA
- Establish “trust” connections with your on premise AD
AD Connector
- AD connector will proxy all the requests to the on-premise AD.
- Supports MFA
- Users are managed on the on-premise AD only
Simple AD
- AD-compatible managed directory on AWS
- Users are managed on the AWS AD only
- Cannot be joined with on-premise AD
- Use when you don’t have an on-premise AD
Setup
.png)
Control Tower
.png)
.png)
AWS IAM Identity Center - Single Sign-On (SSO)
Intro
- Centrally manage Single Sign-On to access multiple accounts and 3rd-party business applications.
- Free service (no pricing)
- Integrated with AWS Organizations (login once for your organization and you can access all the accounts within that org)
- Supports SAML 2.0 markup
- Integration with on-premise Active Directory
- Centralized permission management
- Centralized auditing with CloudTrail
SSO with Microsoft AD
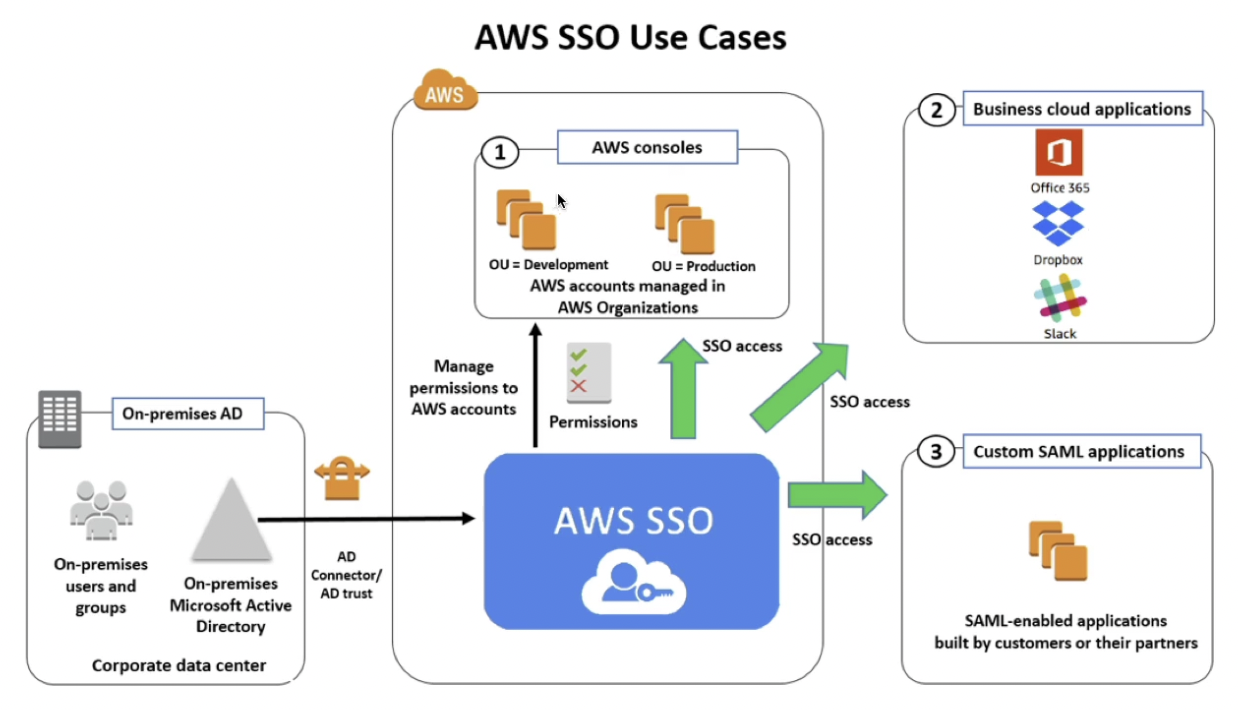
Once users are logged in from AD, they can access AWS consoles, business cloud applications and any custom SAML applications.
AssumeRoleWthSAML vs SSO
With AssumeRoleWithSAML, we need to maintain a 3rd party identity provider login portal. This portal checks in the identity store and returns a SAML assertion that we send to STS for access keys.
With AWS SSO, we don’t need to manage the login portal, it is done through the AWS SSO service. SSO service automatically scales with the number of accounts.
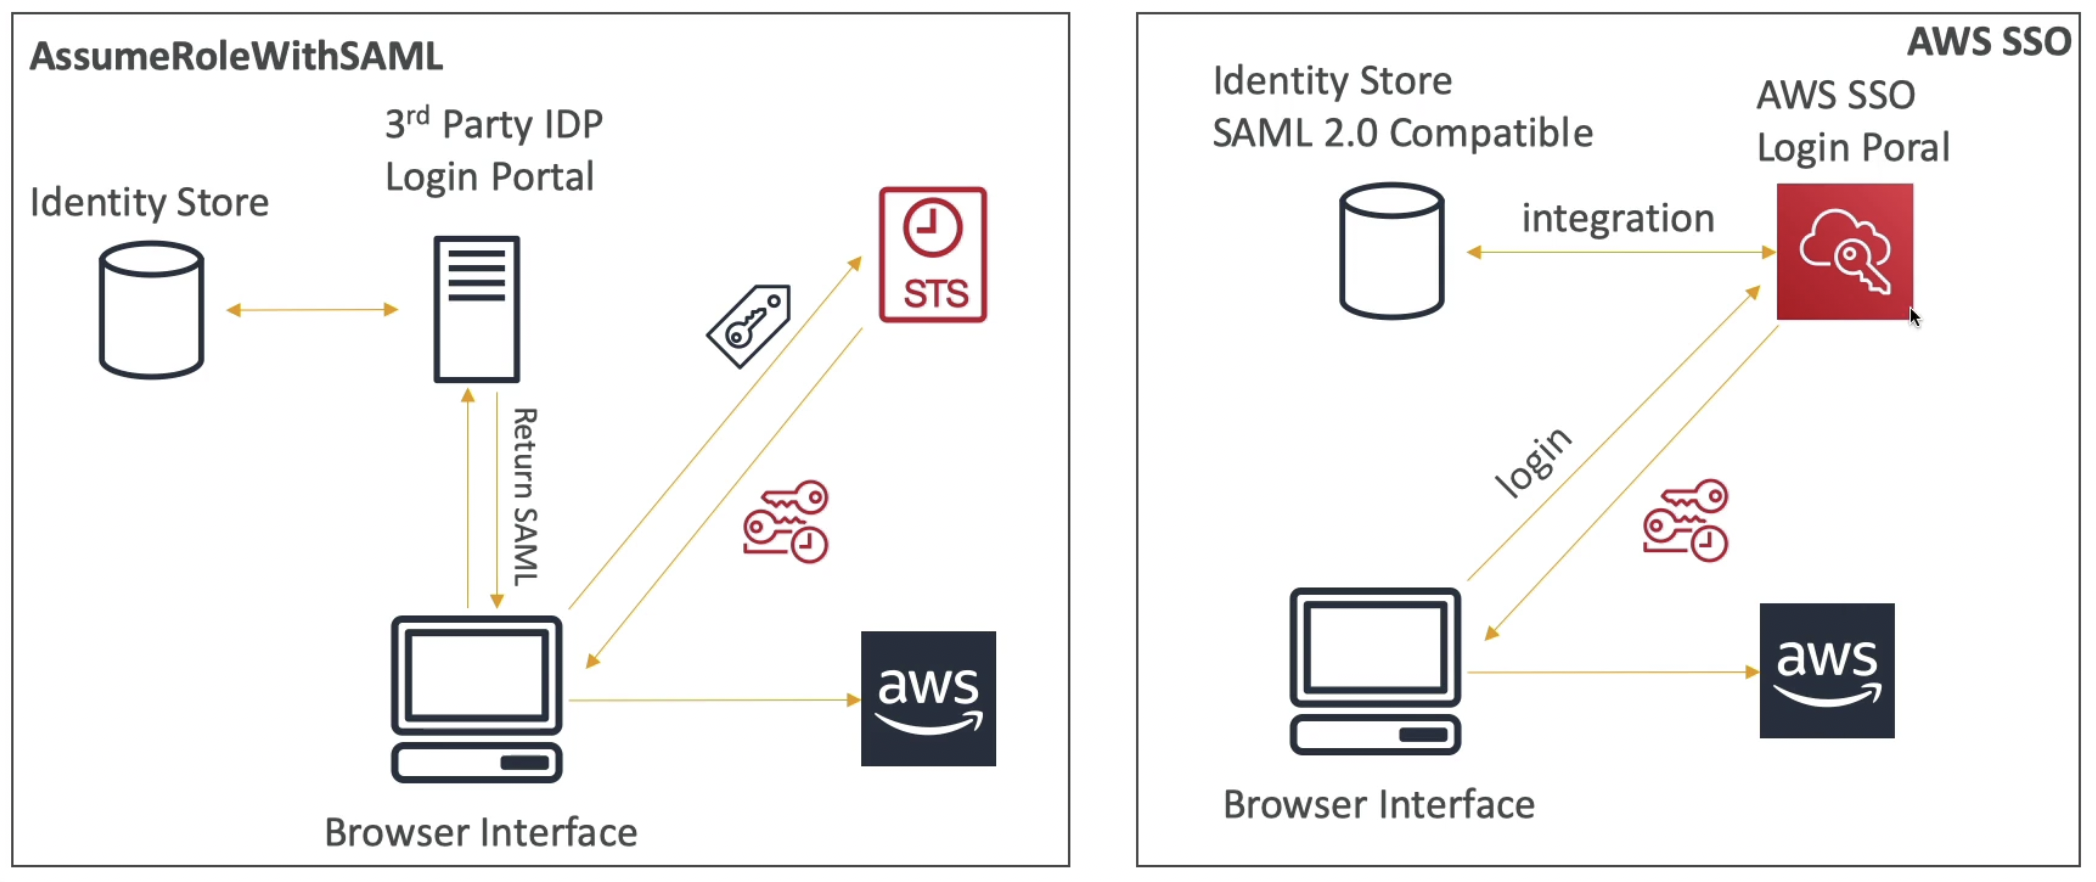
Hands on
AWS SSO → Enable SSO
Once enabled, do the following.

Security Token Service (STS)
- Allows to grant limited and temporary access to AWS resources
- Token is valid for up to one hour (must be refreshed)
- Use cases
AssumeRole
- Within your own account: for additional security (ex. terminating an EC2 instance first requires users to temporarily assume a role)
- Cross Account Access: assume role in target account to perform actions there
- To assign a temporary role to an IAM user
- Steps
- Define an lAM Role within your account or cross-account
- Define which principals can access this lAM Role (who should be allowed to assume this role)
- Use AWS STS (Security Token Service) to retrieve credentials and impersonate the lAM Role you have access to (AssumeRole API). STS will check whether or not the user is allowed to assume that role.
- Temporary credentials can be valid between 15 minutes to I hour
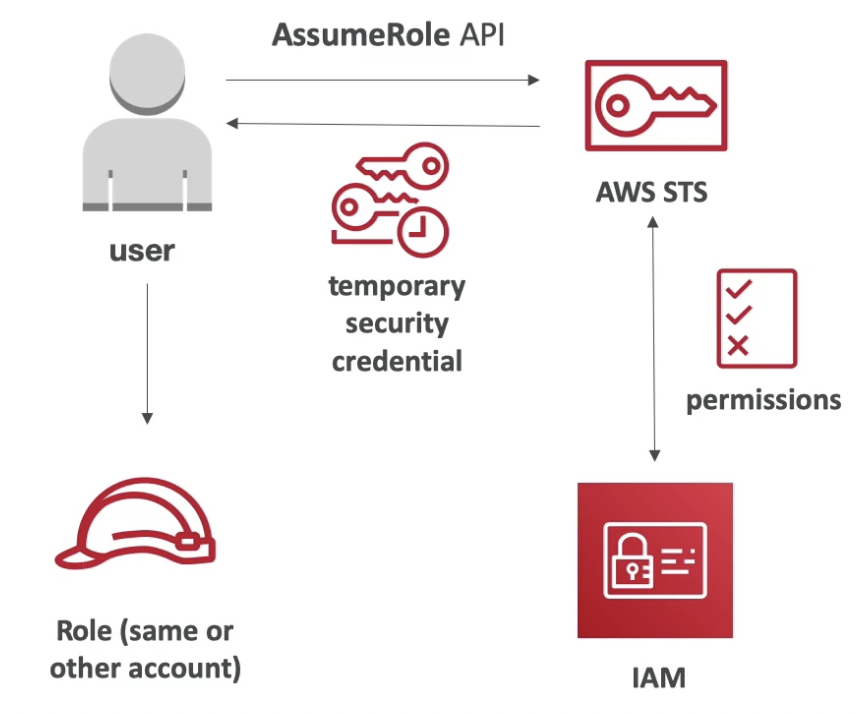
- Cross-account access with STS
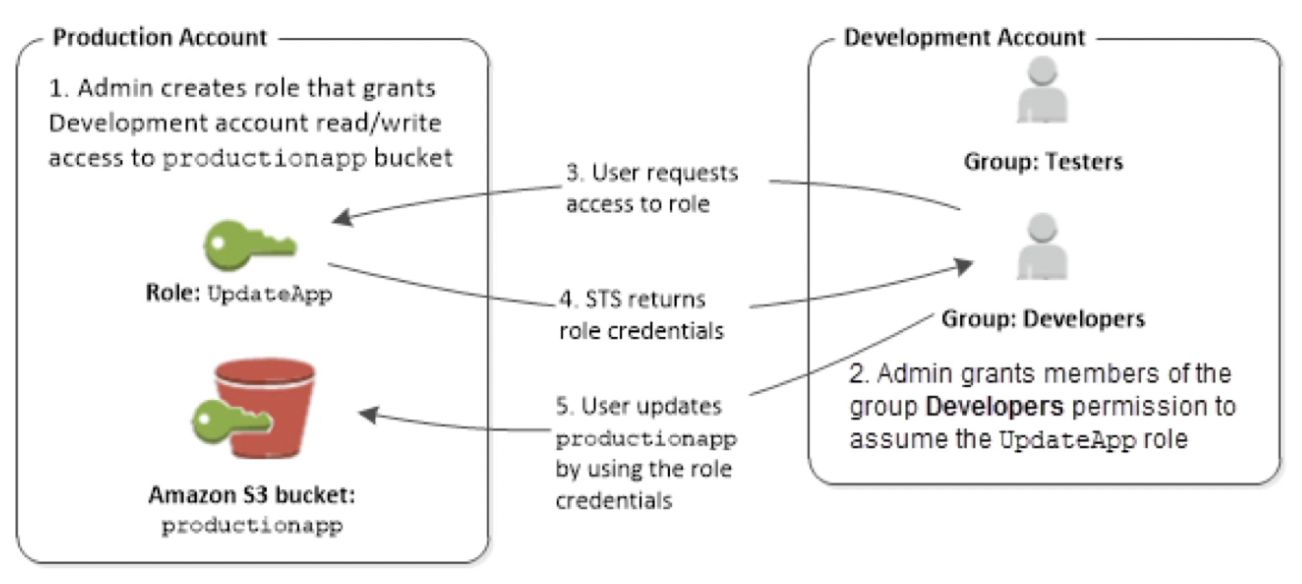
AssumeRoleWithSAML
- return credentials for users logged with SAML (non IAM users)
AssumeRoleWithWebldentity
- return creds for users logged with an identity provider (Facebook Login, Google Login, OIDC compatible…)
- AWS recommends against using this (recommended to use Cognito instead)
GetSessionToken
- for MFA, from a user or AWS account root user
Identity Federation in AWS
Intro
- Federation lets users outside of AWS to assume temporary role for accessing AWS resources. Use when you don’t want to manage users within your AWS account.
- These users assume identity provided access role.
- Need to setup a trust between identity provider and IAM.
- Federations can have many flavors:
- SAML 2.0
- Custom Identity Broker
- Web Identity Federation with Amazon Cognito
- Web Identity Federation without Amazon Cognito
- Single Sign On
- Non-SAML with AWS Microsoft AD
- Using federation, you don’t need to create lAM users (user management is outside of AWS)
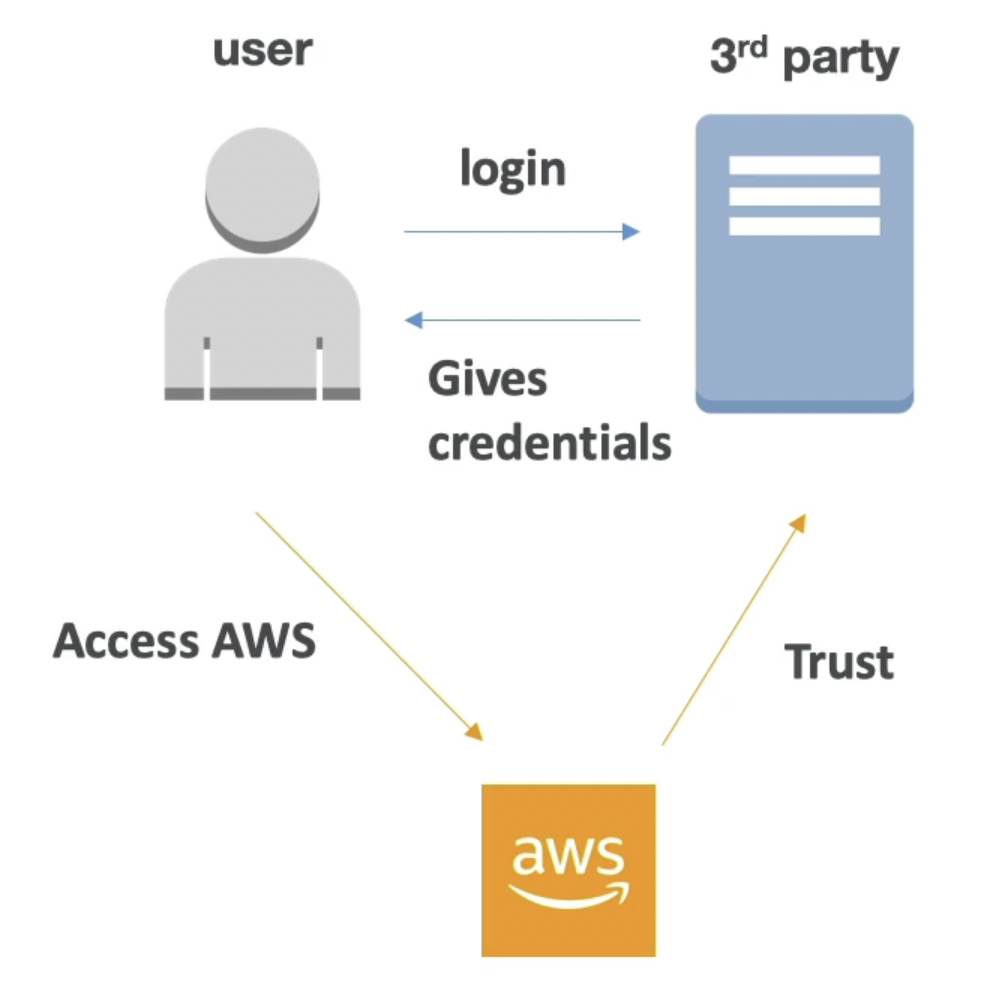
SAML 2.0 Federation
- To integrate Active Directory / ADFS with AWS (or any SAML 2.0)
- Provides access to AWS Console or CLI (through temporary credentials)
- No need to create an IAM user for each of your employees
- SAML assertion is exchanged for security credentials from STS.
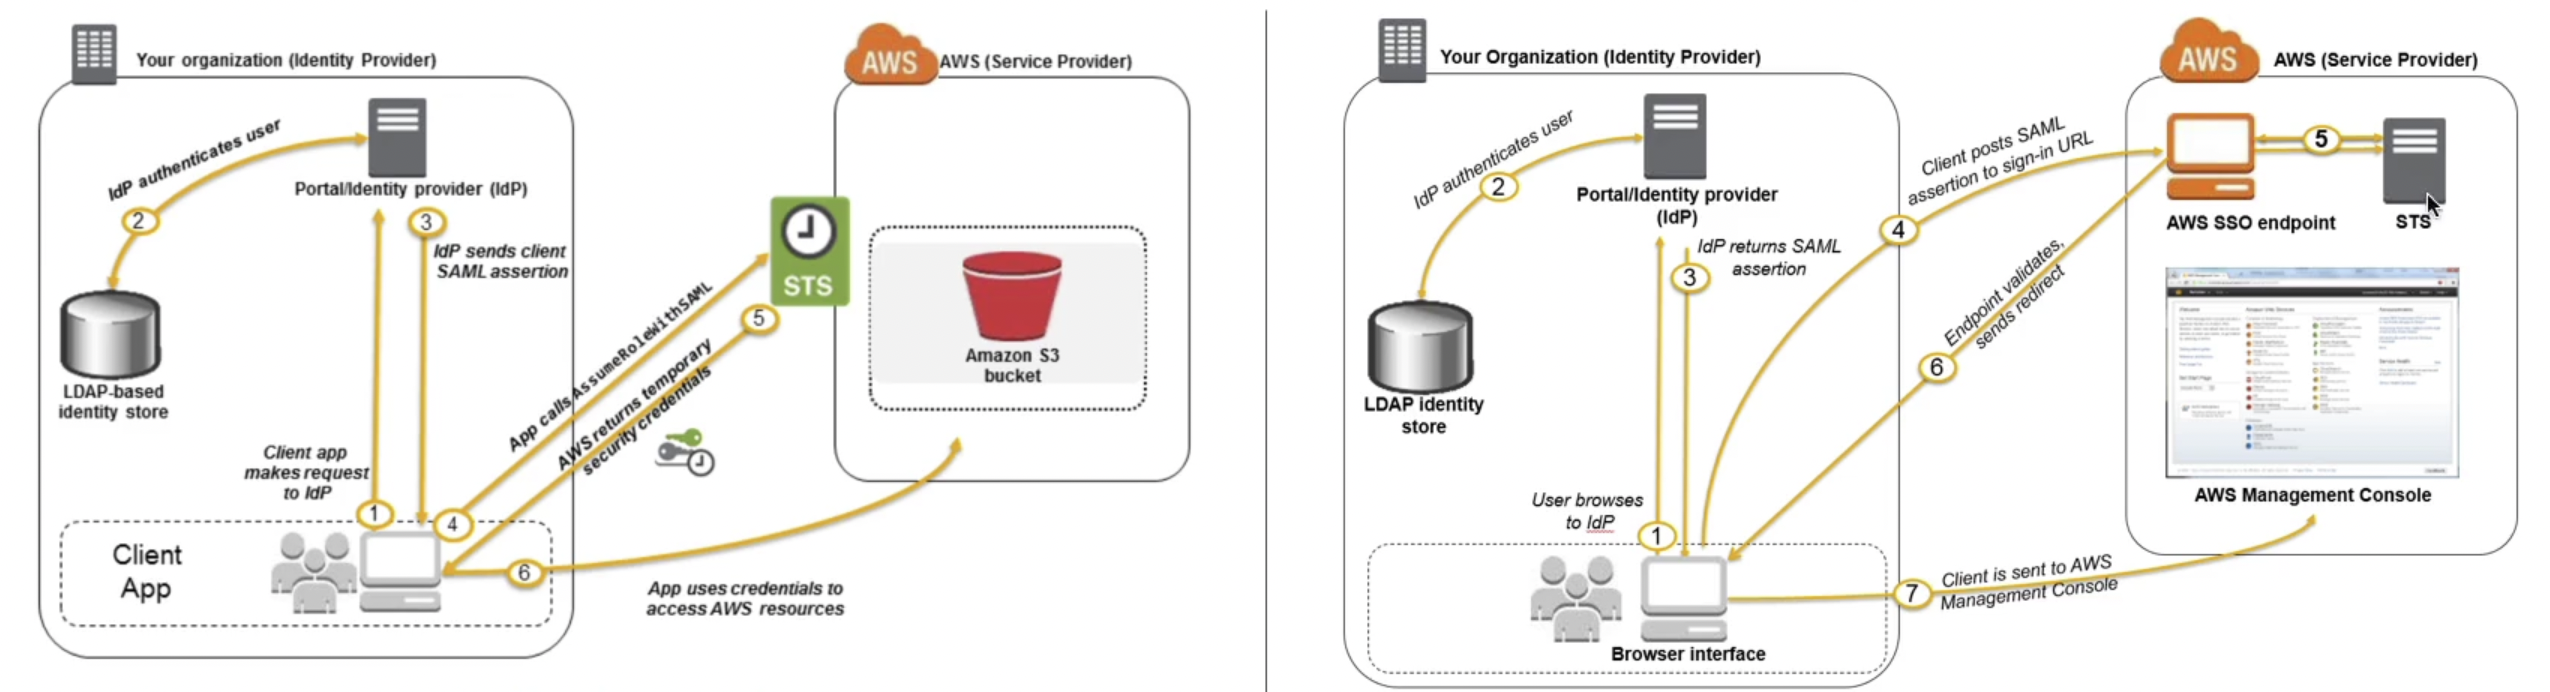
- Needs to setup a trust between AWS IAM and SAML (both ways)
- SAML 2.0 enables web-based, cross domain SSO
- Uses the STS API: AssumeRoleWithSAML
- Note: federation through SAML is the old way, Amazon Single Sign On (SSO) Federation is the new managed and simpler way.
Custom Identity Broker Application
- Use only if identity provider is not compatible with SAML 2.0
- The identity broker must determine the appropriate lAM policy
- Uses the STS API: AssumeRole or GetFederationToken
- In this case instead of client asking STS for temporary security credentials, identity broker does this task.
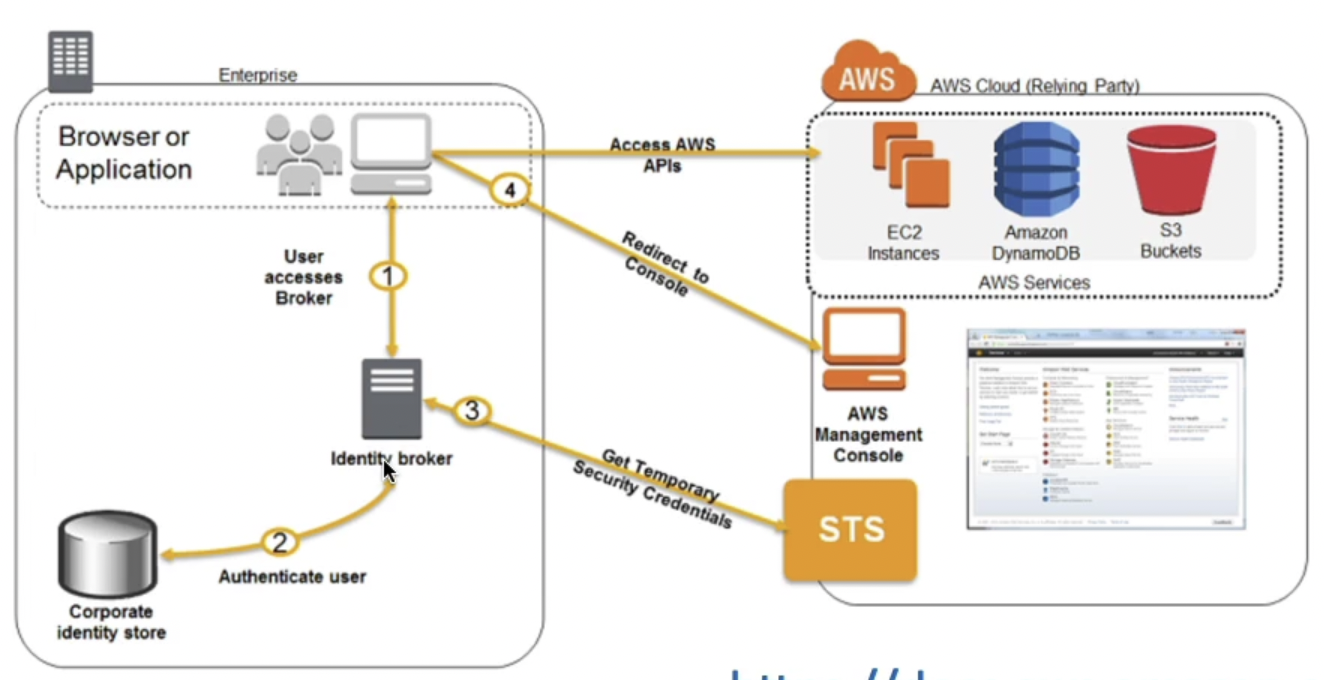
Web Identity Federation
- Used to provide the users (non AWS) of our application, access to AWS resources.
Without Cognito
- Not recommended by AWS, use Cognito instead (allows for anonymous users, data synchronization, MFA)
- In the diagram below, Amazon is acting as the identity provider. It can also be FB or Google.
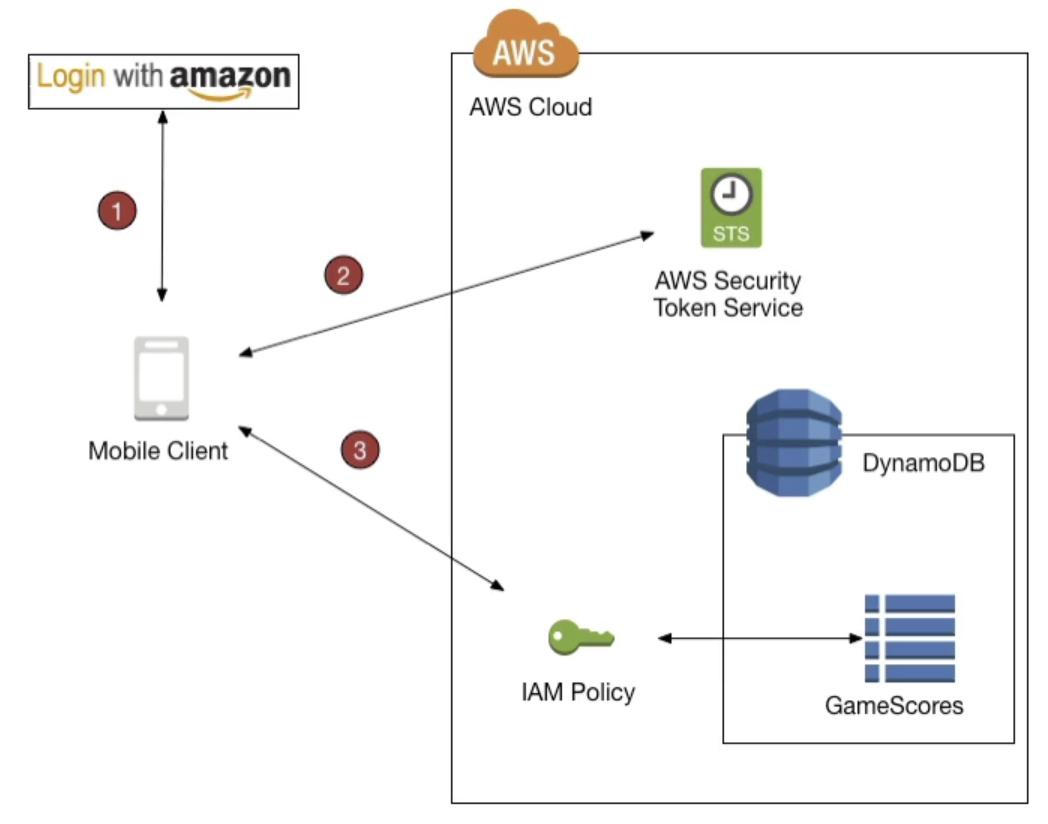
With Cognito
- Provide direct access to AWS Resources from the Client Side (mobile, web app)
- Example: provide (temporary) access to write to S3 bucket using Facebook Login
- We don’t want to create lAM users for our app users as there could be millions of them.
- Steps
- Log in to federated identity provider or remain anonymous
- Use the token to authenticate to Federated Identity Pool
- Get temporary AWS credentials back from the Federated Identity Pool
- These credentials come with a pre-defined IAM policy stating their permissions
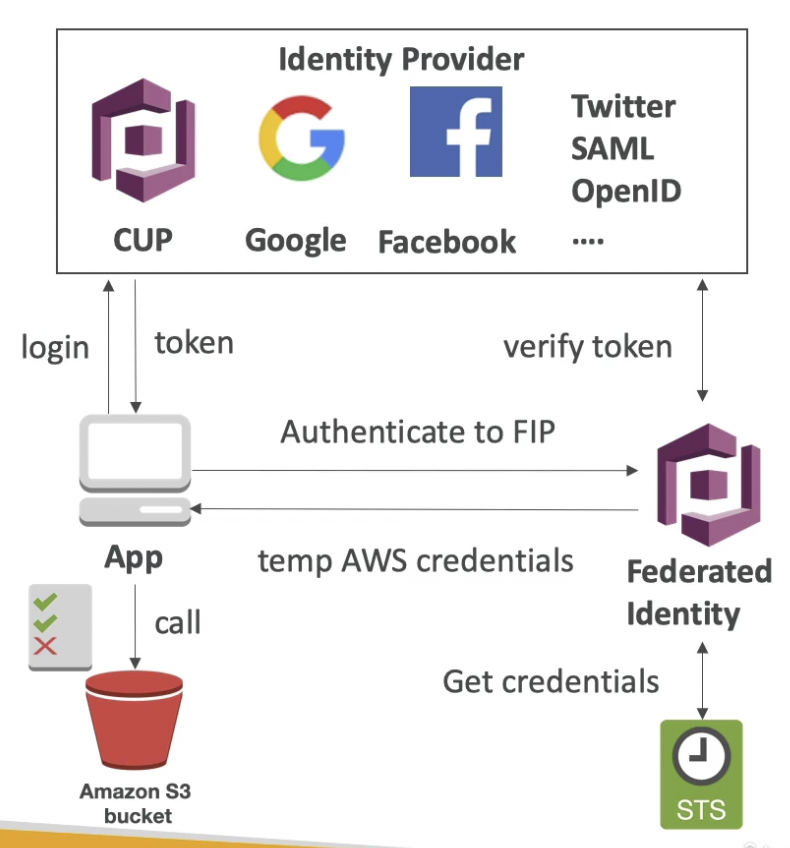
AWS Resource Access Manager (RAM)
- Share AWS resources with other AWS accounts to avoid resource duplication
- Share with any account or within your Organization
- Example:
VPC Subnets:
- allow to have all the resources launched in the same subnets
- must be from the same AWS Organization
- cannot share security groups and default VPC
- each participating account manage their own resources
- participating accounts can’t view, modify, delete resources that belong to other participants or the owner
- Network is shared
- anything deployed in the VPC can talk to other resources in the VPC
- applications are accessed easily across accounts, using private IP
- security groups from other accounts can be referenced
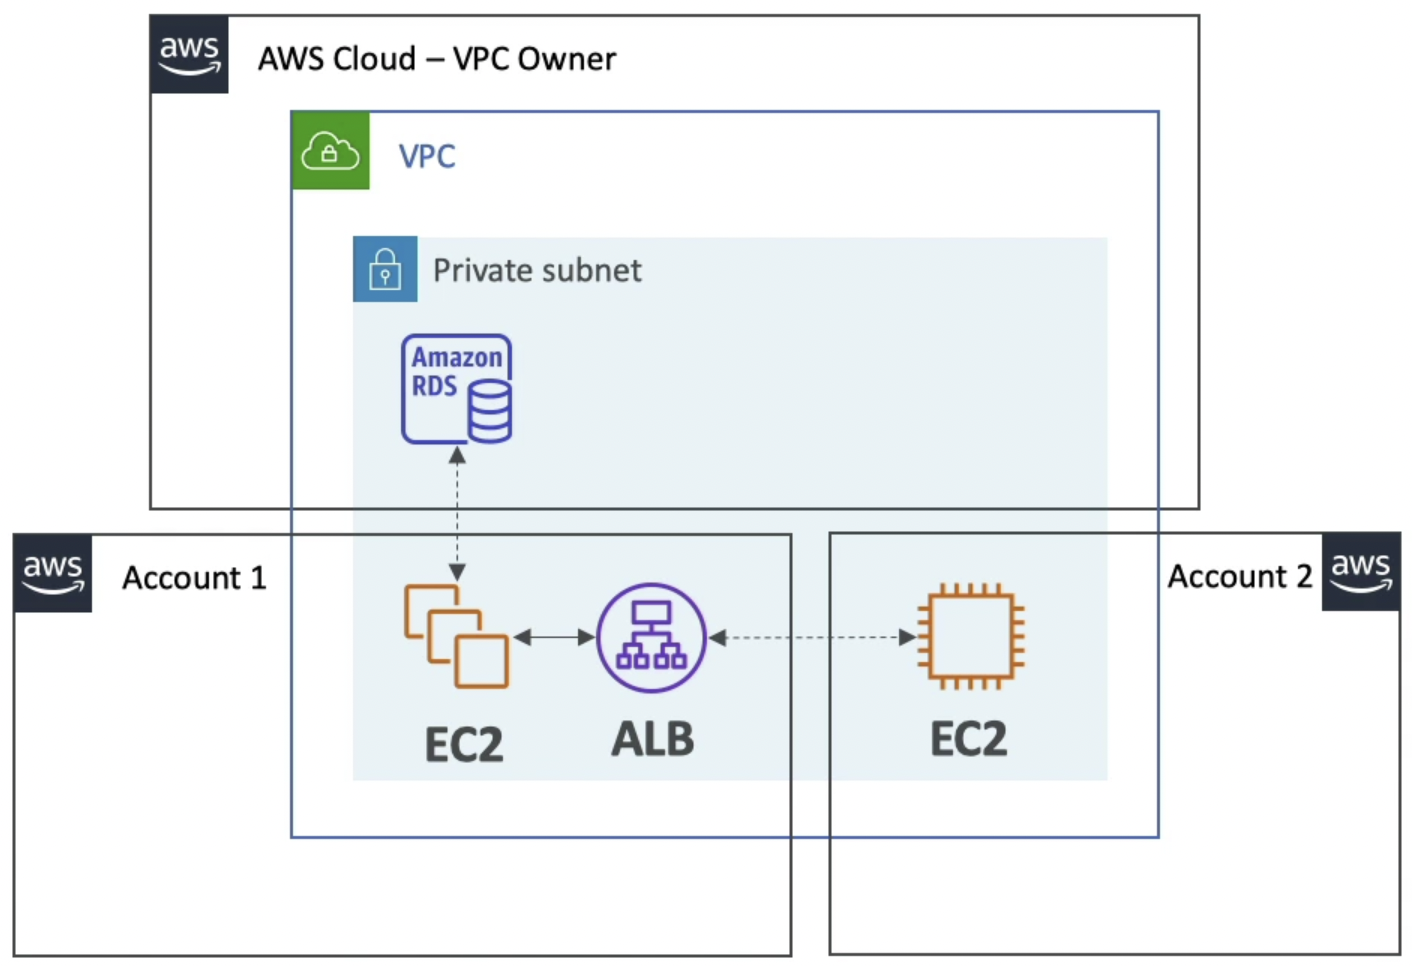
- AWS Transit Gateway
- Route53 Resolver Rules
- License Manager Configurations
Section 27: AWS Security & Encryption: KMS, SSM Parameter Store, CloudHSM, Shield, WAF
Section 27: AWS Security & Encryption: KMS, SSM Parameter Store, CloudHSM, Shield, WAF
Encryption
Encryption in flight (SSL - Secure Sockets Layer)
- Data is encrypted before sending and decrypted after receiving
- SSL certificates help with encryption (HTTPS)
- Encryption in flight ensures no MITM (man in the middle) attack
- Ex: sending credit card info for online payments
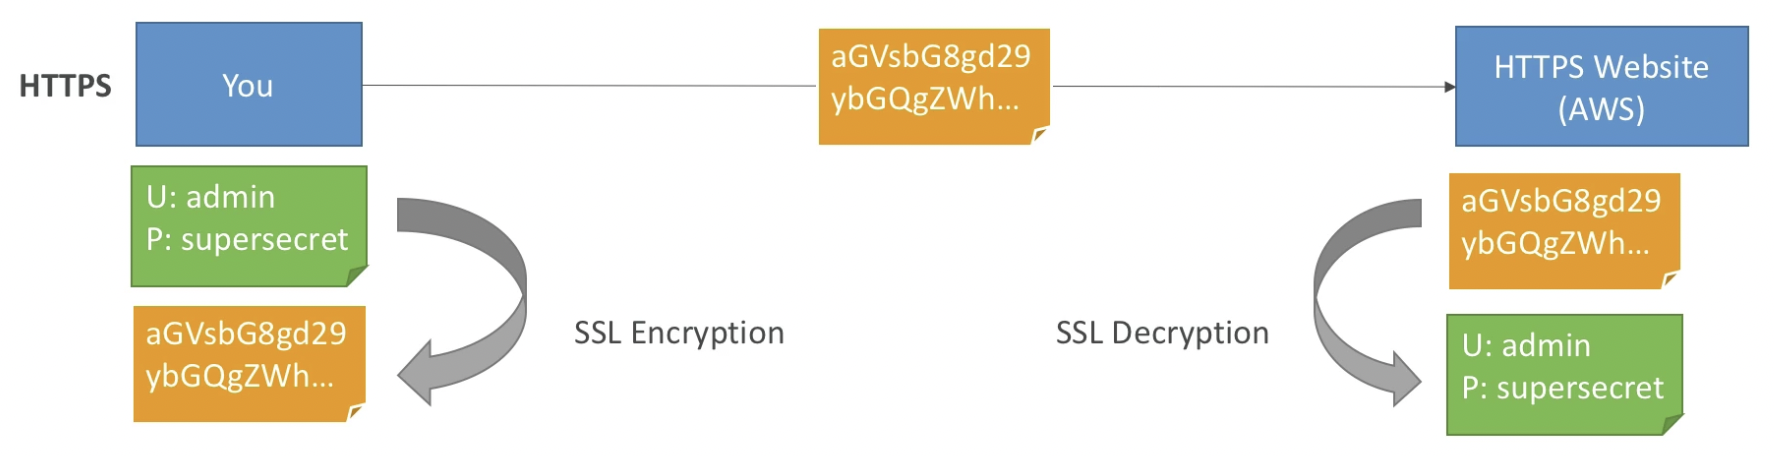
Server side encryption at rest
- Data is encrypted after being received by the server
- Data is decrypted before being sent from the server
- It is stored in an encrypted form thanks to a key (usually a data key)
- The encryption / decryption keys must be managed somewhere and the server must have access to it (KMS)

Client side encryption at rest
- Data is encrypted by the client and never decrypted by the server
- Data will be decrypted by a receiving client
- The server should not be able to decrypt the data
- Could leverage Envelope Encryption
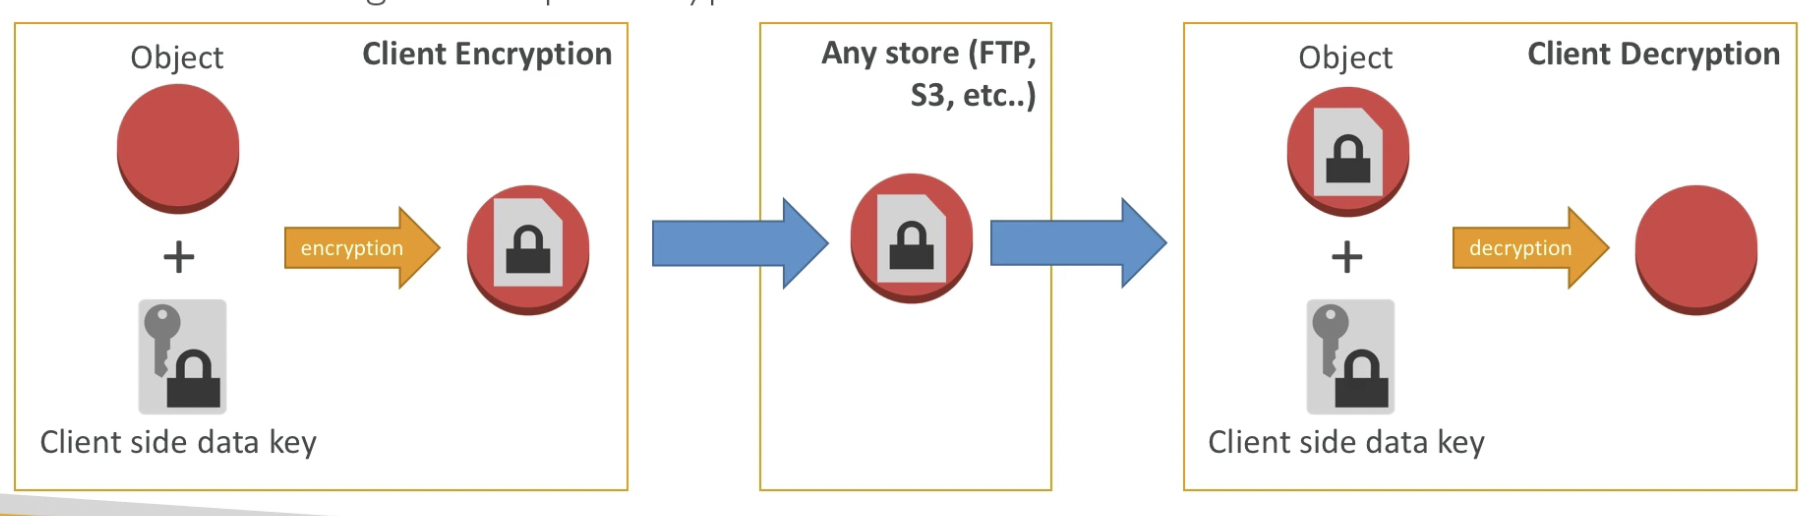
Key Management Service (KMS)
Intro
- Fully integrated with lAM for authorization
- KMS keys are bound to a specific region
- Seamlessly integrated into multiple AWS services such as:
- Amazon EBS: encrypt volumes
- Amazon S3: Server side encryption of objects
- Amazon Redshift: encryption of data
- Amazon RDS: encryption of data
- Amazon SSM: Parameter store
- Can not only use with AWS services but also with the CLI & SDK
- Anytime you need to share sensitive information, use KMS
- Database passwords
- Credentials to external service
- Private Key of SSL certificates
- CMK used to encrypt data can never be retrieved by the user, and the CMK can be rotated for extra security
- Encrypted secrets can be stored in the code or environment variables
- KMS can only help in encrypting up to 4KB of data per call. If data > 4 KB, use envelope encryption
- To give access to KMS to someone:
- Make sure the Key Policy allows the user
- Make sure the lAM Policy allows the API calls
Customer Master Key (CMK)
- Able to fully manage the keys & policies:
- Create
- Rotation policies
- Disable
- Enable
- Able to audit key usage (using CloudTrail)
- Three types of Customer Master Keys
AWS Managed Service Default CMK (free)
- Separate default KMS key for each supported service
- Used to encrypt/decrypt anything in a specific AWS service
- They are fully managed by AWS, we can’t view, rotate or delete them
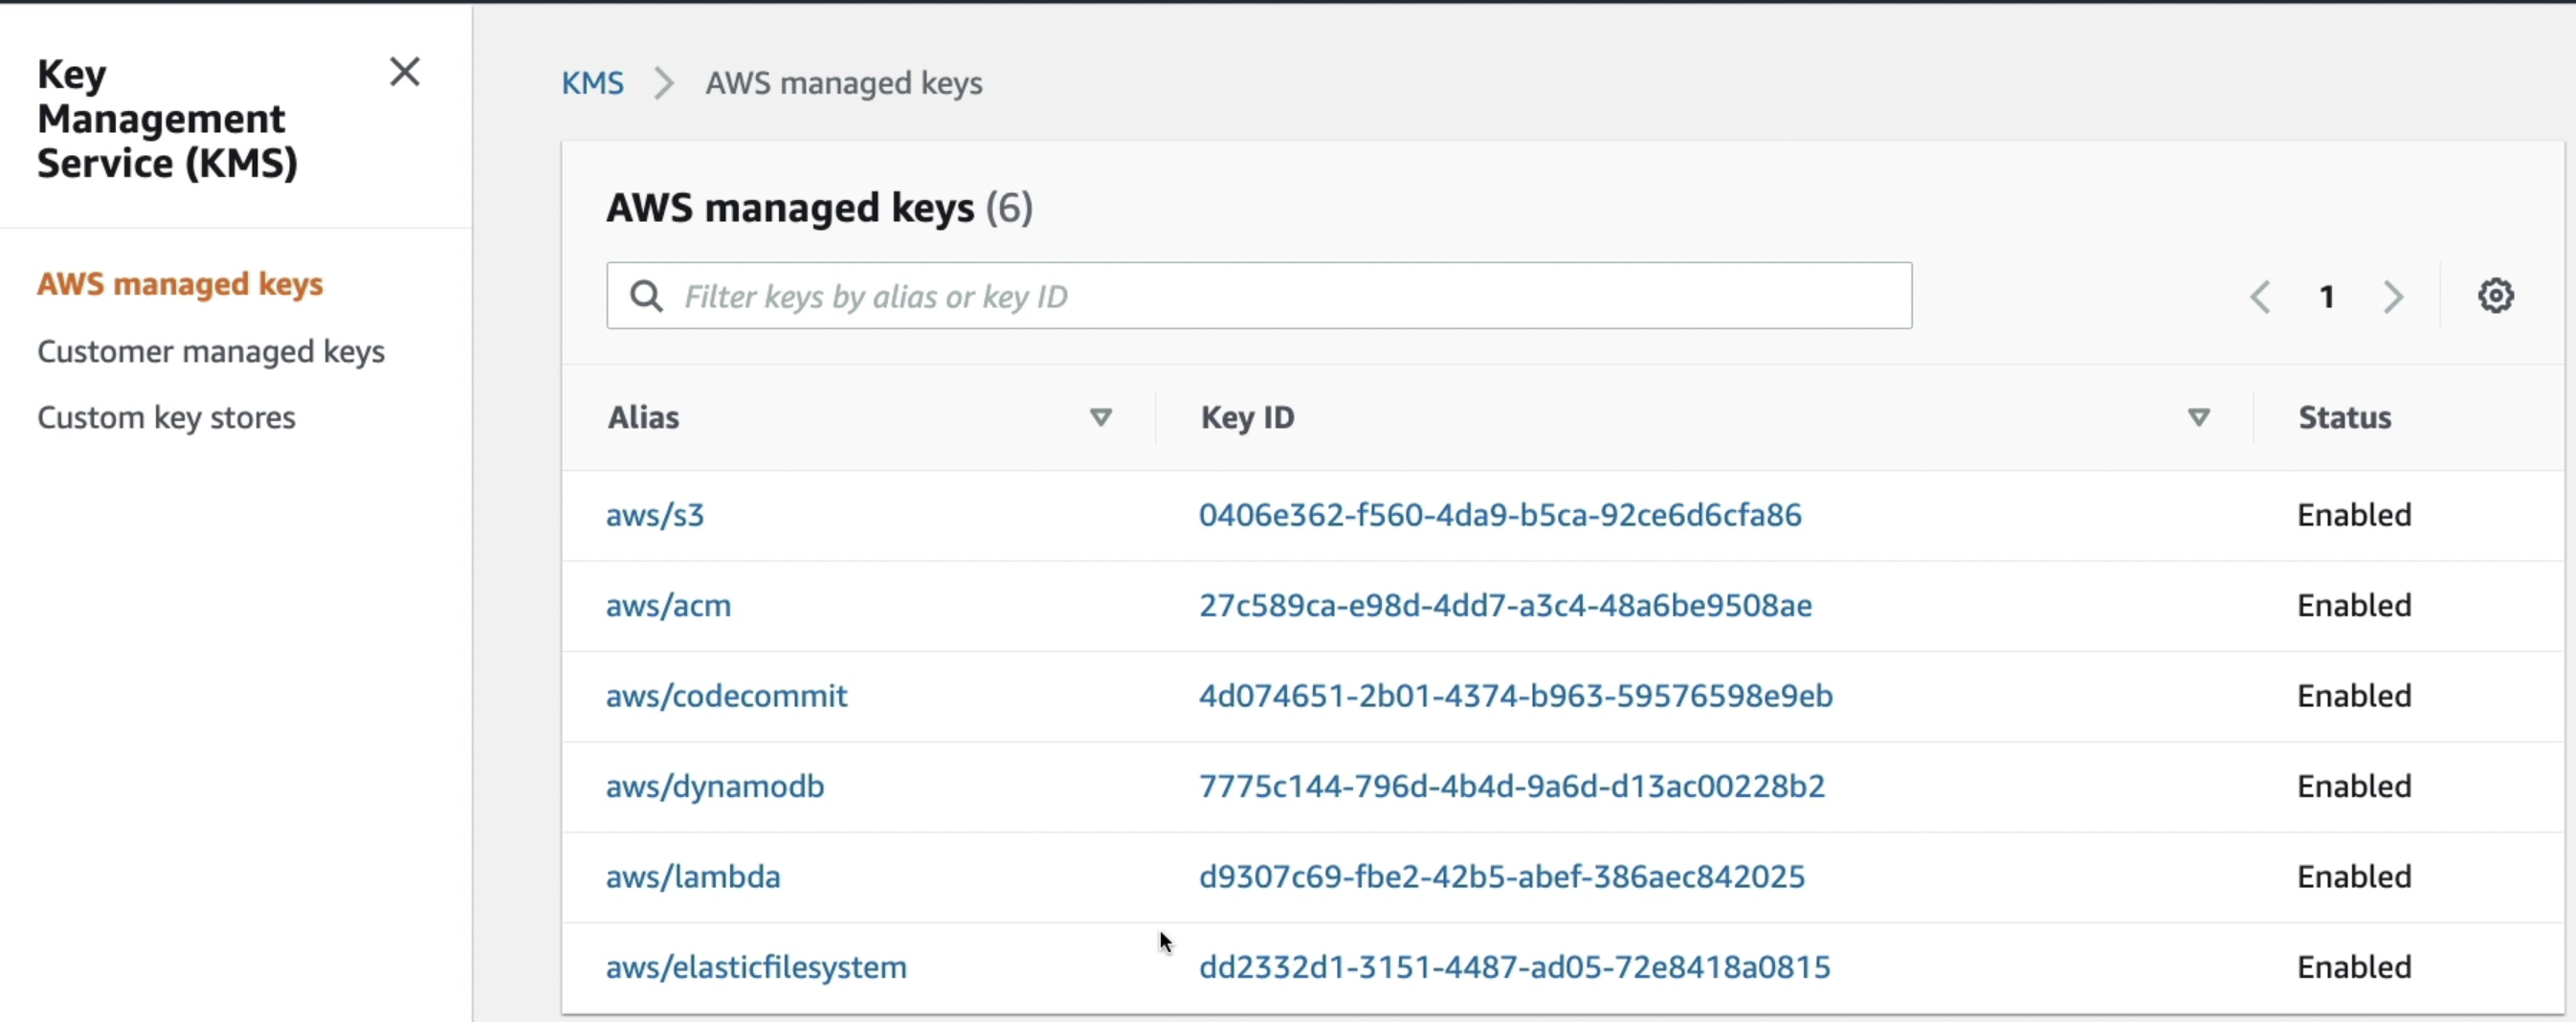
User Keys created in KMS ($1 / month)
- Option to enable rotation every year for additional security
User Keys generated and imported from outside AWS ($1 / month)
- Not recommended
- Must be 256-bit symmetric key
- pay for API call to KMS ($0.03 / 10000 calls)
- Able to fully manage the keys & policies:
Symmetric & Asymmetric Keys
Symmetric (AES-256 keys)
- First offering of KMS, single encryption key that is used to Encrypt and Decrypt data
- AWS services that are integrated with KMS use Symmetric CMKs
- Must call KMS API to encrypt data
- Necessary for envelope encryption
Asymmetric (RSA & ECC key pairs)
- Public (Encrypt) and Private Key (Decrypt) pair
- Used for Encrypt/Decrypt, or Sign/Verify operations
- The public key is downloadable, but you can’t access the Private Key unencrypted
- No need to call the KMS API to encrypt data (data can be encrypted by the client)
- Not eligible for automatic rotation
- Use case: encryption outside of AWS by users who can’t call the KMS API
Encrypted Snapshot migration across regions
- Create a snapshot (encrypted) of the encrypted volume
- Copy the snapshot to another region along with re-encryption using a new key in the new region (keys are bound to a region)
- Make a volume using the snapshot in the new region
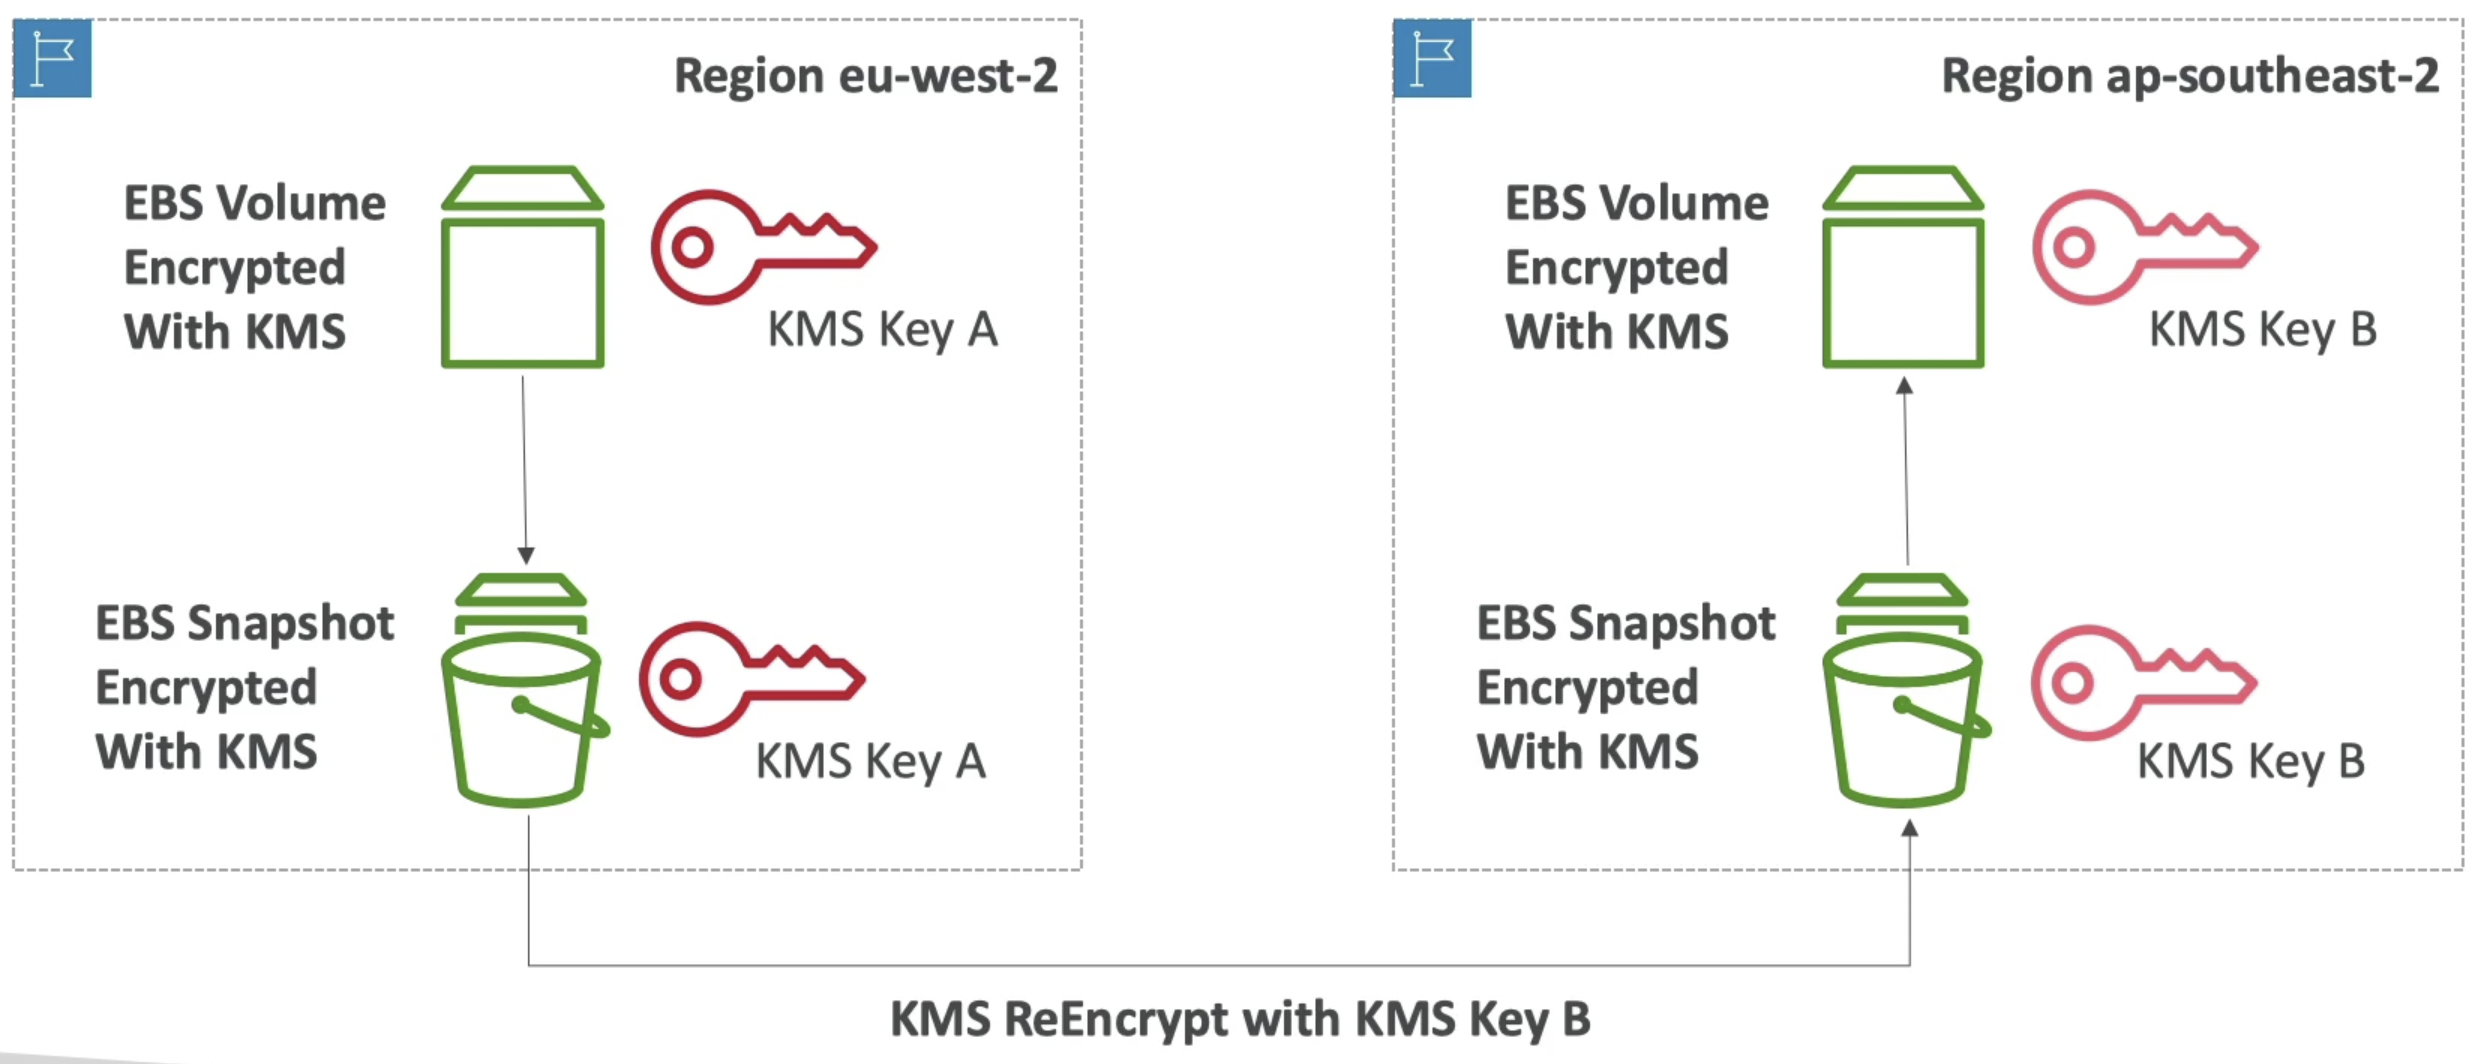
KMS key policies
- Control access to KMS keys, “similar” to S3 bucket policies, you cannot access KMS keys without them
- Default KMS Key Policy:
- Created if you don’t provide a specific KMS Key Policy
- Complete access to the key for the root user ⇒ any user or role can access the key (most permissible)
- Gives access to the IAM policies to the KMS key
- Custom KMS Key Policy:
- Define users, roles that can access the KMS key
- Define who can administer the key
- Useful for cross-account access of your KMS key
Encrypted Snapshot migration across accounts
- Create a Snapshot, encrypted with your own CMK
- Attach a KMS Key Policy to authorize cross-account access
- Share the encrypted snapshot
- In the target account, create a copy of the snapshot (decryption will require the main CMS key),
- Encrypt it with a new KMS Key in your account
- Create a volume from the snapshot
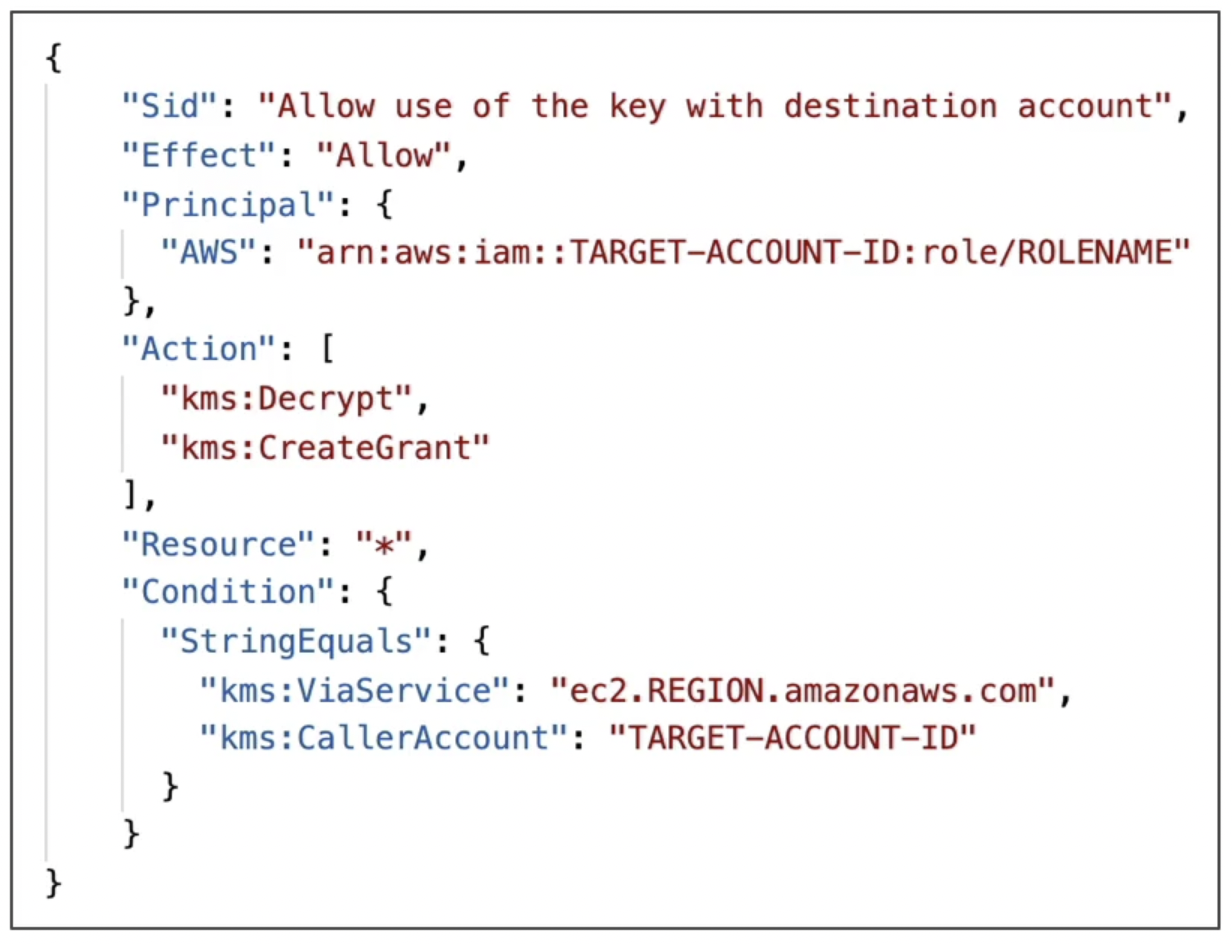
KMS Multi-Region Keys
.png)
.png)
.png)
.png)
new →
Key Rotation
Automatic
- For Customer-managed CMK (not AWS managed CMK)
- If enabled: automatic key rotation happens every 1 year
- Previous key is kept active so you can decrypt old data
- New key has the same CMK ID (only the backing key is changed)
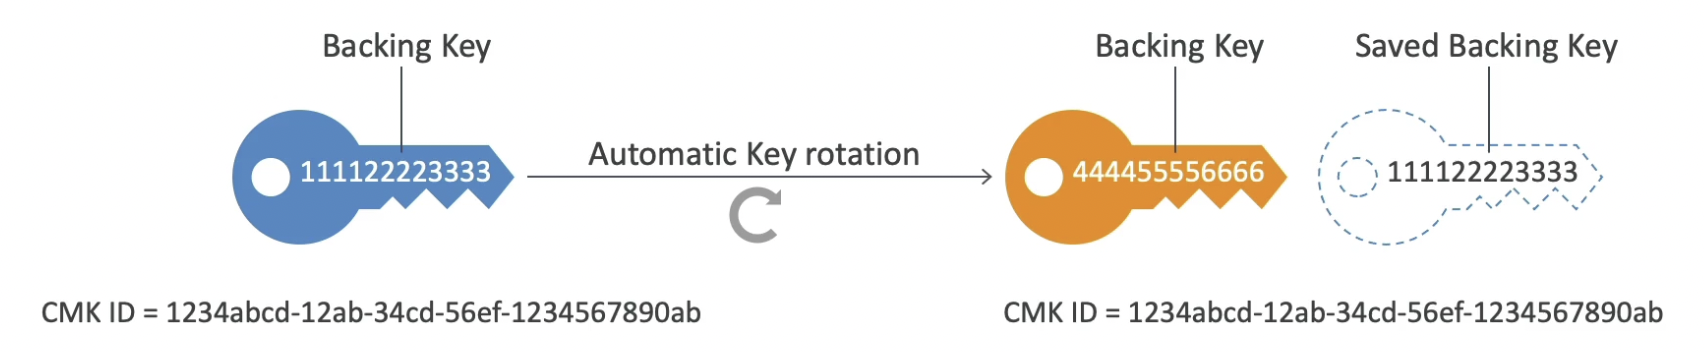
Manual
- When you want to rotate key every 90 days or 180 days
- New Key has a different CMK ID
- Keep the previous key active so that you can decrypt old data
- Better to use aliases in this case as CMK id changes after rotation (to hide the change of key for the application). After rotation, use UpdateAlias API to point the alias to the new key.
- Good solution to rotate CMK that are not eligible for automatic rotation (asymmetric CMK)

S3 Replication & Encryption
.png)
AMI Sharing Process Encrypted via KMS
.png)
SSM Parameter Store
Intro
SSM Parameters Store can be used to store parameters and has built-in version tracking capability. Each time you edit the value of a parameter, SSM Parameter Store creates a new version of the parameter and retains the previous versions. You can view the details, including the values, of all versions in a parameter’s history.
- Secure storage for configuration and secrets for our application
- Optional Seamless Encryption using KMS for encryption and decryption of stored secrets
- Serverless, scalable, durable, easy SDK
- Version tracking of configurations / secrets
- Configuration management using path & IAM
- Notifications with CloudWatch Events
- Integration with CloudFormation

Hierarchy
- Parameters are stored in hierarchical fashion.
- Can be used to reference secrets from secrets manager
- Can directly access parameters from AWS (ex. to get AMI ID for the latest Amazon Linux 2 AMI)
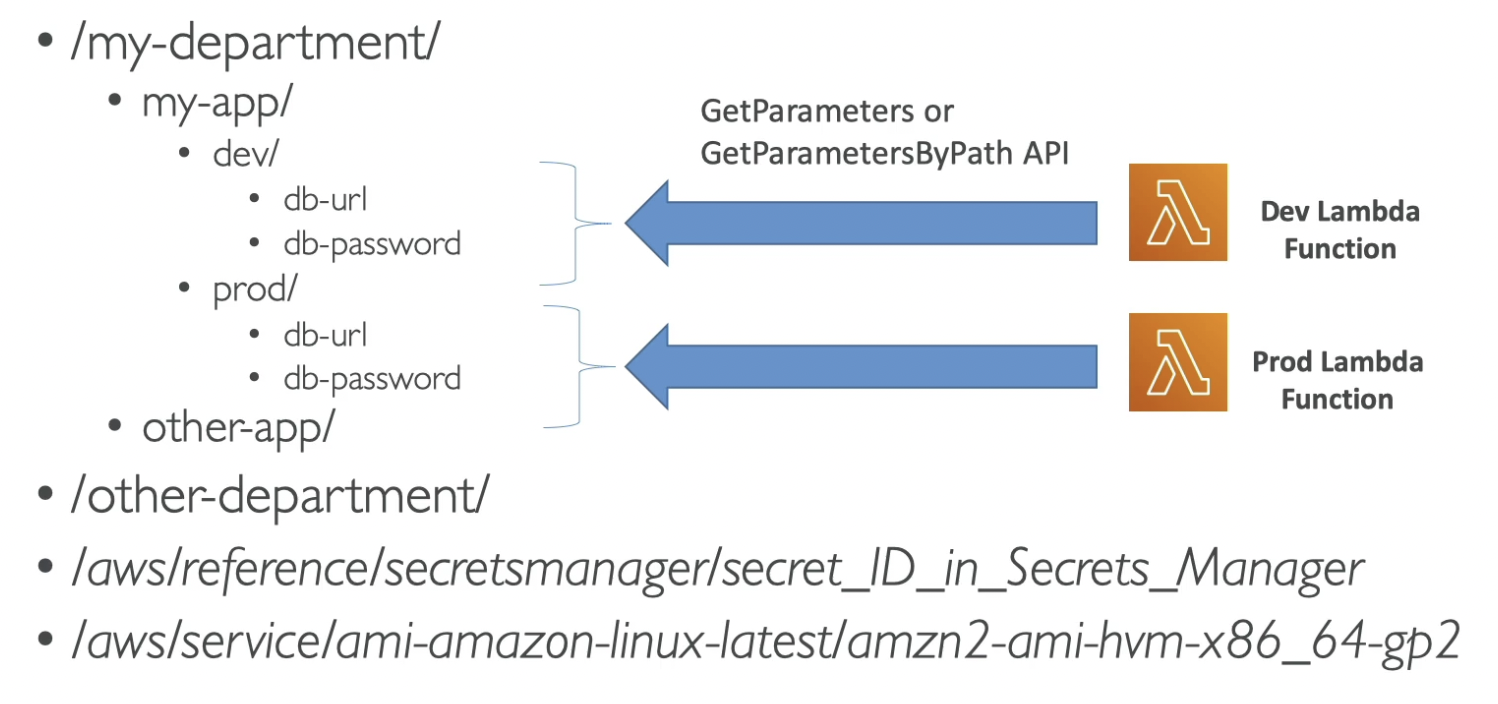
Standard & Advanced tiers
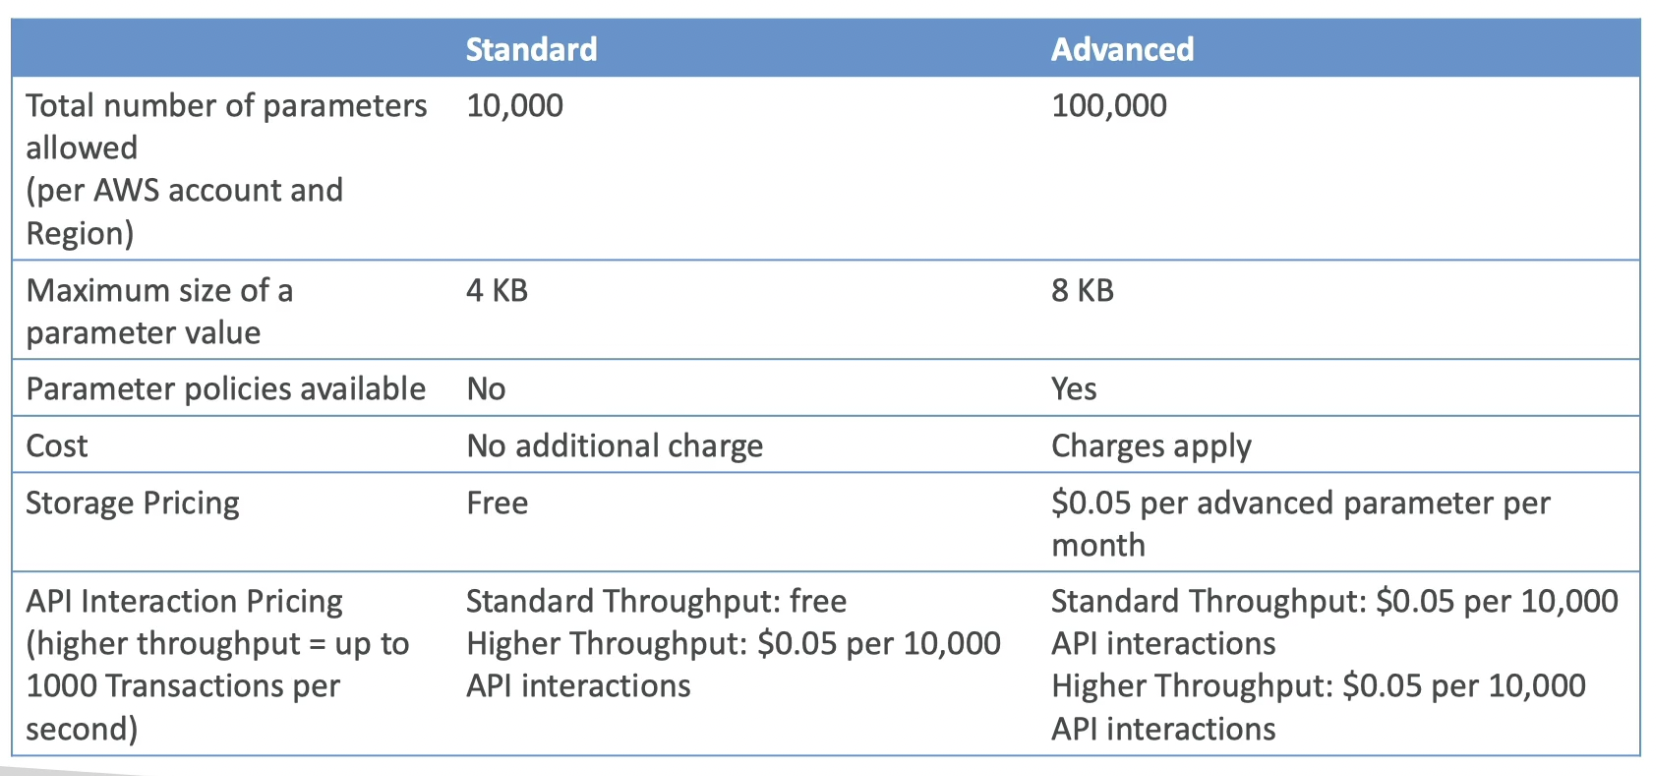
Parameter Policies (advanced parameters)
- Allow to assign a TTL to a parameter (expiration date) to force updating or deleting sensitive data such as passwords
- Can assign multiple policies at a time

Hands on
- Get Parameters (CLI)
aws ssm get-parameters --names /my-app/dev/db-url /my-app/dev/db-password --with-decryption
aws ssm get-parameters-by-path --path /my-app/ --recursive --with-decryption
Secrets Manager
- Newer service, meant for storing secrets only (parameter store is for storing any parameter)
- Capability to force rotation of secrets every fixed number of days (up to 1 year) (not available on Parameter store)
- Automate generation of secrets on rotation (uses Lambda function for this) (not available on Parameter store)
- A single secret consists of multiple key-value pairs
- Integration with Amazon RDS (MySQL, PostgreSQL, Aurora)
- Secrets are encrypted using KMS
- Mostly meant for RDS integration
- Can create secrets for
- databases
- need to specify the username and password to access the database
- link the secret to the respective database to allow for automatic rotation of database login info
- custom secrets
- provide our own key-value pairs
- databases
Multi Region Secrets
.png)
AWS Certificate Manager (ACM)
.png)
.png)
.png)
.png)
.png)
.png)
Web Application Firewall (WAF)
Intro
- Protects your web applications from common web exploits (Layer 7 - HTTP)
- Layer 7 has more data about the structure of the incoming request than layer 4 - TCP, UDP
- Can only be deployed on
- Application Load Balancer
- API Gateway
- CloudFront
- Define Web ACL (Web Access Control List)
- Rules can include:
- IP addresses
- HTTP headers
- HTTP body
- URI strings
- Size constraints (ex. max 5kb)
- Geo-match (block countries)
- Rate-based rules (to count occurrences of events per IP) for DDoS protection
- Protects from common attack SQL injection and Cross-Site Scripting (XSS)
- Rules can include:
.png)
.png)
AWS Shield
DDoS: Distributed Denial of service - Many requests at the same time
- AWS Shield Standard
- Free service that is activated for every AWS customer
- Provides protection from SYN/UDP Floods, Reflection attacks and other layer 3 & layer 4 attacks
- AWS Shield Advanced
- Optional DDoS mitigation service ($3,000 per month per organization)
- Protect against more sophisticated attack on Amazon EC2, Elastic Load Balancing (ELB), Amazon CloudFront, AWS Global Accelerator, and Route 53
- 24/7 access to AWS DDoS response team (DRP)
- Get reimbursed for usage spikes due to DDoS
- AWS Shield Standard
AWS Firewall Manager
- Manage rules in all WAFs across all the accounts of an AWS Organization
- Common set of security rules
- WAF rules (Application Load Balancer, API Gateways, CloudFront)
- AWS Shield Advanced (ALB, CLB, Elastic IP CloudFront)
- Security Groups for EC2 and ENI resources in VPC
- Amazon Route 53 Resolver DNS Firewall
- Policies are created at the region level
- Rules are applied to new resources as they created (good for compliance) across all and future accounts in your organization
.png)
DDoS Protection Best Practices
.png)
.png)
.png)
.png)
Amazon GuardDuty
- Intelligent threat discovery to protect AWS account
- Uses Machine Learning algorithms, anomaly detection, 3rd party data
- One click to enable (30 days trial), no need to install software
- Automatically monitors:
- Cloud Trail Events Logs unusual API calls, unauthorized deployments
- CloudTrail Management Events - create VPC subnet, create trail,
- CloudTrail S3 Data Events - get object, list objects, delete object, …
- VPC Flow Logs - unusual internal traffic, unusual IP address
- DNS Logs - compromised EC2 instances sending encoded data within DNS queries
- Kubernetes Audit Logs - suspicious activities and potential EKS cluster compromises
- Cloud Trail Events Logs unusual API calls, unauthorized deployments
- Can setup CloudWatch Event rules to be notified in case of findings
- CloudWatch Events rules can target AWS Lambda or SNS for automation
- Can protect against CryptoCurrency attacks (has a dedicated “finding” for it)

Amazon Inspector
- Automated Security Assessments for
- EC2 instances
- Leveraging the AWS System Manager (SSM) agent running on EC2 instances for continuous assessment of EC2 instances
- Analyze against unintended network accessibility
- Analyze the running OS against known vulnerabilities
- Containers push to Amazon ECR - Elastic Container Registry
- Assessment of containers as they are pushed
- EC2 instances
- Reporting & integration with AWS Security Hub
- Send findings to Amazon Event Bridge
- It will give a risk score associated with all vulnerabilities for prioritization
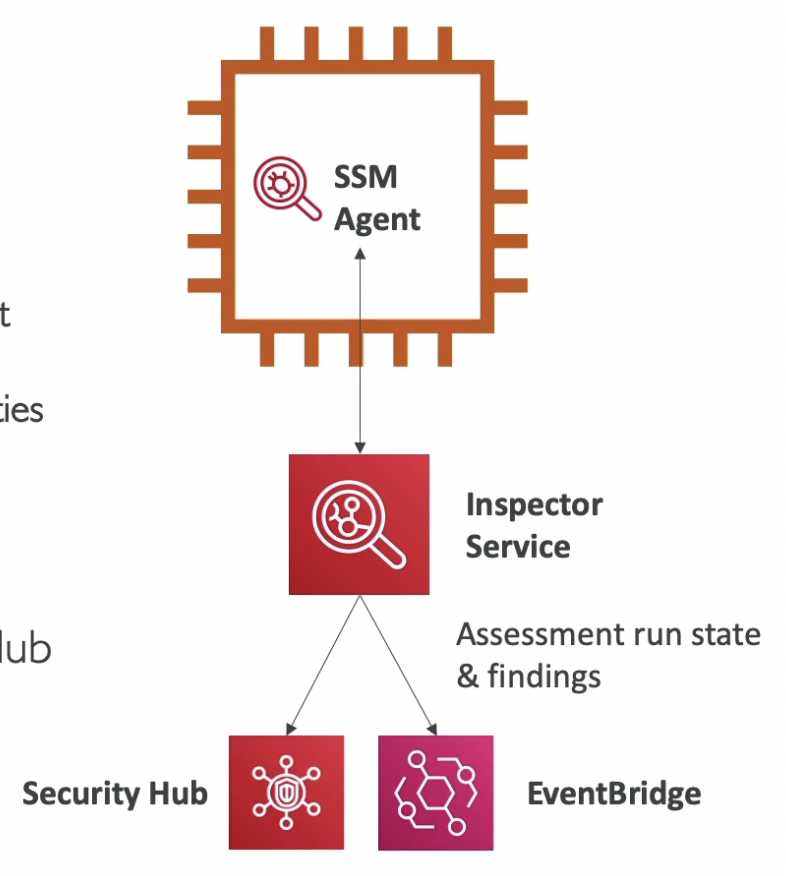
.png)
- Automated Security Assessments for
Amazon Macie
Amazon Macie is a fully managed data security service that uses Machine Learning to discover and protect your sensitive data stored in S3 buckets. It automatically provides an inventory of S3 buckets including a list of unencrypted buckets, publicly accessible buckets, and buckets shared with other AWS accounts. It allows you to identify and alert you to sensitive data, such as Personally Identifiable Information (PII).
- Amazon Macie is a fully managed data security and data privacy service that uses machine learning and pattern matching to discover and protect your sensitive data in AWS.
- Macie helps identify and alert you to sensitive data, such as personally identifiable information (PII) in an S3 bucket.
- One click to enable
- Notifies through an EB event
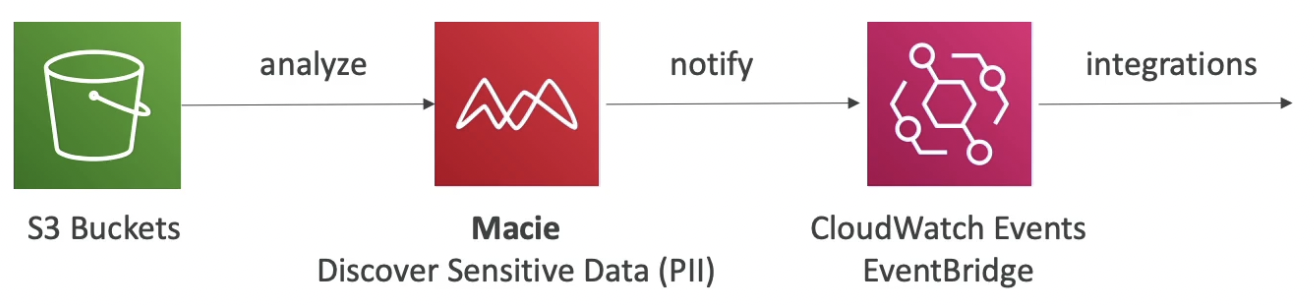
CloudHSM
Intro
- AWS provisions encryption hardware (Hardware Security Module)
- You manage your own encryption keys entirely (not AWS)
- HSM device is stored in AWS (tamper resistant, FIPS 140-2 Level 3 compliance)
- Supports both symmetric and asymmetric encryption (SSL/TLS keys)
- No free tier available
- CloudHSM clusters are spread across Multi AZ (HA)
- Redshift supports CloudHSM for database encryption and key manasgement
- Good option to use with SSE-C encryption
- IAM permissions are required to perform CRUD operations on HSM cluster
- CloudHSM Software is used to manage the keys and users (in KMS, everything is managed using IAM)

KMS vs CloudHSM
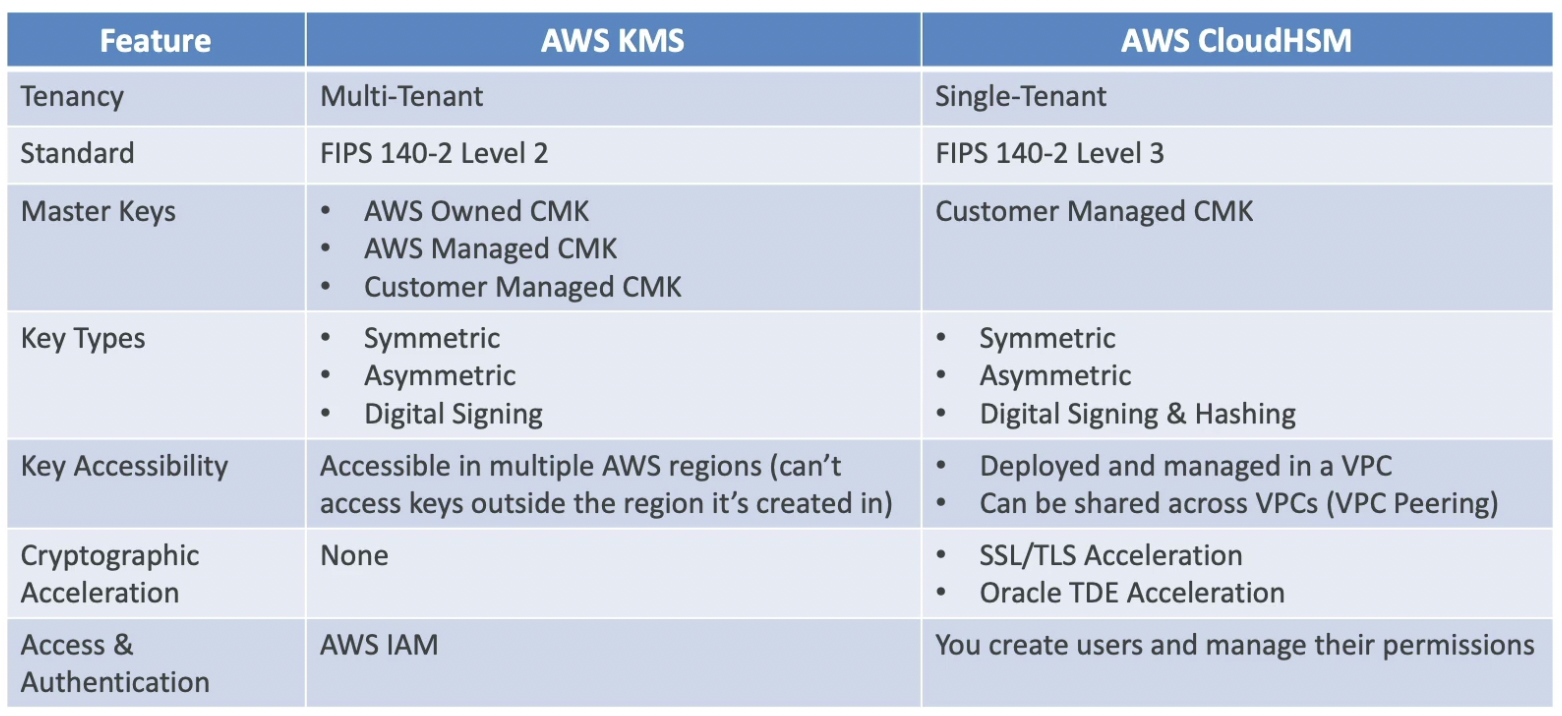
Untitled

Untitled
Architecture for DDoS Protection
Shield will protect against DDoS attack and WAF will control the kind of requests that can pass through.

Shared Responsibility Model
- Intro
- AWS’s responsibility - Security of the Cloud
- Protecting infrastructure (hardware, software, facilities, and networking) that runs all the AWS services
- Managed services like S3, DynamoDB, RDS, etc.
- Customer’s responsibility - Security in the Cloud
- For EC2 instance, customer is responsible for management of the guest OS (including security patches and updates), firewall & network configuration, IAM
- Encrypting application data
- Shared responsibility:
- Patch Management, Configuration Management, Awareness & Training
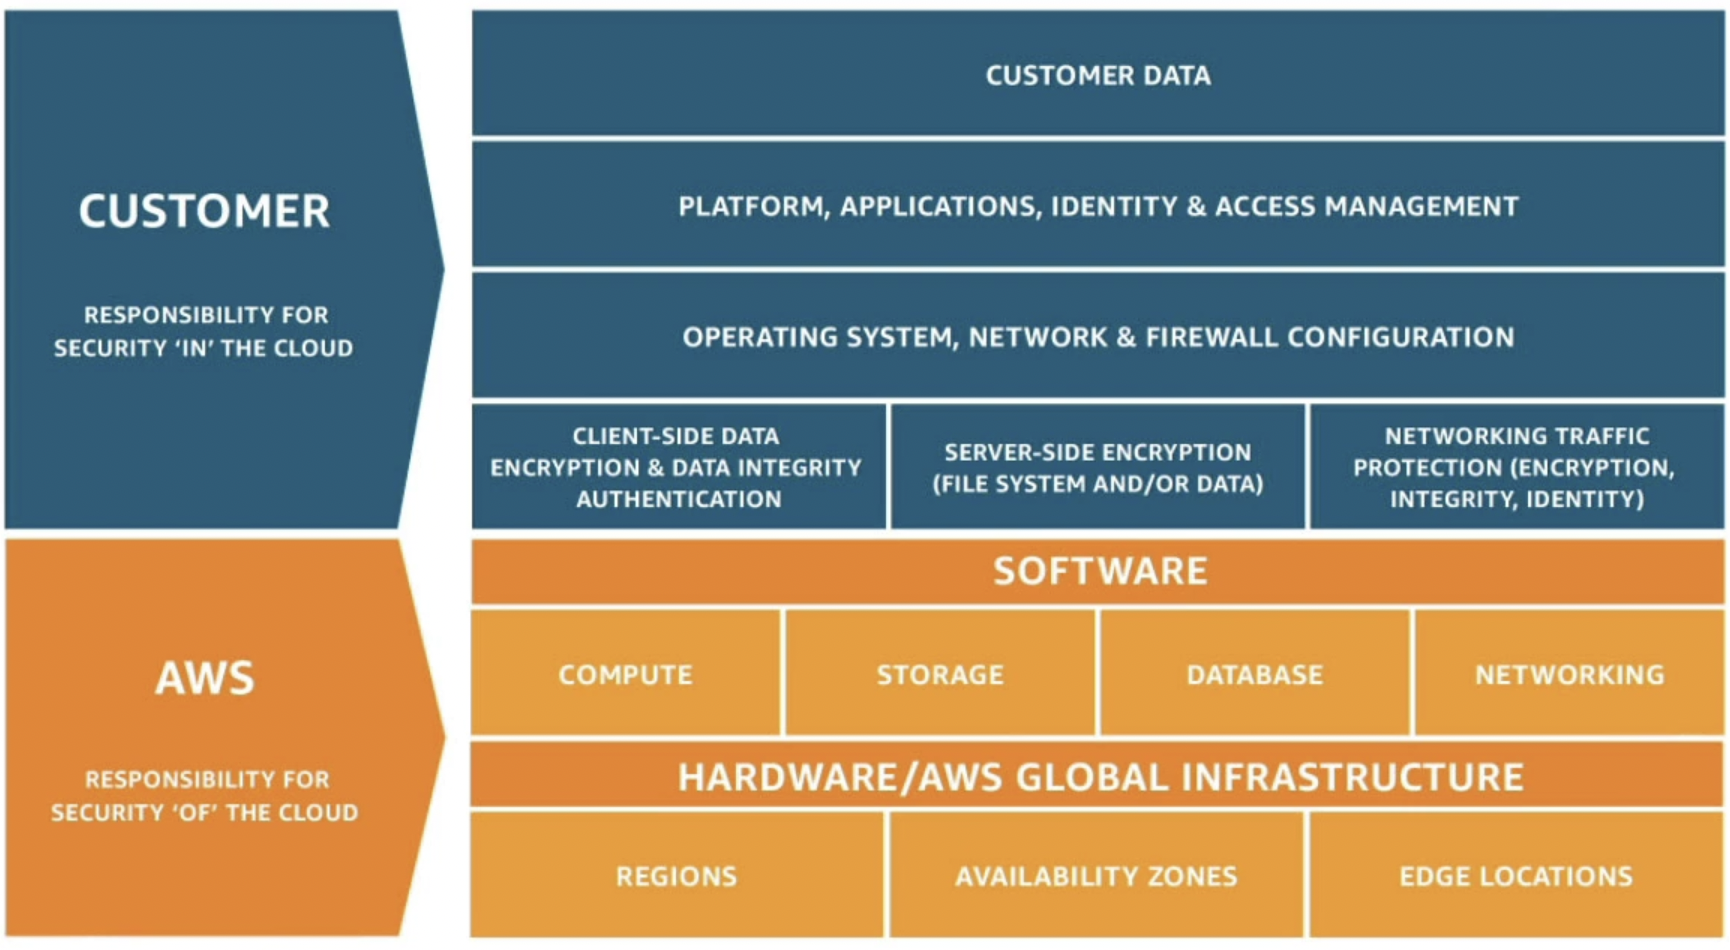
Untitled
- AWS’s responsibility - Security of the Cloud
- RDS - example
- AWS responsibility:
- Manage the underlying EC2 instance, disable SSH access
- Automated DB patching
- Automated OS patching
- Audit the underlying instance and disks & guarantee it functions
- Your responsibility:
- Check the ports / IP / security group inbound rules in DB’s SG
- In-database user creation and permissions
- Creating a database with or without public access
- Ensure parameter groups or DB is configured to only allow SSL connections
- Database encryption setting
- AWS responsibility:
- S3 - example
- AWS responsibility:
- Guarantee you get unlimited storage
- Guarantee you get encryption if you enable it
- Ensure separation of the data between different customers
- Ensure AWS employees can’t access your data
- Your responsibility:
- Bucket configuration
- Bucket policy / public setting
- IAM user and roles
- Enabling encryption
- AWS responsibility:
- Intro
Section 28: Networking - VPC
Section 28: Networking - VPC
Classless Inter-Domain Routing (CIDR)
- It is a method for allocating IP addresses
- CIDR consists of 2 components
- Base IP
- Subnet Mask
- Defines how many bits are frozen from the left side
- Can be represented in two ways
- /8 = 255.0.0.0
- /16 = 255.255.0.0
- /24 = 255.255.255.0
- /32 = 255.255.255.255

- 0.0.0.0/0 ⇒ all IP space
- The Internet Assigned Numbers Authority (IANA) established certain blocks of IPv4 addresses for the use of private (LAN) and public (Internet) addresses
- Private IP can only allow certain values:
- 10.0.0.0 - 10.255.255.255 (10.0.0.0/8) ⇒ used in big networks (24 bits can change)
- 172.16.0.0 - 172.31.255.255 (172.16.0.0/12) ⇒ AWS default VPC
- 192.168.0.0 - 192.168.255.255 (192.168.0.0/16) ⇒ home networks
- All the rest of the IP addresses on the Internet are Public
VPC (Virtual Private Cloud)
Theory
- You can have multiple VPCs in an AWS region (max. 5 per region - soft limit, can be increased)
- Max. CIDR per VPC is 5
- For each CIDR:
- Min. size is /28 (16 IP addresses)
- Max. size is /16 (65536 IP addresses)
- Because VPC is private, only the Private IPv4 ranges are allowed
- When we create a VPC, we need to specify an IPv4 CIDR. Once created, a default route table and network ACL will be attached to the subnets of this VPC.
- A VPC consists of subnets (sub-range of IP addresses) where each subnet is bound to a specific AZ
- All new AWS accounts have a default VPC
- New EC2 instances are launched into the default VPC if no subnet is specified
- Default VPC has Internet connectivity and all EC2 instances inside it have public IPv4 addresses and public and a private IPv4 DNS names
Hands on
- Create a VPC
VPC → Create
CIDR: 10.0.0.0/16 (max size)
We can edit the CIDR and add up to 5 CIDRs in the VPC.

- Create a VPC
Subnets
Theory
- A sub range of IPv4 addresses within your VPC
- Each subnet is bound to a specific AZ
- Subnets in a VPC cannot have overlapping CIDRs
- AWS reserves 5 IP addresses (first 4 & last 1) in each subnet. These 5 IP addresses are not available for use. Example: if CIDR block 10.0.0.0/24, then reserved IP addresses are:
- 10.0.0.0 ⇒ Network Address
- 10.0.0.1 ⇒ Reserved by AWS for the VPC router
- 10.0.0.2 ⇒ Reserved by AWS for mapping to Amazon-provided DNS
- 10.0.0.3 ⇒ Reserved by AWS for future use
- 10.0.0.255 ⇒ Network Broadcast Address. AWS does not support broadcast in a VPC, therefore the address is reserved
- Exam Tip: If you need 29 IP addresses for EC2 instances: You can’t choose a subnet of size /27 (32 IP addresses, 32 - 5 = 27 < 29) You need to choose a subnet of size /26 (64 IP addresses, 64 - 5 = 59 > 29)
Hands on
Inside the custom VPC, create 4 subnets

Internet Gateway (IGW)
Theory
- Allows resources in a VPC connect to the Internet
- Should be used to connect public resources to the internet (use NAT gateway for private resources)
- It scales horizontally and is highly available and redundant
- Must be created separately from a VPC
- One VPC can only be attached to one IGW and vice versa
- Internet Gateways on their own do not allow Internet access, route table of the public subnets must also be edited to allow requests destined outside the VPC to be routed to the IGW.
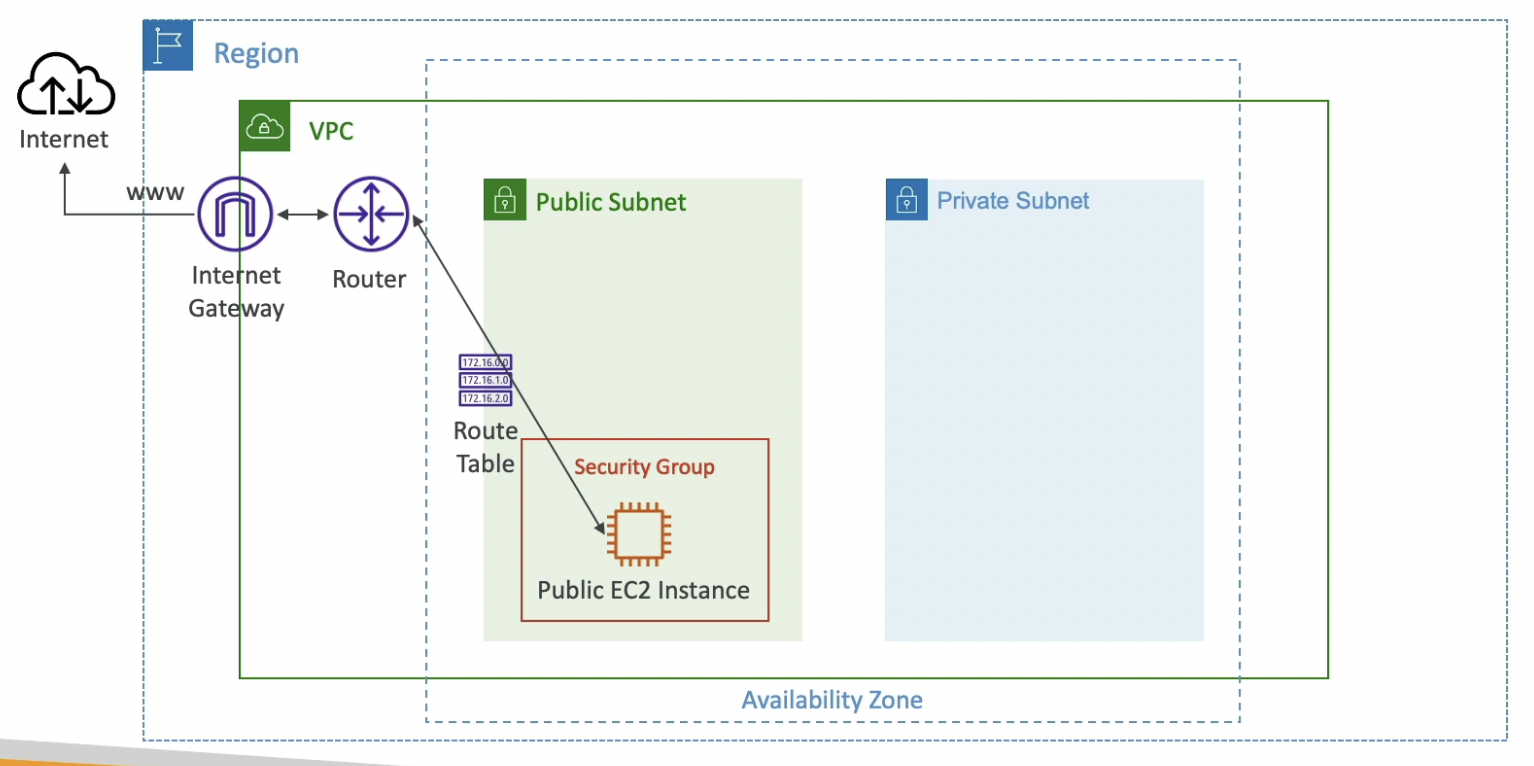
Hands on
- Create an EC2 instance in a public subnet
Now, if we try to connect to this instance, it will not work as the internet gateway is not configured.
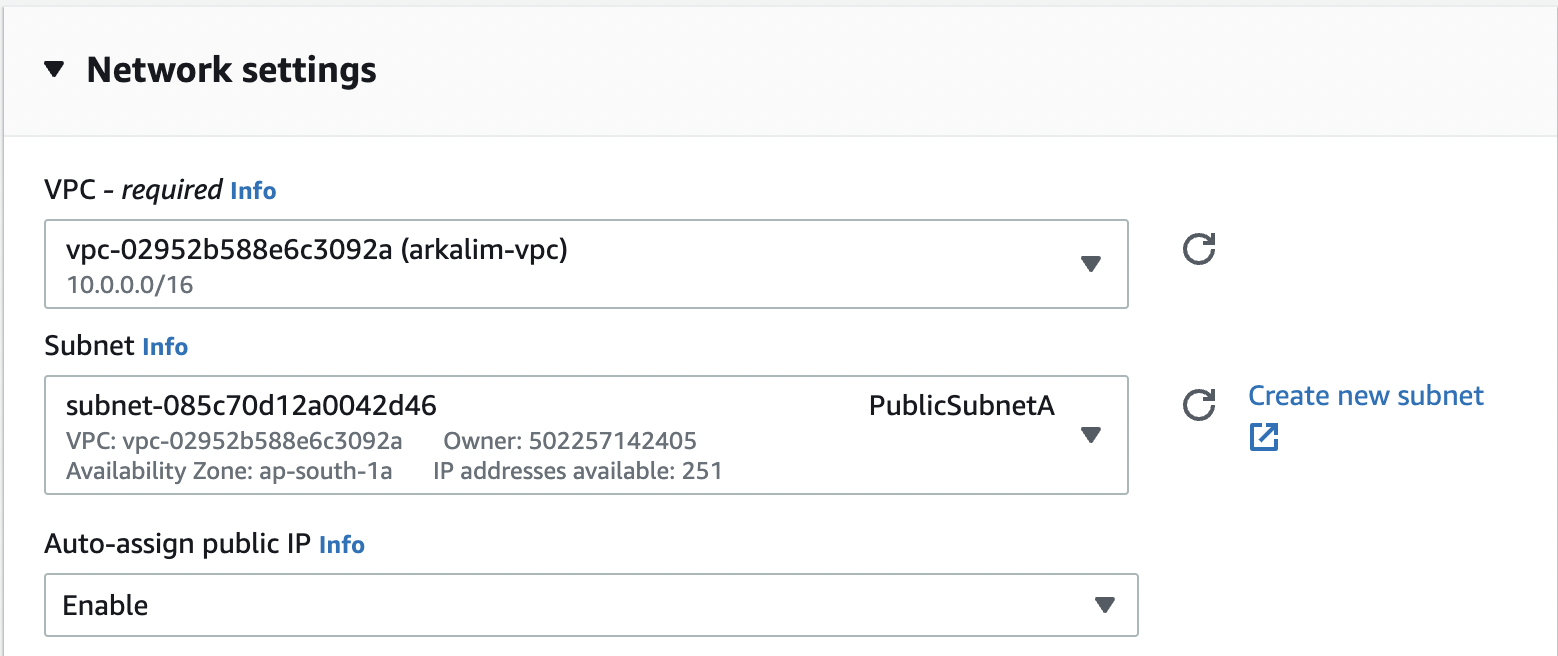
Untitled
- Create Internet Gateway & attach it to VPC
VPC → Internet Gateways → Create
- Create Public and Private route tables and assign them to respective subnets
Create PublicRouteTable and associate it to PublicSubnetA & PublicSubnetB. Do the same with PrivateRouteTable.

Untitled
- Add route to Public Route Table to send traffic to IGW
The below routes say:
- If the traffic is destined to VPC, route it locally (to VPC)
- If the destination IP doesn’t match the above criteria, send it to the internet gateway

Untitled
Now, we can connect to our EC2 instance in the public subnets from the public internet
- Create an EC2 instance in a public subnet
Bastion Hosts
Theory
- It is an EC2 instance running in the public subnet of our VPC to allow users to SSH into the instances in the private subnet.
- Users from the internet SSH into the Bastion Host which will then SSH into the EC2 instance of the private subnet.
- Security groups of the private instances should only allow traffic from the bastion host.
- Exam Tip: Make sure the bastion host only has port 22 traffic from the IP address you need (tightened security).
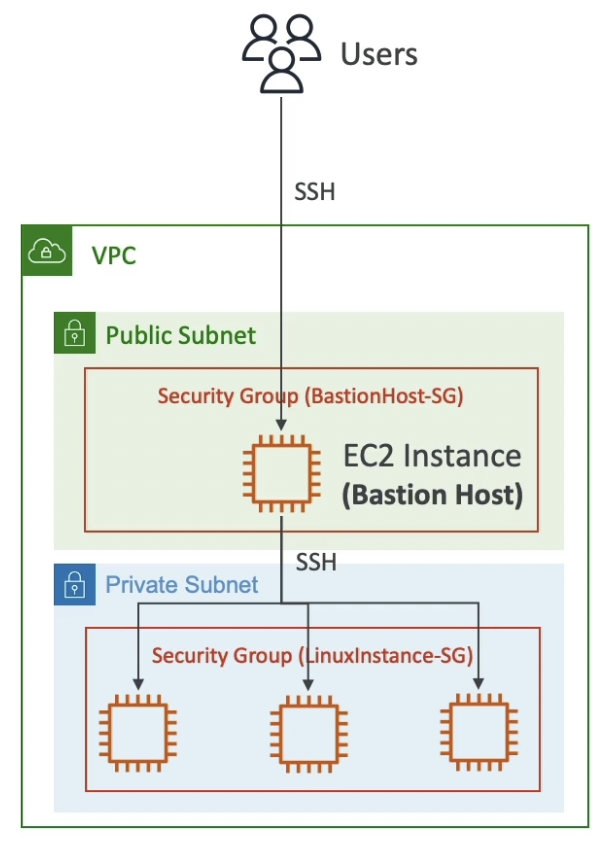
Hands on
Create an EC2 instance in a private subnet with a security group to only allow SSH from the Bastion Host
SSH into Bastion Host and then SSH into the private instance.
NAT Instances (outdated)
Theory
- NAT (Network Address Translation)
- Allows EC2 instances in private subnets to connect to the Internet without being connected from the internet
- It is an instance launched in the public subnet which routes the packets to-from the public internet to the private instances.
- Must disable EC2 setting: source / destination IP check on the NAT instance as the IPs can change.
- NAT instances must have Elastic IP attached to it
- Route Tables must be configured to route traffic from private subnets to the NAT instance (its elastic IP)
- In the diagram below, the private instance wants to hit a public server.
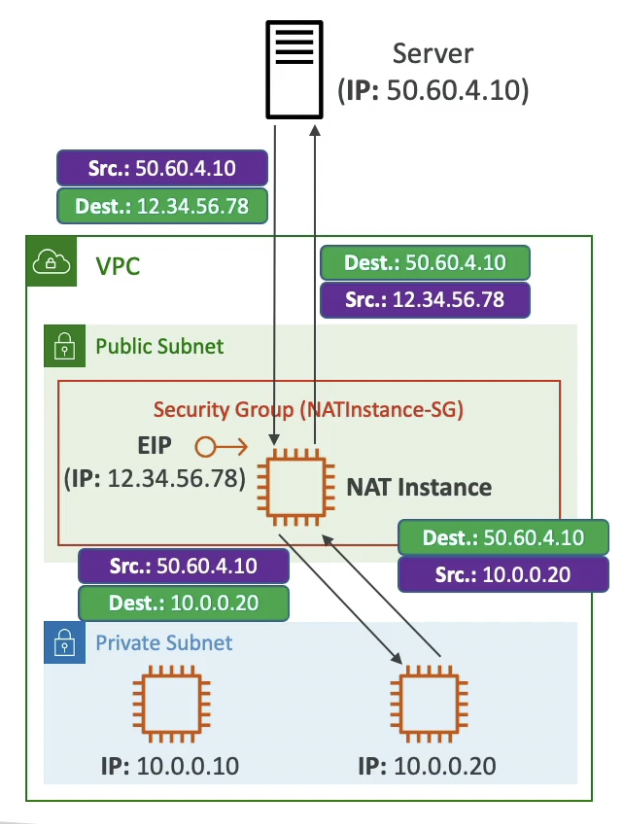
- Pre-configured Amazon Linux AMI is available for NAT instances (deprecated on December 31, 2020)
- Not highly available or resilient out of the box. You need to create an ASG in multi-AZ + resilient user-data script
- Internet traffic bandwidth depends on EC2 instance type
- You must manage Security Groups & rules:
- Inbound:
- Allow HTTP / HTTPS traffic coming from Private Subnets
- Allow SSH from your home network (access is provided through Internet Gateway)
- Outbound:
- Allow HTTP / HTTPS traffic to the Internet
- Inbound:
Architecture
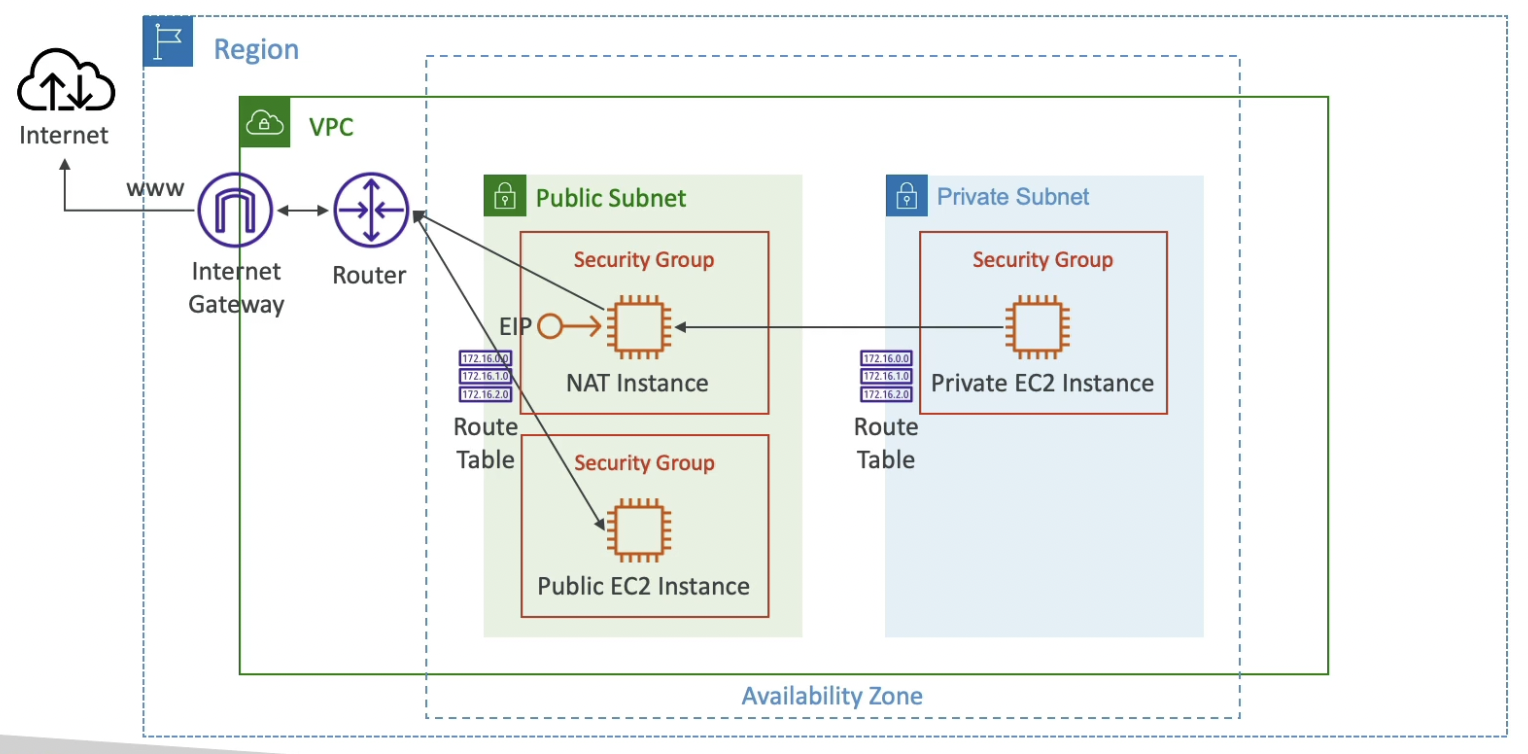
Untitled
Hands on
- Create a NAT instance using a pre-configured AMI
Security group rules for NAT instance: allow incoming HTTP, HTTPS and ICMP-IPv4 traffic from our VPC

- Disable source/destination check on the NAT instance
- Edit PrivateRouteTable to send all requests destined to public internet to the NAT instance

Untitled
Now if we
ping google.comfrom the private instance, we will get the result back.- Create a NAT instance using a pre-configured AMI
NAT Gateway
Intro
- Used to allow instances in private subnet to connect to internet but not be accessed over the internet.
- AWS-managed NAT, higher bandwidth, high availability, no administration
- Pay per hour for usage and bandwidth
- NATGW is created in a specific Availability Zone
- Just like NAT instances, NAT gateway uses an Elastic IP
- Can’t be used by EC2 instances in the same subnet (only from other subnets)
- Routing of requests: Private Subnet ⇒ NATGW ⇒ IGW
- 5 Gbps of bandwidth with automatic scaling up to 45 Gbps
- No Security Groups required
- Route table of the private subnets need to be updated to route public requests to NAT gateway

High availability
- NAT Gateway is resilient within a single Availability Zone
- Must create multiple NAT Gateways in multiple AZs for fault-tolerance
- There is no cross-AZ failover needed because if an AZ goes down, all of the instances in that AZ are also down. So, they don’t need NAT.

NAT Gateway vs NAT Instance
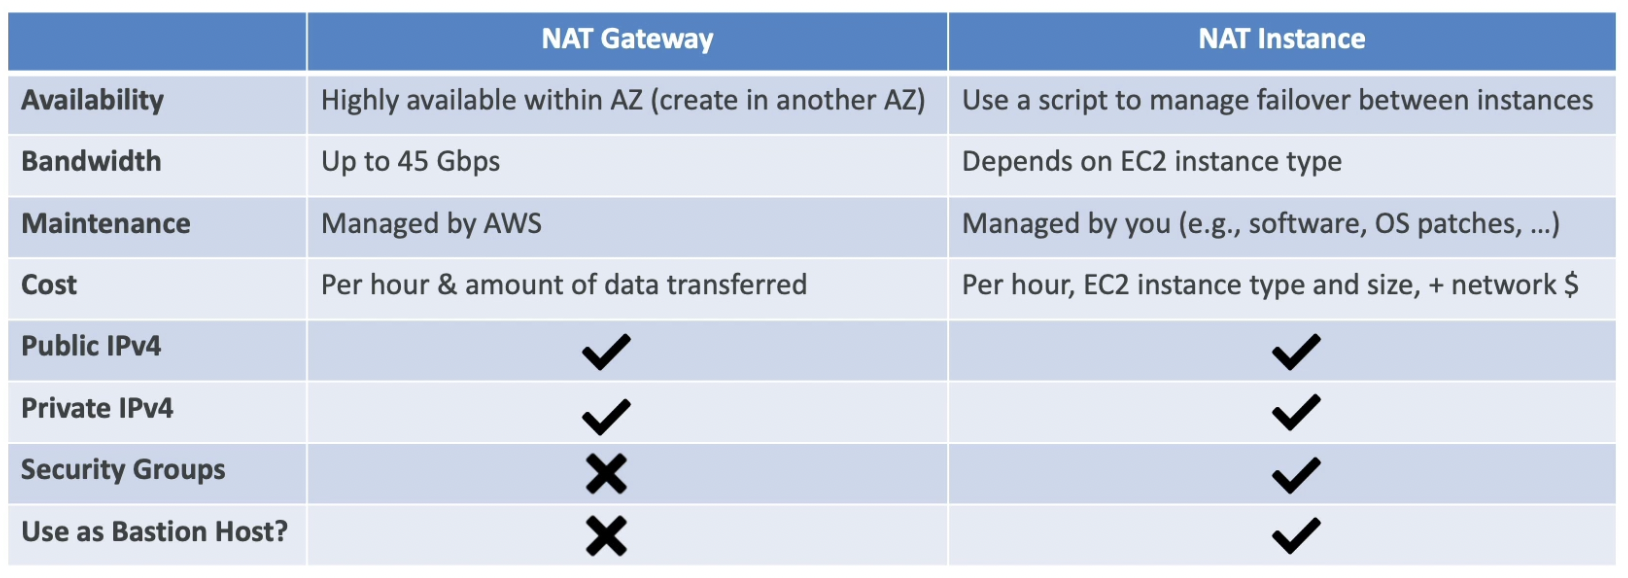
Hands on
- Create a NAT Gateway
VPC → NAT Gateways → Create
Subnet: any public subnet
Connectivity type: Public
Need to allocate an elastic IP
- Edit PrivateRouteTable to send public requests to NAT Gateway
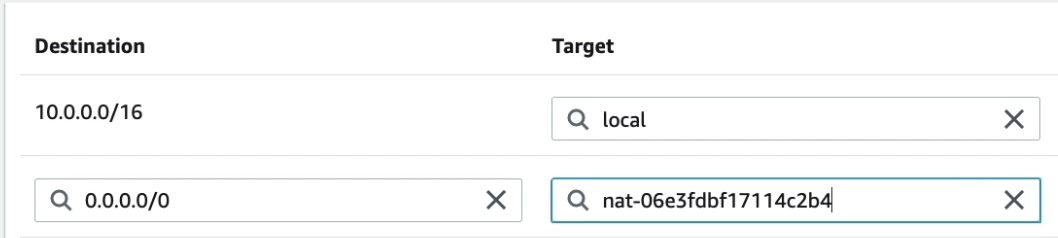
Untitled
Now, we can hit public endpoints from the instances in our private subnets.
- Create a NAT Gateway
Network Access Control List (NACL)
Intro
- NACL are like a firewall which control traffic from and to subnets
- One NACL per subnet but a single NACL can be attached to multiple subnets
- New subnets are assigned the Default NACL
- You define NACL Rules:
- Rules have a number (1-32766), lower number has higher precedence
- First rule match will drive the decision
- Example: if you define #100 ALLOW 10.0.0.10/32 and #200 DENY 10.0.0.10/32, the IP address will be allowed because 100 has a higher precedence over 200
- The last rule is an asterisk (*) and denies a request in case of no rule match
- AWS recommends adding rules by increment of 100 so that you can add rules in between if needed
- Newly created NACLs will deny everything
- NACL are a great way of blocking a specific IP address at the subnet level
Default NACL
- Allows everything inbound/outbound
- Do NOT modify the Default NACL, instead create custom NACLs
- If this NACL is associated with any subnet, it will allow all traffic in and out of the subnet
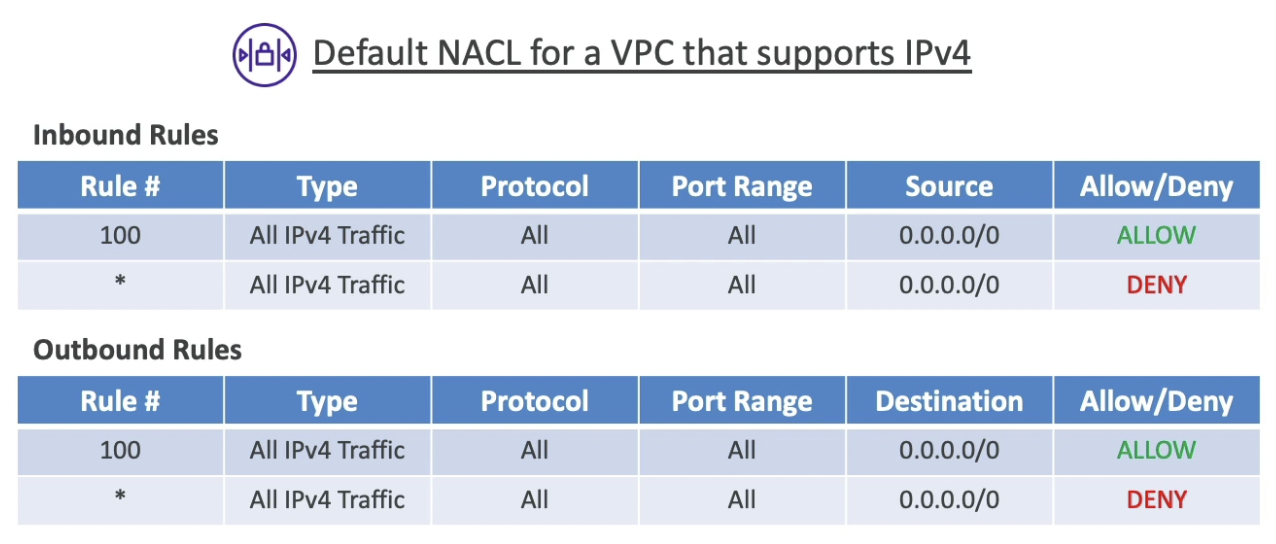
NACL & Security Groups
- NACL evaluates the incoming and outgoing requests at the subnet level.
- NACL is stateless whereas Security Groups are stateful
- Incoming requests: Evaluated by NACL before entering the subnet → Evaluated by SG → Response passes through the SG without check (stateful) → Response evaluated at NACL (stateless)
- The above point can be verified by running a HTTP server on a public instance in the VPC and blocking outbound traffic on the security group. The response will still travel out from the security group (stateful). On the other hand, adding a higher precedence rule in the NACL to block the outbound traffic will not allow the response from the server to reach back to client.
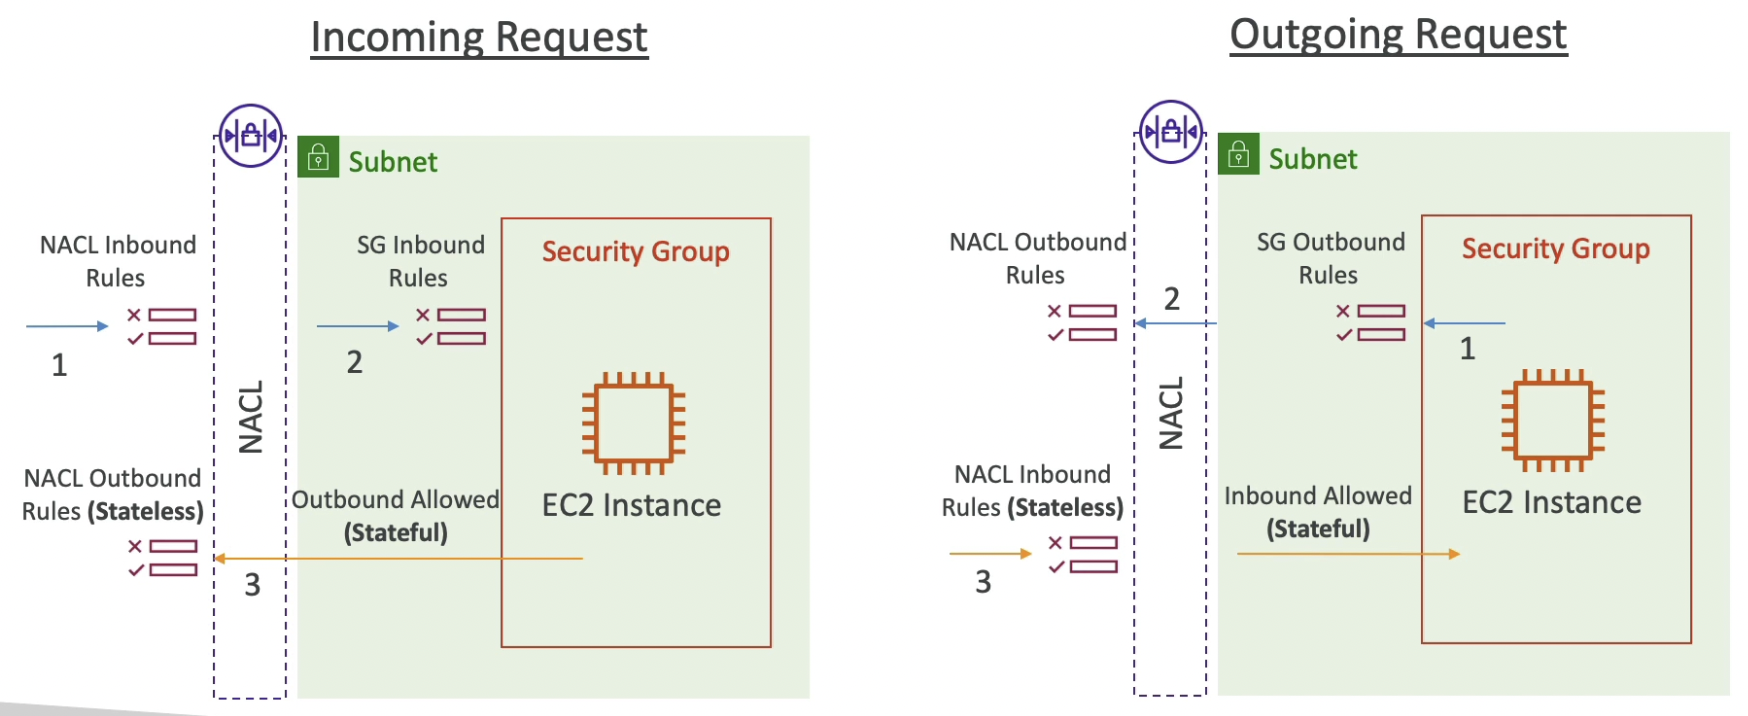
NACL with Ephemeral Ports
Ephemeral Ports
When a client sends an HTTP request to a server, it does so on a fixed IP and port of the server. In the request, the client also sends a temporary port for the server to respond back. The server when sending the response uses this port which is only lived for the duration of this HTTP connection.

.png)
In the example below, the client EC2 instance needs to connect to DB instance.
Since the ephemeral port can be randomly assigned from a range of ports, the Web Subnets’s NACL must allow inbound traffic from that range of ports and similarly DB Subnet’s NACL must allow outbound traffic on the same range of ports.
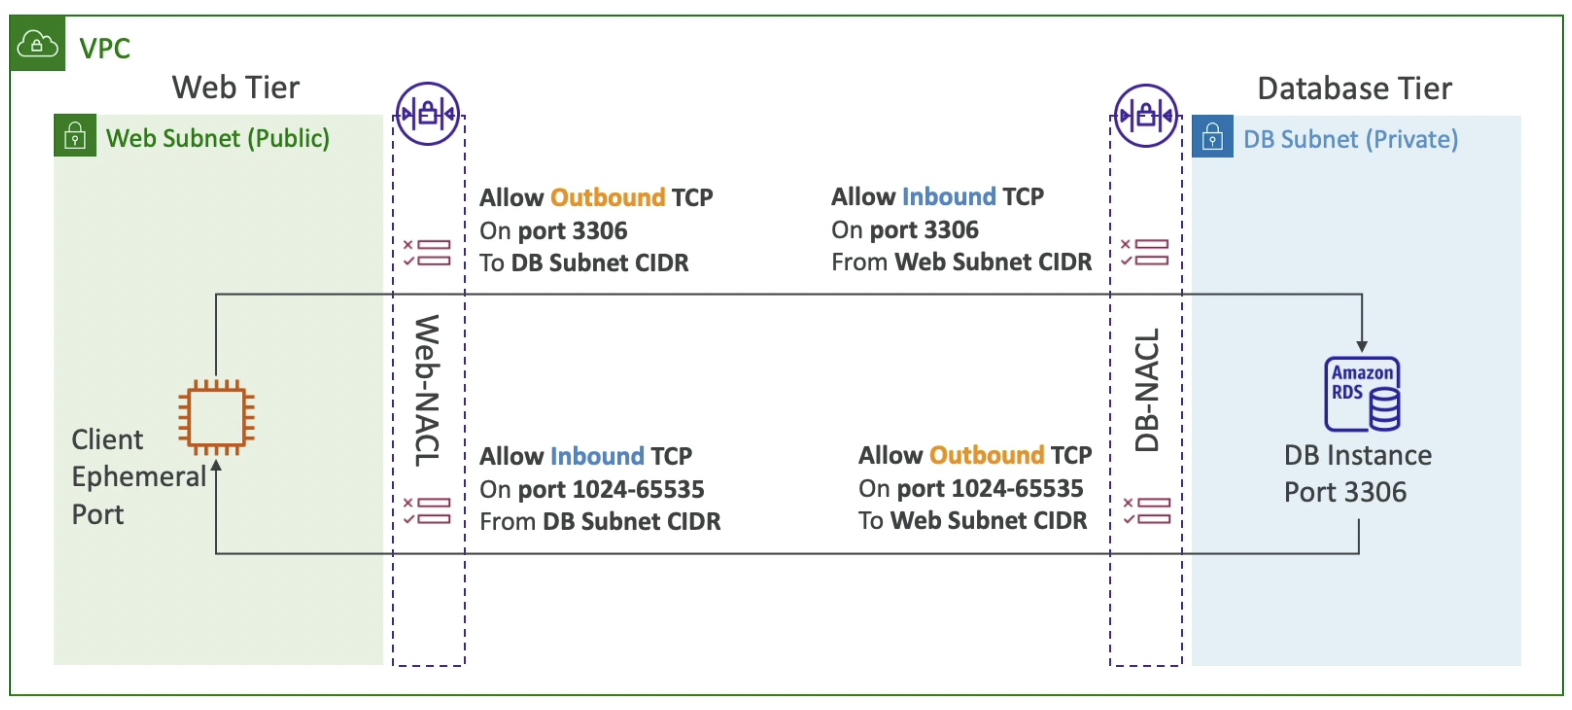
Multiple subnets ⇒ configure NACL for cross subnet connections too.
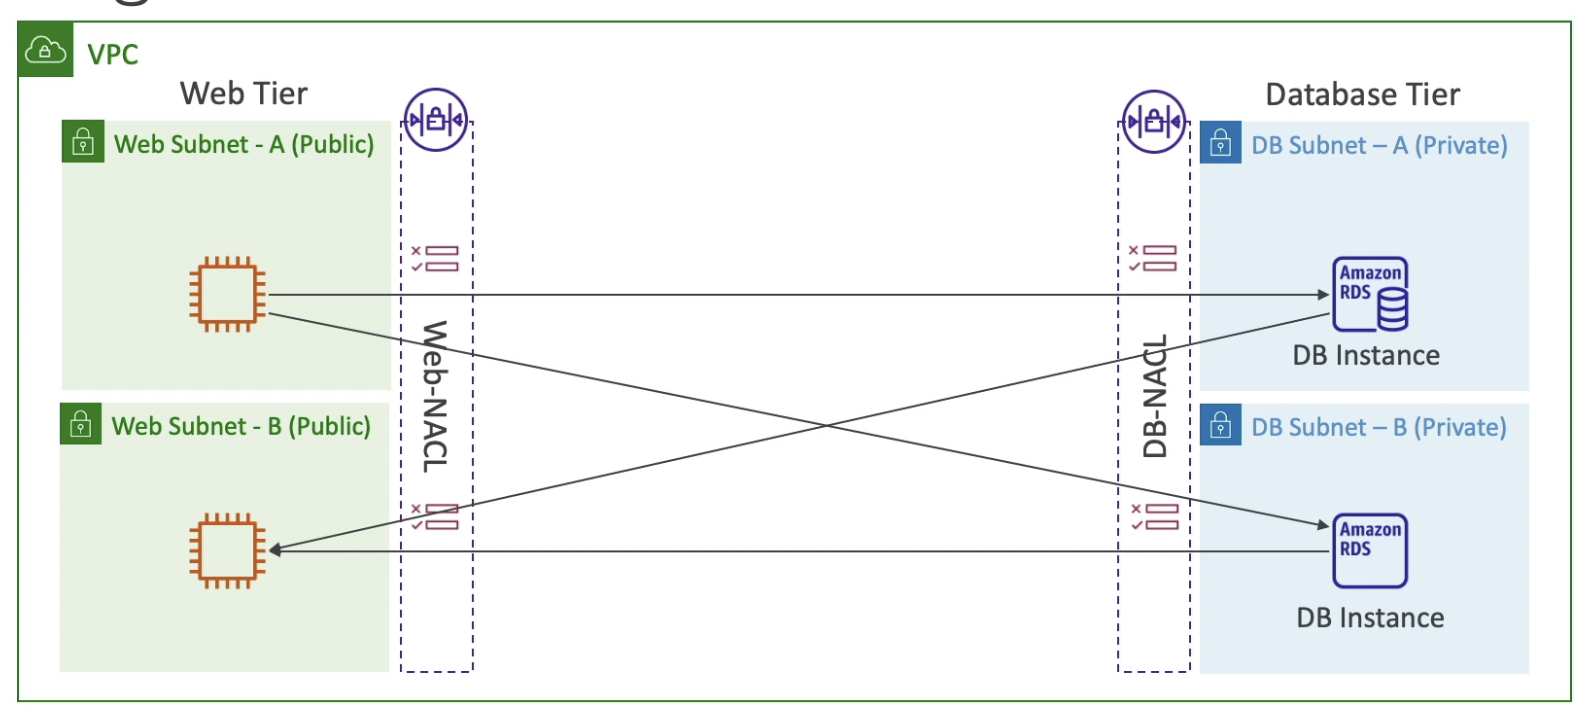
NACL vs Security Groups
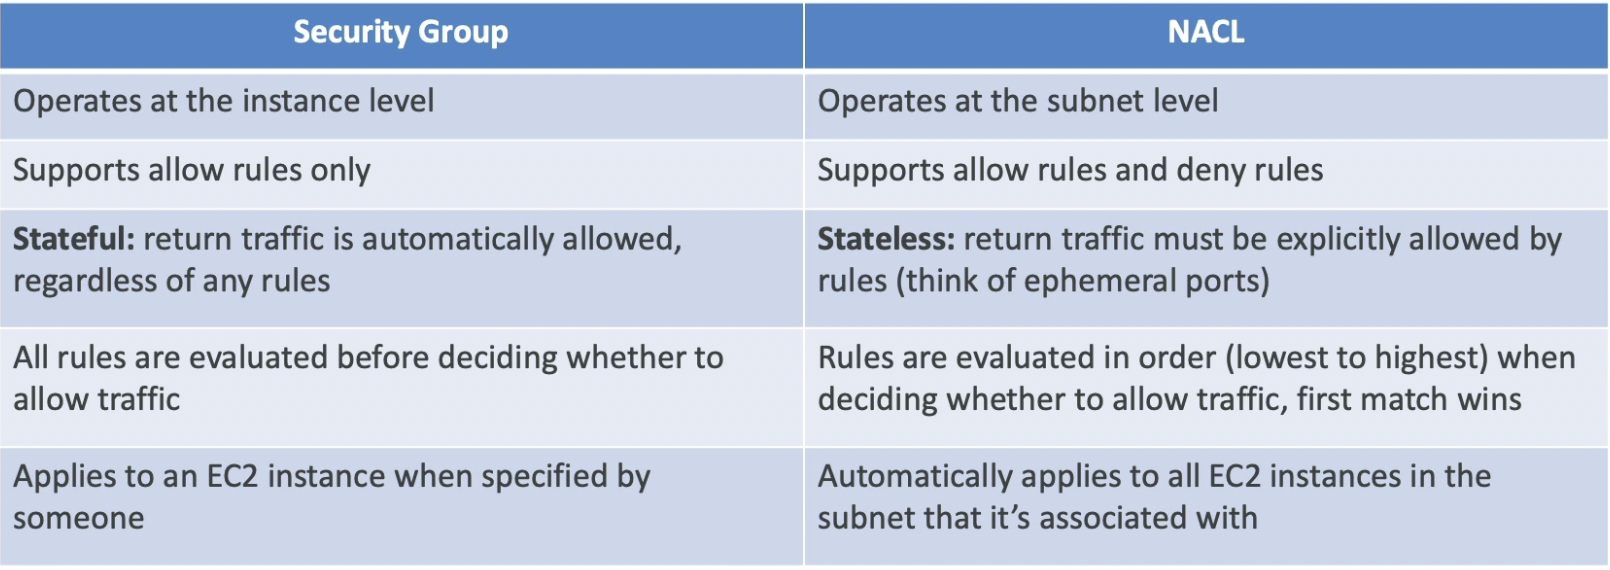
VPC Peering
Theory
- Privately connect two VPCs (could be in different region or account) using AWS’ network to make them behave as if they were in the same network

- Participating VPCs must not have overlapping CIDRs
- VPC Peering connection is NOT transitive (A - B, B - C ≠> A - C)
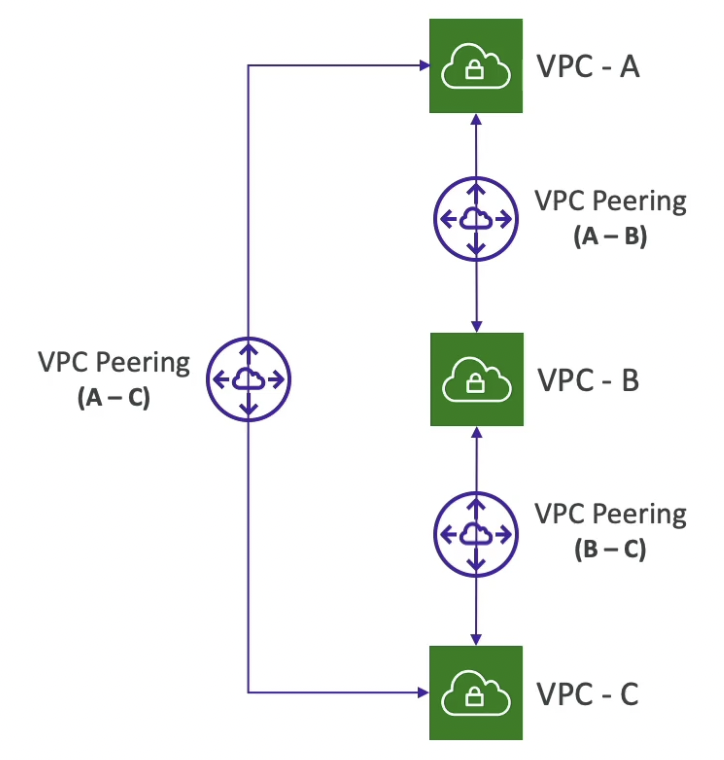
- You must update route tables in each VPC’s subnets to ensure EC2 instances across VPCs can communicate with each other
- You can reference a security group in a peered VPC across account or region. This allows us to use SGs instead of CIDRs when configuring rules.

- Privately connect two VPCs (could be in different region or account) using AWS’ network to make them behave as if they were in the same network
Hands on
- Launch an EC2 instance in the Default VPC
- Launch an EC2 instance in the public subnet of custom VPC with a simple HTTP server
- Create a peering connection between the default VPC and custom VPC
VPC → Peering Connection → Create
Accept the peering request
- Configure the PublicRouteTable for custom VPC
Route the traffic destined to Default VPC through the peering connection.

Untitled
- Configure the DefaultRouteTable for default VPC
Route the traffic destined to Custom VPC through the peering connection.

Untitled
Now the two VPCs will behave as one but with different CIDRs.
To test, run
curl private_ip_of_the_instance_in_custom_vpc
VPC Endpoints (AWS PrivateLink)
Intro
- These are private endpoints within your VPC that allow AWS services to privately connect to resources within the VPC without traversing the public internet.
- In the diagram below, DynamoDB is connected through the public internet (more cost due to the request being routed through NATGW & IGW) but CloudWatch and S3 are connected within the AWS network.

- They’re redundant and scale horizontally
- They remove the need of IGW, NATGW, etc. to access AWS Services
- In case of issues:
- Check DNS Setting Resolution in your VPC
- Check Route Tables
.png)
Types of VPC Endpoints
Interface Endpoints
- Provisions an ENI (private IP address) as an entry point per subnet
- Need to attach a security group to the VPC endpoint to control access to the VPC endpoint
- Supports most AWS services
- $ per hour + $ per GB of data processed
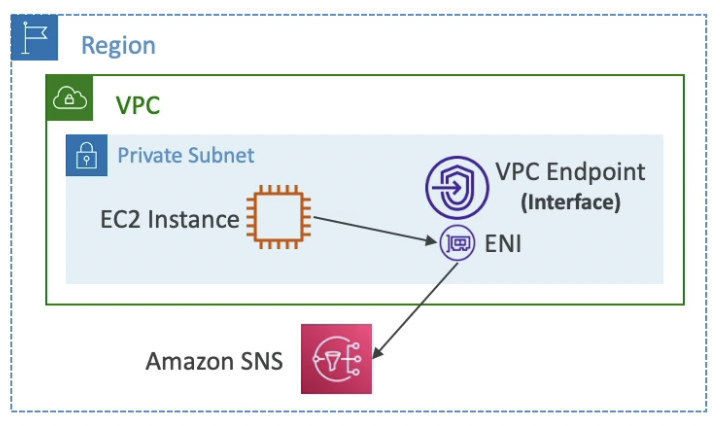
Gateway Endpoints
- Provisions a gateway and must be used as a target in a route table
- Supports only S3 and DynamoDB
- free
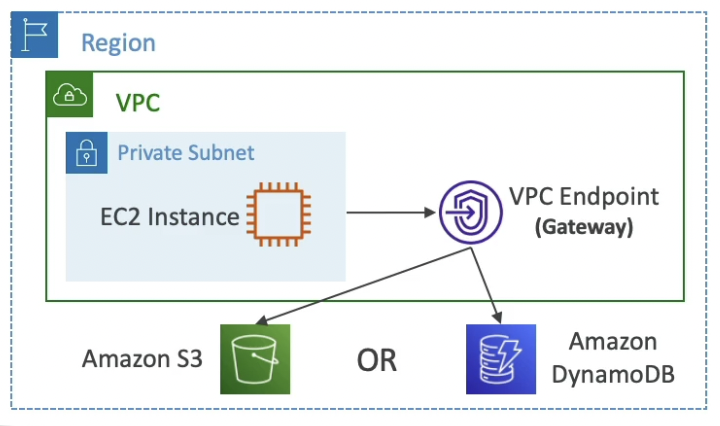
Hands on
- Access S3 bucket through the public internet
- Attach an IAM role policy to allow the private instance to access S3 buckets within the account
- Select instance → Actions → Instance settings → Modify IAM Role
- SSH into Bastion Host → SSH into private instance →
aws s3 lsthis command will work
- Attach an IAM role policy to allow the private instance to access S3 buckets within the account
- Remove internet access to Private Subnet
Edit the route table of private subnet → Remove the route which redirects public destined packets to NAT gateway for internet access
Now,
aws s3 lscommand will not work as it routes through the public internet
- Create a VPC endpoint to allow access to S3
VPC → Endpoints → Create
VPC: Custom VPC
Route Table: PrivateRouteTable
Now, a new managed route will be added to the private route table to route S3 requests internally through the private network.

Untitled
Now, we can run
aws s3 ls --region ap-south-1with the region as in AWS CLI, the default region is us-east-1
- Access S3 bucket through the public internet
VPC Flow Logs
Theory
- Capture information about IP traffic going into your interfaces
- Flow Logs can be at three levels:
- VPC Flow Logs
- Subnet Flow Logs
- Elastic Network Interface (ENI) Flow Logs
- Flow logs can be configured to show:
- Accepted traffic
- Rejected traffic
- All traffic
- Helps to monitor & troubleshoot connectivity issues
- Can be used for analytics on usage patterns, or malicious behavior
- Flow logs data can go to S3 (bulk analytics) or Cloud Watch Logs (near real-time decision making)
- Query VPC flow logs using Athena on S3 or Cloud Watch Logs Insights
- Captures network information from AWS managed interfaces too: ELB, RDS, ElastiCache, Redshift, WorkSpaces, NATGW, Transit Gateway, etc.
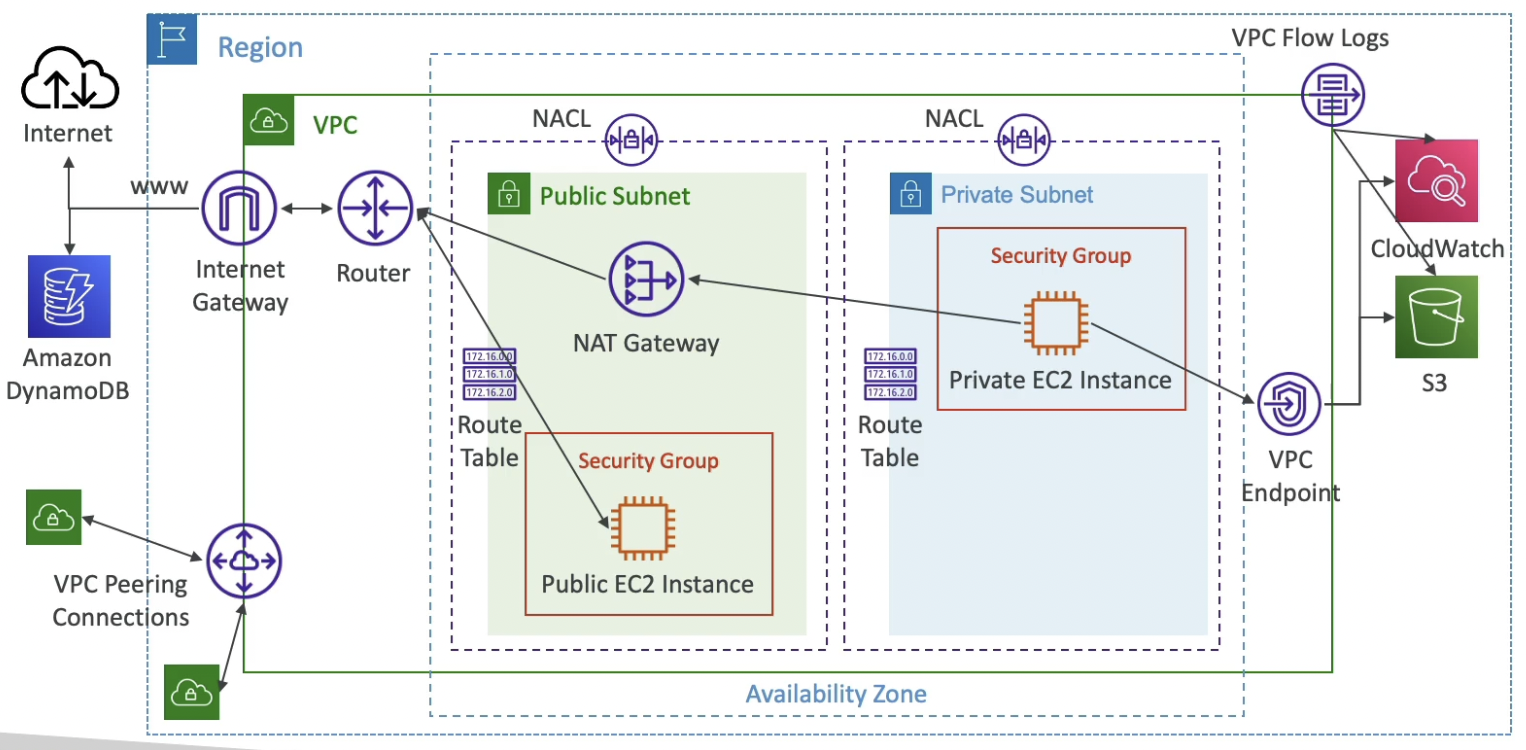
VPC Flow Logs syntax

- srcaddr & dstaddr - help identify problematic IP
- srcport & dstport - help identity problematic ports
- action - success or failure of the request due to Security Group / NACL
Troubleshooting NACL and SG issues
For incoming requests, if the inbound traffic is rejected, it could be due to NACL or SG blocking the request. But, if the outbound traffic is rejected, then it means only NACL is blocking the response as SG is stateless (default allow). Similarly, for outbound requests.

VPC Flow Logs - Architectures
.png)
Site-to-Site VPN
Intro
- Used to connect our VPC to the network of a corporate data center.
- Customer gateway on the corporate data center and VPN gateway on the VPC are connected via a VPN connection (encrypted) that goes through the public internet.
- Virtual Private Gateway (VGW)
- VPN concentrator on the AWS side of the VPN connection
- VGW is created and attached to the VPC from which you want to create the Site-to-Site VPN connection
- Possibility to customize the ASN (Autonomous System Number)
- Customer Gateway (CGW)
- Software application or physical device on customer side of the VPN connection
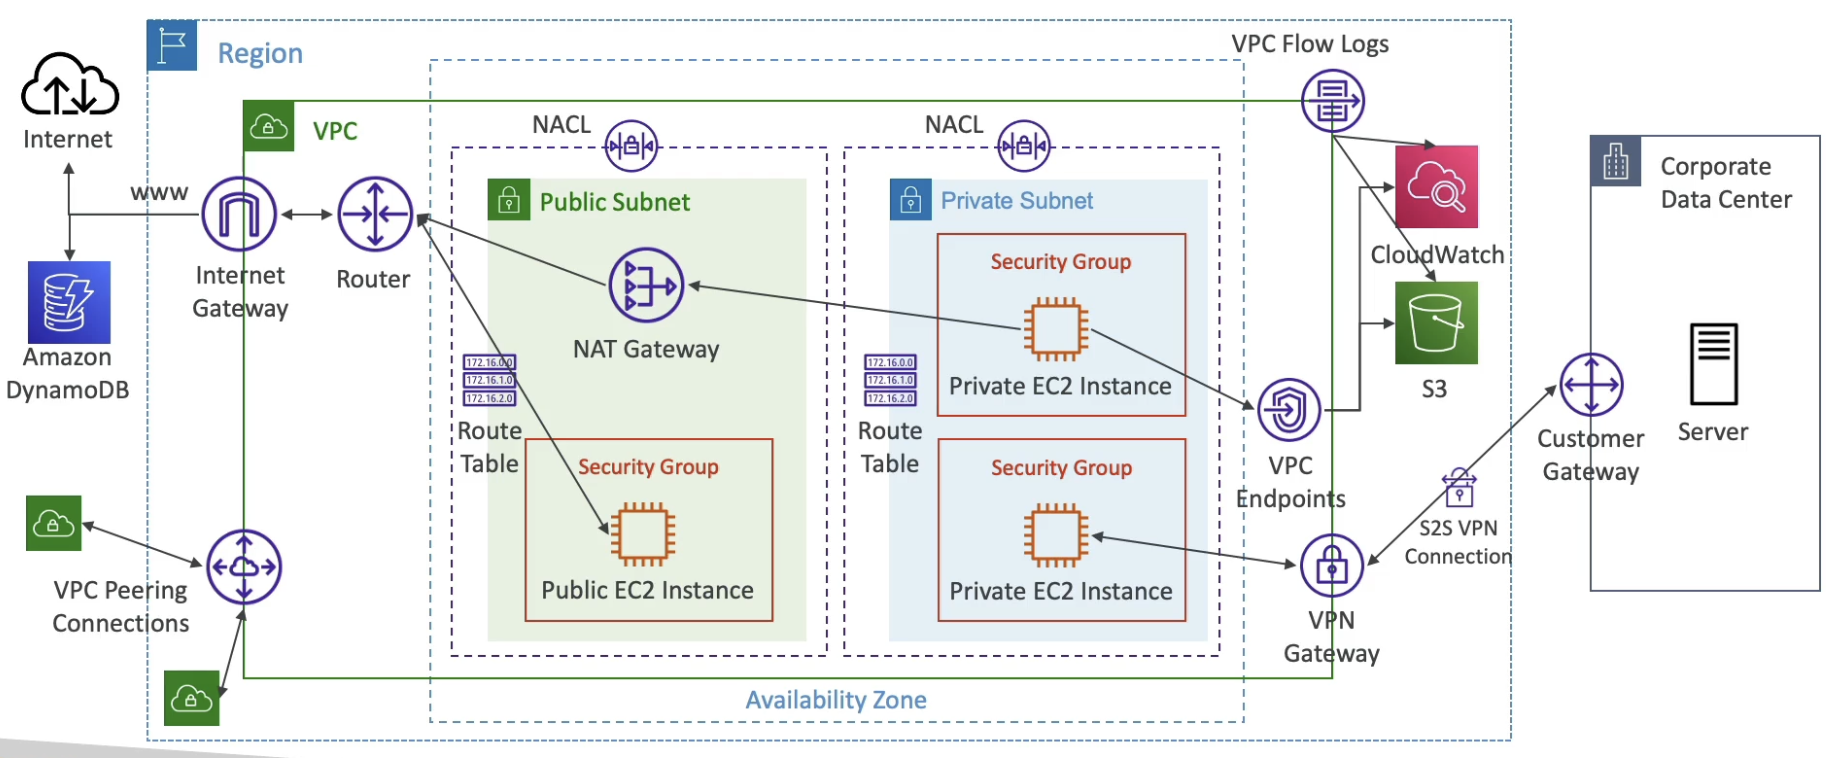
Connection
- If the customer gateway device has a public internet-routable IP address, VPN will connect to it.
- If the customer gateway device is behind a NAT device that’s enabled for NAT traversal (NAT-T), use the public IP address of the NAT device to connect with VPN.
- Important step: enable Route Propagation for the Virtual Private Gateway in the route table that is associated with your subnets
- If you need to ping your EC2 instances from on-premises, make sure you add the ICMP protocol on the inbound rules of your security groups
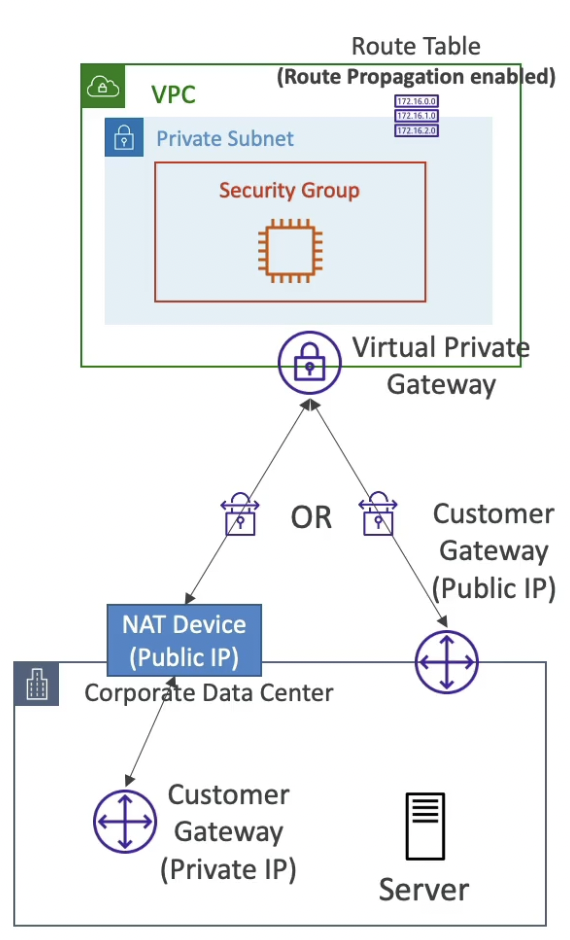
VPN CloudHub
- Provide secure communication between multiple sites, if you have multiple VPN connections
- Low-cost hub-and-spoke model for primary or secondary network connectivity between different locations (VPN only)
- It’s a VPN connection so it goes over the public Internet but the connection is encrypted in flight
- Every participating network can communicate with one another through the VPN connection
- To set it up, connect multiple VPN connections on the same VGW, setup dynamic routing and configure route tables

Direct Connect (DX)
Intro
- Provides a dedicated private connection from a remote network to your VPC, more stable and secure than Site-to-Site VPN
- AWS Direct Connect Location is a physical location that needs to be commissioned
- Dedicated connection must be setup between your DC and AWS Direct Connect locations
- You need to setup a Virtual Private Gateway on your VPC
- Access public resources (S3) and private (EC2) on same connection
- Supports both IPv4 and IPv6
- Use Cases:
- Increase bandwidth throughput - working with large data sets - lower cost
- More consistent network experience - applications using real-time data feeds
- Supports Hybrid Environments (on premises + cloud)
- Lead times are often longer than 1 month to establish a new connection
- Private Virtual Interface (VIF) is used to connect to private instances and similarly for public instances.
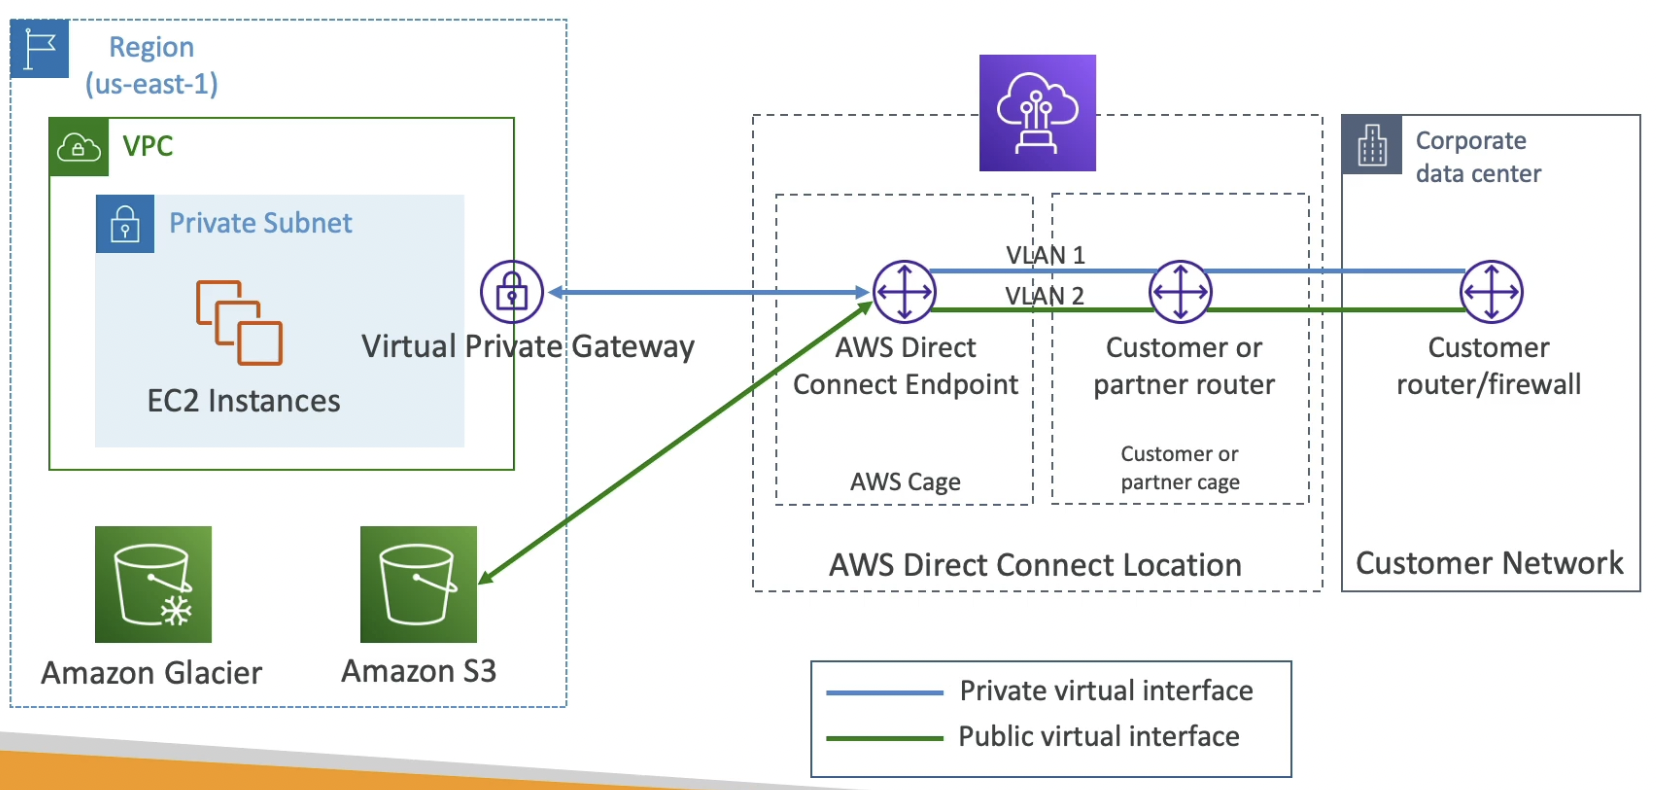
Direct Connect Gateway
Used when you want to setup a Direct Connect to multiple VPCs in many different regions (same account)
Using DX, we will create a VIF to the Direct Connect Gateway which will extend the VIF to Virtual Private Gateway (VGW) in the two regions.
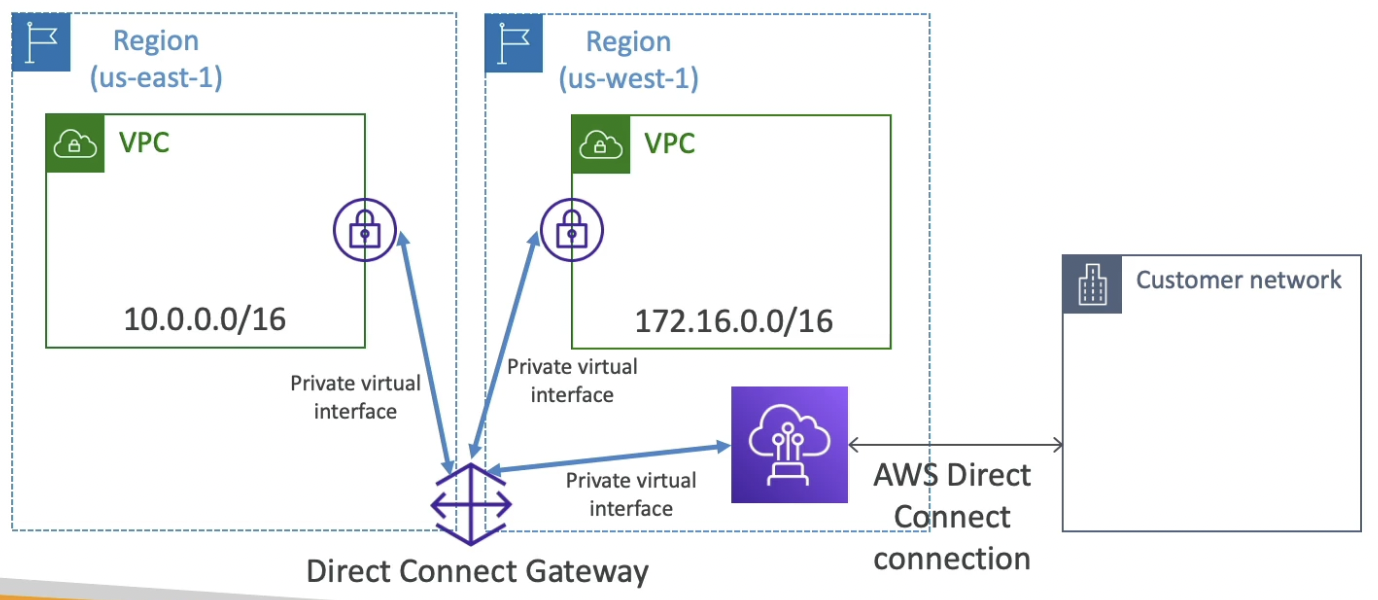
Connection types
- Dedicated Connection
- 1 Gbps and 10 Gbps capacity
- Physical ethernet port dedicated to a customer
- Request made to AWS first, then completed by AWS Direct Connect Partners
- Hosted Connection
- 50Mbps, 500 Mbps, to 10 Gbps
- Connection requests are made via AWS Direct Connect Partners
- Capacity can be added or removed on demand (more flexible than dedicated connection)
- 1, 2, 5, 10 Gbps available at select AWS Direct Connect Partners
- Dedicated Connection
Encryption
- Data in transit is not encrypted but is private as the connection is private
- To have encryption in flight, use AWS Direct Connect + VPN which provides an IPsec-encrypted private connection. Good for an extra level of security, but slightly more complex to put in place.
- Data is shared through a VPN between the customer router and AWS Direct Connection Endpoint. So, all the traffic will be encrypted.
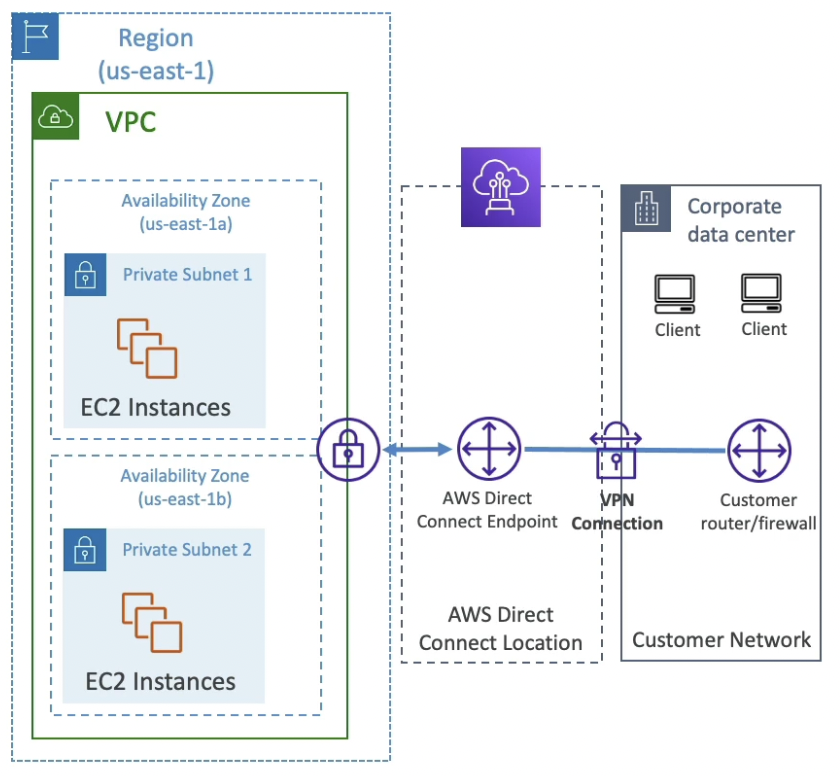
Resiliency
In the diagram below, each VIF is private.
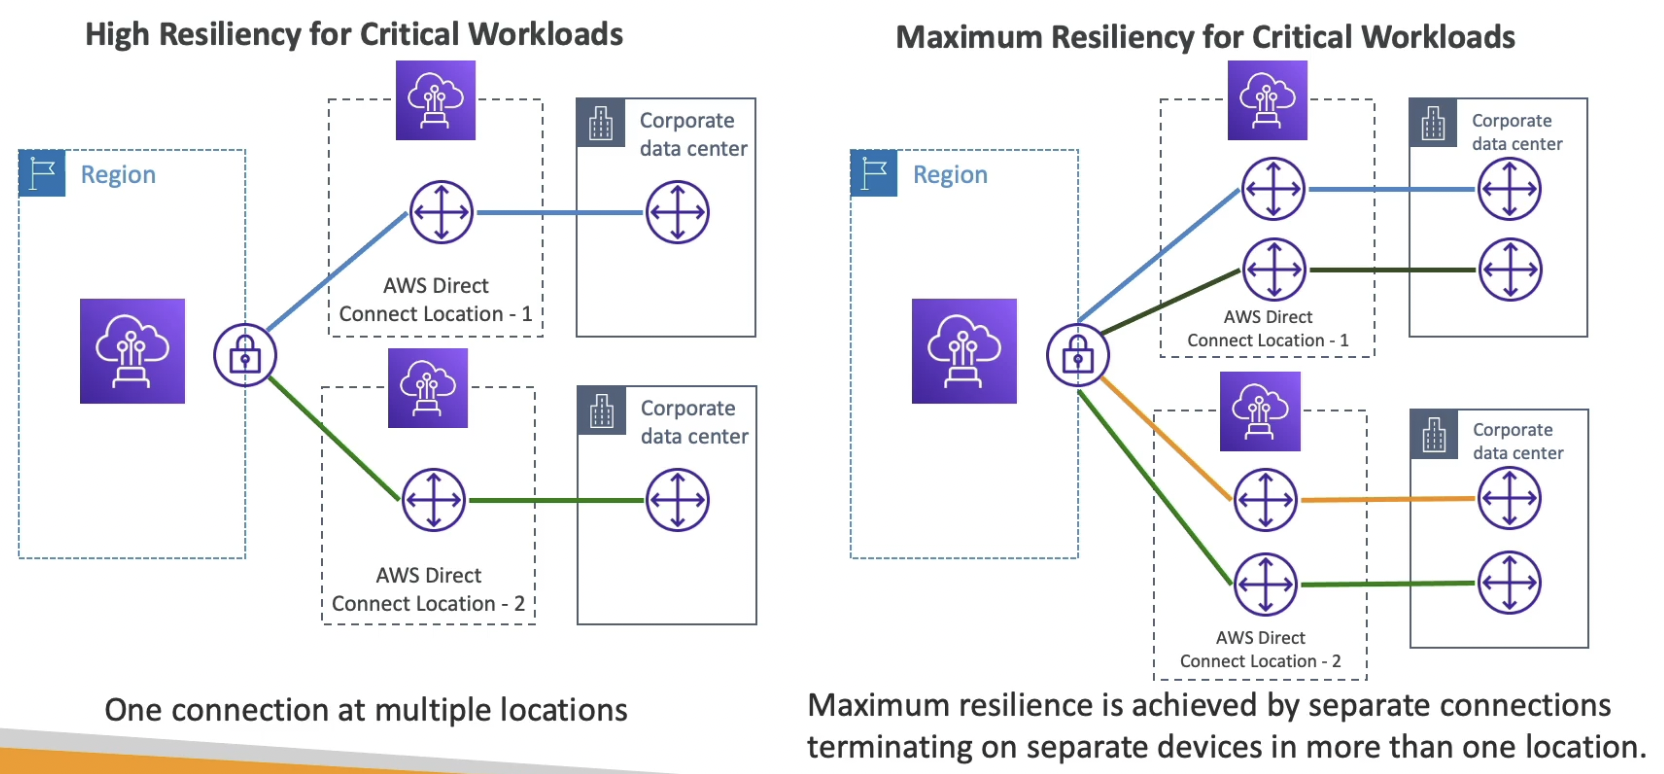
Direct Connect + Site to Site VPN
.png)
Transit Gateway
Intro
- Transit Gateway solves the problem of common network topologies getting complicated
- Transitive peering between thousands of VPCs and on-premise data centers, hub-and-spoke (star) connection
- Transit Gateway is a regional resource, can work cross-region too
- Can peer Transit Gateways across regions
- Can share Transit Gateway across accounts using Resource Access Manager (used to connect Direct Connect Gateway to VPCs in multiple accounts)
- Route Tables: limit which VPC can talk with other VPC
- Works with Direct Connect Gateway, VPN connections and VPCs
- Supports IP Multicast (not supported by any other AWS service)
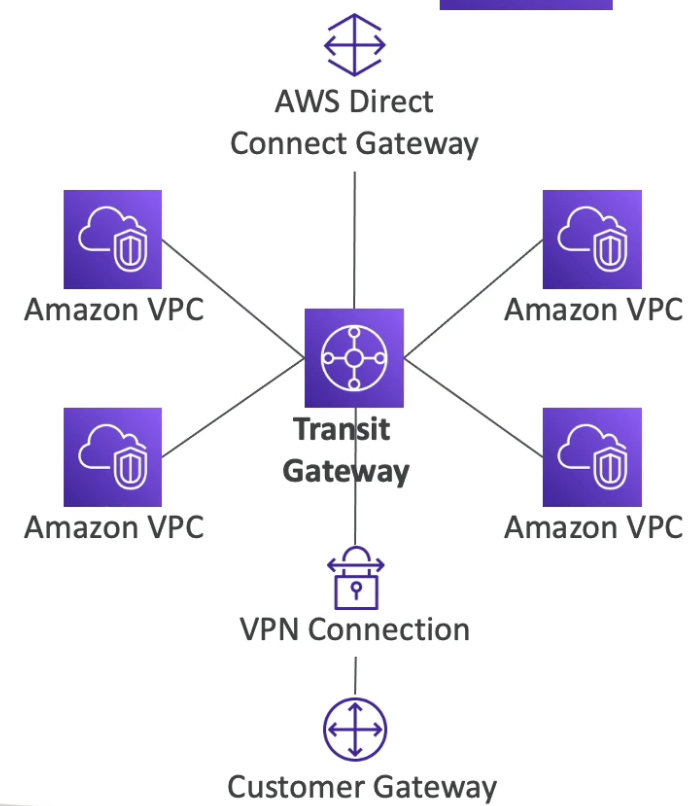
Increasing BW of Side-to-Side VPN connection using ECMP
- ECMP (Equal-cost multi-path routing) is a routing strategy to allow to forward a packet over multiple best path
- To increase the bandwidth of the connection between Transit Gateway and corporate data center, multiple site-to-site VPN connections can be created each with 2 tunnels for increased bandwidth.

Transit Gateway throughput with ECMP
- If we connect a VPN to a Virtual Private Gateway (VGW), we only get one connection into a single VPC. The connection has 2 tunnels, out of which only 1 is used ~ 1.25 Gbps.
- If we connect a VPN to a transit gateway, we get one side-to-side VPN into many VPC. Each connection has 2 tunnels, both of which are used ~ 2.5 Gbps. To increase the throughput, increase the number of side-to-side VPN connections through ECMP.
- Pay per GB of data going through the transit gateway (added cost for multiple connections)
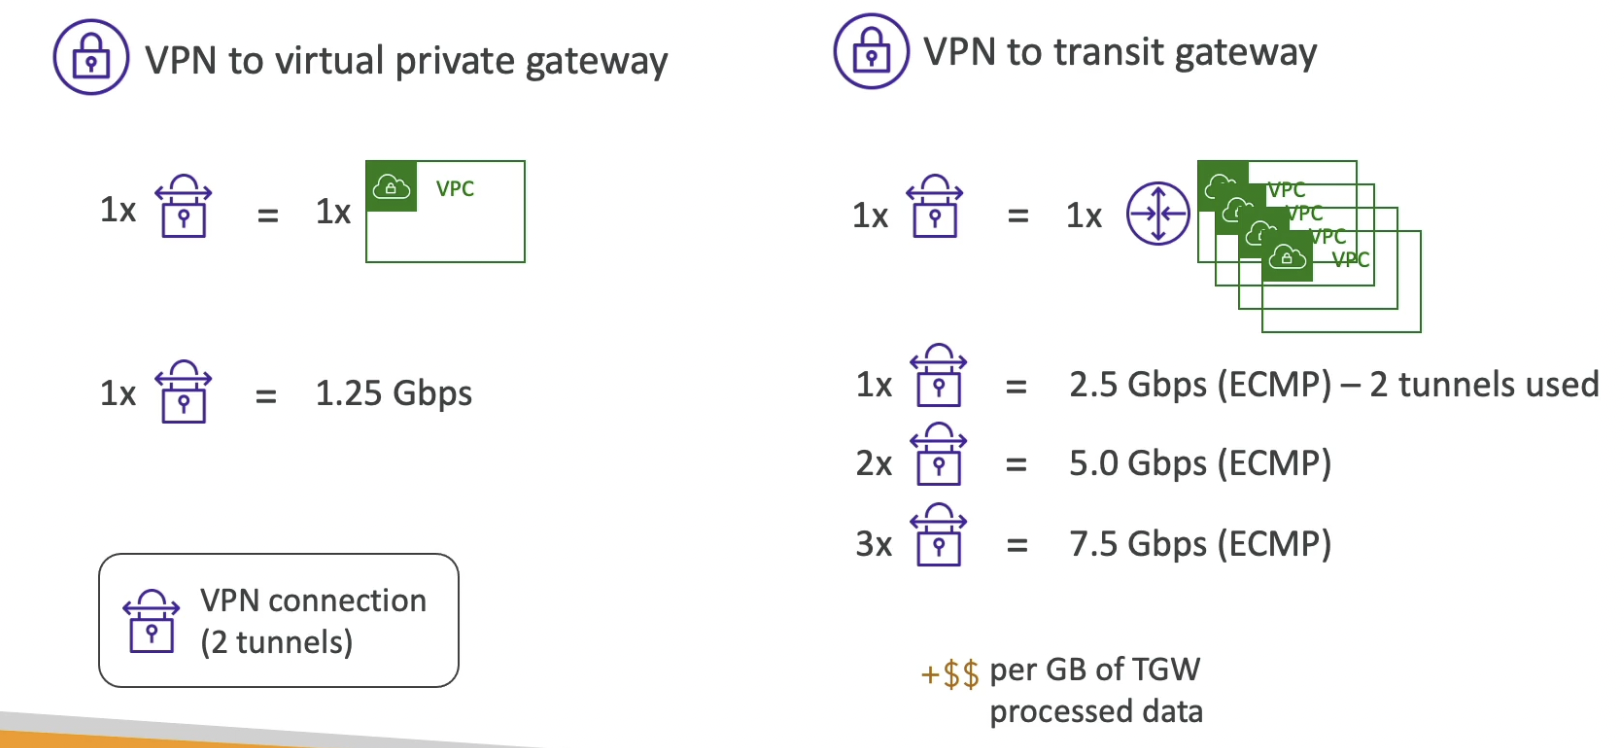
Share Direct Connect between multiple AWS accounts
Using Transit Gateway, we can share a direct connect connection between multiple accounts and VPCs.
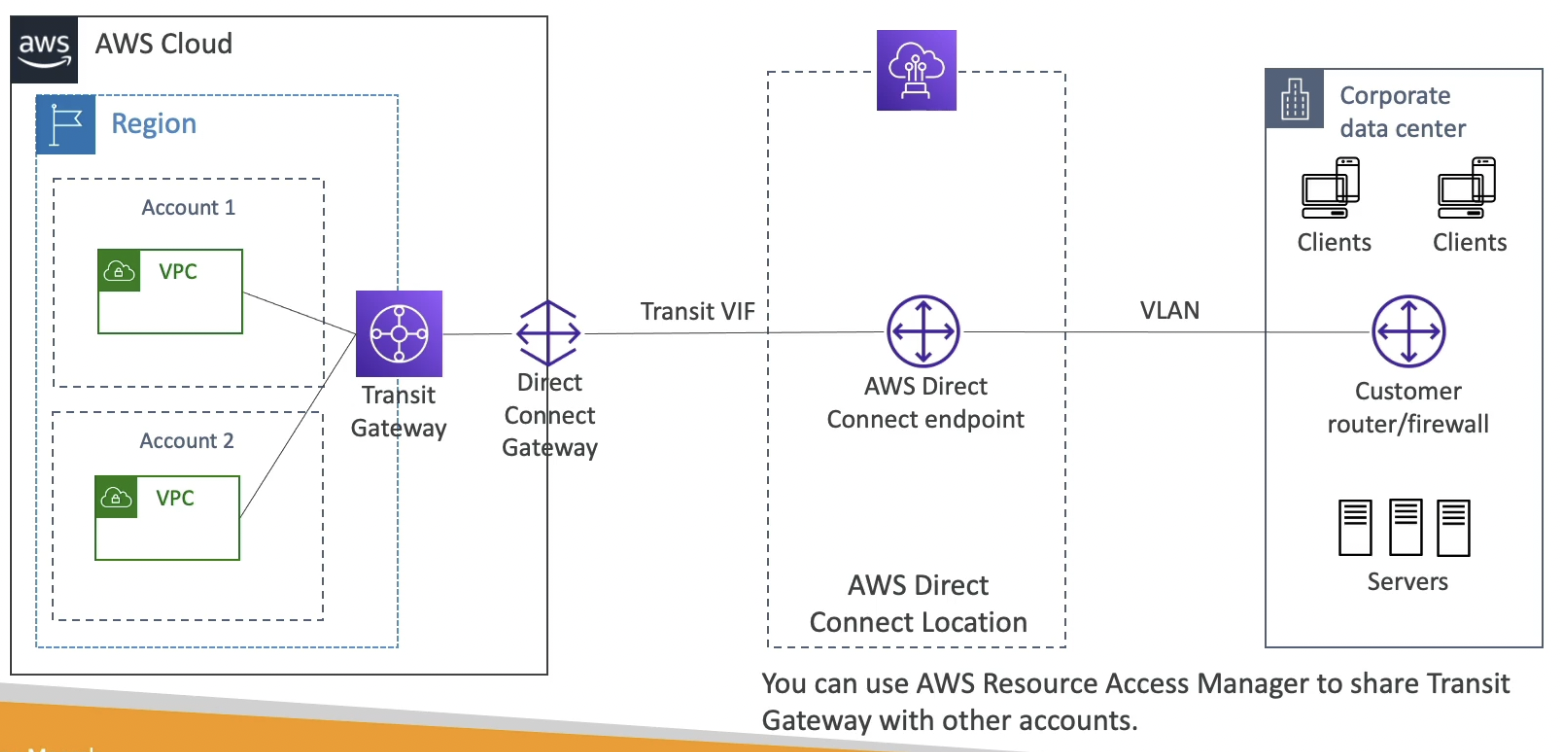
Traffic Mirroring
- Allows you to capture and inspect network traffic in your VPC without disturbing the normal flow of traffic.
- Capture the traffic
- From (Source) ENIs
- To (Targets) an ENI or a Network Load Balancer
- Capture all packets or capture the packets of your interest (optionally, truncate packets).
- Source and Target can be in the same VPC or different VPCs (VPC Peering)
- Use cases: content inspection, threat monitoring, troubleshooting, etc.
- Inbound and outbound traffic through ENIs (eg. attached to EC2 instances) will be mirrored to the destination (NLB) for inspection without affecting the original traffic.
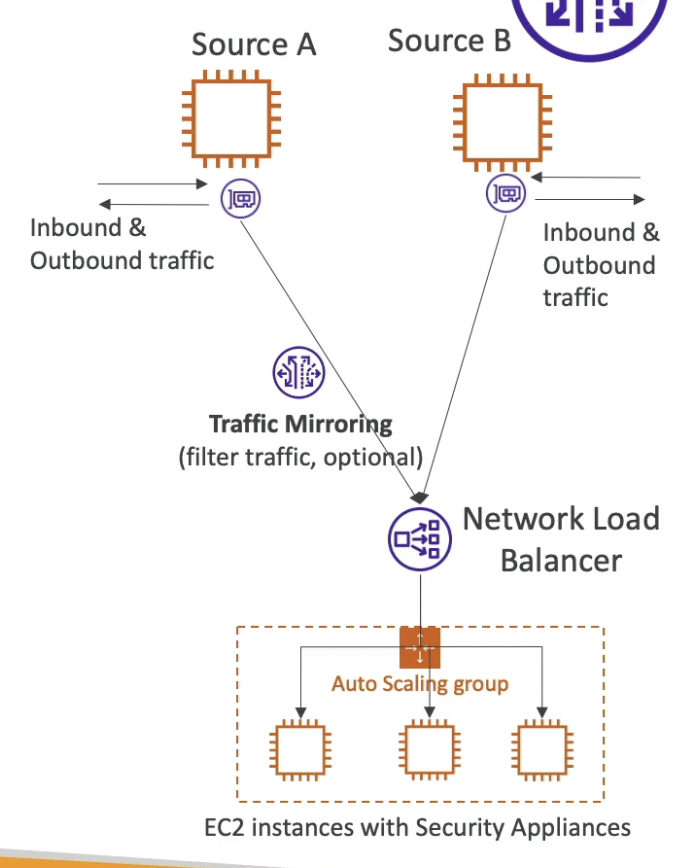
IPv6 for VPC
- IPv4 designed to provide 4.3 Billion addresses (they’ll be exhausted soon)
- IPV6 is designed to provide 3.4 x 10^38 unique IP addresses
- Every IPv6 address is public and Internet-routable (no private range)
- Format x.x.x.x.x.x.x.x (x is hexadecimal, range can be from 0000 to ffff)
- Examples:
- 2001:db8:3333:4444:5555:6666:7777:8888
- 2001:db8:3333:4444:cccc:dddd:eeee:ffff
- :: ⇒ all 8 segments are zero
- 2001:db8:: ⇒ the last 6 segments are zero
- ::1234:5678 ⇒ the first 6 segments are zero
- 2001:db8::1234:5678 ⇒ the middle 4 segments are zero
- IPv4 cannot be disabled for your VPC and subnets
- You can enable IPv6 to operate in dual-stack mode in which your EC2 instances will get at least a private IPv4 and a public IPv6. They can communicate using either IPv4 or IPv6 to the internet through an Internet Gateway.

- If you cannot launch an EC2 instance in your subnet, It’s not because it cannot acquire an IPv6 (the space is very large). It’s because there are no available IPv4 in your subnet. Solution: create a new IPv4 CIDR in your subnet.
.png)
Egress-only Internet Gateway
Intro
- Used for IPv6 only (similar to a NAT Gateway but for IPV6)
- Allows instances in your VPC outbound connections over IPv6 while preventing the internet to initiate an IPv6 connection to your instances
- You must update the Route Tables

IPv6 Routing
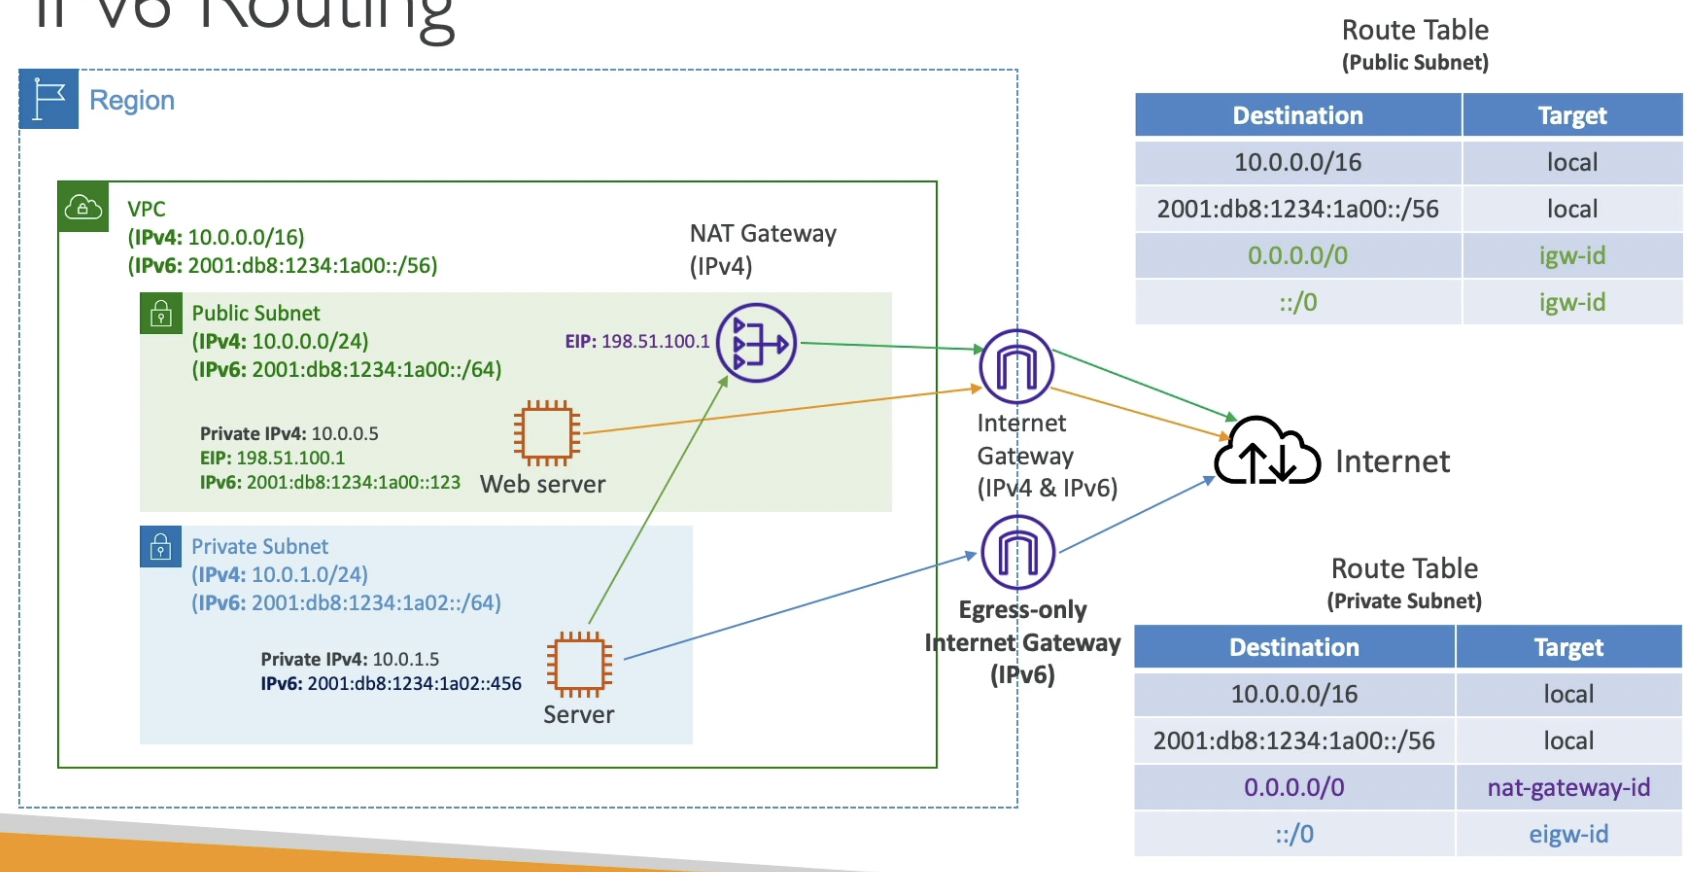
VPC Summary
- CIDR ⇒ IP Range
- VPC - Virtual Private Cloud, we define a list of IPv4 & IPv6 CIDR
- Subnets tied to an AZ, we define a CIDR for each subnet
- Internet Gateway at the VPC level, provide IPv4 & IPv6 Internet Access
- Route Tables must be edited to add routes from subnets to the IGW, VPC Peering Connections, VPC Endpoints, etc. to ensure that the traffic flows properly.
- Bastion Host public EC2 instance to SSH into, that has SSH connectivity to EC2 instances in private subnets
- NAT Instances gives Internet access to EC2 instances in private subnets. Old, must be setup in a public subnet, disable Source / Destination check flag
- NAT Gateway managed by AWS, provides scalable Internet access to private EC2 instances, IPv4 only
- Private DNS + Route 53 ⇒ enable DNS Resolution + DNS Hostnames (VPC)
- NACL ⇒ stateless, subnet rules for inbound and outbound, ephemeral ports
- Security Groups ⇒ stateful, operate at the EC2 instance level
- Reachability Analyzer ⇒ perform network connectivity testing between AWS resources
- VPC Peering ⇒ connect two VPCs with non overlapping CIDR, non-transitive
- VPC Endpoints ⇒ provide private access to AWS Services (S3, DynamoDB, CloudFormation, SSM) within a VPC
- VPC Flow Logs can be setup at the VPC / Subnet / ENI Level, for ACCEPT and REJECT traffic, helps identifying attacks, analyze using Athena or Cloud Watch Logs Insights
- Site-to-Site VPN ⇒ setup a Customer Gateway on DC, a Virtual Private Gateway on VPC, and site-to-site VPN over public Internet
- AWS VPN CloudHub ⇒ hub-and-spoke VPN model to connect your sites
- Direct Connect ⇒ setup a Virtual Private Gateway on VPC, and establish a direct private connection to an AWS Direct Connect Location. More secure and stable connection but takes longer to setup.
- Direct Connect Gateway ⇒ setup Direct Connect to many VPCs in different AWS regions
- AWS PrivateLink / VPC Endpoint Services:
- Connect services privately from your service VPC to customers VPC
- Doesn’t need VPC Peering, public Internet, NAT Gateway, Route Tables
- Must be used with Network Load Balancer & ENI
- Can connect AWS services to 1000s of VPCs
- ClassicLink ⇒ connect EC2-Classic EC2 instances privately to your VPC (deprecated)
- Transit Gateway ⇒ transitive peering connections for VPC, VPN & DX Gateway
- Traffic Mirroring ⇒ copy network traffic from ENIs for further analysis
- Egress-only Internet Gateway ⇒ like a NAT Gateway, but for IPv6
Networking Costs in AWS
Inter-AZ & Inter-Region Networking
- Use Private IP instead of Public IP for good savings and better network performance
- Use same AZ for maximum savings (at the cost of high availability)

Egress Traffic Network Cost
- Egress traffic: outbound traffic - from AWS to outside (paid)
- Ingress traffic: inbound traffic - from outside to AWS (typically free)
- Try to keep as much internet traffic within AWS to minimize costs
- Direct Connect location that are co-located in the same AWS Region result in lower cost for egress network

S3 Data Transfer Pricing
- S3 ingress (uploading to S3): free
- S3 to Internet: $0.09 per GB
- S3 Transfer Acceleration:
- Faster transfer times (50 to 500% better)
- Additional cost on top of Data Transfer (+$0.04 to $0.08 per GB)
- S3 to CloudFront: free (internal network)
- CloudFront to Internet: $0.085 per GB (slightly cheaper than S3)
- Caching capability (lower latency)
- Reduce costs associated with S3 Requests (7x cheaper with CloudFront)
- S3 Cross Region Replication: $0.02 per GB

NAT Gateway vs VPC Endpoint
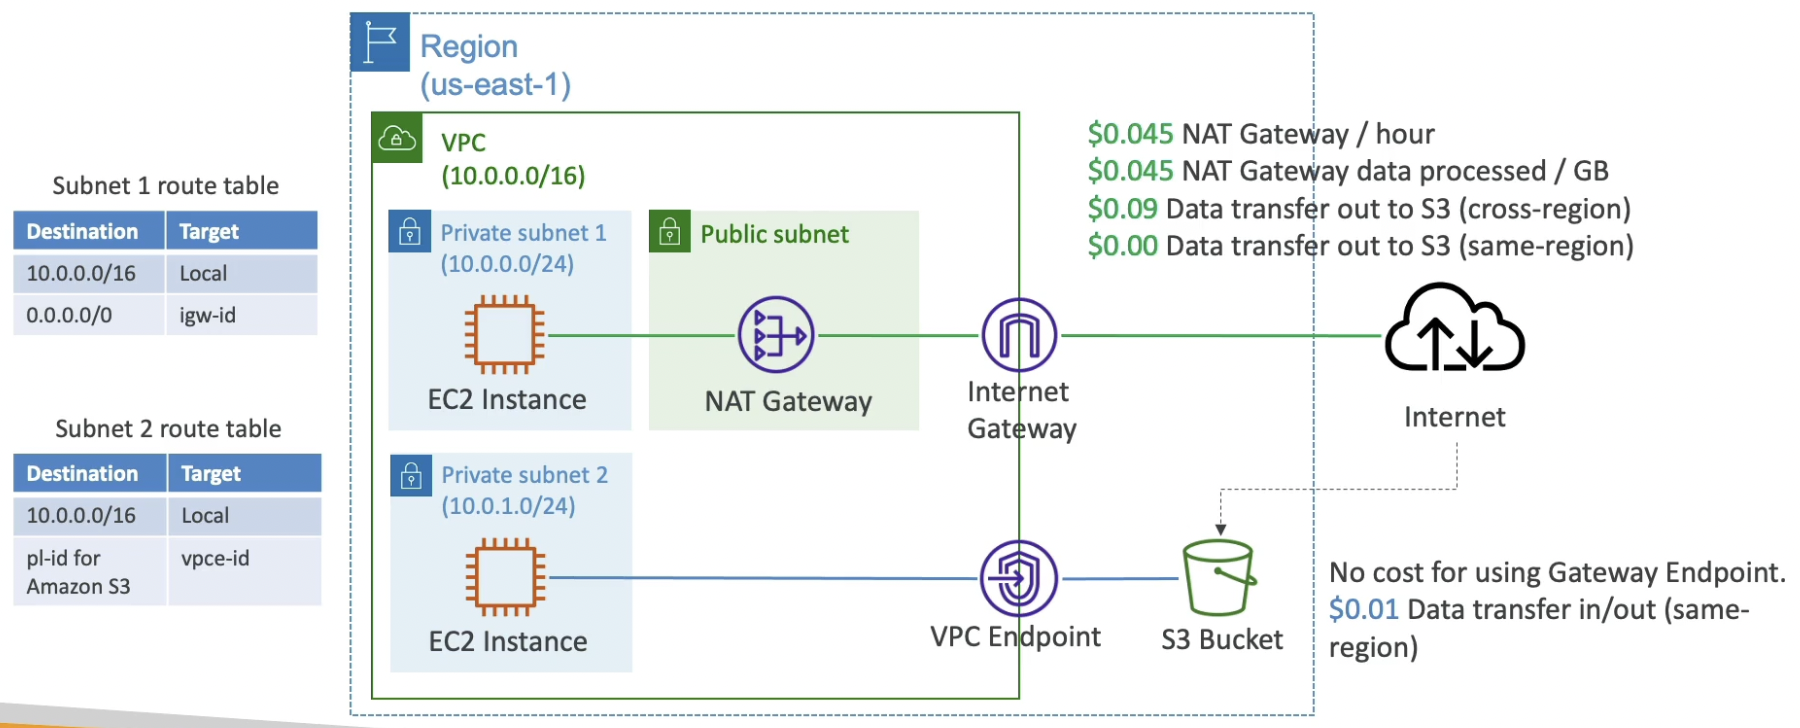
Network Protection on AWS
.png)
.png)
.png)
DNS Resolution in VPC
Theory
Two settings need to be enabled to allow DNS resolution within a VPC:
DNS Support (enableDnsSupport)
- Enabled by default, allows the resources within the VPC to query the DNS provided by Route 53 Resolver at 169.254.169.253 or the reserved IP address at the base of the VPC IPv4 network range plus two (.2)
- If disabled, we need to provide a custom DNS server otherwise we won’t be able to hit hostnames

Untitled
DNS Hostnames (enableDnsHostnames)
- If enabled, assigns public hostname to EC2 instance in our VPC if it has a public IPv4
- Won’t do anything unless enableDnsSupport=true
- By default
- Default VPC - Enabled
- Custom VPC - Disabled
- When DNS Hostnames is enabled, the instances have both public and private hostnames.
- When disabled, instances in the VPC will have a public IP but no public DNS.

Untitled
If you use custom DNS domain names in a Private Hosted Zone in Route 53, you must set both these attributes (enableDnsSupport & enableDnsHostname) to true.

Untitled
Hands on
- Enable DNS Hostnames for the VPC
VPC → Select VPC → Action → Edit DNS Hostnames → Enable
- Create a Hosted Zone in Route 53
💡 Hosted zone configures how to route traffic for a domain
Route 53 → Hosted Zones → Create
Type: Private
Select the Region and VPC
- Create a new record in the Hosted Zone to route traffic going to google.arkalim.internal to www.google.com

Untitled
Now we can run
ping google.arkalim.internalfrom our bastion host- Enable DNS Hostnames for the VPC
Reachability Analyzer
- A network diagnostics tool that troubleshoots network connectivity between two endpoints in your VPC
- The source and destination could be anything in the VPC
- It builds a model of the network configuration, then checks the reachability based on these configurations (it doesn’t send packets, just tests the configurations)
- When the destination is:
- Reachable - it produces hop-by-hop details of the virtual network path
- Not reachable - it identifies the blocking components (eg. configuration issues In SGs, NACLs, Route Tables, etc.)
- Use cases:
- Troubleshoot connectivity issues
- Ensure network configuration is as intended
- Example path for connectivity between two EC2 instances
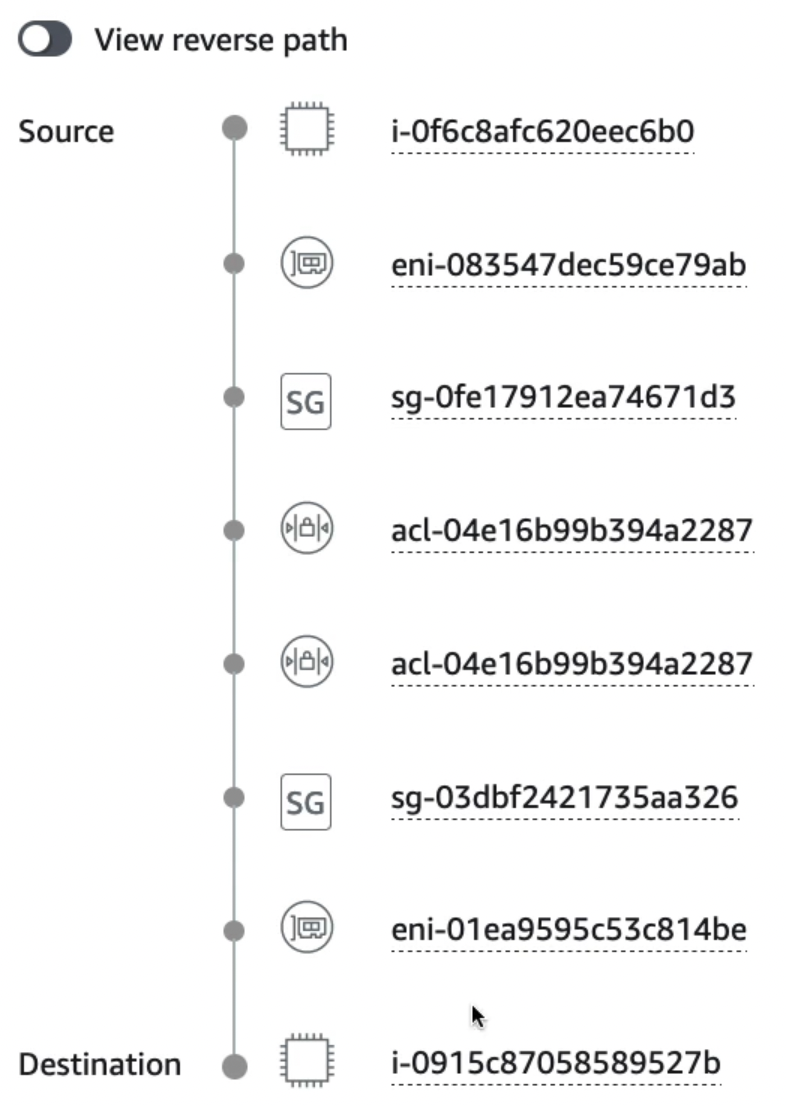
Untitled
EC2 Classic & AWS ClassicLink
- EC2-Classic: instances run in single network shared with other customers (this is how AWS started)
- Amazon VPC: your instances run logically isolated to your AWS account (this is what AWS has become)
- ClassicLink allows you to link EC2-Classic instances to a VPC in your account
- Must associate a security group
- Enables communication using private IPv4 addresses
- Removes the need to make use of public IPv4 addresses or Elastic IP addresses
💡 Likely to be distractors at the exam
AWS PrivateLink
Exposing services in your VPC to other VPCs
Option 1: Make it public
- Traffic goes through the public internet
- Tough to manage access

Untitled
Option 2: VPC Peering
- Each peer connection exposes the whole network even though we want to externalize just a few services
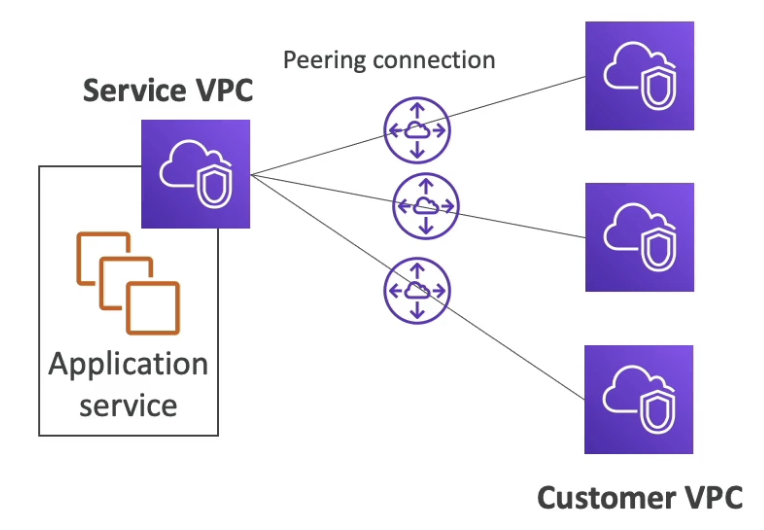
Untitled
Option 3: AWS PrivateLink
- Most secure & scalable way to expose service to 1000s of VPCs in the same or other accounts
- Does not require VPC peering, internet gateway, NAT, route tables, etc.
- Requires a Network Load Balancer (most common) or GWLB (Service VPC) and ENI (Customer VPC)
- If the NLB is in multiple AZ, then you need ENIs in multiple AZ and the solution is fault tolerant
- The NLB in the Service VPC and ENI in the Customer VPC talk directly through the AWS PrivateLink

Untitled
PrivateLink with ECS
- ECS tasks require an ALB. So, we can connect the ALB to the NLB for PrivateLink.
- Corporate Data Centers will still connect through the VPN or Direct Connect.
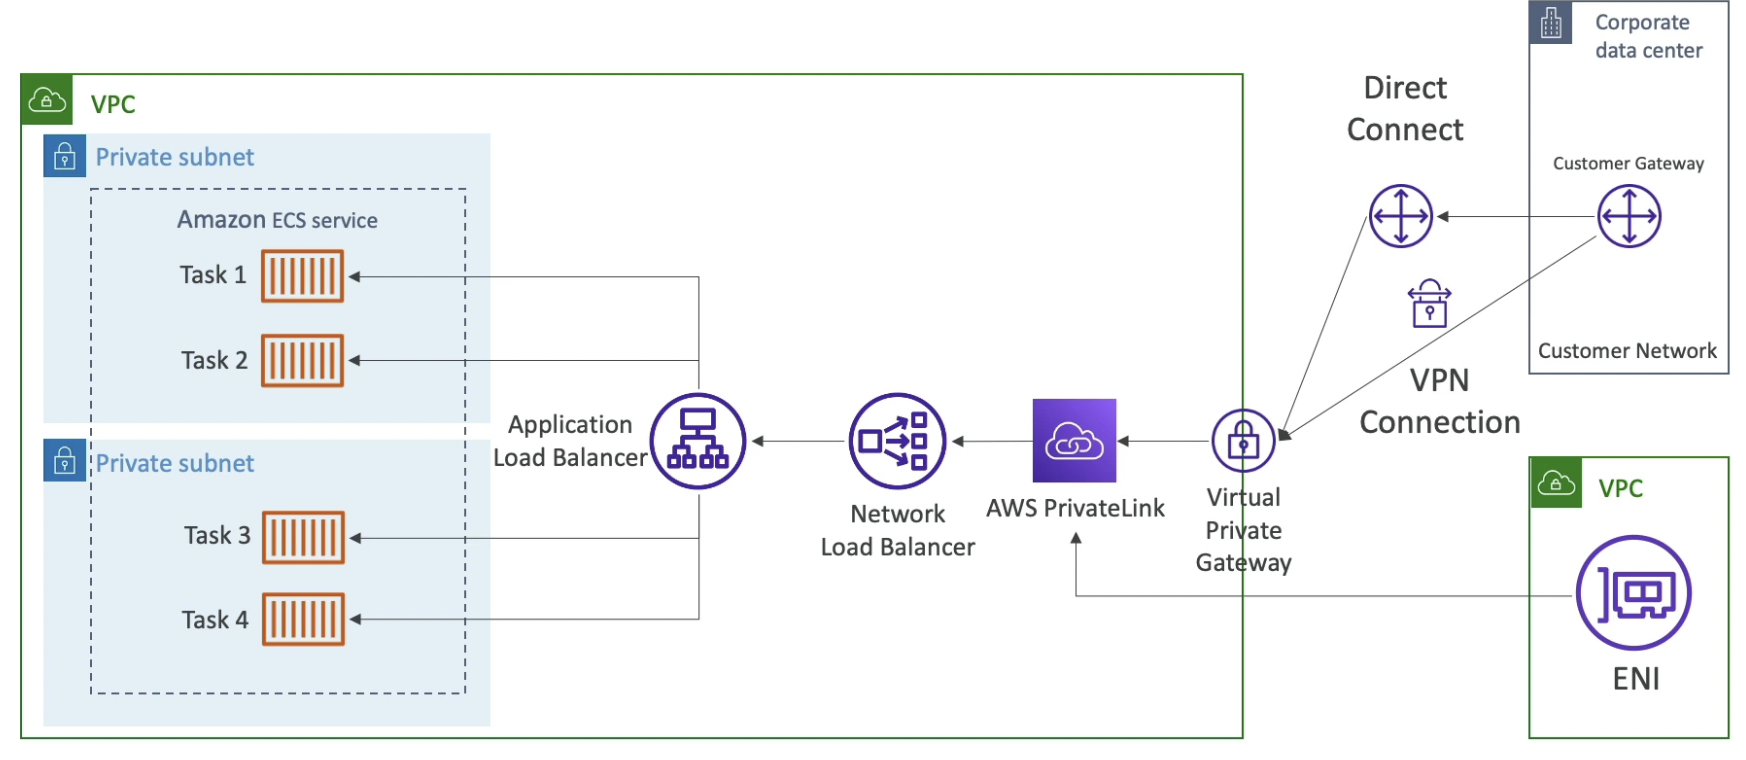
Section 29: Disaster Recovery & Migrations
Section 29: Disaster Recovery & Migrations
Disaster Recovery
Intro
- Any event that has a negative impact on a company’s business continuity or finances is a disaster
- Disaster recovery (DR) is about preparing for and recovering from a disaster
- Recovery Point Objective: how often you backup your data or how much data are you willing to lose in case of a disaster
- Recovery Time Objective: how long it takes to recover from the disaster (down time)
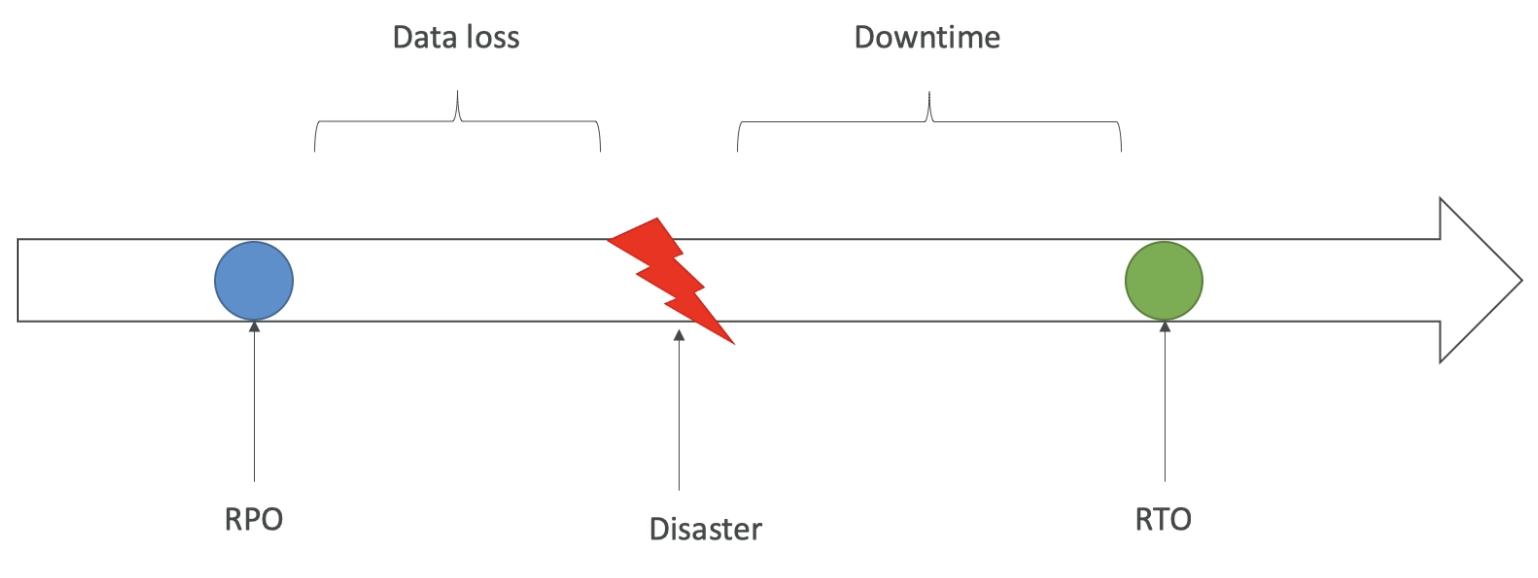
Strategies
Intro
.png)
Backup & Restore
- High RPO (backup every day or week)
- High RTO (in case of a disaster, need to spin up instances and restore volumes from snapshots, takes time)
- Less management
- Low cost
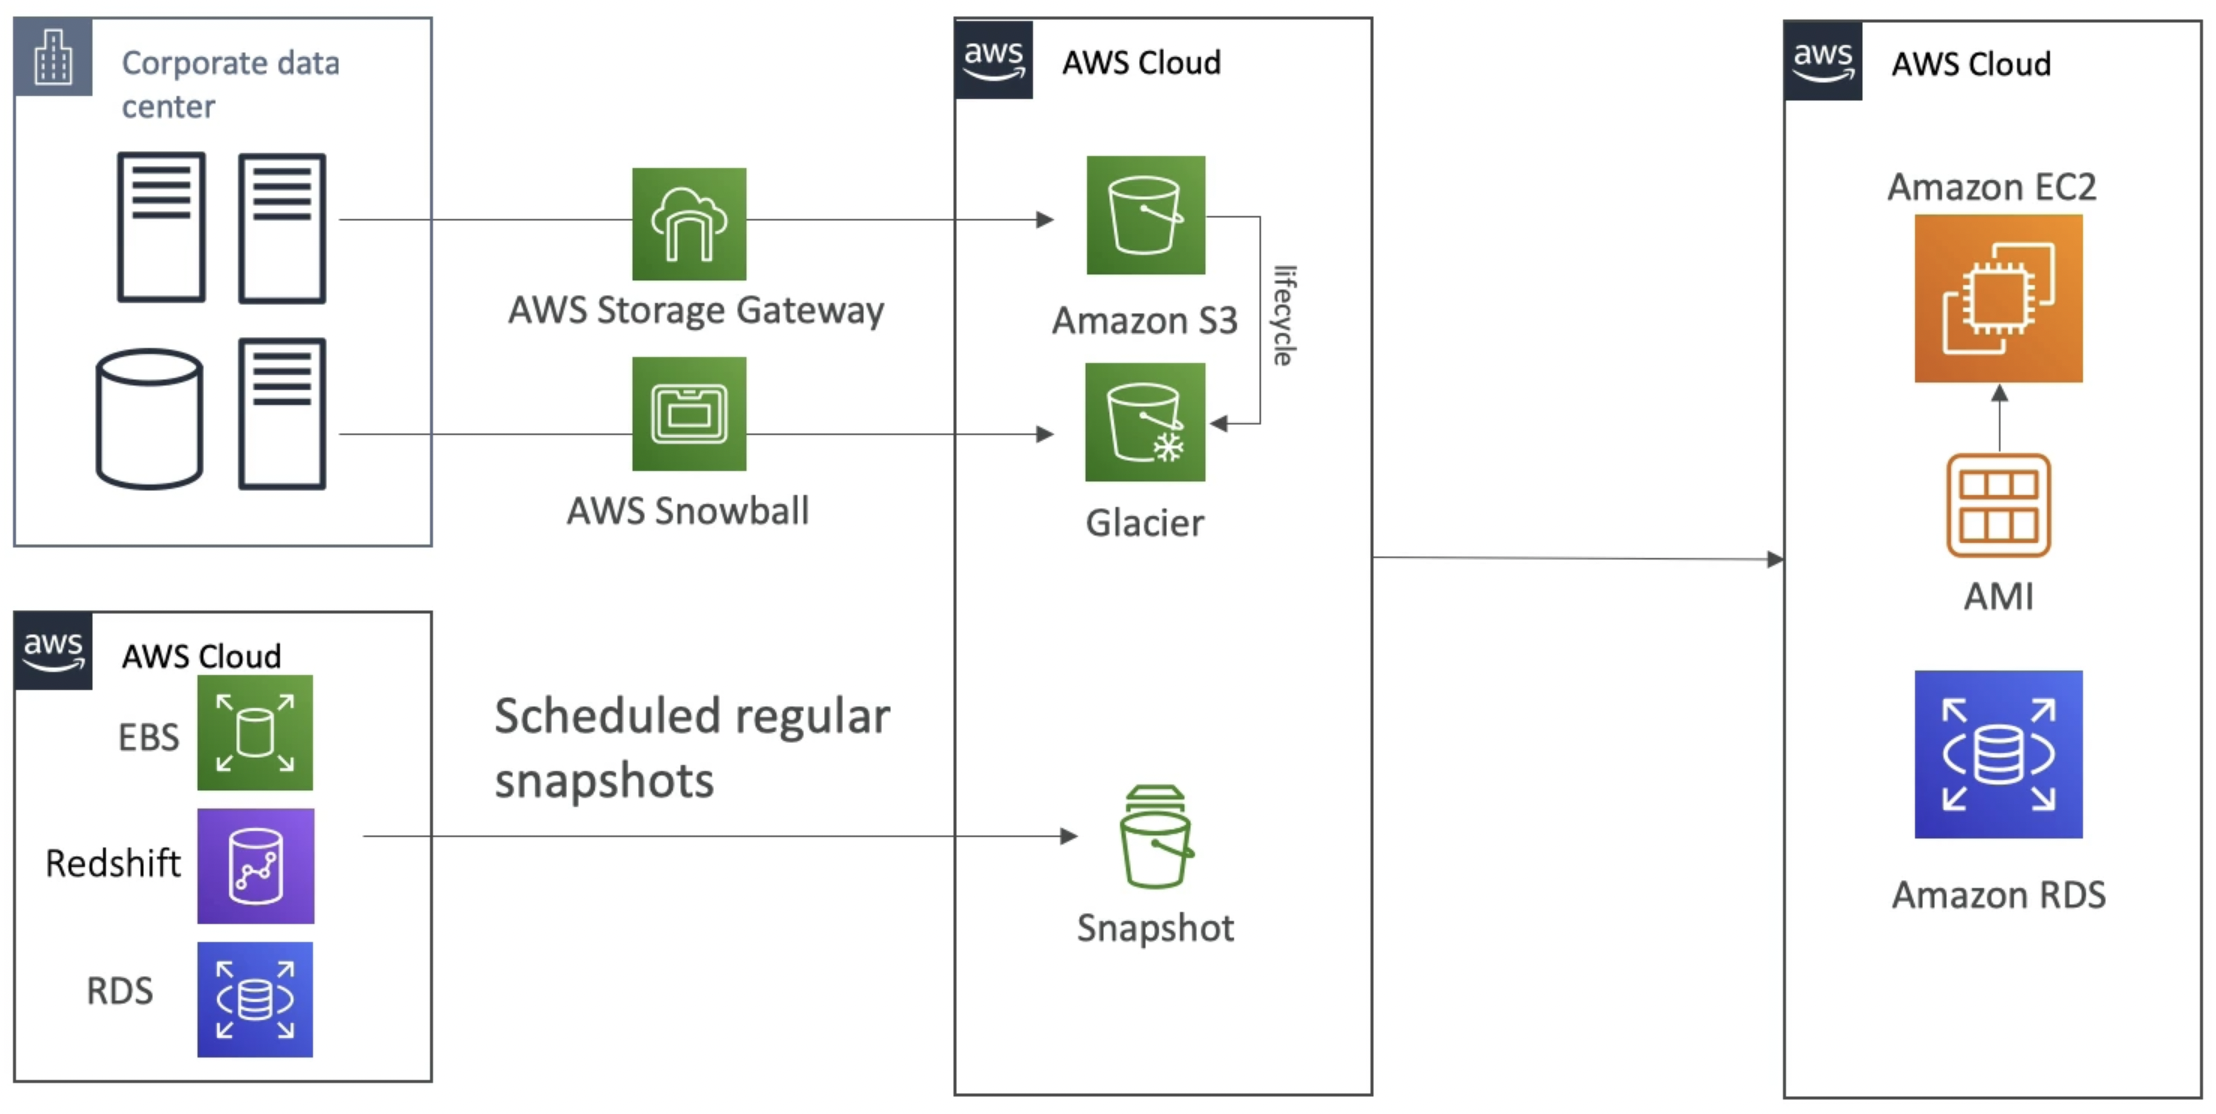
Pilot Light
- Critical parts of the app are always running in the cloud (eg. continuous replication of data to another region, if one region fails, quickly failover to the other region)
- Faster than Backup and Restore as critical systems are already up
- Low RPO and RTO
- In the diagram below, DB is critical so it is replicated continuously in RDS but EC2 instance is spin up only when a disaster strikes.
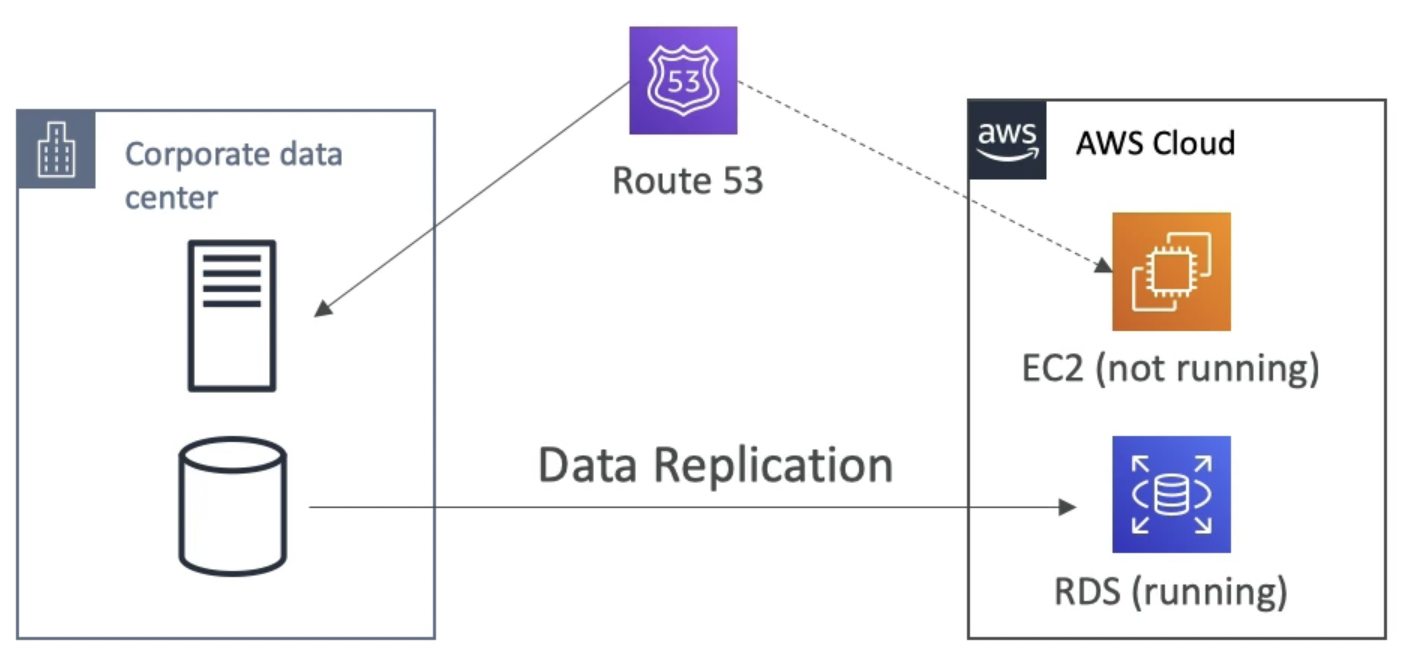
Warm Standby
- A complete backup system is up and running but at the minimum capacity. This system is quickly scaled to production capacity in case of a disaster.
- Very low RPO & RTO
- Expensive

Multi-Site / Hot Site Approach
- A backup system is running at full production capacity and the request can be routed to either the DC or the backup system running on AWS.
- Multi-data center approach
- Lowest RPO & RTO (minutes or seconds)
- Very Expensive
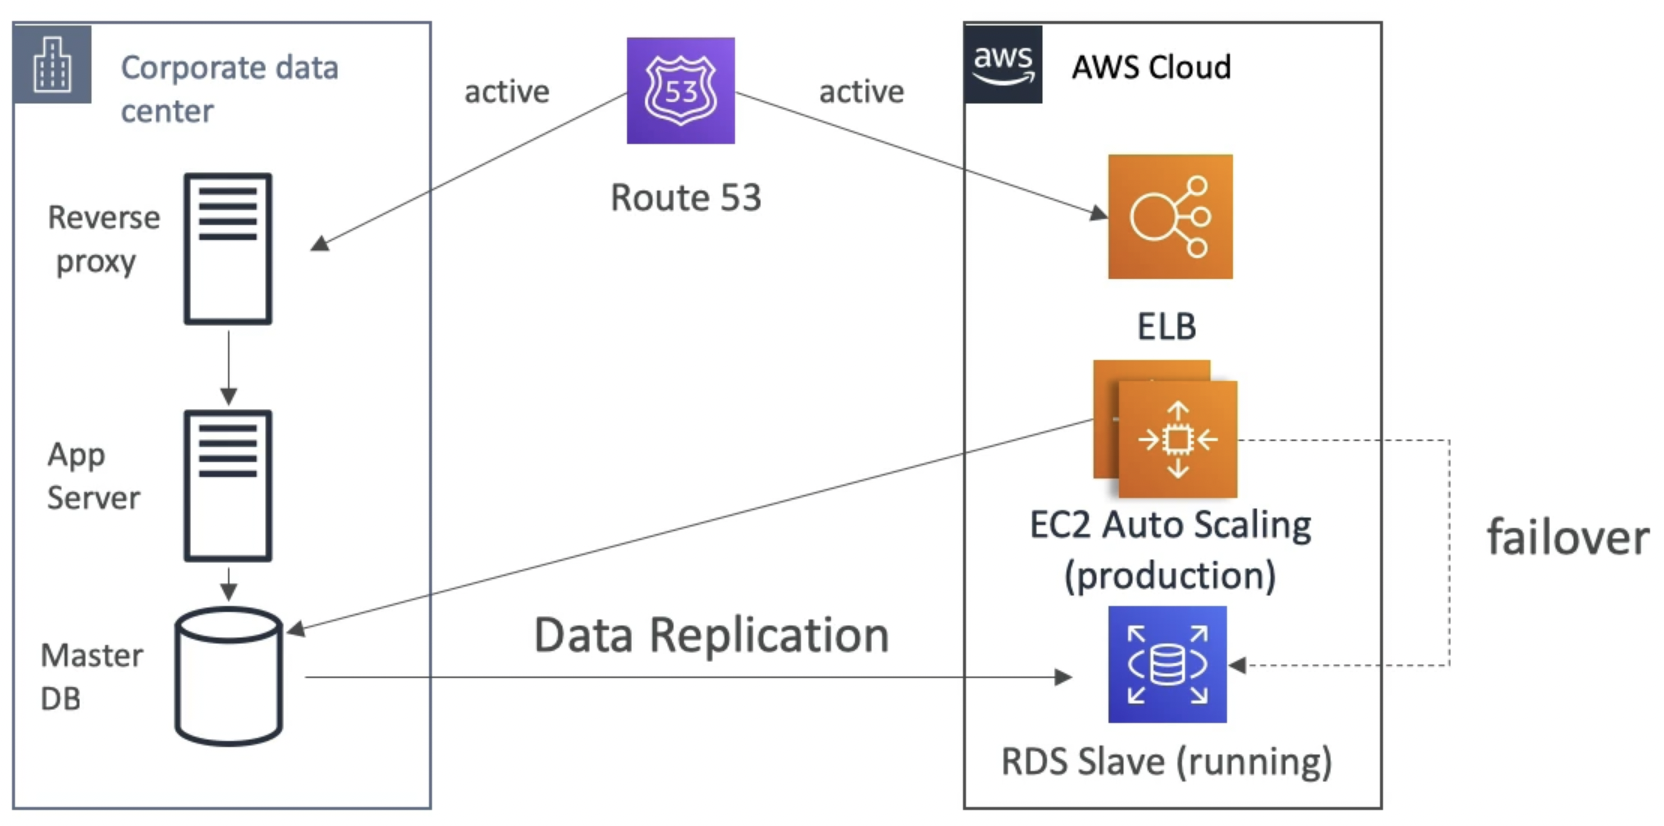
AWS Multi Region
.png)
Outro
.png)
Database Migration Service (DMS)
Intro
- Quickly and securely migrate databases from on-premises to AWS cloud
- The source database remains available during the migration
- Supports:
- Homogeneous migrations (eg. Oracle to Oracle)
- Heterogeneous migrations (eg. Microsoft SQL Server to Aurora)
- Continuous Data Replication using CDC (change data capture)
- You must create an EC2 instance running the DMS software to perform the replication tasks. If the amount of data is large, use a large instance. If multi-AZ is enabled, multiple instances will be created in different AZs.

.png)
- If the source and target DBs aren’t running the same engine, we need to use Schema Conversion Tool (SCT) to convert the DB’s schema from one engine to another.

DMS Continuous Migration
In the example below, source and target engines are different. SCT is installed on premises and the schema conversion is written to RDS (target). DMS instance with CDC is used for continuous data migration.
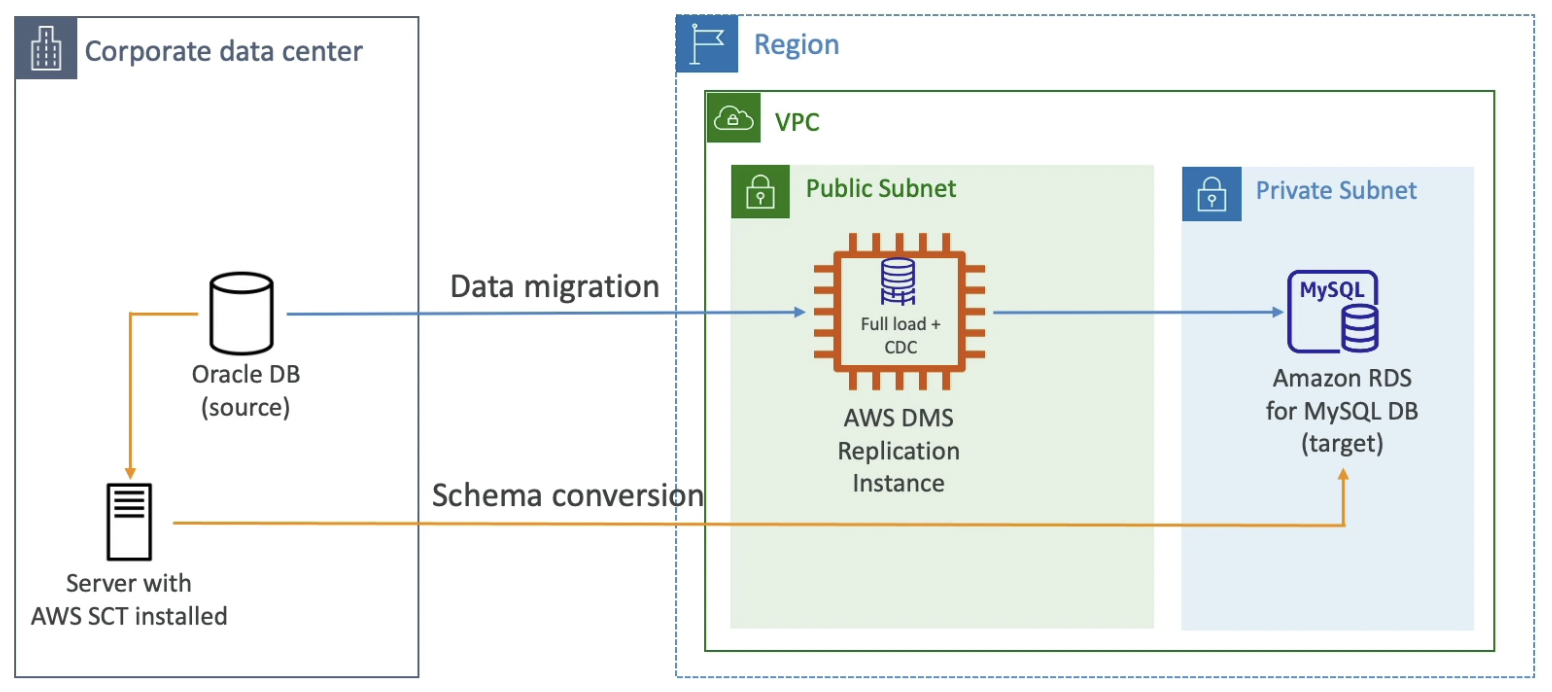
RDS and Aurora Migrations
AWS On-premises strategies
- Ability to download Amazon Linux 2 AMI as a VM (.iso format) and run on virtualization softwares like VMWare, KVM, Virtual Box (Oracle VM), Microsoft Hyper-V
- VM Import / Export
- Migrate existing applications as VMs into EC2
- Create a DR repository strategy for your on-premise VMs
- Can export back the VMs from EC2 to on-premise
- AWS Application Discovery Service
- Gather information about your on-premise servers to plan a migration
- Server utilization and dependency mappings
- Track with AWS Migration Hub
- AWS Database Migration Service (DMS)
- replicate On-premise ⇒ AWS , AWS ⇒ AWS, AWS ⇒ On-premise
- Works with various database technologies (Oracle, MySQL, DynamoDB, etc..)
- AWS Server Migration Service (SMS)
- Incremental replication of on-premise live servers to AWS
AWS Backup
Intro
- Fully managed service
- Centrally manage and automate backups across AWS services
- No need to create custom scripts and manual processes
- Supported services:
- Amazon EC2 / Amazon EBS
- Amazon S3
- Amazon RDS (all DBs engines) / Amazon Aurora / Amazon DynamoDB
- Amazon DocumentDB / Amazon Neptune
- Amazon EFS / Amazon FSx (Lustre & Windows File Server)
- AWS Storage Gateway (Volume Gateway)
- Supports cross-region backups
- Supports cross-account backups
- Supports point in time recovery (PITR) for supported services
- On-Demand and Scheduled backups
- Tag-based backup policies
- You create backup policies known as Backup Plans
- Backup frequency (every 12 hours, daily, weekly, monthly, cron expression)
- Backup window
- Transition to Cold Storage (Never, Days, Weeks, Months, Years)
- Retention Period (Always, Days, Weeks, Months, Years)
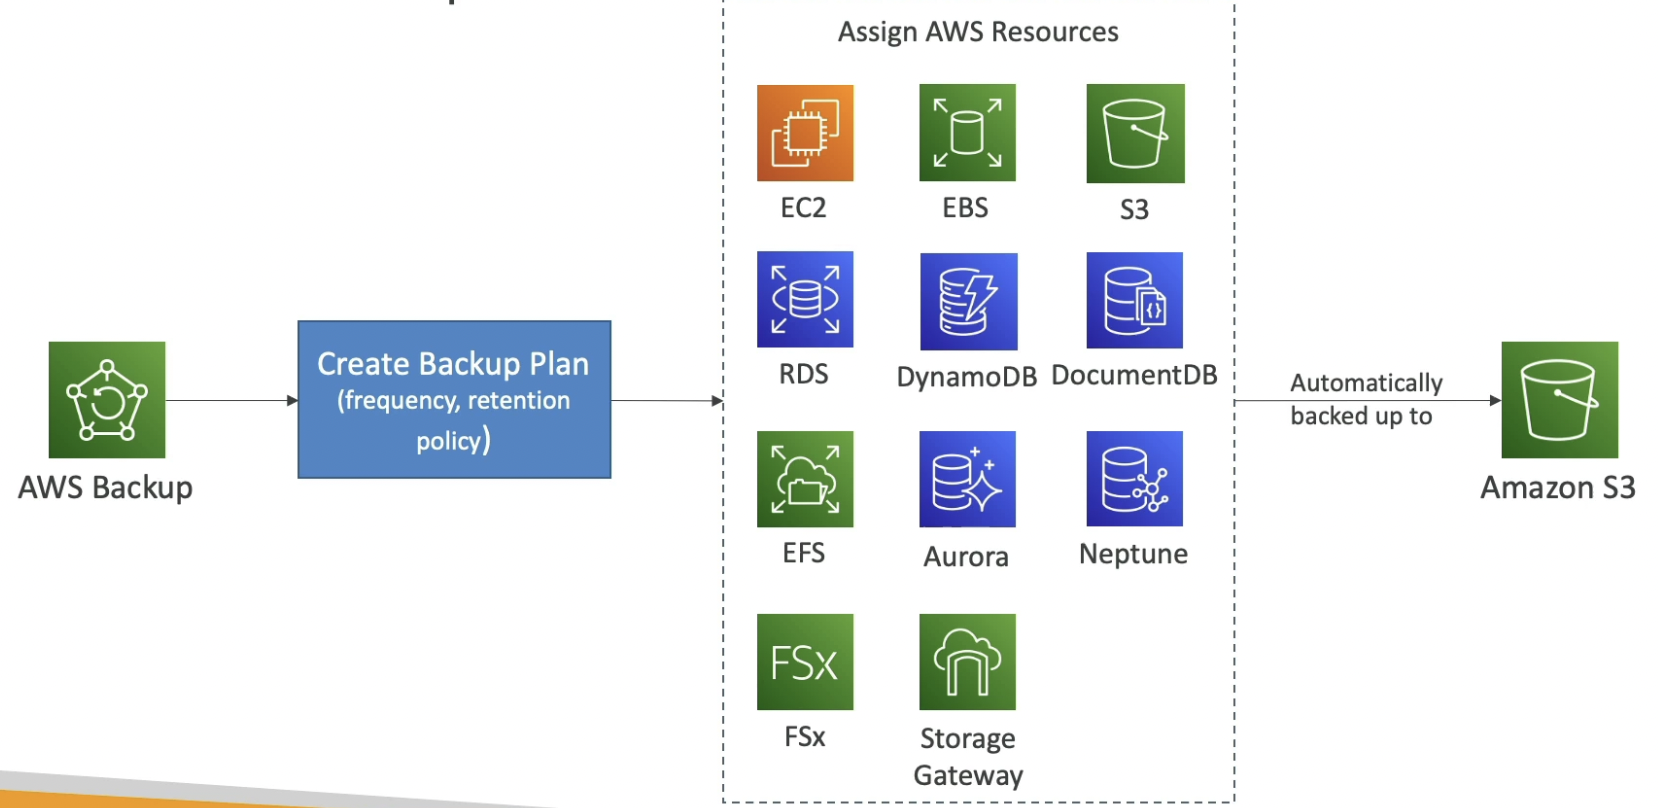
Vault Lock
- Enforce a WORM (Write Once Read Many) state for all the backups that you store in your AWS Backup Vault
- Additional layer of defense to protect your backups against:
- Inadvertent or malicious delete operations
- Updates that shorten or alter retention periods
- Even the root user cannot delete backups when enabled
Application Migration Service - MGN
.png)
.png)
Transferring large amount of data into AWS
Example: transfer 200 TB of data to the cloud. We have a 100 Mbps internet connection.
- Over the internet / Site-to-Site VPN:
- Immediate to setup
- Will take 200(TB)* 1000(GB)* 1000(MB)*8(Mb)/100 Mbps = 16,000,000s = 185d
- Over direct connect - 1Gbps:
- Long for the one-time setup (over a month)
- Will take 200(TB)1000(GB)8(Gb)/| Gbps = 1,600,000 = 18.5d
- Over Snowball:
- Will take 2 to 3 snowballs in parallel
- Takes about 1 week for the end-to-end transfer
- Can be combined with DMS
- For on-going replication transfers: Site-to-Site VPN or DX with DMS or DataSync
- Over the internet / Site-to-Site VPN:
VMware cloud on AWS
.png)
AWS DataSync
Intro
- Move large amount of data from on-premise to AWS over the public internet using TLS
- Can synchronize to: Amazon S3 (any storage classes including Glacier), Amazon EFS, Amazon FSx for Windows
- Move data from your NAS or file system via NFS or SMB
- Replication tasks can be scheduled hourly, daily, weekly (not continuous replication)
- Need to install AWS DataSync Agent on premises
- Can setup a bandwidth limit
NFS / SMB to AWS
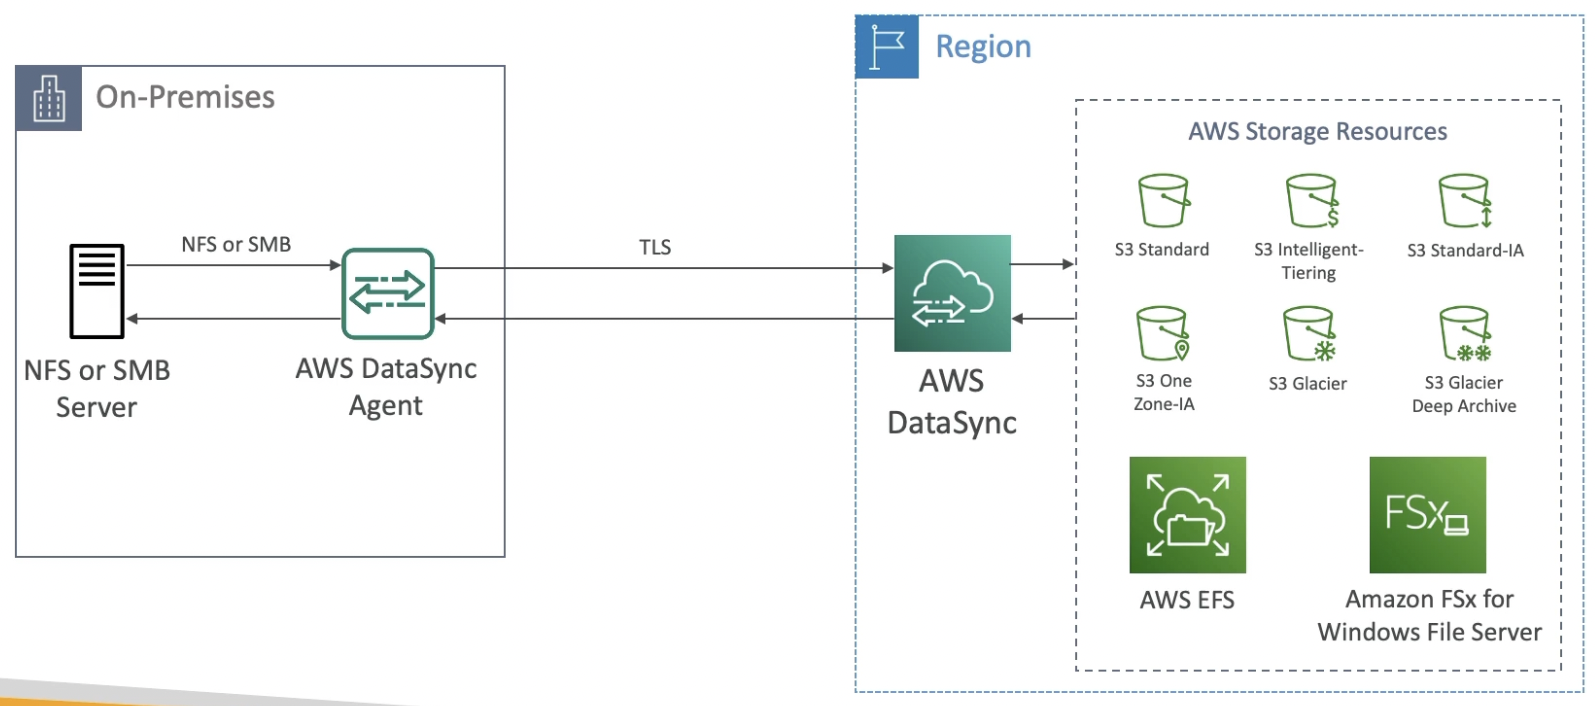
EFS to EFS
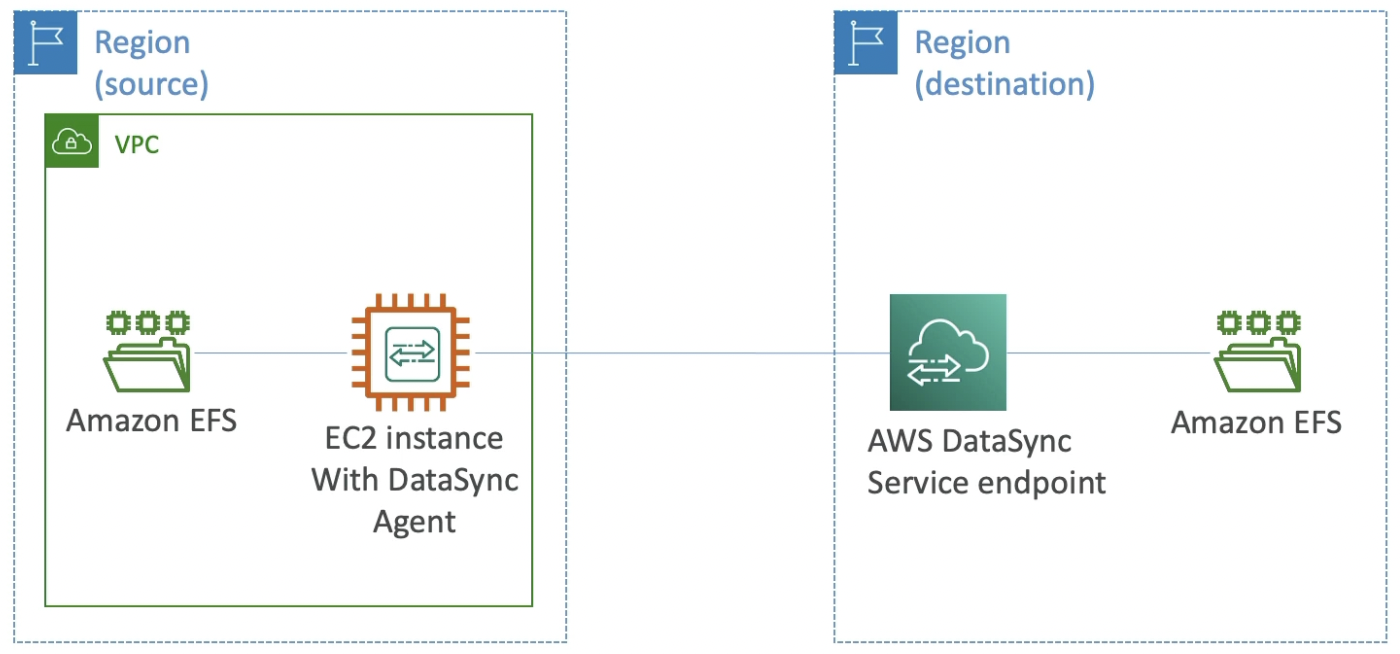
Section 30: More Solution Architectures
Section 30: More Solution Architectures
Event Processing
SQS + Lambda
Need to setup a DLQ to prevent infinite loop if a message is faulty
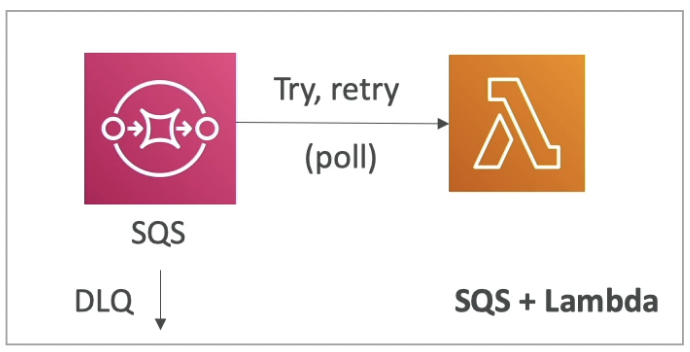
SQS FIFO + Lambda
If a message is faulty, it can block the entire queue due to infinite loop (need DLQ)

SNS + Lambda
Lambda retries each failed message 3 times after which it is sent to the DLQ directly by the lambda.

Fan out pattern
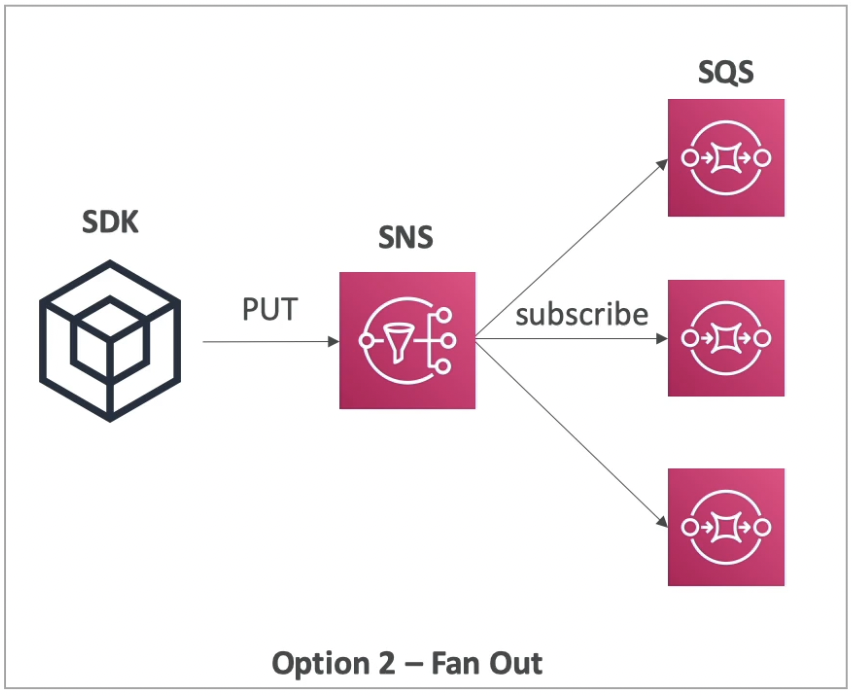
S3 Event Notifications
.png)
.png)
EventBridge - Intercept API Calls
.png)
API Gateway
.png)
Caching
The upper flow is for serving dynamic content and the lower flow is for serving static content.
Cache hit can happen on CloudFront, API Gateway or DB cache. The later the cache hit, higher the network, latency and computation.
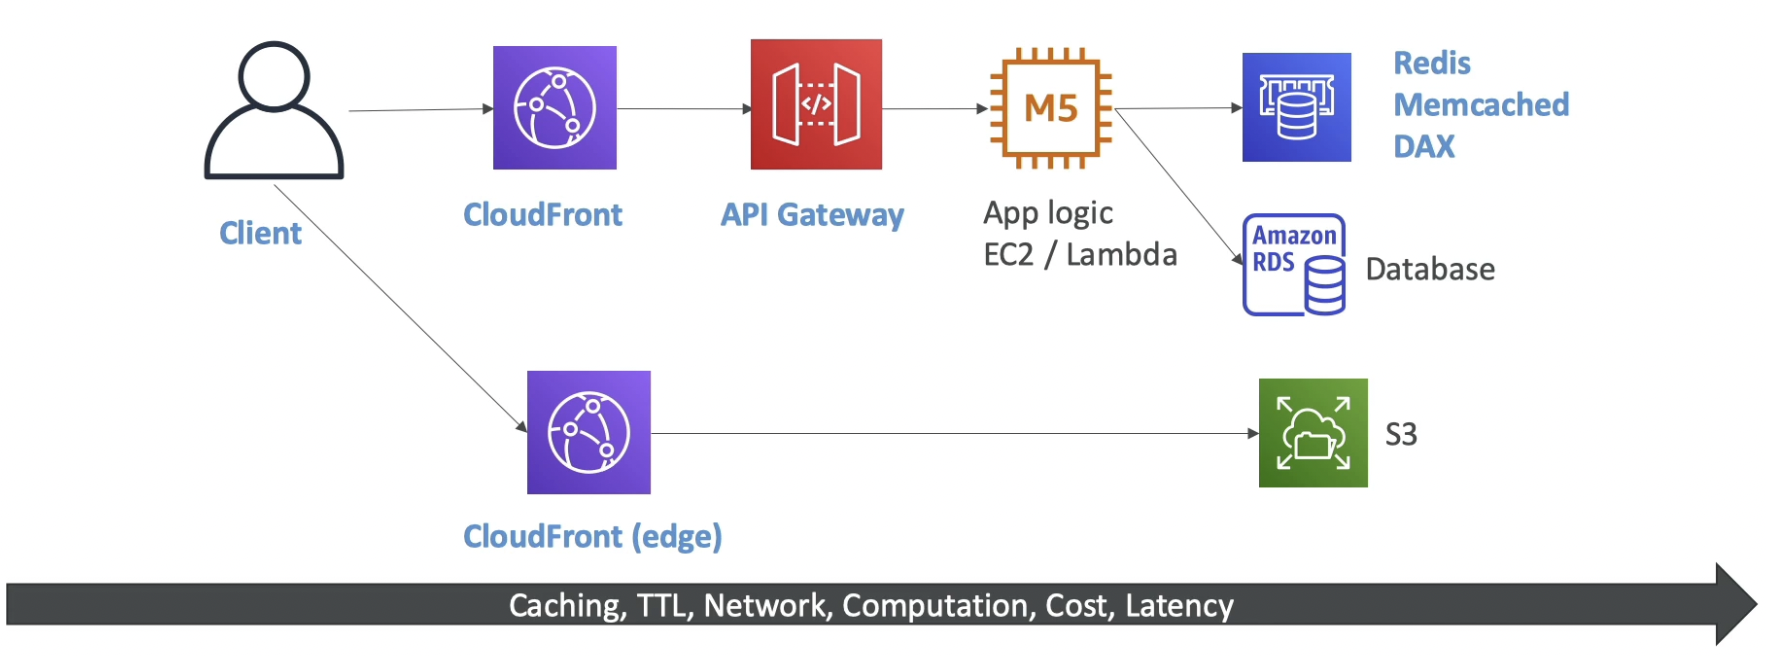
Blocking an IP address
- We can explicitly deny the specific IP address in the NACL. SG only has allow rules so if the application is global, we will have to allow all the IPs. We can use a firewall software running on the instance but in that case since the request has already reached the instance, it will incur processing cost.
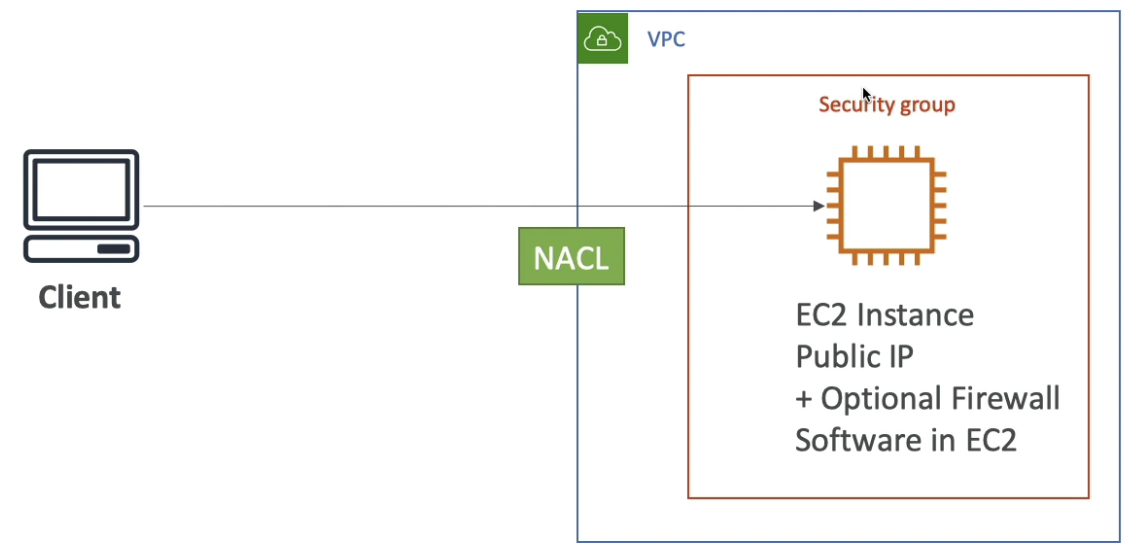
- In case of ALB, the incoming connection is terminated and the ALB creates a new connection with the EC2 instance. EC2 instance must allow ALB’s SG. For ALB, the NACL can be used to block the IP.
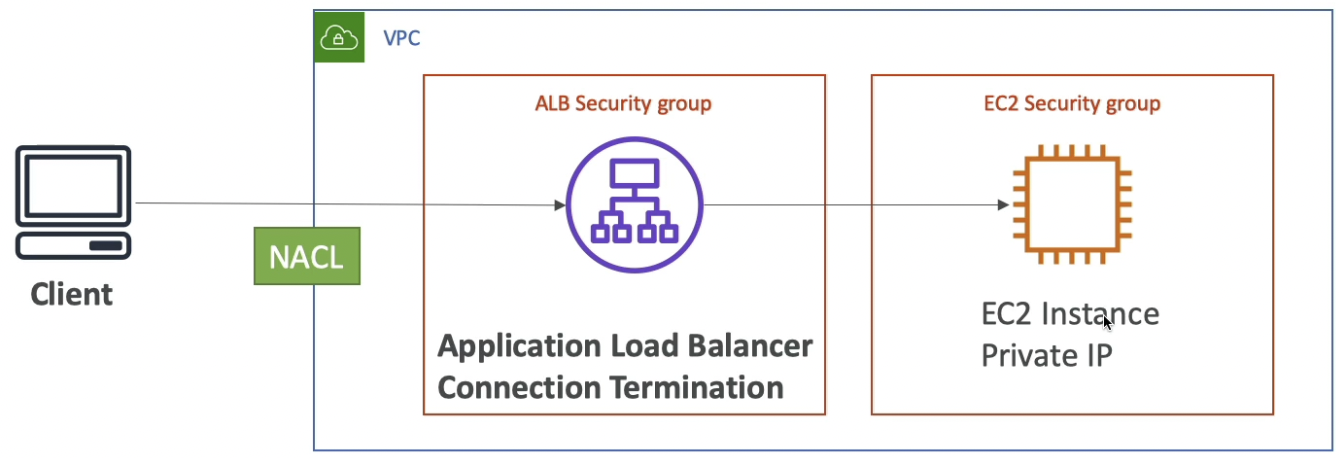
- NLB doesn’t terminate the incoming connection. There is no SG for NLB. The instance gets to see the client’s public IP. NACL will be used to block the IP.
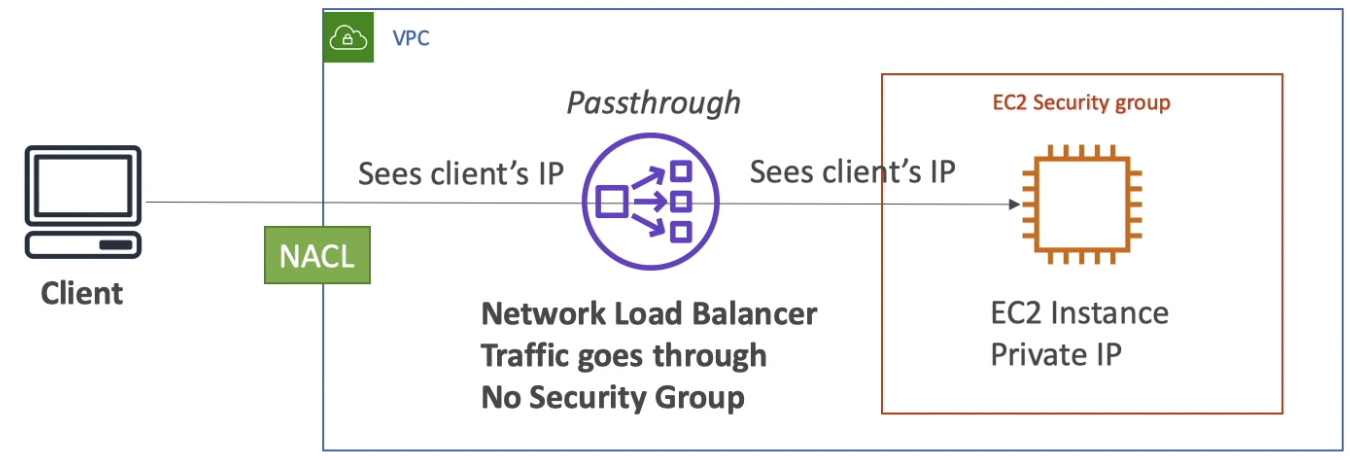
- Web Application Firewall (WAF) can be used for complex IP filtering at the ALB level along with IP blocking at NACL - Network Access Control List (two lines of defense).

- CloudFront distribution sits outside the VPC. The ALB gets to see the CF’s public IPs only (not the client IP). So, NACL isn’t helpful in this case. To block a specific IP, use WAF at the CF level.

- We can explicitly deny the specific IP address in the NACL. SG only has allow rules so if the application is global, we will have to allow all the IPs. We can use a firewall software running on the instance but in that case since the request has already reached the instance, it will incur processing cost.
High Performance Computing (HPC)
Intro
- The cloud is the perfect place to perform HPC
- You can create a very high number of resources in no time
- You can speed up time to results by adding more resources
- You can pay only for the systems you have used
- Perform genomics, computational chemistry, financial risk modeling, weather prediction, machine learning, deep learning, autonomous driving
Data Management & Transfer
- AWS Direct Connect:
- Move GB/s of data to the cloud, over a private secure network
- Snowball & Snowmobile
- Move PB of data to the cloud
- AWS DataSync
- Move large amount of data between on-premise and S3, EFS, FSx for Windows
- AWS Direct Connect:
Compute & Networking
- EC2 Instances:
- CPU optimized, GPU optimized
- Spot Instances / Spot Fleets for cost savings + Auto Scaling
- EC2 Placement Groups: Cluster for good network performance
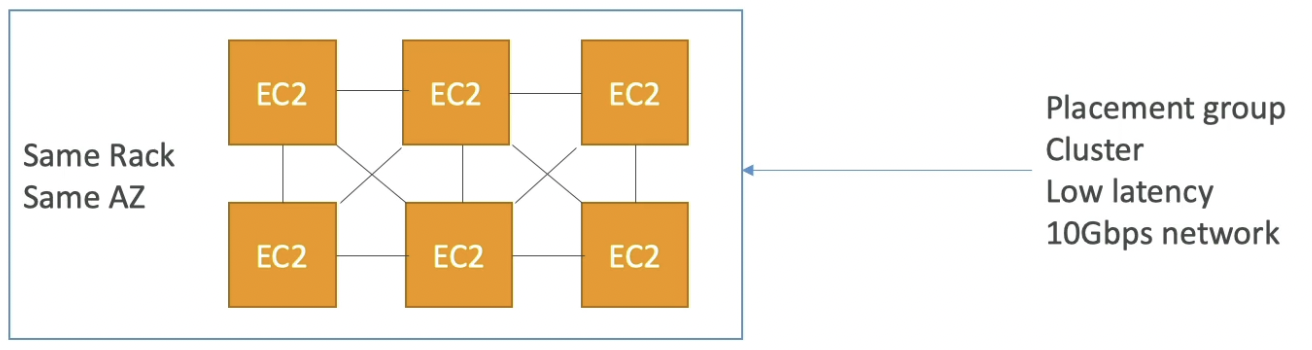
- EC2 Enhanced Networking (SR-IOV)
- Higher bandwidth
- Higher PPS (packet per second)
- Lower latency
- Can be achieved in two ways:
- Option I: Elastic Network Adapter (ENA) - up to 100 Gbps
- Option 2: Intel 82599 VF up to 10 Gbps - legacy (old standard)
- Elastic Fabric Adapter (EFA)
- Improved ENA for HPC, only works for Linux
- Great for inter-node communications, tightly coupled workloads
- Leverages Message Passing Interface (MP) standard
- Bypasses the underlying Linux OS to provide low-latency, reliable transport
- EC2 Instances:
Storage
- Instance-attached storage:
- EBS: scale up to 256,000 lOPS with io2 Block Express
- Instance Store: scale to millions of IOPS, linked to EC2 instance, low latency
- Network storage:
- Amazon S3: large blob, not a file system
- Amazon EFS: scale IOPS based on total size, or use provisioned IOPS mode
- Amazon FSx for Lustre:
- HPC optimized distributed file system, millions of IOPS
- Backed by S3
- Instance-attached storage:
Automation & Orchestration
- AWS Batch
- AWS Batch supports multi-node parallel jobs, which enables you to run single jobs that span multiple EC2 instances.
- Easily schedule jobs and launch EC2 instances accordingly
- AWS Parallel Cluster
- Open-source cluster management tool to deploy HPC on AWS
- Configure with text files
- Automate creation of VPC, Subnet, cluster type and instance types
- Ability to enable EFA on the cluster (improves network performance)
- AWS Batch
EC2 High Availability
Method 1
.png)
Method 2 - Stateless
Create a system where only 1 EC2 instance stays active at a time. If the instance goes down, ASG will start a new one. Also, the
EC2 instance will issue an API call to attach the Elastic IP based on tag.

Method 3 - Stateful
The EC2 instance maintains state in an EBS volume (attached to an AZ). If the instance goes down, create a snapshot of the EBS volume which will be triggered on ASG Terminate lifecycle hook. Similarly, when a new instance is spun up, create a new EBS volume in the appropriate instance using the ASG Launch lifecycle hook.
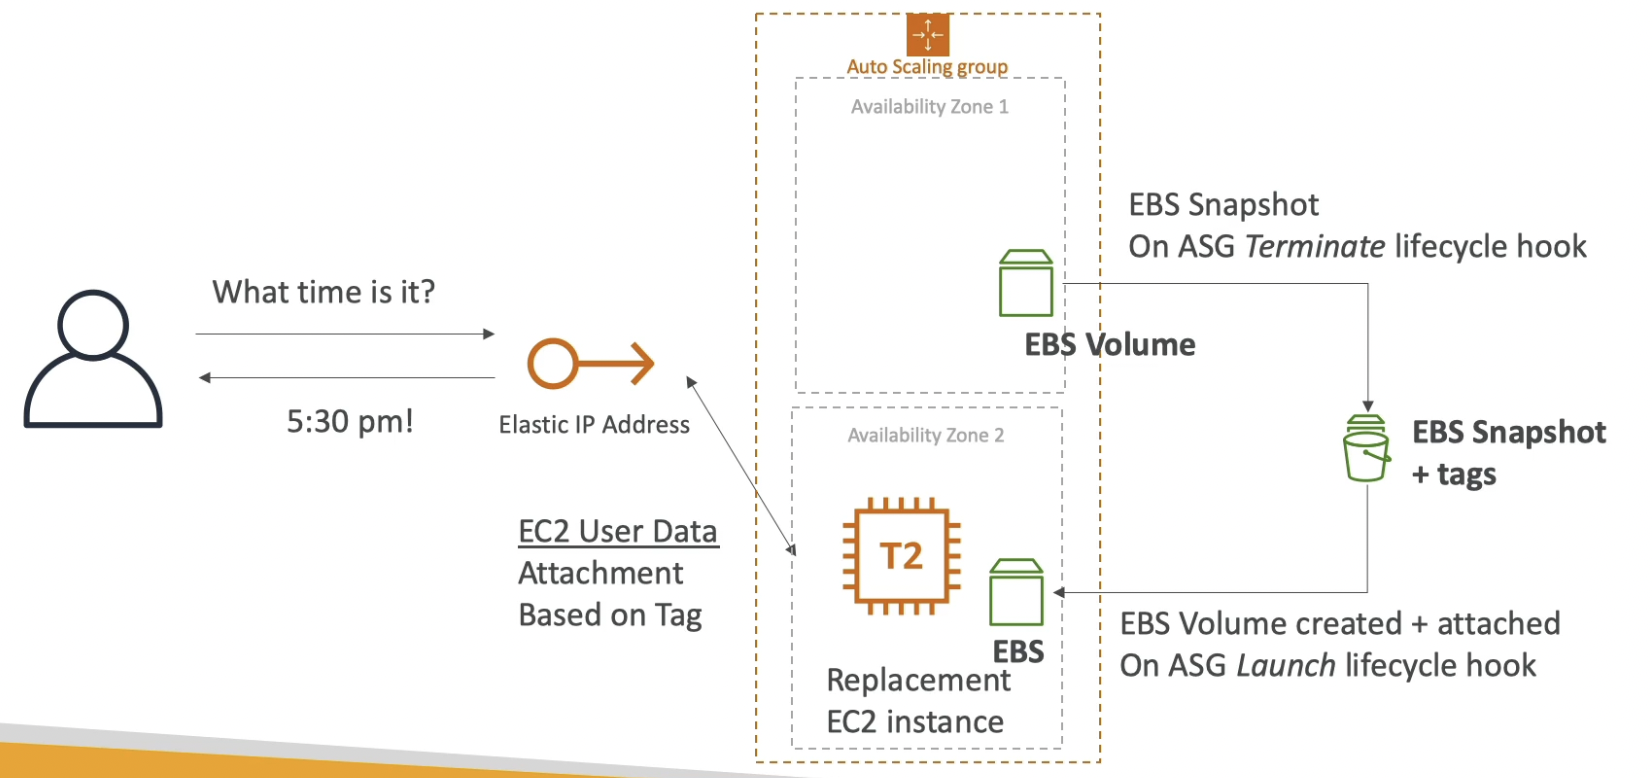
Bastion Host - High Availability
- HA options for Bastion Host
- Run 2 Bastion Hosts across 2 AZ
- Run 1 Bastion Host across 2 AZ with ASG 1:1:1
- Routing to the bastion host
- If 1 bastion host, use an elastic IP with ec2 user-data script to access it
- If 2 bastion hosts, use a Network Load Balancer (layer 4) deployed in multiple AZ. If NLB, the bastion hosts can live in the private subnet directly (more secure)
Note: Can’t use ALB as the ALB is layer 7 (HTTP protocol) and SSH works with TCP
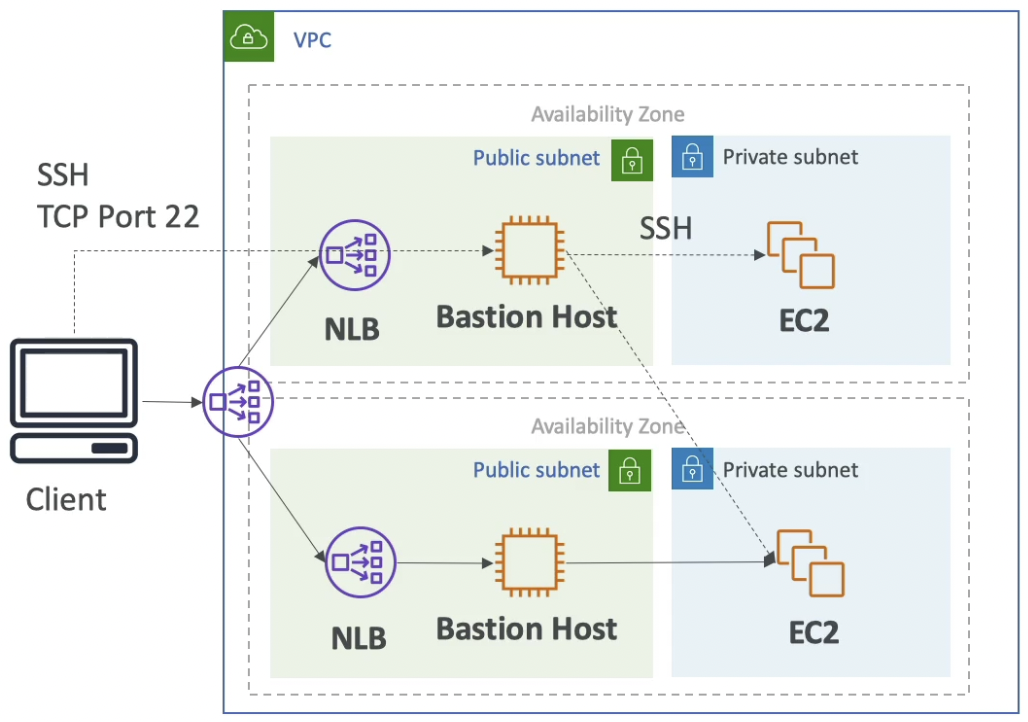
- HA options for Bastion Host
Section 31: Other Services
Section 31: Other Services
CloudFormation
Infrastructure as Code
- Currently, we have been doing a lot of manual work
- All this manual work will be very tough to reproduce:
- in another region
- in another AWS account
- within the same region if everything was deleted
- IaC allows us to write our infrastructure as a config file which can be easily replicated
CloudFormation Intro
- CloudFormation is a declarative way of outlining your AWS Infrastructure, for any resources (most of them are supported).
- CloudFormation creates the resources for you, in the right order, with the exact configuration that you specify
- No resources are manually created, which is excellent for control
- The code can be version controlled for example using git
- Changes to the infrastructure are reviewed through code
- Cost
- Each resources within the stack is tagged with an identifier so you can easily see how much a stack costs you
- You can estimate the costs of your resources using the CloudFormation template
- Savings strategy: In Dev, you could automation deletion of templates at 5 PM and recreated at 8 AM, safely
- Productivity
- Ability to destroy and re-create an infrastructure on the cloud on the fly
- Automated generation of Diagram for your templates for PPT slides
- Declarative programming (no need to figure out ordering and orchestration)
- Separation of concern: create many stacks for many apps and many layers (eg. VPC stacks, Network stacks, App stacks, etc.)
- Don’t re-invent the wheel
- Leverage existing templates on the web!
- Leverage the documentation
How it works
- Templates have to be uploaded in S3 and then referenced in CloudFormation
- To update a template, we can’t edit previous ones. We have to re-upload a new version of the template to AWS
- Stacks are identified by a name
- Deleting a stack deletes every single artifact that was created by CloudFormation (very clean way of deleting resources)
Deploying CloudFormation Templates
- Manual way:
- Editing templates in the CloudFormation Designer
- Using the console to input parameters, etc
- Automated way:
- Editing templates in a YAML file
- Using the AWS CLI (Command Line Interface) to deploy the templates
- Recommended way when you fully want to automate your flow
- Manual way:
Building Blocks
- Templates components
- Resources: your AWS resources declared in the template (mandatory)
- Parameters: the dynamic inputs for your template
- Mappings: the static variables for your template
- Outputs: References to what has been created (will be returned upon stack creation)
- Conditionals: List of conditions to perform resource creation
- Metadata
- Templates helpers:
- References
- Functions
- Templates components
StackSets
- Create, update, or delete stacks across multiple accounts and regions with a single operation
- Administrator account to create StackSets
- Trusted accounts to create, update, delete stack instances from StackSets
- When you update a stack set, all associated stack instances are updated throughout all accounts and regions.
Simple Email Service - SES
.png)
AWS Pinpoint
.png)
SSM Session Manager
.png)
Systems Manager
Systems Manager - Run Command
.png)
Systems Manager - Patch Manager
.png)
Systems Manager - Maintenance Windows
.png)
Systems Manager - Automation
.png)
CostExplorer
AWS Cost Explorer enables you to view and analyze your costs and usage. You can view data for up to the last 12 months, forecast how much you are likely to spend for the next 12 months, and get recommendations for what EC2 reserved instances to purchase.
- Visualize, understand, and manage your AWS costs and usage over time
- Create custom reports that analyze cost and usage data.
- Analyze your data at a high level: total costs and usage across all accounts or Monthly, hourly, resource level granularity
- Choose an optimal Savings Plan (to lower prices on your bill)
- Forecast usage up to 12 months based on previous usage
Elastic Transcoder
.png)
AWS Batch
.png)
.png)
.png)
AppFlow
.png)
.png)
CICD (Continuous Integration - Continuous Delivery)
Continuous Integration
- Developers push the code to a code repository often (GitHub / CodeCommit / Bitbucket / etc…)
- A testing / build server checks the code as soon as it’s pushed (CodeBuild / Jenkins CI etc…)
- The developer gets feedback about the tests and checks that have passed / failed
- Find bugs early, fix bugs
- Deliver faster as the code is tested
- Deploy often
- Happier developers, as they’re unblocked

Untitled
Continuous Delivery
- Ensure that the software can be released reliably whenever needed.
- Ensures deployments happen often and are quick
- Shift away from “one release every 3 months’ to”5 releases a day"
- That usually means automated deployment using CodeDeploy, Jenkins CD, Spinnaker, etc.

Untitled
Technology Stack for CICD
- AWS CodeBuild is a fully managed continuous integration (CI) service that compiles source code, runs tests, and produces software packages that are ready to deploy. It is an alternative to Jenkins.
- AWS CodeDeploy is a fully managed deployment service that automates software deployments to a variety of computing services such as EC2, Fargate, Lambda, and your on-premises servers. You can define the strategy you want to execute such as in-place or blue/green deployments.
- AWS CodePipeline is a fully managed continuous delivery (CD) service that helps you automate your release pipeline for fast and reliable application and infrastructure updates. It automates the build, test, and deploy phases of your release process every time there is a code change. It has direct integration with Elastic Beanstalk.
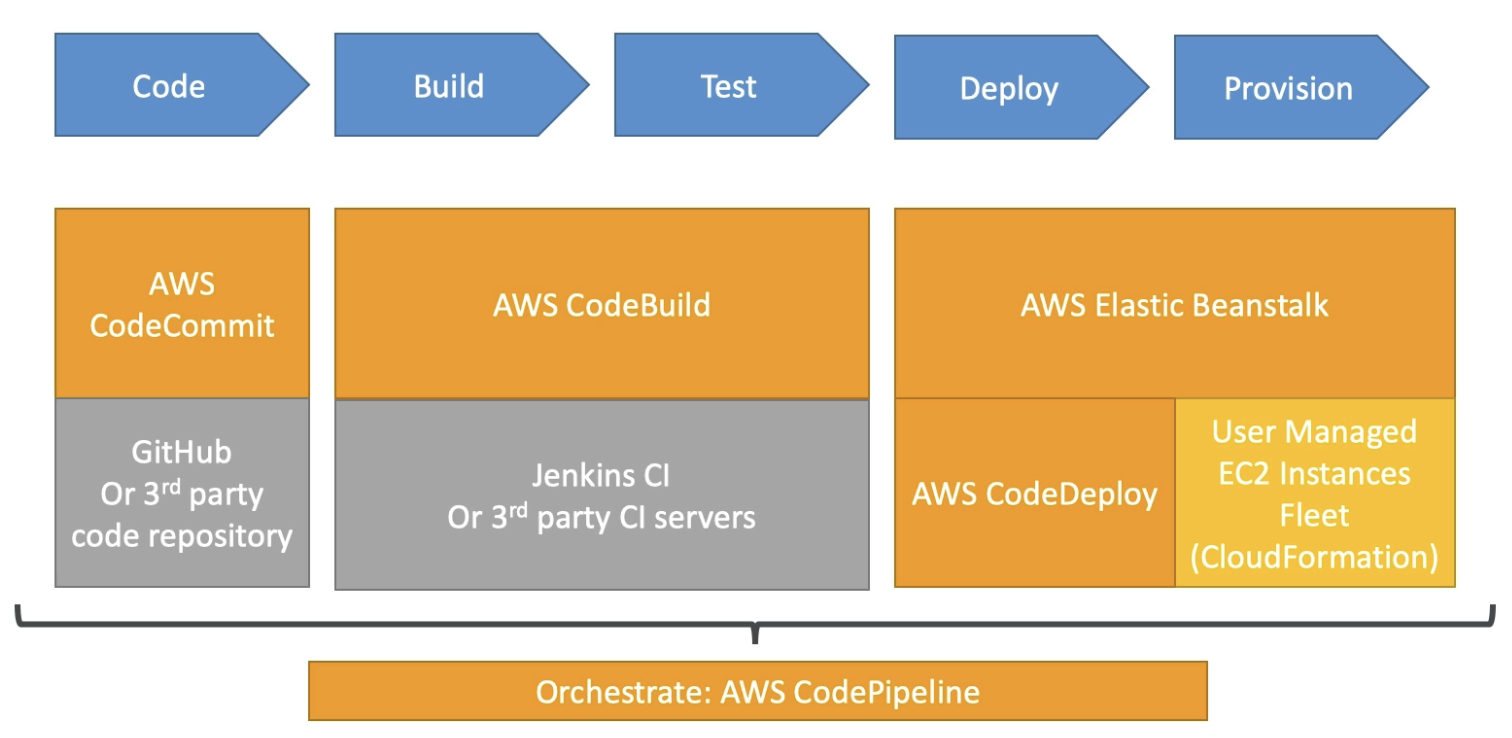
Untitled
Step Functions
- Build serverless visual workflow to orchestrate your Lambda functions
- Represent flow as a JSON state machine
- Features: sequence, parallel, conditions, timeouts, error handling…
- Can also integrate with EC2, ECS, On premise servers, API Gateway
- Maximum workflow execution time of 1 year
- Possibility to implement human approval feature but it is complicated
- Use cases:
- Order fulfillment
- Data processing
- Web applications
- Any workflow
- Provides a visual graph showing the current state and which path the workflow has taken.
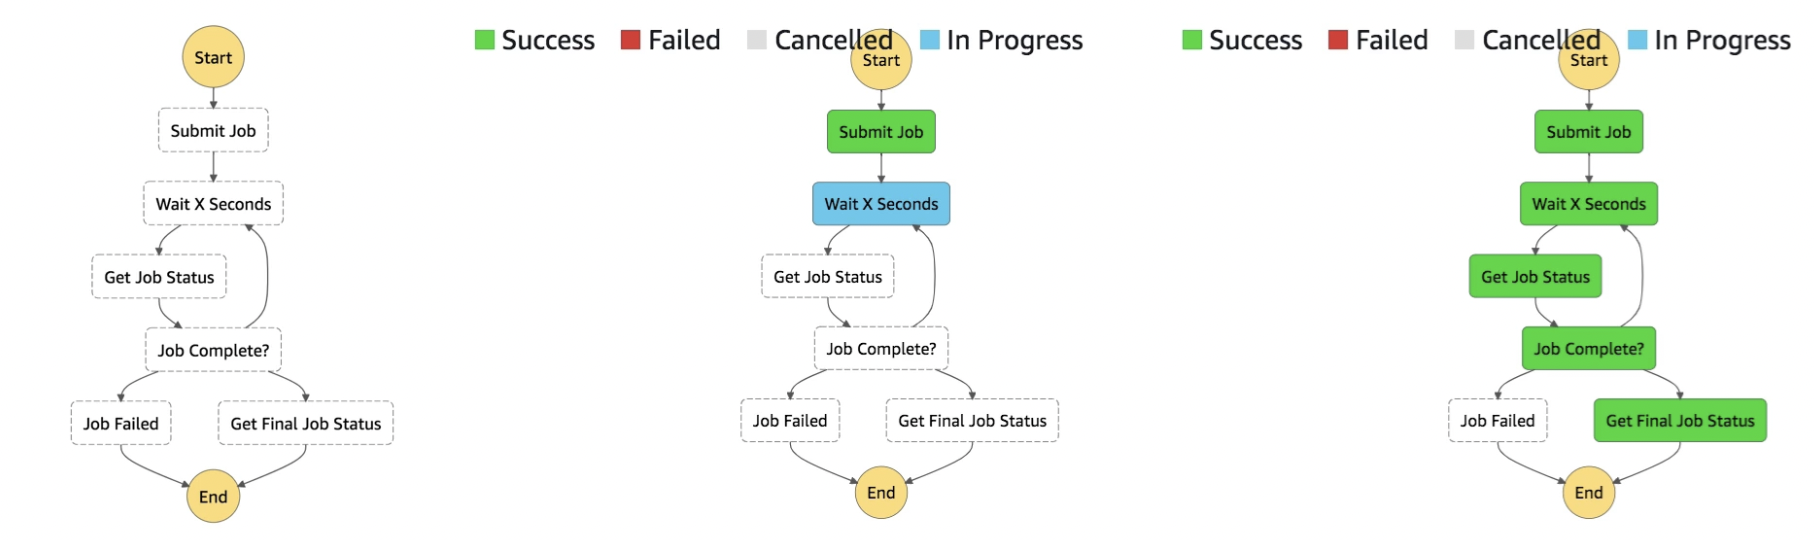
Untitled
Simple Workflow Service (SWF)
- Coordinate work amongst applications
- Outdated service (step functions are preferred instead)
- Code runs on EC2 (not serverless)
- 1 year max runtime
- Built-in “human intervention” step
- Example: order fulfilment from web to warehouse to delivery
- Step Functions are recommended to be used for new applications, except:
- If you need external signals to intervene in the processes
- If you need child processes that return values to parent processes
Elastic Map Reduce (EMR)
- EMR helps creating Hadoop clusters (Big Data) to analyze and process vast amount of data
- The clusters can be made of hundreds of EC2 instances
- Also supports Apache Spark, HBase, Presto, Flink…..
- EMR takes care of all the provisioning and configuration
- Auto-scaling and integrated with Spot instances
- Use cases: data processing, machine learning, web indexing, big data…
OpsWorks
- Chef & Puppet are two open-source softwares that help you perform server configuration automatically, or repetitive actions
- They work great with EC2 & On Premise VM
- AWS OpsWorks is nothing but AWS Managed Chef & Puppet
- It’s an alternative to AWS SSM
- Exam tip: Chef & Puppet ⇒ AWS OpsWorks
Amazon WorkSpaces
Amazon WorkSpaces is a fully managed, persistent desktop virtualization service that enables your users to access data, applications, and resources they need, anywhere, anytime, from any supported device. It can be used to provision either Windows or Linux desktops.
- Managed & Secure Cloud Desktop
- Great to eliminate management of on-premise VDI (Virtual Desktop Infrastructure)
- On Demand, pay per by usage
- Secure, Encrypted, Network Isolation
- Integrated with Microsoft Active Directory

AppSync
- Store and sync data across mobile and web apps in real-time
- Makes use of GraphQL (mobile technology from Facebook)
- Client Code can be generated automatically
- Integrations with DynamoDB/ Lambda
- Real-time subscriptions
- Offline data synchronization (replaces Cognito Sync)
- Fine Grained Security
Section 32: WhitePapers & Architectures
Section 32: WhitePapers & Architectures
AWS Well Architected Framework Guidelines
- Stop guessing your capacity needs
- Test systems at production scale
- Automate to make architectural experimentation easier
- Allow for evolutionary architectures
- Design based on changing requirements
- Drive architectures using data
- Improve through game days
- Simulate applications for flash sale days (load testing)
AWS Well Architected Framework Pillars
- Cost Optimization
- Performance Efficiency
- Reliability
- Security
- Sustainability
- Operational Excellence
AWS Well Architected Tool
- Free tool to review your architectures against the 6 pillars Well-Architected
- Framework and adopt architectural best practices
- How does it work?
- Select your workload and answer questions
- Review your answers against the 6 pillars
- Obtain advice: get videos and documentations, generate a report, see the results in a dashboard
Let’s have a look: https://console.aws.amazon.com/wellarchitected
AWS Trusted Advisor
- Service that analyzes your AWS accounts and provides recommendations on:
- Cost Optimization:
- low utilization EC2 instances, idle load balancers, under-utilized EBS volumes…
- Reserved instances & savings plans optimizations
- Performance:
- High utilization EC2 instances, CloudFront CDN optimizations
- EC2 to EBS throughput optimizations, Alias records recommendations
- Security:
- MFA enabled on Root Account, IAM key rotation, exposed Access Keys
- S3 Bucket Permissions for public access, security groups with unrestricted ports
- Fault Tolerance:
- EBS snapshots age, Availability Zone Balance
- ASG Multi-AZ, RDS Multi-AZ, ELB configuration, etc.
- Service Limits
- whether or not you are reaching the service limit for a service and suggest you to increase the limit beforehand
- Cost Optimization:
- No installation needed
- Can enable weekly email notification from the console
- Core Checks and recommendations all customers
- Full Trusted Advisor Available for Business & Enterprise support plans
- Ability to set CloudWatch alarms when reaching limits
- Programmatic Access using AWS Support API
- Service that analyzes your AWS accounts and provides recommendations on: